Transcription
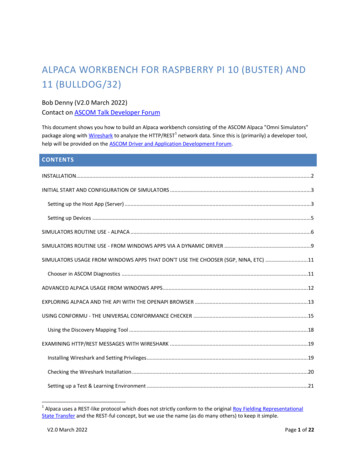
ALPACA WORKBENCH FOR RASPBERRY PI 10 (BUSTER) AND11 (BULLDOG/32)Bob Denny (V2.0 March 2022)Contact on ASCOM Talk Developer ForumThis document shows you how to build an Alpaca workbench consisting of the ASCOM Alpaca "Omni Simulators"1package along with Wireshark to analyze the HTTP/REST network data. Since this is (primarily) a developer tool,help will be provided on the ASCOM Driver and Application Development Forum.CONTENTSINSTALLATION .2INITIAL START AND CONFIGURATION OF SIMULATORS .3Setting up the Host App (Server) .3Setting up Devices .5SIMULATORS ROUTINE USE - ALPACA .6SIMULATORS ROUTINE USE - FROM WINDOWS APPS VIA A DYNAMIC DRIVER .9SIMULATORS USAGE FROM WINDOWS APPS THAT DON'T USE THE CHOOSER (SGP, NINA, ETC) .11Chooser in ASCOM Diagnostics .11ADVANCED ALPACA USAGE FROM WINDOWS APPS .12EXPLORING ALPACA AND THE API WITH THE OPENAPI BROWSER .13USING CONFORMU - THE UNIVERSAL CONFORMANCE CHECKER .15Using the Discovery Mapping Tool .18EXAMINING HTTP/REST MESSAGES WITH WIRESHARK .19Installing Wireshark and Setting Privileges .19Checking the Wireshark Installation .20Setting up a Test & Learning Environment .211Alpaca uses a REST-like protocol which does not strictly conform to the original Roy Fielding RepresentationalState Transfer and the REST-ful concept, but we use the name (as do many others) to keep it simple.V2.0 March 2022Page 1 of 22
INSTALLATION2The Omni Simulators and ConformU components are placed into /opt /ascom.alpaca.simulators and/opt/ascom.alpaca.conformu, respectively, along with the .desktop files needed in /usr/share/applications forthe simulators app to appear in the Desktop GUI's Berry menu under Accessories.The files and folders within the opt and usr folders go into the corresponding places under /opt and /usr on yourBuster or Bulldog OS. Of course you will need to do this with root privileges so use the shell/terminal and Linuxcommands to do the copying. When done, make sure the /opt/ascom.alpaca.simulators and/opt/ascom.alpaca.conformu directories exist and that each of these directories shows a bunch of files plus awwwroot subfolder within. Also make sure that the files ascom.alpaca.simulators.desktop andascom.alpaca.conformu.desktop exist in /usr/share/applications/. You may see the Berry menu flash as you addthe .desktop files, but you need to reboot for the entries to show with their icons. In the end, the Berry menushould show Alpaca Conform and Alpaca Simulators:2Considered best practices, see What does /opt mean in LinuxV2.0 March 2022Page 2 of 22
INITIAL START AND CONFIGURATION OF SIMULATORSSelecting the Alpaca Simulators menu item should cause the Omni Simulator to start. You will first see a shellwindow containing several logged messages and, depending on your browser, several harmless GUI and othererror messages. Shortly thereafter your default browser (normally Chromium) will appear.Note the URL of the simulator's home page http://localhost:32323. You might want to bookmark this.SETTING UP THE HOST APP (SERVER)The first thing to do is open and review the Driver Setup window. All of the simulators share a single host app(server) and the common settings for this are here.V2.0 March 2022Page 3 of 22
For now, just fill in the Server Location with any descriptive text you wish and click Save. Allow Remote Accesscontrols whether other computers on your LAN will have access to the simulated devices. Leave the Server(Alpaca) Port as well as the Discovery Port at their default values unless you have a good reason (and the networkV2.0 March 2022Page 4 of 22
configuration skills) to change them. The other settings are for advanced/unusual situations and are selfexplanatory.SETTING UP DEVICESEach simulated device has a SetupDialog() page which you can display with its Setup button. This serves the samerole as the SetupDialog() window that an ASCOM/COM driver has. The device characteristics are established onthis page. The settings you make are persistent and apply to all apps that use the simulated device. For example,to set up your simulated rotator, opening its SetupDialog() window:Clicking Save makes your changes persistent. Use the browser's back arrow to close the setup dialog. Hopefullythis will get you going with the simulators you want to use.V2.0 March 2022Page 5 of 22
SIMULATORS ROUTINE USE - ALPACAPlease note: Windows is not required for Alpaca as we will see.Once the simulators are running, you can close the browser and the simulators should simply answer and providethe simulated devices to any app that wants to use them. For example, using SkySafari 7 Plus or Pro, make a newTelescope Preset, select ASCOM Alpaca as the Connection Type. Leave Auto-Detect and click Scan. You may needto scan twice. You should end up with this:Then Next. Leave Set Time and Location on. SkySafari will send the location (latitude and longitude) to the(simulated) telescope, and it will be a persistent simulator setting. The simulator's date/time will not be changedbecause the simulator does not have root privileges.V2.0 March 2022Page 6 of 22
At this point you'll have a simulated mount in SkySafari. Connect in SkySafari, and the sky should move to centeron the simulator telescope coordinates. You can also open the Telescope settings in the browser and look to seethat the Latitude and Longitude of the simulator (now) matches the location you have set in Sky Safari. This willonly be true after you have connected SkySafari to the telescope. That's when it sends the coordinates. Here'sSkySafari connected to the simulated telescope pointing at the Pleiades and showing the configured field of viewindicator.V2.0 March 2022Page 7 of 22
V2.0 March 2022Page 8 of 22
SIMULATORS ROUTINE USE - FROM WINDOWS APPS VIA A DYNAMIC DRIVERPlease note: Windows is not required for Alpaca as we saw above.The Windows ASCOM Platform provides a Chooser that can automatically create and configure an ASCOM driverthat translates from COM to Alpaca and back. This means your Windows astronomy app can use Alpaca devices(like the OmniSimulator devices) today with no changes to the app.You only need to do this once for this Alpaca device. In your ASCOM-compatible astronomy app, use the Chooseras usual to specify the type of device. Let's say you are using FocusMax and your focuser is a self-contained WiFiAlpaca device. You can use the Omni Simulator's WiFi Alpaca focuser to simulate this. Assuming your Windowssystem is on the same local network, in FocusMax show the ASCOM Focuser Chooser:Enable Discovery (one time setting) then Discover Now. The Chooser will automatically discover when opened thenext time and thereafter. You will see the Alpaca Discovery light flash on and off. Once it is finished, click thedevice list as usual, you will see a new Alpaca-discovered Focuser listed (it's the simulator). Select it. You'll see thistooltip. Click OK as advised.V2.0 March 2022Page 9 of 22
Now you'll be asked for Administrator privileges, needed t create a new ASCOM/COM device that is accessible toall users not just you. Allow it, and probably tell the Platform not to bug you about this in the future:The new ASCOM COM driver that provides access from your app (in this case FocusMax) to the WiFi Alpaca focuserhas been created. At this point you can click OK and then OK in the Chooser and "just use it" in FocusMax.V2.0 March 2022Page 10 of 22
SIMULATORS USAGE FROM WINDOWS APPS THAT DON'T USE THE CHOOSER (SGP, NINA,ETC)Programs such as Sequence Generator Pro (SGP) and Nighttime Imaging 'N' Astronomy (NINA) don't use theASCOM Chooser to select their ASCOM devices. Therefore they do not have in-app access to the automatic Alpacagateway driver creation feature in the ASCOM Chooser. This is no problem though. You can use any program thathas Chooser Support for the type of device to which you want to connect. In this example the program would needto have Chooser support for a Focuser. We just created the dynamic driver for the Alpaca focuser in FocusMax andit would already show in SGP and NINA. That is enough, but.CHOOSER IN ASCOM DIAGNOSTICSIf the device you want to use from SGP or NINA is used only in SGP or NINA, you can still get a Chooser for thedevice. Let's say your program needs to use an Alpaca Dome and no other program on your Windows system usesDomes. Go to the Windows Start Menu ASCOM Platform 6 Tools ASCOM Diagnostics. In the ASCOMDiagnostics window that appears, select the Choose Device menu, Choose and Connect to Device (32-bitapplication). Now you see the Device Connection Tester, but you're not going to connect, you just need theChooser. Select your device type, then click Choose. The ASCOM Chooser for that device type will appear. Use it todiscover and select an Alpaca device, click OK then just close ASCOM Diagnostics. At this point the Alpaca deviceshould appear in the SGP or NINA device list since it is "just another Windows device" as far as those programs areconcerned.V2.0 March 2022Page 11 of 22
ADVANCED ALPACA USAGE FROM WINDOWS APPSAny time you open the Chooser and one of the Alpaca drivers is selected, you can click Properties. to show awindow where you can control advanced network capabilities for your app, including username/password security,ports, etc.If you are network-skilled most of this will make sense. If not don't worry about it. But there is one cool thing youcan do from here. If you click "This ASCOM Device", you'll see the device (Focuser in this case) setup page in thebrowser. Try it. Once you see this and understand what this does, click OK. Similarly, the "Whole Alpaca Device"button will open the browser to show the Driver (the host app and server) setup you saw during initialconfiguration. Try this now as well.V2.0 March 2022Page 12 of 22
EXPLORING ALPACA AND THE API WITH THE OPENAPI BROWSERThe OmniSimulator includes a complete implementation of the OpenAPI Browser (formerly known as Swagger UI).All of the Alpaca device APIs are presented as visual documentation, including live "Try it out" capability. To getthere, return the simulator's home pageEventually, you'll see this. Note that this can be quite slow to initially open on a Raspberry Pi 3. Once it is openeach end point should open in less than 10 seconds. On a Raspberry Pi 4 this is much more tolerable. It's beyondthe scope of this document to describe how to use this popular API tool. This Perforce blog post does a decent jobof guiding you through the OpenAPI/Swagger UI testing tool.V2.0 March 2022Page 13 of 22
V2.0 March 2022Page 14 of 22
USING CONFORMU - THE UNIVERSAL CONFORMANCE CHECKERConformU is a universal cross-platform interface and behavior checker for all Alpaca devices. ConformU performs3deep checks of both interface compliance and behavior by interacting with a device through Alpaca . It also has a4useful Alpaca DIscovery Map function which allows you to browse Alpaca devices on your local network . It isactually quite simple to use, however there are advanced settings available for unusual situations. We'll skip thesefor now. When you start ConformU via the Berry menu, you should see a shell window similar to the one for theOmniSim, and then this:If you want to follow along with this, start the Workbench Alpaca Simulators now (you'll see its tab in theChromium screenshots below). To run a test, you must first tell ConformU which Alpaca device you want to test.Start by clicking the Select Device button and following the map shown below:3ConformU gets its name "universal" because it can check both ASCOM COM and ASCOM Alpaca. However hereon the Raspberry Pi, it is limited to checking Alpaca devices.4Alpaca discovery is limited to the local network by design.V2.0 March 2022Page 15 of 22
You're ready to test now. You can get to the device's settings as well as its Alpaca server's settings with the DeviceSetup link on the left, but we'll assume you have already configured your device to be ready to use. It must bepowered up, COM ports correct, etc. Please note that ConformU will move / operate all devices e.g. slew atelescope to various positions, rotate a dome and open/close its shutter, etc., so please ensure the area is clear ofobstructions, including people, and that it is safe! Now switch back to Home and start the test by clicking the Startbutton:V2.0 March 2022Page 16 of 22
You will see the progress of the test, step by step. Depending on the device, it may take quite a while and causemany moves. When it is finished you'll see something like this:V2.0 March 2022Page 17 of 22
The log of the test is written to SING THE DISCOVERY MAPPING TOOLThe Alpaca Discovery Map tool is useful for finding out out what devices are accessible from your Raspberry Pi.Open the Alpaca Discovery Map, click Discover, and see the results. Here's what you should see with theWorkbench Omni Simulator running on your Raspberry Pi. Keep in mind that discovery operates only on your localnetwork and not the public internet:V2.0 March 2022Page 18 of 22
EXAMINING HTTP/REST MESSAGES WITH WIRESHARKWhile familiarizing yourself with Alpaca, as well as testing your app or driver, it can be very useful to see the actualHTTP/REST messages between the app (requestor) and the driver (responder). By installing the amazing Wiresharkon your Pi along with the OmniSim, you can see the actual HTTP/REST messages. It's easy to install but being sopowerful it will take you some time to get used to it. To save you time, here is a link to the PDF Wireshark UserManual.INSTALLING WIRESHARK AND SETTING PRIVILEGESTo install it on the Pi, you need about 100MB. In a shellpi@raspberrypi: sudo apt install wiresharkDuring installation you'll see thisV2.0 March 2022Page 19 of 22
Make sure to answer Yes to this so you don't have to start Wireshark with root privs. But there is more, note itsays you still need to be a member of the "wireshark" group. Once the installation completes, add yourself(typically you are user "pi"):"pi@raspberrypi: sudo usermod -a -G wireshark piNow log out and back in to join the "wireshark" group. You will find Wireshark in the Berry menu under InternetCHECKING THE WIRESHARK INSTALLATIONNow start Wireshark and be sure you see the network interfaces, indicating that you have successfully allowednon-root capturing and joined the "wireshark" group. You should see this:V2.0 March 2022Page 20 of 22
If you see wlan0 and traffic then you're ready to use Wireshark. If you are on Ethernet the traffic will be on eth0.Otherwise:1.2.Did you answer Yes to the non-root capture? You can check by entering this commandpi@raspberrypi: sudo dpkg-reconfigure wireshark-commonwhich will show the allow non-root dialog that appeared during installation. Answer Yes .Did you log out and back in after adding yourself to the "wireshark" group?Go back and repeat the installation steps till you see a Wireshark window with the physical interfaces as shownabove.SETTING UP A TEST & LEARNING ENVIRONMENTYou can use an application such as the Windows DeviceHub (via an Alpaca dynamic driver as shown above),SkySafari Plus or Pro on iOS or Cartes du Ciel on any of its supported platforms to connect to the OmniSim'sTelescope Simulator. Or you can use the Workbench's ConformU tool though it produces a lare amount of traffic.Once you have an app (anywhere) talking to the simulated telescope on the Pi, you can use the amazing Wiresharkto see the HTTP/REST traffic between them. Here we use SkySafari Pro on 192.168.0.21, and we're runningWireshark on the same Pi that's running the OmniSimulator, on 192.168.0.42. Have a look at this packet captureof SkySafari's initial connect to the Telescope. The key to setting this up is the display filter, which limits the displayto HTTP and port 32323 (the OmniSim's port). If you make a mistake in the display filter the background will turnreddish. Without the display filter you will see a lot of uninteresting (for our purposes) trash.V2.0 March 2022Page 21 of 22
Look at the list of REST transactions. The first gets the list of devices as shown. Next you see a PUT of true to thetelescope's connected endpoint, and this succeeds. Then it GETs some capability properties: canslewasync,cansync, canpark, etc.It's beyond the scope of this document to be a tutorial on Wireshark. There are loads of videos on YouTubecovering Wireshark. And there's always the PDF Wireshark User Manual.V2.0 March 2022Page 22 of 22
ALPACA WORKBENCH FOR RASPBERRY PI 10 (BUSTER) AND 11 (BULLDOG/32) Bob Denny (V2.0 March 2022) Contact on ASCOM Talk Developer Forum This document shows you how to build an Alpaca workbench consisting of the ASCOM Alpaca "Omni Simulators" package along with Wireshark to analyze the HTTP/REST1 network data. Since this is (primarily) a developer tool,