Transcription
NDSUConnected Component WorkbenchECE 461Connected Component WorkbenchConnected Component Workbench is the software used to program Allen Bradley Mico-810 PLC's. Copies can beobtained fom the following ench.pageNote that if you are using a Windows XP machine, you need an older version from a CD ROM. Please see theinstructor if this is you.NotationInputs:Connect COM-0 to -DC24 (0V) to enable inputs 0.3Connect -DC24 to -DC24 to enable inputs 4.7Inputs 0.3 are digital (0V logic 0, 24V logic 1)Inputs 4.7 and digital (24V) or analog (0.10V), depending upon the input voltageConstant Inputs:Time:T#300xd dayh hourm minutess secondsms millisecondsBinary: 2#2#1001 0010 binary number 0x52Hex: 16#Decimal: 10#Getting Started:Start Connected Components Wizard. You should get the following screenJSG1rev August 13, 2016
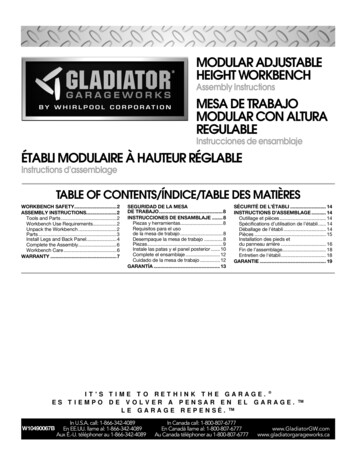
NDSUConnected Component WorkbenchECE 461Select the PLC we're using: 2080-LC10-12QWB, and draag it left to the Program window. Double click onPrograms and select New Ladder Diagram:This should give you the following display: an empty programJSG2rev August 13, 2016
NDSUConnected Component WorkbenchECE 461Program elements are shown in the lower right corner: these are drag and drop elements:Rung: Add a new line to the programOutputs: These must be placed on the far right of the ladder diagramDirect Coil: Boolean variable. When energised, the variable becomes true. If the variable is an output relay,the relay closes. When de-energised, the coil opens. Can also be an internal state.Reverse Coil: Booleam vairable. Energised is open (true), de-energised is closed (false).Set Coil: When energised, the coil closes and remains closed.Reset Coil: When energised, the coil opens and remains open.Pulse Rising Edge Coil: The coil closes momentarilly when the output is energised (rising edge)Pulse Falling Edge Coil: The coil opens momentarilly when the output is de-energised (falling edge)Inputs: These must be placed on the left side of the ladder diagramDirect Contact: True means the switch closes, false means the switch is open.Reverse Contact: Closed when false, open when true.Pulse Rising Edge Contact: Momentarilly closes when the signal goes high (rising edge)Pules Falling Edge Contact: Momentarilly closes when the signal goes low (falling edge)Blocks:100 operations, such as a time delay. More on this later.JSG3rev August 13, 2016
NDSUConnected Component WorkbenchECE 461Example Code:Write a prorgram so that the red LED turns on whenever you press button 0.Function:Y AInputs:A IN0Output:Y OUT0Program:Click on the Input Coil icon and drag it to the left of the ladder diagram. To define this input as IN0, double clickon the coil and select I/O Micro 810This lets you assign a coil to the input pins and output relays:IO EM DO 0x Digital Output #x (relay output x)IO EM DI 0x Digital Input #x (input pin x)Select Digital Input 0 for pin #0. You can give it an Alian (name) if you like.Click on the Output Coil icon and drag it to the right side of the display and assign it to Digital Output 0.JSG4rev August 13, 2016
NDSUConnected Component WorkbenchECE 461Your program should then look like the following:Compilation:Click on the Build icon. This translates the ladder diagram to machine code. With any luck. you'll get a successfulmessage:Program:Connect the Micro-810 to a PC through the USB port. When you click on the Download icon, you'll get amessage asking which device. Select the USB port and Micro810It will then ask if you want to halt the current program:JSG5rev August 13, 2016
NDSUConnected Component WorkbenchECE 461say yes. About 30 seconds later, after the program is downloaded, it will ask if you want to restart the (new)program. Say yes.At this point, the program should be running: when you press button 0, the red light turns on.Example 2: Two On-Off SwitchesWrite a program with the following functionality:IN0: Turn on the red LED (out 0)IN1: Turn off the red LEDIN2: Turn on the yellow LED (out 1)IN3: Turn off the yellow LEDCreate four rungs by dragging the rung icon left. Add four input coils and four output coils as follows:JSG6rev August 13, 2016
NDSUConnected Component WorkbenchECE 461Example 3: Logical AND and ORWrite a program whichTurns on the red LED when button 0 and 1 are pressed, andTurns on the yellow LED when buttons 2 or 3 are pressed.Program: To create the OR function, drag the Branch inco left and place in in the second rung. Add to DirectContacts for input 2 and 3.Note thatTwo switches in series is an AND functionTwo switches in parallel is an OR functionCombinational Logic on a PLCFrom ECE 275, if you can implement AND, OR, and NOT functions, you can implement any truth table. Oneway to do this is using Karnough maps.Example: Write a program whichTurns off all LEDs when no buttons are pressedTurns on the blue LED (DO3) when one or more buttons are pushedTurns on the green LED (DO2) when two or more buttons are pressed, andTurns on the yellow LED (DO1) when three or more buttons are pressedAssume only buttons 0 / 1 / 2 are used and defined asA input 0B input 1C input 2First, set up a Karnough map for each output:JSG7rev August 13, 2016
NDSU0A1Connected Component WorkbenchECE 461BCBCBC00 01 11 1000 01 11 1000 01 11 1001101A1111Blue: 1 or more10010A0111Green: 2 or more0000010010Yellow: 3 or moreNext, circle the ones in groups of 2n (shown in red above). This givesBlue A B CGreen AB AC BCYellow ABCImplement this in Ladder Logic. In Connected Component Workbench, the code will look like the following:Note that there are other solutions. For example, you could create a local variable for when one, two, or threebuttons are pressed - with the following logic for each:One ABC ABC ABCTwo ABC ABC ABCThree ABCThe blue LED (one or more) is on if any of these three are trueJSG8rev August 13, 2016
NDSUConnected Component WorkbenchECE 461The green LED (two or more) is on if Two or Three is trueThe yellow LED is on if three is trueCreate a local variableThen use this local variable along with logic for one, two, or three buttons being pressedJSG9rev August 13, 2016
NDSUConnected Component WorkbenchECE 461Debug Feature:Once you download your code, click the Debug button (F5)This will then show you on the screen which lines of code are turned on as you press the buttons. It helpsunderstand what is going on (and we'll use this feature a lot).For example, when you press A and B, the display under Debug mode looks like the following:Red shows which paths are turned on (true)JSG10rev August 13, 2016
Connected Component Workbench Connected Component Workbench is the software used to program Allen Bradley Mico-810 PLC's. Copies can be . Start Connected Components Wizard. You should get the following screen NDSU Connected Component Workbench ECE 461 JSG 1 rev August 13, 2016.