Transcription
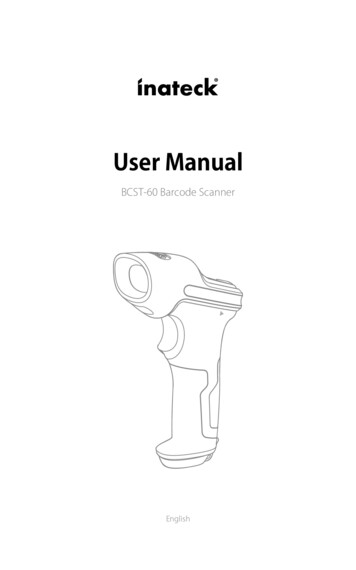
User ManualBCST-60 Barcode ScannerEnglish
ContentsIMPORTANT NOTICE5Safety Precaution5Maintenance Precaution5Overview of Inateck BCST-60 barcode Scanner5Appearance5Features of the Scanner6Product Specification7Correct Aiming8Incorrect Aiming8QUICK START9The flow chart of Setup10Enter the Setting Mode10Exit with Save11Exit without Save11Restore Factory Defaults11Check Software Version12Save Custom Settings12Chapter 1 Features and Basic Setups1.1. Battery14141.1.1. Mounting the battery (charging)141.1.2. Basic operation of Inateck BCST-60 Barcode Scanner141.1.3. Auto Sleep Mode151.2. Data Buffer171.2.1. Wireless mode (Wireless)171.2.2. Inventory Mode191.3. LED Indicator201.4. Beeper201.4.1. Beeper Volume211.5. Scanning modes221.5.1. Auto laser-off Mode221.5.2. Auto-induction Mode231.5.3. Continuous Scanning Mode241.5.4. Manual Mode261.6. Types Of Keyboard271.7. Symbologies Supported292
Chapter 2 How to Connect with Computer/phone/POS302.1. USB Wired Data Transmission302.2. Wireless Data Transmission302.3. Transmission Speed31Chapter 3 Symbology Settings323.1. Codabar323.1.1. Enable / Disable Codabar323.1.2. Start/Stop Transmission333.2. Code 11343.2.1. Enable/Disable Code 11343.2.2. Checksum Verification353.3. Code 128373.3.1. Enable / Disable Code 128373.4. Code 39383.4.1. Enable/Disable Code 39383.4.2. Start/Stop Transmission393.4.3. Checksum Verification403.4.4. ASCII Code Recognition Range Setting413.4.5. VIN423.4.6. Code 32433.5. Code 93453.5.1. Enable/ Disable Code 93453.6. EAN-8463.6.1. Enable/Disable EAN-8463.6.2. Checksum Verification473.7. EAN-13483.7.1. Enable / Disable EAN-13483.7.2. Checksum Verification493.7.3. ISBN503.7.4. ISSN513.8. MSI523.8.1. Enable / Disable MSI barcode523.8.2. Checksum Verification533.9. UPC-A553.9.1. Enable / Disable UPC-A553.9.2. UPC-A output “0”563.9.3. Checksum Verification573.10. UPC-E583.10.1. Enable / Disable UPC-E583.10.2. Enable / Disable UPC-E 1593
3.10.3. Start Character Transmission603.10.4. Convert UPC-E to UPC-A613.10.5. Checksum Verification623.11. IATA 2 of 5633.11.1. Enable/ Disable IATA 25633.11.2. Checksum Verification643.12. Interleaved 2 of 5653.12.1. Enable / Disable Interleaved 25653.13. Matrix 2 of 5663.13.1. Enable or Disable Matrix 25663.13.2. Checksum Verification673.14. Standard 2 of 5 / Industrial 2 of 5683.14.1. Enable / Disable Standard 25683.14.2. Checksum Verification693.15. China Postal Code703.15.1. Enable/Disable China Postal Code3.15.2. Checksum Verification7071Chapter 4 Defining Output Format724.1. Code ID724.2. Stop Code of Barcode Setting744.3. Customized Settings of Prefix and Suffix Code of Barcode754.4. Delete Character(s) on Output Result764.5. Letter Case Setting784.6. Additional Code794.6.1. Two digits Additional Code794.6.2. Five digits Additional Code804.7. Separator814.8. Short Barcode824.9. Caps Lock Control83Appendix 1 Prefix/Suffix number and symbol list84Contact Information924
IMPORTANT NOTICESafety Precaution* DO NOT disassemble the scanner, or place foreign matter into the scanner in case of ashort circuit or circuit damage.* DO NOT expose the scanner or battery to any flammable sources.Maintenance Precaution* The dust can be wiped out of the body of the scanner with a clean wet cloth.* The power Switch of the scanner should be switched to off mode before long termnon-use.* You are suggested to write down the specific scenario and consult the maintenanceperson should you find the scanner abnormal.Overview of Inateck BCST-60 barcode ScannerAppearanceLaser WindowTriggerBuzzerPower SwitchUSB PortLED1LED2Shockproof Cover5
Features of the Scanner* Featured by four types of scanning mode, including Auto Laser-off Mode, Autoinduction Mode, Continuous scanning Mode and Manual Mode.* Six international keyboards supported: North American Keyboard, German Keyboard,French Keyboard, Spanish Keyboard, Italian Keyboard, UK English Keyboard.* The volume of sound can be well adjusted through barcode settings.* Feedback via LED indicator and beeper is available.* 32 digits Prefix and Suffix settings can be customized freely.* Enables deleting of up to 99 digits start & stop characters of barcodes.* 256 KB memory for reserve buffer, which can store up to 5000 scan barcodes, isprovided in case of 2.4GHz connection interruption.* Settings of scanning mode, barcode type and data transmitting format are availablethrough scanning correspondent barcode.* Well received for its completely self-owned Intellectual property.* Outstanding for numerous decoding types supported and Super-fast decoding speed.* Anti-crash and anti-shock design.* Extremely Comfortable Operation design.* Up to one million times’ clicking life.* Wireless transmission range reaches as far as 35 meters.* Integrated 2600mAh large capacity lithium ion battery.* Impressive low energy consumption ensures long using life.Introduction of Key Function* Switch the Power Switch to “On” mode to get the scanner turned on; Switch the PowerSwitch to “Off ” mode to turn the scanner off .* Click the Scan Trigger to read the barcodes.6
Product SpecificationPHYSICAL CHARACTERISTICSModel NumberInateck BCST-60MaterialPC TPUSizeLength 92mm*Width 69mm* Height 162mmWeight200gColorBlack, GreenVoltageDC 5VBattery Capacity2600mAhPERFORMANCE CHARACTRISTICSLight SourceLaser LED 655 5nmSensorLinear image sensorEEPROM256K, can store thousands of barcodesApplicable BarcodesCodabar, Code 11, Code 128, Code39, Code 93, EAN-8, EAN-13,ISBN, ISSN, MSI,UPC-A, UPC-E, IATA 25, Industrial 25 / Standard 25,Interleaved 25,Matrix 25, China Postal Code,FedEx,USPS, code 32,VINResolution3milDecode Rate220 times/sDecode ModeSingle-Line AimingScanning modeAutomatic mode /Manual modeNominal Working Distance4 40cmScan Width400mm @ 400mmPrint Contrast20%Decode AnglesRoll 30o,Pitch 75o,Yaw 80oCylinder Horizontal ScanDiameter 20mmIndicationBuzzer, LEDInterfacesUSBRadio Frequency2.4---2.4835 GHzTransmission Rate1MbpsWireless Range 35mContinuous Scanning times80000 timesEMCCE , FCC, RoHS, FDA, IEC62133, UN38.3Operating Temp.0 a 50 C / 32 a 122 FStorage Temp.0 a 50 C / 32 a 122 FOperating Humidity20-85% ( non-condensing )Storage Humidity20-85% ( non-condensing )USER ENVIRONMENT7
Correct AimingIncorrect Aiming8
QUICK STARTSettings of the Inateck BCST-60 Barcode Scanner can be changed by Scanning thesetup barcodes included in this manual. This section describes the procedure of settingthe Inateck BCST-60 Barcode Scanner by scanning the setup barcodes. Examples aredemonstrated as below.Step 1: Turn on inateck BCST-60 Barcode Scanner.Switch the Power Switch to “On” mode to get the scanner turned on. Click the Trigger(Scan button), and Inateck BCST-60 will emit a red laser.Step 2: Enter the Setting Mode.Scan “Enter setup””barcode, and Inateck BCST-60 Barcode Scanner will respond with threechord sounds, and LED2 indicator will be on with color becoming blue.Enter setupStep 3: Read a Setup barcode.Change scanner setting by scanning certain function setup barcode (e.g.: ‘Enablecodabar’ barcode). The Inateck BCST-60 Barcode Scanner will response with two beeps(tone ascending from low to high), and LED2 indicator will be on with color becomingblue.Enable CodabarStep 4: Exiting the Setting Mode.Scan “Exit with save” barcode to finish the setup. Inateck BCST-60 Barcode Scanner willrespond with three chord sounds, and blue LED2 indicator will automatically be turnedoff .Exit with saveNote: The Inateck BCST-60 Barcode Scanner will respond with a long beep if any setuperror occurs, for instance, none-setting barcodes are scanned under setting mode. Setuperrors can be canceled by scanning barcode “Exit without Save”.Exit without save9
The flow chart of SetupEnter setupRead a Setup barcodeExit with saveEnter the Setting Mode“Enter setup” barcode will emerge in this and the following chapters of manual, theInateck BCST-60 scanner will go into setting mode once this barcode is scannedsuccessfully.Once the barcode is scanned successfully, the Inateck BCST-60 Barcode Scanner willrespond with three chord sounds, and the LED2 indicator will be on with color becomingblue.Enter setupInstruction below will explain other function settings of the Inateck BCST-60 Barcodescanner.10
Exit with Save“Exit with Save” barcode will emerge in this and the following chapters of manual, theInateck BCST-60 scanner will exit setting mode once this barcode is scanned successfully.Once the barcode is scanned successfully, the Inateck BCST-60 Barcode Scanner willrespond with three chord sounds, and the LED2 indicator will be on with color becomingblue.Exit with SaveExit without Save“Exit without Save” barcode is suggested to scan when error setup occurs. And justlike the response of scanning barcode “Enter with Save”, the Inateck BCST-60 BarcodeScanner will respond with three chord sounds, and the LED2 indicator will be on withcolor turning blue if the barcode is scanned successfully.Exit without saveRestore Factory Defaults“Restore Factory Defaults” barcode is a special barcode, which the Inateck BCST-60Barcode Scanner will respond with a short beep (high tone) after scanning. At this time,the system of scanner could restore factory defaults, and there’s no need to scan"Exit withSave" barcode again.Restore Factory Defaults“Restore Factory Defaults” barcode can be used under following circumstances:1. The scanner doesn’t work. For example, it cannot read/ scan any barcodes.2. You forget the settings you did to the scanner before, and you don't want to beaffected by the forgotten settings when you use the scanner.3. You are to use a function which is not usually used or is not the default setting of thescanner.Note: Most of the settings have factory defaults selection. The factory default value foreach setting is indicated by an asterisk "*".11
Check Software VersionIf you want to check the software version of Inateck BCST-60, you should scan the “EnterSetup” and “Output Software Version” barcode:Enter SetupOutput Software VersionChecking the software version is usually done in the enter setup mode, so it is necessaryto scan “Exit without Save” barcode after the software version outputs.Exit without saveSave Custom Settings1. You may change factory defaults and customize some functions suitable for your ownapplications when using the inateck BCST-60. You need scan ‘Enter Setup’ ‘Functionsetup barcode you want to customize(e.g.: Output Code ID)’ ‘Save Custom Settings’ ‘Exit with Save’ barcodes in turn to set the function well.Enter SetupOutput Code IDSave Custom SettingsExit with save12
2. If you want to restore to custom settings after resetting the barcode scanner, just read‘Enter Setup’ ‘Restore Custom Settings’ ‘Exit with Save’ barcode in turn, and thecustom settings will be restored.Enter SetupRestore Customs SettingsExit with save13
Chapter 1 Features and Basic SetupsThis chapter introduces the features and usage of the barcode Scanner.1.1. BatteryThe scanner is powered by 2600mAh chargeable Lithium batteries. The large capacityof batteries enables the scanner to work continuously for 150 hours, or to read 180 000barcodes (read barcode Code 128 every 3s).The required voltage for charging is 5V, and current under 500mA. A current control chipis set inside the scanner for overcurrent protection- filtering out excessive current toensure a 500mA charging, which guarantees normal use as long as the charging voltageis 5V. You can charge it via an ordinary phone charger or USB port on a computer thatregularly output voltage at 5V.1.1.1. Mounting the battery (charging)Insert USB cable into the bottom of the scanner for charging. The red LED1 indicator willbe on during charging, and it will go off when the scanner is fully charged.1.1.2. Basic operation of Inateck BCST-60 Barcode ScannerTurn on the scannerSwitch the Power Switch to “On” mode to get the scanner turned on.Cautions:The scanner is equipped with powerful power management algorithm that consumeslittle power in standby mode. For a better using experience, please don’t turn off thescanner if it’ll be in use shortly. For more information please refer to 1.1.3.Scan barcodeClick the Trigger (the scan button), and Inateck BCST-60 will emit a red laser.Turn off the scannerSwitch the Power Switch to “Off” mode to turn the scanner off.14
1.1.3. Auto Sleep ModeIn order to conserve battery power, user can specify the time interval for the scanner toautomatically sleep. By default, it is set to be 3 minutes.1 min(*) 3 min5 min10 minE g.: Steps to set 5 minutes for the scanner to be automatically sleep are as below:1. Read the "Enter Setup" barcode;Enter Setup2. Read the "Enter Auto Sleep mode" barcode;Enter Auto sleep mode3. Read the "5min" barcode;5 min4. Read the "Exit with Save" barcode.Exit with Save15
Note: If you want to keep the scanner being powered on all the time, scan "Exit AutoSleep mode" barcode instead of step 2 and 3.Exit Auto sleep mode16
1.2. Data BufferDuring the 2.4GHz connection (Wireless Mode), the Inateck BCST-60 Scanner uses a 256KBmemory as a data buffer, and sends the collected data to the host computer one by onevia the 2.4GHz. The 256KB transmit buffer on the scanner can hold as many as 5000 basedon Code128.1.2.1. Wireless mode (Wireless)Upon reading a barcode successfully, the scanner will respond with one short beep (hightone) and its LED indicator will be on with color turning green and then go off quickly.However, the host computer with 2.4GHz adapter may not receive the data immediatelyif the scanner gets out of reaching range of the 2.4GHz adapter. In that case, the scannerwill respond with one short beep (high tone) and its LED indicator will be on with colorbecoming blue before going off quickly if the barcode is scanned successfully.With the 256KB data buffer, the scanner can ignore the transmission status and keep onreading barcodes until the buffer is full. When the buffer is full, the scanner will respondwith a long beep (high tone), which reminds the user that the space of buffer is notenough and cannot store any more barcodes. Once the Buffer is full, the user shouldreturn to the range of 2.4GHz connection quickly. When the connection is completed, itis necessary to double click the trigger if you want to upload the data to the computeras the data in the buffer won’t be uploaded automatically. The data in the buffer willbe sent back to the host computer and the space of buffer will be released. If you wantthe barcodes be uploaded to host computer automatically when the connection iscompleted, you can read ‘Enter Setup ’ ‘Enable Auto Uploading’ ‘Exit with Save’barcodes in turn to realize it.Enable Auto Uploading(*)Disable Auto UploadingEnter SetupExit with SaveExit without Save17
You can also choose to clear the data in the buffer every time when you turn on thescanner. You can read ‘Enter Setup ’ ‘Enable Clear Data in Buffer When the scanner wasturned on’ ‘Exit with Save ’ barcodes in turn to realize it.Enable Clear Data in Buffer When thescanner was turned on(*) Disable Clear Data in Buffer Whenthe scanner was turned onEnter SetupExit with SaveExit without Save18
1.2.2. Inventory ModeIf you want to keep the barcodes in the buffer of Inateck BCST-60 for multiple uploading,you can choose inventory mode. In inventory mode, Inateck BCST-60 will count thenumber of the barcodes automatically. Users may use inventory mode to keep scannedbarcodes in the buffer of Inateck BCST-60, and upload them to computer in batches.Under inventory mode, users are not restricted to the time and location when uploaddata. Of course, history data can be cleared in buffer after uploading. More details aboutinventory mode are as below.Note:1. The below five functions can be realized without extra scanning of “Enter Setup” or"Exit with Save" barcodes.2. The below five functions can be used under any scanning mode mentioned in 1.5.1) Scan the ‘Enter Inventory Mode’ barcode to enter Inventory ModeEnter Inventory Mode2) Scan the ‘Data Upload (for Inventory Mode only)’barcode to upload data from buffer (forInventory Mode only)Data Upload (for Inventory Mode only)3) Scan the barcode to upload the number of scanned barcodes (for Inventory Modeonly)Upload the Number of scanned barcodes (for Inventory Mode only)4) Scan the barcode to clear data in buffer (for Inventory Mode only).Clear Data in Buffer (for Inventory Mode only)5) Scan the barcode to return to Common Mode(*) Return to Common Mode19
1.3. LED IndicatorThe LED indicators on Inateck BCST-60 can help the user know more about the currentoperation status.MeaningLED StatusGreen LED flashes once Blue LEDflashes onceBarcode successfully read and uploaded to computerBlue LED flashes onceBarcode successfully read and saved in buffer, but not uploaded tocomputerBlue LED stays onInateck BCST-60 scanner on setup statusYellow LED blinks(light/shaderatio0.5s : 0.5s)Inateck BCST-60 scanner on setup status Low batteryRed LED stays onInateck BCST-60 scanner in charge (Red LED o when battery is full)1.4. BeeperThe beeper built in Inateck BCST-60 can help the user to know about the currentoperation status.MeaningBeepingOne short high note (100ms)Read barcode successfullyTwo short high notes (the same)Barcode scanner shutdownOne short high note (20ms)Data upload from scanner to hostOne long high note (400ms)Wrong Setup(on setup status, blue LED stays on)Invalid scanning due to full buffer. (Scanned barcode notsaved)Pairing Failure (Occurs only during the pairing process)One or several long high notes (800ms)USB being configured (It happens when USB cable isinserted)Three chord soundsEnter setup mode(Blue LED on)Exit setup mode(Blue LED off )Two short notes (tone from low to high)Correct SetupTwo short beeps (tone from high to low)The connection between Inateck BCST-60 and computer isdisrupted.20
1.4.1. Beeper VolumeMuteMinimum Volume(*) Medium VolumeMaximum VolumeFor example: Steps to set Minimum Volume for beeper are as below:1. Read the "Enter Setup" barcode;Enter Setup2. Read the "Minimum Volume" barcode;Minimum Volume3. Read the "Exit with Save" barcode.Exit with Save21
1.5. Scanning modesFour kinds of scanning modes are supported by the Inateck BCST-60 Barcode Scanner:1.5.1. Auto laser-off ModeBy default, the scanning mode is set to Auto laser-off Mode. If the user click the ScanTrigger, the Inateck BCST-60 Scanner will emit a red light line. This indicates the scannercould scan barcode. If the barcode is not successfully scanned, the laser will be offautomatically after auto laser-off waiting time, which usually defaults to 2 seconds andcan be setup to 1s, 2s, 3s and 5s. Yet the laser will be off as soon as Inateck BCST-60 scans(*) Auto laser-off ModeSetup Auto laser-off waiting time1s(*) 2s3s5sEnter setupExit with SaveExit without Savebarcode.E.g.: To set the scanning mode to Auto laser-off mode and set the auto laser-off waitingtime to 1s, you need to:1. Read the "Enter Setup" barcode;2. Read the " Auto laser-off Mode” barcode;3. Read the”Setup Auto laser-off waiting time” barcode; 4. Read the “1s” barcode;5. Read the “Exit with Save” barcode.22
1.5.2. Auto-induction ModeThere’s no need to click the trigger under the Auto-induction Mode, the users just needto move the barcodes to be scanned in front of the light band of Inateck BCST-60, inwhich a red light line will show up indicating the scanner is ready to scan. The scanningwill not stop until the scanner is under the following situation:* Read a barcode successfully;* The pre-set timeout expires (the default time is 2s, the same as the auto laser-off time).You can also set up the best auto-induction distance according to actual demand, thedefault distance is long distance.Auto Induction ModeSetup Auto-induction DistanceShort Distance(*)Long DistanceEnter setupExit with SaveExit without SaveFor Example, Steps to set the scanner into auto induction mode are as below:1. Read the “Enter Setup” barcode;2. Read the “Auto-induction Mode” barcode;3. Read the “Exit with Save” barcode.Steps to set the scanner into auto induction mode and set the auto-induction distance as“Short Distance” are as below:1. Read the “Enter Setup” barcode;2. Read the “Auto-induction Mode” barcode;3. Read the “Setup Auto-induction Distance”barcode ;4. Read the “Short Distance” barcode;5. Read the “Exit with Save” barcode.23
1.5.3. Continuous Scanning ModeThere’s no need to click Scan Trigger in this mode, as the laser of the scanner will be onand the scanner will enter into scanning mode automatically.The laser of the scanner will not go off until Inateck BCST-60 scans barcode. And the laserwill go off once the scanner scans barcode successfully. And then the scanner will go intowaiting mode, in which the waiting time(also known as intermittent time of continuousscanning), usually defaults to 2 seconds, can be set to 400ms, 800ms,1s,2s,3s,5s, 10s and15s.And the laser of the scanner will be on again once the waiting time passes. And it willonly goes off when the scanner scans barcode successfully. And it will go back and forthlike this.Continuous scanning modeSetup Intermittent time of Continuous scanning400ms800ms1s(*)2s3s5s10s15s24
Enter setupExit with SaveExit without SaveFor Example, steps to set the scanner into Continuous Scanning mode are as below:1. Read the "Enter Setup" barcode;2. Read the "Continuous Scanning Mode" barcode;3. Read the "Exit with Save" barcode.Steps to set the scanner into Continuous Scanning mode and set the Intermittent time ofContinuous scanning setup into 1s are as below:1. Read the "Enter Setup" barcode;2. Read the "Continuous Scanning Mode" barcode;3. Read the "Setup Intermittent time of Continuous scanning " barcode;4. Read the “1s” barcode;5. Read the "Exit with Save" barcode.25
1.5.4. Manual ModeUnder this Manual Mode, the Inateck BCST-60 Scanner will emit a red light line whichindicates the scanner could scan if the user keeps pressing the Trigger. And the scanningwill not stop until the scanner under the following situation.* Read a barcode successfully;* Release the Trigger;Manual ModeEnter SetupExit with SaveExit without SaveFor Example, If you want to set the scanner into manual mode, you may need to:1. Read the "Enter Setup" barcode;2. Read the "Manual Mode" barcode;3. Read the "Exit with Save" barcode.26
1.6. Types Of KeyboardInateck BCST-60 is compatible with Windows, Android, and MacOS. The default modeis Windows/Android compatible. You can change the mode by scanning the barcodesbelow.(*) Windows/Android modeMacOS modeTo run BCST-60 on MacOS devices, please follow the steps:1) Scan “enter setup”;2) Scan “MacOS device mode”;3) Scan “Save and exit”.Note: If you are to use BCST-60 with Android devices, make sure to apply Gboard as theinput method. Apart from setting the scanner under “Windows/Android” mode, you alsoneed to set the scanner keyboard language as American English that supports “Gboard”input method. The language settings of Gboard won’t affect the output.Inateck BCST-60 support six international keyboards: US Keyboard, German Keyboard,French Keyboard, Spanish Keyboard, Italian Keyboard, UK English Keyboard, with USKeyboard as default. You are suggested to set the keyboard type of the scanner to be inagreement with that in real use by scanning the correspondent barcode listed below.Enter SetupUK KeyboardGerman KeyboardFrench KeyboardSpanish KeyboardItalian KeyboardExit with Save(*) US Keyboard27
For example, steps to set the keyboard type into “German Keyboard” are as below:1. Scan the “ Enter Setup” barcode;2. Scan the “German Keyboard” barcode;3. Scan the “Exit with Save” barcode to end language setting.Note: The keyboard language of Inateck BCST-60 should keep in consistent with that ofcomputer, otherwise, garbled might appear in scanning result.28
1.7. Symbologies SupportedMost of the popular barcode symbologies are supported by the Inateck BCST-60 Scanner.You can check them in list below.DefaultsSymbologies Supported: Enable/DisableEnableCodabarDisableCode 11Code 128EnableCode 39EnableCode bleDisableMSIEnableUPC- AEnableUPC- EDisableIATA 2 of 52 of 5 barcodesEnableInterleaved 2 of 5Matrix 2 of 5DisableStandard 2 of 5 / Industrial 2 of 5DisableDisableChina Postal Code29
Chapter 2 How to Connect with Computer/phone/POS2.1. USB Wired Data TransmissionFollowing the USB-HID agreement, the Inateck BCST-60 supports timely data transmissionthrough USB cable connection. Data connection through USB is preferred when it'sconnected via USB cable.2.2. Wireless Data TransmissionThe Inateck BCST-60 supports 2.4GHzs wireless data transmission, yet this can only berealized after pairing with dongle. Since the pairing of our Inateck BCST-60 has beenfinished when it was produced, All you need to do is to plug the dongle into a USB 2.0 ora USB 3.0 interface, and you are able to use the scanner to scan barcode or transmit dataif an text on your computer is opened. What’s more, Inateck BCST-60 supports multiplyInateck BCST-60s to be paired with one dongle. Please follow steps below to finish thepairing:1). Scan the “Enter Setup” to enter the setting mode barcode;2). Scan the “Pairing” barcode.Enter setupPairingNote: Inateck BCST-60 will exit the setting mode automatically once the pairing is donesuccessfully. And it will stay in setting mode if the pairing fails, then you need to scan thepairing code to repair them again. The pairing process may affect the Inateck BCST-60scanner nearby a little bit but no data loss will be caused. In addition, It is strongly advisednot to use several scanners simultaneously together if they are paired with the samedongle in case of data loss.30
2.3. Transmission SpeedThe scanner works in high speed transmission mode by default with default datatransmission interval at 0 ms. If you want to use the scanner with some low-speedsoftware (like Excel on Android devices), please adjust the transmission interval of thescanner for to avoid data loss.(*) 0ms16ms32ms64ms96ms128msHow to set 16ms as interval for data transmission1. Scan “Enter setup”;2) Scan “16ms”3) Scan “Save and Exit”.Exit with SaveEnter setup31
Chapter 3 Symbology Settings3.1. Codabar3.1.1. Enable / Disable CodabarDecide whether to enable Codabar through selecting correspondent barcode below. TheInateck BCST-60 Scanner defaults enable Codabar contents.Enable codabarDisable codabarEnter SetupExit with SaveExit without SaveNote: Scanning the "Disable Codabar" barcode will result in the scanner being unable toread the Codabar barcode. Thus, if the scanner cannot read the Codabar barcode, pleasetry to scan "Enable Codabar" to reset.For example: Steps to enable Codabar are as below:1. Read the "Enter Setup" barcode;2. Read the "Enable Codabar" barcode;3. Read the "Exit with Save" barcode.32
3.1.2. Start/Stop TransmissionDecide whether to include Start/Stop characters in the data being transmitted byscanning relevant barcodes below, with Transmit Codabar Start/Stop Characters asdefault.(*)Transmit Codabar Start/StopCharactersDo not Transmit Codabar Start/StopCharactersEnter SetupExit with SaveExit without SaveFor example: Do Not Transmit Codabar Start/Stop Characters.1. Read the "Enter Setup" barcode;2. Read the "Enable Codabar" barcode; (If Codebar is disabled, it is needed to enable it);3. Read the "Do Not Transmit Codabar Start/Stop Characters" barcode;4. Read the "Exit with Save" barcode.33
3.2. Code 113.2.1. Enable/Disable Code 11Decide whether to include Enable/Disable code 11 in the data being transmitted byscanning relevant barcodes below, with disable Code 11 as default.Enable Code 11Disable Code11Enter SetupExit with SaveExit without SaveNote: Read the "Disable Code 11" barcode will make the scanner not being able to readthe Code 11 barcode. Thus, if the scanner cannot read the Code 11 barcode, please try toscan "Enable Code 11" to reset.For example: Enable Code 11.1. Read the "Enter Setup" barcode;2. Read the "Enable Code 11" barcode;3. Read the "Exit with Save" barcode.34
3.2.2. Checksum VerificationChecksum character is not enforced to be included in the data of Code 11. If checksumcharacter is included, it should be the last one or two characters of the barcode data. Asa calculate value based on all the data, Checksum character is used to check whether thedata is correct or not.Thus, if the scanner is set to "Do Not Verify code”, which is default, the scanner will read allthe barcode data.If the scanner is set to "Verify with one digit Checksum Character", the scanner will checkthe data based on the last character of the barcode data. It will not be able to read code11 without checksum character or code 11 with two digits checksum character.If the scanner is set to "Verify with two digits Checksum Character", the scanner will checkthe data based on the last two characters of the barcode data. It will not be able to readcode 11 without checksum character or code 11 with one digit checksum character.If the scanner is set to "Verify with Output Checksum Character", the scanner will checkthe data based on the last one or two characters of the barcode data. If the check passes,the scanner will output the checksum characters as the last one or two characters ofnormal data. Inateck BCST-60 default outputs checksum characters.If the scanner is set to "Verify without Output Checksum Character", the scanner will notoutput checksum character.(*) Do Not Verify codeVerify with one digit ChecksumCharacterVerify with two digits ChecksumCharacter(*) Verify with Output ChecksumCharacterVerify without Output ChecksumCharacterEnter SetupExit with SaveExit without Save35
For example, Operations are as below if you want to set Verify with two digits OutputChecksum Character:1). Scan the “Enter Setup” barcode;2). Read the "Verify with two digits Output Checksum Character" barcode;3). Read the "Verify without O
"Enter setup" barcode will emerge in this and the following chapters of manual, the Inateck BCST-60 scanner will go into setting mode once this barcode is scanned successfully. Once the barcode is scanned successfully, the Inateck BCST-60 Barcode Scanner will respond with three chord sounds, and the LED2 indicator will be on with color becoming