Transcription
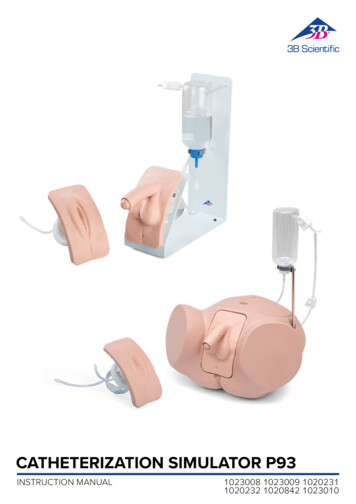
CATHETERIZATION SIMULATOR P93INSTRUCTION MANUAL1023008 1023009 10202311020232 1020842 1023010
CATHETERIZATION SIMULATOR P93CONTENTIntroduction.3Delivery Contents.4Functions.6Assembly.7Putting in the genital inserts .7Filling the bladder – Preparation for the PRO version:.7Filling of the bladder (Basic and Pro).8Emptying the bladder.8Adjusting the constriction of the urethra.9Disassembly. 11Disassembly of the genital inserts. 11Cleaning and Care. 12Technical Data. 12Imprint. 122 CATHETERIZATION SIMULATOR Content
CATHETERIZATION SIMULATOR P93INTRODUCTIONYou have acquired a catheterization simulator with basic features (Basic) or advanced features (PRO). It can be used to simulate the steps to correctly carryout catheterization in men or women. Standard procedures as part of professional training for nurses and everyday clinical practice can be taught andimproved.Basic version (m/f)3CATHETERIZATION SIMULATOR IntroductionPRO version (m/f)
CATHETERIZATION SIMULATOR P93DELIVERY CONTENTS4Basic (m) 1020232Basic (f) 1020231Basic (s) 1020842PRO (m) 1023009PRO (f) 1023008PRO (s) 1023010CATHETERIZATION SIMULATOR Delivery Contents
CATHETERIZATION SIMULATOR P93P93B-S 1020842Genital insert, maleReservoir bottleVentilation tube withlocking clipGenital insert, femaleDrainage tubeReplacementspongesBase, basic versionTalcumpowderP93SPC-S 1023010Reservoir bottleVentilation tube with locking clipAbdomen PROTalcum powderGenital insert, femaleReplacement spongesAbdominal wallwith puncture siteGenital insert, maleLocking clip fordrainage tubeDrainage tube with Y-connector5CATHETERIZATION SIMULATOR Delivery ContentsSupport rod PRO
CATHETERIZATION SIMULATOR P93FUNCTIONSThe Basic version offers a simplified and clear demonstration of bladdercatheterisation. Thanks to an anatomically realistic lower body withremovable abdominal wall, the PRO version enables very practicalpractice of transurethral catheterisation and suprapubic cathetermanagement.The soft outer genital parts – labia for the female insert and foreskin forthe male insert – are flexible and offer realistic handling.Students can practice preparing the models in sterile conditions, andare given support while introducing the catheter (e.g. the labia are keptspread apart) and teaching features are highlighted.Both gender inserts provide a very realistic experience in insertingcatheters, since the relevant structural features with regard to the lengthand the route of the urethra have been taken into account. The malegenital insert also offers 3-levels of urethral constriction.The transparent bladder can be filled via a 500 ml reservoir bottle andchecked visually to ensure the catheter has been correctly placed. If thecatheter is correctly inserted, fluid starts to flow out automatically. Theoutflow can be controlled manually using a locking clip.Basic versionPRO versionArea of applicationSimplified presentation anddemonstrationRepresentation, demonstrationand realistic exercisesBasic bodySchematic metal baseAnatomically correct replica of anabdomen.Removable abdominal wallSuprapubic catheterNot representedAbdominal wall with puncture sitefor practising suprapubic catheterexchange and supplyGenital insertsMale or female; the set alsoincludes flexible labia or foreskinMale or female; the set alsoincludes flexible labia or foreskin6CATHETERIZATION SIMULATOR Functions
CATHETERIZATION SIMULATOR P93ASSEMBLYPutting in the genital inserts The genital inserts can be put in by way of a magnetic connector, bothinto the main body in the PRO version and into the metal base of thebasic version. First, pass the connection tube of the bladder through the opening ofthe metal base or of the basic body. Then put the upper edge of the genital insert into the recess (PROversion) or on to the beveled surface (basic version). The entire genital insert should click into place. Please ensure that the genital inserts are placed centrally and are fullyengaged. In the PRO version, this can be seen when the insert is totallyflush with the basic body.Filling the bladderPreparation for the PRO version: Screw the stand supplied into the body (in the basic version, the standis already integrated). To do this, loosen the nut and the crinkle washer from the stand thread Now insert the stand rod from the top into the hole provided. Slide the rod into the opening until it can go no further, and make surethat the rod comes through the opposite opening on the underside ofthe basic body. Now place the corrugated washer over the threads of the support rod. Put the nut on the thread, fix it with the fingers and screw the standrod into the nut. Screw in the rod until it is sufficiently tight, then stop. Itshould be possible to turn the stand rod further.7CATHETERIZATION SIMULATOR AssemblyTop viewView from belowView from belowView from below
CATHETERIZATION SIMULATOR P93Filling of the bladder (Basic and Pro) First check that all the individual parts of the genital insert are fittingcorrectly. The transparent bladder must be firmly screwed to thebase plate of the genital insert. On the PRO version, the bladder mustbe screwed to the base plate of the abdominal wall instead whenpractising suprapubic catheter exchange. Fill the reservoir bottle with a sufficient quantity of liquid (fill volume500 ml). Make sure that the locking clip to the ventilation tube of thebottle is fastened. Connect the right (top view) tube connector of the bladder to thereservoir bottle. In the Basic version, connect the left tube connector to the bleed tube.The open end of the bleed tube is inserted through the hole on themetal stand. In the PRO version, the bleed tube is connected using aY-connector to the reservoir bottle. Now, block the reservoir bottle from the top in the retaining clip bypushing the blue sealing cap of the bottle sideways into the retainingclip of the stand. After checking that all the connections are correctly in place, open thelocking clip on the ventilation tube. The system will then automatically fill up to the correct fluid level(completely full bladder). The upper locking clip needs to stay open during all the training session.Suprapubic catheter exchange:For suprapubic catheter exchange, sufficient bladder filling is essential.If the bladder volume is insufficient, the required filling volume of 300ml can be achieved retrogradely on the PRO version via the suprapubiccatheter. Since the filling volume of the transparent bladder is 200 ml,100 ml goes into the reservoir bottle to create the required overpressurein the system. When filling, the lower locking clip on the drain hoseshould remain closed and the upper locking clip open.Emptying the bladder Once the simulation has been completed, the residual liquid should bedrained out as much as possible. To do this, open the locking clip and empty the liquid via the open endof the drain hose (position the end of the hose well below the bladder). Disconnect the fully emptied reservoir bottle from the bladder. Disconnect the bleed tube from the bladder. Remove the genital insert from the basic body or from the metal base.Make sure that the open ends of both tubes are always above the levelof the bladder. Hold the genital insert so that the genitals are facing upwards. Unscrew the genital part or abdominal wall from the transparentbladder so that you can lock it firmly and securely with one hand Empty the bladder by pouring out the liquid.8CATHETERIZATION SIMULATOR Assembly
CATHETERIZATION SIMULATOR P93Adjusting the constriction of the urethra The male genital insert has 3 urethra constriction settings in the parsmembranosa: “Open”, “partly constricted” and “totally constricted”. On the right side of the bladder stem (top view) there is a metal pin andan adjustment slide. Pull the metal pin out slightly, thereby releasing the pressure from theadjustment slide. Pull firmly on the metal pin; it is held in place firmly byspring tension. Now push the adjustment slide to the desired position. From the “open” position, the adjustment slide can be pushed to thenext lowest position without pressing the metal rod. A clear “click”sound confirms that the next position has been locked into place. To go to the next highest position (e.g. from “Full constriction” to “Partconstriction”) the metal pin must, however, always be pulled.Metal pin and adjustment slideOpenPartial constrictionFull constriction3 levels of urethral constriction“Open” - “Partial constriction” - “Full constriction”èAdvice:Before starting a training session, a pre lubricated catheter should be fully inserted into the bladder for a good lubrication of the entire urethra.This is needed only for the training with the male insert.9CATHETERIZATION SIMULATOR Assembly
CATHETERIZATION SIMULATOR P93Urethra constrictionCatheter size (balloon catheter)Catheter size“Open"14 CH16 CH“Partial constriction”12 CH14 CH“Full constriction”----èNote:Both silicone and PVC catheters can be used. When using balloon catheters, we recommend the size, CH 14, or otherwise, catheter size 16.Catheters with straight and rounded tips should be used.èAdvice:According to the guidelines for correct catheterization, even during the simulation, lubricating gel (not included) should be placed into the urethrato ensure that the catheter can be inserted smoothly. Alternatively, some lubricating gel can be placed on the tip of the catheter.10CATHETERIZATION SIMULATOR Assembly
CATHETERIZATION SIMULATOR P93DISASSEMBLYDisassembly of the genital inserts To ensure that the areas that come into contact with liquid during thesimulation can be cleaned and dried without leaving residue, the genitalinserts can be taken apart. To do this, pull both the skin of the male and female inserts forwards. Remove the small sponge insert below the genitals. If it has absorbed alot of liquid, it can be wrung out. Now screw off the bladder in an anticlockwise direction. Remove the gray sphincter silicone insert. Attention: Do not use sharpobjects and take care if you have long fingernails; there is a risk oftearing! Remove the white plastic insert (it is preferable to reach into the circularopenings with 2 fingers, or lift the model so that the genital insert fallsout). Remove the skin-colored pelvic floor insert. Remove as much moisture residue as possible with a dry cloth. Place all the individual parts to dry in a well-ventilated place away fromdirect sunlight. Once dry, all parts can be put back together in reverse order.11CATHETERIZATION SIMULATOR Disassembly
CATHETERIZATION SIMULATOR P93CLEANING AND CAREThe surface of the simulator can be cleaned with a damp cloth, or rinsedunder running water. All soft elastic parts may also be cleaned in the caseof severe soiling with a solution of mild soap and water. Please ensurethat all parts are completely dry before storing. A little talcum powdershould be sprinkled on the dry soft elastic parts before storage (sprinkleon and distribute evenly by rubbing). To prepare the model for a sterilepreparation during the simulation, we recommend the use of clear liquids(e.g. water for simulation purposes). If colored disinfectants are applied,remove them as soon as possible after the simulation to avoid permanentstains.èAdvice:According to the guidelines for correct catheterisation, lubricating gel (not included) should also be inserted into the urethra or puncture site onthe abdominal wall from the PRO version during simulation to ensure that the catheter can be inserted smoothly.TECHNICAL DATADimensions:Simulator Basic (H x W x D) 36 x 11 x 26.5 cmSimulator PRO (H x W x D) 50 x 42 x 30 cmWeight Basic: approx. 2.3 kgWeight PRO: approx. 3.5 kgOperating temperature 10 C to 60 CStorage temperature -20 C to 60 CIMPRINTA worldwide group of companies3B Scientific GmbHLudwig-Erhard-Straße 20 20459 Hamburg GermanyPhone: 49 (0)40-73966-0 Fax: 49 (0)40-73966-1003bscientific.com info@3bscientific.com Copyright 2021 for instruction manual and design of product: 3B Scientific GmbH, Germany12CATHETERIZATION SIMULATOR Cleaning and Care Technical Data Imprint
practice of transurethral catheterisation and suprapubic catheter management. Both gender inserts provide a very realistic experience in inserting catheters, since the relevant structural features with regard to the length and the route of the urethra have been taken into account. The male genital insert also offers 3-levels of urethral .