Transcription
SonicWall GMS 8.6 VirtualApplianceGetting Started Guide
1ContentsBefore You Begin . . . . . . . . . . . . . . . . . . . . . . . . . . . . . . . . . . . . . . . . . . . . . . . . . . . . . . . . . . . . . . . . . . . . 4System Requirements . . . . . . . . . . . . . . . . . . . . . . . . . . . . . . . . . . . . . . . . . . . . . . . . . . . . . . . . . . . . . . . . . . 4Supported Platforms . . . . . . . . . . . . . . . . . . . . . . . . . . . . . . . . . . . . . . . . . . . . . . . . . . . . . . . . . . . . . . . 5Unsupported Platforms . . . . . . . . . . . . . . . . . . . . . . . . . . . . . . . . . . . . . . . . . . . . . . . . . . . . . . . . . . . . 5GMS Hardware Resource Requirements . . . . . . . . . . . . . . . . . . . . . . . . . . . . . . . . . . . . . . . . . . . . . . . 5Hard Drive HDD Specifications . . . . . . . . . . . . . . . . . . . . . . . . . . . . . . . . . . . . . . . . . . . . . . . . . . . . . . . 6GMS Virtual Appliance Supported Platforms . . . . . . . . . . . . . . . . . . . . . . . . . . . . . . . . . . . . . . . . . . . . 6Virtual Appliance Deployment Requirements . . . . . . . . . . . . . . . . . . . . . . . . . . . . . . . . . . . . . . . . . . . 6Browser Requirements . . . . . . . . . . . . . . . . . . . . . . . . . . . . . . . . . . . . . . . . . . . . . . . . . . . . . . . . . . . . . 7Database Requirements . . . . . . . . . . . . . . . . . . . . . . . . . . . . . . . . . . . . . . . . . . . . . . . . . . . . . . . . . . . . 7Java Requirements . . . . . . . . . . . . . . . . . . . . . . . . . . . . . . . . . . . . . . . . . . . . . . . . . . . . . . . . . . . . . . . . . 7Network Requirements . . . . . . . . . . . . . . . . . . . . . . . . . . . . . . . . . . . . . . . . . . . . . . . . . . . . . . . . . . . . . 8SonicWall Appliance and Firmware Support . . . . . . . . . . . . . . . . . . . . . . . . . . . . . . . . . . . . . . . . . . . . 9Non-SonicWall Appliance Support . . . . . . . . . . . . . . . . . . . . . . . . . . . . . . . . . . . . . . . . . . . . . . . . . . . 10Record Configuration Information . . . . . . . . . . . . . . . . . . . . . . . . . . . . . . . . . . . . . . . . . . . . . . . . . . . . . . . 10Introduction to the Management Interfaces . . . . . . . . . . . . . . . . . . . . . . . . . . . . . . . . . . . . . . . . . . . . . 11Overview of the Two Interfaces . . . . . . . . . . . . . . . . . . . . . . . . . . . . . . . . . . . . . . . . . . . . . . . . . . . . . . . . . 11Switching Between Management Interfaces . . . . . . . . . . . . . . . . . . . . . . . . . . . . . . . . . . . . . . . . . . . . . . . 12UMA System Interface Introduction . . . . . . . . . . . . . . . . . . . . . . . . . . . . . . . . . . . . . . . . . . . . . . . . . . . . . 12Management Interface Introduction . . . . . . . . . . . . . . . . . . . . . . . . . . . . . . . . . . . . . . . . . . . . . . . . . . . . . 12Login Screen . . . . . . . . . . . . . . . . . . . . . . . . . . . . . . . . . . . . . . . . . . . . . . . . . . . . . . . . . . . . . . . . . . . . . 13Dashboard . . . . . . . . . . . . . . . . . . . . . . . . . . . . . . . . . . . . . . . . . . . . . . . . . . . . . . . . . . . . . . . . . . . . . . 13Management Interface . . . . . . . . . . . . . . . . . . . . . . . . . . . . . . . . . . . . . . . . . . . . . . . . . . . . . . . . . . . . 14Using the GMS TreeControl Panel . . . . . . . . . . . . . . . . . . . . . . . . . . . . . . . . . . . . . . . . . . . . . . . . . . . . . . . 17Installing and Upgrading . . . . . . . . . . . . . . . . . . . . . . . . . . . . . . . . . . . . . . . . . . . . . . . . . . . . . . . . . . . . . 20Upgrading from an Earlier Version of GMS . . . . . . . . . . . . . . . . . . . . . . . . . . . . . . . . . . . . . . . . . . . . . . . . 20Installing with VMware vSphere . . . . . . . . . . . . . . . . . . . . . . . . . . . . . . . . . . . . . . . . . . . . . . . . . . . . . . . . . 21. . . . . . . . . . . . . . . . . . . . . . . . . . . . . . . . . . . . . . . . . . . . . . . . . . . . . . . . . . . . . . . . . . . . . . . . . . . . . . . . . . . 27Performing Basic Tasks and Host Configuration . . . . . . . . . . . . . . . . . . . . . . . . . . . . . . . . . . . . . . . . . . 28Power the Virtual Appliance On . . . . . . . . . . . . . . . . . . . . . . . . . . . . . . . . . . . . . . . . . . . . . . . . . . . . . . . . . 28Configure Host Settings on the Console . . . . . . . . . . . . . . . . . . . . . . . . . . . . . . . . . . . . . . . . . . . . . . . . . . 28Configure Host Settings on the Appliance Management Interface . . . . . . . . . . . . . . . . . . . . . . . . . . . . . 30Viewing the Settings Summary . . . . . . . . . . . . . . . . . . . . . . . . . . . . . . . . . . . . . . . . . . . . . . . . . . . . . . . . . . 32Editing The Virtual Machine Settings . . . . . . . . . . . . . . . . . . . . . . . . . . . . . . . . . . . . . . . . . . . . . . . . . . . . . 33Changing the Default IP Address of GMS Virtual Machine Installations . . . . . . . . . . . . . . . . . . . . . . . . . 35Registering and Licensing . . . . . . . . . . . . . . . . . . . . . . . . . . . . . . . . . . . . . . . . . . . . . . . . . . . . . . . . . . . . 37Registering/Licensing After a Fresh Install . . . . . . . . . . . . . . . . . . . . . . . . . . . . . . . . . . . . . . . . . . . . . . . . 37Registering Associated Servers in a Distributed Deployment . . . . . . . . . . . . . . . . . . . . . . . . . . . . . . . . . 40Configuring UMA Deployment Options . . . . . . . . . . . . . . . . . . . . . . . . . . . . . . . . . . . . . . . . . . . . . . . . . 44SonicWall GMS 8.6 Getting Started GuideContents2
Deployment Considerations . . . . . . . . . . . . . . . . . . . . . . . . . . . . . . . . . . . . . . . . . . . . . . . . . . . . . . . . . . . . 44Using the Role Configuration Tool . . . . . . . . . . . . . . . . . . . . . . . . . . . . . . . . . . . . . . . . . . . . . . . . . . . . . . . 45Manually Configuring the System Role . . . . . . . . . . . . . . . . . . . . . . . . . . . . . . . . . . . . . . . . . . . . . . . . . . . 48Configuring the All In One Role . . . . . . . . . . . . . . . . . . . . . . . . . . . . . . . . . . . . . . . . . . . . . . . . . . . . . . 49Configuring the Database Only Role . . . . . . . . . . . . . . . . . . . . . . . . . . . . . . . . . . . . . . . . . . . . . . . . . . 50Configuring the Console Role . . . . . . . . . . . . . . . . . . . . . . . . . . . . . . . . . . . . . . . . . . . . . . . . . . . . . . . 50Configuring the Agent Role . . . . . . . . . . . . . . . . . . . . . . . . . . . . . . . . . . . . . . . . . . . . . . . . . . . . . . . . . 51Configuring the Reports Summarizer Role . . . . . . . . . . . . . . . . . . . . . . . . . . . . . . . . . . . . . . . . . . . . . 51Configuring the Monitor Role . . . . . . . . . . . . . . . . . . . . . . . . . . . . . . . . . . . . . . . . . . . . . . . . . . . . . . . 52Configuring the Event Role . . . . . . . . . . . . . . . . . . . . . . . . . . . . . . . . . . . . . . . . . . . . . . . . . . . . . . . . . 52Configuring the Syslog Collector Role . . . . . . . . . . . . . . . . . . . . . . . . . . . . . . . . . . . . . . . . . . . . . . . . . 53Configuring the Flow Server Role . . . . . . . . . . . . . . . . . . . . . . . . . . . . . . . . . . . . . . . . . . . . . . . . . . . . 54Configuring the All in One-Flow Server (Demo Mode Only) . . . . . . . . . . . . . . . . . . . . . . . . . . . . . . . 54Configuring the Gateway . . . . . . . . . . . . . . . . . . . . . . . . . . . . . . . . . . . . . . . . . . . . . . . . . . . . . . . . . . . 55Configuring Database Settings . . . . . . . . . . . . . . . . . . . . . . . . . . . . . . . . . . . . . . . . . . . . . . . . . . . . . . 57Configuring Deployment Settings . . . . . . . . . . . . . . . . . . . . . . . . . . . . . . . . . . . . . . . . . . . . . . . . . . . . 58Controlling Deployment Services . . . . . . . . . . . . . . . . . . . . . . . . . . . . . . . . . . . . . . . . . . . . . . . . . . . . . . . . 61Provisioning and Adding Units . . . . . . . . . . . . . . . . . . . . . . . . . . . . . . . . . . . . . . . . . . . . . . . . . . . . . . . . 62Preparing SonicWall Appliances for GMS Management . . . . . . . . . . . . . . . . . . . . . . . . . . . . . . . . . . . . . 62Preparing a SonicWall Firewall . . . . . . . . . . . . . . . . . . . . . . . . . . . . . . . . . . . . . . . . . . . . . . . . . . . . . . 62Preparing an SMA Appliance . . . . . . . . . . . . . . . . . . . . . . . . . . . . . . . . . . . . . . . . . . . . . . . . . . . . . . . . 63Provisioning a SonicWall E-Class SMA Series Appliance . . . . . . . . . . . . . . . . . . . . . . . . . . . . . . . . . . 63Adding SonicWall Appliances to GMS . . . . . . . . . . . . . . . . . . . . . . . . . . . . . . . . . . . . . . . . . . . . . . . . . . . . 63Adding SonicWall Appliances Manually . . . . . . . . . . . . . . . . . . . . . . . . . . . . . . . . . . . . . . . . . . . . . . 64Importing SonicWall Appliances . . . . . . . . . . . . . . . . . . . . . . . . . . . . . . . . . . . . . . . . . . . . . . . . . . . . 67Managing Multiple Appliances . . . . . . . . . . . . . . . . . . . . . . . . . . . . . . . . . . . . . . . . . . . . . . . . . . . . . 68Support . . . . . . . . . . . . . . . . . . . . . . . . . . . . . . . . . . . . . . . . . . . . . . . . . . . . . . . . . . . . . . . . . . . . . . . . . . 69Related Technical Documentation . . . . . . . . . . . . . . . . . . . . . . . . . . . . . . . . . . . . . . . . . . . . . . . . . . . . . . . 69SonicWall Live Product Demos . . . . . . . . . . . . . . . . . . . . . . . . . . . . . . . . . . . . . . . . . . . . . . . . . . . . . . . . . . 70SonicWall Support . . . . . . . . . . . . . . . . . . . . . . . . . . . . . . . . . . . . . . . . . . . . . . . . . . . . . . . . . . . . . . . . . . 71About This Document . . . . . . . . . . . . . . . . . . . . . . . . . . . . . . . . . . . . . . . . . . . . . . . . . . . . . . . . . . . . . . . . . 72SonicWall GMS 8.6 Getting Started GuideContents3
1Before You BeginThis Getting Started Guide contains installation procedures and configuration guidelines for deployingSonicWall GMS as a Virtual Machine in a VMware environment. SonicWall GMS can configure, manage, andmonitor the status of thousands of SonicWall Internet security appliances and non-SonicWall appliances from acentral location. SonicWall GMS provides the following benefits: Centralized security and network management Sophisticated VPN deployment and configuration Active device monitoring and alerts Intelligent reporting and activity visualization Centralized logging and offline managementTopics: System Requirements on page 4 Record Configuration Information on page 9System RequirementsSonicWall GMS comes with a base license to manage either 5, 10, or 25 nodes. You can purchase additionallicenses on MySonicWall. For more information on licensing additional nodes, read the “SonicWall Upgrades”section of the GMS 8.5 Console Admin Guide.Before installing, review the requirements in the following sections: GMS Hardware Resource Requirements on page 5 Hard Drive HDD Specifications on page 5 GMS Virtual Appliance Supported Platforms on page 5 Unsupported Platforms on page 6 Unsupported Platforms on page 6 Browser Requirements on page 6 Database Requirements on page 7 Java Requirements on page 7 Network Requirements on page 7 SonicWall Appliance and Firmware Support on page 8 Non-SonicWall Appliance Support on page 9SonicWall GMS 8.6 Getting Started GuideBefore You Begin4
GMS Hardware Resource RequirementsUse the Capacity Calculator 2 to determine the hardware requirements for your deployment.The performance of GMS Virtual Appliance depends on the underlying hardware. It is highly recommended todedicate all the resources that are allocated to the Virtual Appliance, especially the hard-disk (datastore). Inenvironments with high volumes of syslogs or AppFlow (IPFIX), you will need to dedicate local datastores to theGMS Virtual Appliance.NOTE: When GMS is booting for the first time, it takes longer for the server to become available. Do NOTPower Off/On the appliance during this time as doing so will cause the boot to fail and an “Available diskspace.” error message to appear. Redo the role configuration, be patient, and the configuration should besuccessful.When using Thick or Flat provisioning as the storage type option, the entire amount of disk space is allocatedwhen you import and deploy the GMS file. When using Thin provisioning, the initial size is very small and growsdynamically as more disk space is needed by the GMS application, until the maximum size is reached. Afterbeing allocated, the size does not shrink if the application space requirements are subsequently reduced.Additional disk space provided to GMS in the virtual environment, beyond the respective limits of 250GB or950GB, is not utilized.A minimum of 4GB RAM is required. However, 16GB of RAM is highly recommended for better performance ofreporting modules.NOTE: A Windows 64-bit operating system with at least 16GB of RAM is highly recommended for betterperformance of reporting modules. For more information, read the “Capacity Planning and PerformanceTuning” appendix in the GMS 8.5 Firewall - Manage Administration Guide.Hard Drive HDD SpecificationsThe following hard drive HDD specifications are required when using GMS Software on a Windows Server or aGMS Virtual Appliance:Hardware RequirementsRequirementDetailsSpindle Speed10,000 RPM or higherCache64 MB or higherTransfer rate600 MBs or higherAverage latency4 microseconds or lowerGMS Virtual Appliance Supported PlatformsThe elements of basic VMware structure must be implemented prior to deploying SonicWall GMS. GMS runs onthe following VMware platforms: VMware ESXi 6.5, 6.0, and 5.5NOTE: For fresh installations of GMS 8.6, VMware ESXi 6.5 is required.This means that new deployments of GMS 8.6 can only be deployed on servers running VMware ESXi 6.5 orhigher. However, upgrades from GMS 8.4 to GMS 8.5 are supported on servers running earlier versions of ESXi.NOTE: GMS is not supported on MS-Windows Server virtual machines running in cloud services, such asMicrosoft Azure and Amazon Web Services EC2.SonicWall GMS 8.6 Getting Started GuideBefore You Begin5
Unsupported PlatformsThe following platforms have been dropped from support: CDP management and reporting UMA EM5000 as part of the GMS deployment Windows 32-bit as part of the GMS deployment Firewalls with firmware older than SonicOS 5.0 Gen4 or older FirewallsVirtual Appliance Deployment RequirementsConsider the following before deploying the GMS Virtual Appliance: GMS management is not supported on Apple MacOS. All modules are 64-bit. Using the Flow Server Agent role requires a minimum of: Quad Core 16GB of memory 300GB available disk spaceTo determine the hardware requirements for your deployment, use the Capacity Planning Tool ment-and-reporting/global-management-systemThe performance of GMS Virtual Appliance depends on the underlying hardware. It is highly recommended todedicate all the resources that are allocated to the Virtual Appliance, especially the hard-disk (datastore). Inenvironments with high volumes of syslogs or AppFlow (IPFIX), you will need to dedicate local datastores to theGMS Virtual Appliance.Read the “Capacity Planning and Performance Tuning” appendix in the GMS 8.5 Firewall - ManageAdministration Guide.Browser RequirementsSonicWall GMS uses advanced browser technologies such as HTML5 that are supported in most recentbrowsers. SonicWall recommends using the latest Chrome, Firefox, Internet Explorer, or Safari browsers foradministration of the SonicWall GMS.This release supports the following Web browsers: Google Chrome 42.0 and higher (recommended browser for dashboard real-time graphics display) Mozilla Firefox 37.0 and higher Microsoft Edge 41 or higher Microsoft Internet Explorer 11.0 and higher (do not use compatibility mode)NOTE: Internet Explorer version 10.0 in Metro interfaces of Windows 8 is currently not supported.Turn off Compatibility Mode when accessing the GMS management interface with InternetExplorer. For more information, see the Knowledge Base article located sw14003SonicWall GMS 8.6 Getting Started GuideBefore You Begin6
Mobile device browsers are not recommended for SonicWall GMS system administration.NOTE: If using Chrome version 42 and newer to access GMS 7.2 and older, you will need to enable NPAPIsupport in Chrome, which by default has been disabled starting with version 42.Database RequirementsPreviously, GMS automatically installed MySQL as part of the base installation package. The GMS 8.6 upgradereplaces the Infobright with MySQL database formerly used in earlier versions with Infobright with Postgres(IB-PG). The installer will ask if you want to perform the data migration to the new database. Separatelyinstalled instances of MySQL are not supported with GMS.The following SQL Server versions are supported: SQL Server 2014 SQL Server 2012NOTE: For SQL Server deployments in countries in which English is not the default language, set thedefault language to English in the Login Properties of the GMS database user in the SQL Serverconfiguration.NOTE: A database user with “DB Creator” privileges must be provided to GMS during the RoleConfiguration process of any GMS Server.Java RequirementsNOTE: Java is required only when you are using Net Monitor.Download and install the latest version of the Java 8 plug-in on any system that accesses the GMS managementinterface. This can be downloaded ork/java/javase/downloads/index.htmlNetwork RequirementsTo complete the SonicWall GMS deployment process documented in this Getting Started Guide, the followingnetwork requirements must be met: The SonicWall GMS virtual appliance must have access to the Internet The SonicWall GMS virtual appliance must have a static IP addressNOTE: Depending on the configuration of SonicWall log settings and the amount of traffic handled by eachdevice, the network traffic can vary dramatically. The 1KB/s for each device is a general recommendation.Your installation requirements might vary. Refer to the Capacity Calculator 2.SonicWall GMS 8.6 Getting Started GuideBefore You Begin7
SonicWall Appliance and Firmware SupportSonicWall GMS supports SonicWall firewall App Control policy management and reporting. Refer to the SonicOSdocumentation for information on which SonicOS firmware versions support these features.NOTE: GMS 8.6 does not support legacy SonicWall appliances, including: Firewall appliances running firmware earlier than SonicOS 5.5 CSM Series CDP SeriesSonicWall GMS 8.6 supports the following SonicWall appliances and firmware versions:Component RequirementsSonicWall PlatformsSonicWall Firmware VersionNetwork Security ApplianceNSsp 120006.5.1.8-1n or newerSuperMassive 10000 seriesSonicOS 6.0 or newerNOTE: Only partial policy management and reporting support iscurrently available. The following SuperMassive specific featuresare not supported for centralized policy management in GMS: Multi-blade Comprehensive Anti-Spam Service (CASS) High Availability/Clustering Support for Management Interface Flow Reporting Configurations Multi-blade VPN Advanced Switching Restart: SonicOS versus ChassisContact your SonicWall Sales representative ontact-sales formore information.SuperMassive 9000 seriesSonicOS 6.1 or newerNSA/NSa seriesSonicOS 5.5 or newerNSv seriesSonicOS 6.5.2 or newerTZ and TZ Wireless seriesSonicOS 5.5 or newerSonicWall SOHOSonicOS 5.9.1.3 or newer 5.9 versionsSonicWall SOHO WirelessSonicOS 6.2.6 or newer 6.x versionsSecure Mobile AccessSRA/SSL-VPN SeriesSSL-VPN 2.0 or newer (management)SSL-VPN 2.1 or newer (management and reporting)E-Class SRA SeriesE-Class SRA 9.0 or newerSMA 6200/7200SMA 10.7.2 or newerEmail Security/Anti-SpamEmail Security SeriesEmail Security 7.2 or newer (management only)Notes: Appliances running firmware newer than this GMS release can still be managed and reports can still begenerated. However, the new features in the firmware will be supported in an upcoming release of GMS.SonicWall GMS 8.6 Getting Started GuideBefore You Begin8
Non-SonicWall Appliance SupportSonicWall GMS provides monitoring support for non-SonicWall TCP/IP and SNMP-enabled devices andapplications.Record Configuration InformationBefore continuing, record the following configuration information for your reference.SMTP Server Address:The IP address or host name of your Simple Mail Transfer Protocol (SMTP)server. For example, mail.emailprovider.com.HTTPS Web Server Port:The number of your secure (SSL) Web server port if customized. The defaultport is 443.GMS Administrator Email 1:The email address of a SonicWall GMS administrator who receives emailnotifications from SonicWall GMS.GMS Administrator Email 2:The email address of an additional SonicWall GMS administrator whoreceives email notifications from SonicWall GMS. This field is optional.Sender Email Address:The email address from which the email notifications are sent by SonicWallGMS.GMS Gateway IP:The IP address of the SonicWall GMS gateway between the GMS agent andthe network. This optional field is only applicable if you have a GMS gateway.GMS Gateway Password:The password for the SonicWall GMS gateway. This optional field is onlyapplicable if you have gateway between the GMS and the network.Database Vendor:Your database vendor if you are using a SQL Server database.*Database Host/IP:The IP address of the database host. This is not required when using thebundled database on this server.*Database User:The MySQL user name for the database administrator. This is not requiredwhen using the bundled database on this server 1Database Password:The MySQL password for the database administrator. This is not requiredwhen using the bundled database on this server. 11. This information is needed if Microsoft SQL Server is used, or in the case of a distributed deployment.SonicWall GMS 8.6 Getting Started GuideBefore You Begin9
2Introduction to the ManagementInterfacesThis section describes the two SonicWall GMS management interfaces. An almost identical URL is used whenaccessing either the GMS management interface or the Universal Management Host system interface, but theURL is modified to specify either “sgms” or “appliance.”Topics: Overview of the Two Interfaces on page 10 Switching Between Management Interfaces on page 11 UMA System Interface Introduction on page 11 Management Interface Introduction on page 11Overview of the Two InterfacesThe GMS Universal Management Suite (UMS) installs two separate management interfaces: SonicWall Universal Management Appliance (UMA) System Management Interface – Used for systemmanagement of the host server, including registration and licensing, setting the admin password,selecting the deployment role, and configuring other system settings.To access the UMA system management interface on the default HTTPS port using a browser on the hostserver, use the URL:http://localhost/appliance/From another system, access the UMA system management interface with the URL:http:// IP address : port /appliance/ SonicWall GMS Management Interface – Used to access the GMS application that runs on the Windowsserver. This interface is used to configure GMS management of SonicWall appliances, including creatingpolicies, viewing reports, and monitoring networks, and for configuring GMS administrative settings.Access the GMS management interface with one of the following URLs:http://localhost/sgms/orhttp:// IP address : port /sgms/SonicWall GMS 8.6 Getting Started GuideIntroduction to the Management Interfaces10
Switching Between Management InterfacesOn systems deployed in the All In One role, the “SuperAdmin” user can easily switch between the UMA systemmanagement interface and the GMS management interface. The SuperAdmin is the master administrator forthe entire GMS installation.When logged in to either interface, the SuperAdmin can switch to the login page of the other interface byclicking Switch in the top right corner of the page. Switch is only visible for SuperAdmin users.UMA System Interface IntroductionThe SonicWall Universal Management Appliance (UMA) system interface is used for system management of theSonicWall GMS instance, including registration and licensing, setting the admin password, configuring databasesettings, selecting the deployment role, and configuring other system settings.When installing SonicWall Universal Management Suite on a host, a Web server is installed to provide thesystem management interface. The system interface is available by default athttp://localhost/appliance/ after restarting the system.The login screen allows you to securely log in to the SonicWall UMA system interface using your system user IDand password.NOTE: The admin account on the system interface can have a different password than the admin accountfor GMS.Management Interface IntroductionGMS is a Web-based application for configuring and gathering reports from thousands of SonicWall Internetsecurity appliances and non-SonicWall appliances, all from a central location. This section provides anintroduction to the main elements of the Web-based management interface.Topics: Login Screen on page 12 Dashboard on page 12 Management Interface on page 13SonicWall GMS 8.6 Getting Started GuideIntroduction to the Management Interfaces11
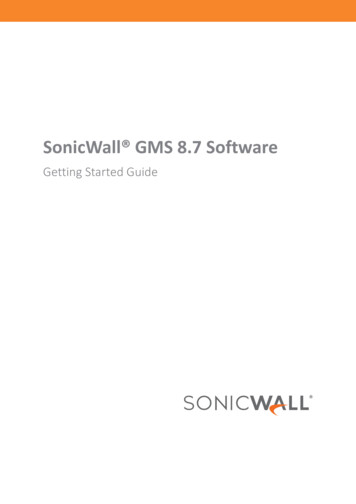
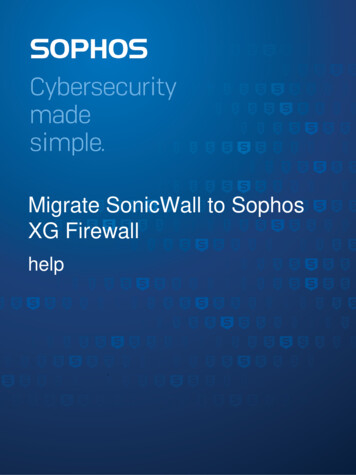
Login ScreenThe login screen allows you to securely log in to GMS using your GMS application user ID and password. TheGMS management interface is available by default at https://localhost/sgms/ after completing registration.DashboardThe DASHBOARD control bar provides top-of-the page menu items for customizing the settings of this page. Thecontrol bar is a customizable dashboard of your SonicWall GMS deployment. The Dashboard view provides: Powerful network visualization reporting, monitoring, and search filtering tools consolidated into onearea of the management user interface. An executive summary through a Universal Dashboard geographic map. The Geographic View providesa scalable map that displays your GMS-managed units and servers using graphical icons that providesystem state information with a mouse over. A centralized location to create Universal Scheduled Reports for Firewall, SMA, and Email Securityreporting solutions. Top-of-the page menu items for customizing the settings of this page.SonicWall GMS 8.6 Getting Started GuideIntroduction to the Management Interfaces12
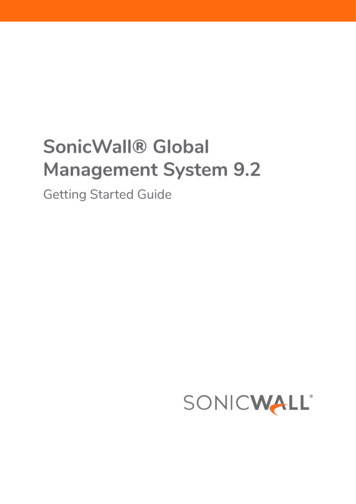
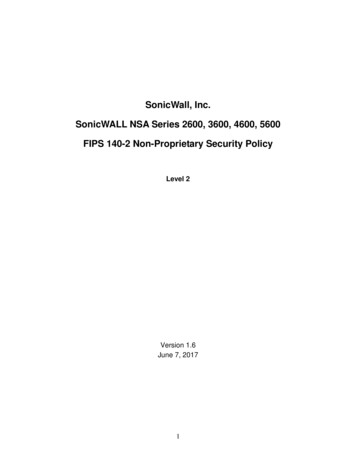
When the Dashboard loads after GMS login, the control bar is displayed and then becomes hidden until youplace your mouse cursor at the top of the page as shown in the following figure. You can lock the control bar byclicking on the “pin the control bar” icon.For more information on configuring the Universal Dashboard and Universal Scheduled Reports, refer to the“Using the Dashboard View” chapter in the SonicWall GMS 8.5 Introduction - Dashboard Administration Guide.Management InterfaceThe GMS management interface is the main control panel. The management interface allows you to add andmodify appliances, complete monitoring and reporting tasks, set policies for managed appliances, and configureGMS settings.Topics: Navigation Views on page 14 Left Pane on page 14 Center Pane on page 14 Right Pane on page 14 Description of Managed Appliance States on page 15SonicWall GMS 8.6 Getting Started GuideIntroduction to the Management Interfaces13
Navigation ViewsThe management interface navigation views are located at the top of the management interface. The navigationviews are: DASHBOARD, FIREWALL, MONITOR, CONSOLE, SMA, and, ES. The MONITOR view provides real-timemonitoring at the global, group or appliance level. The ES, and SMA views are only visible when enabled fromthe CONSOLE Management Settings screen. The CONSOLE view provides tools to customize options foundin the other GMS views and to manage GMS settings that affect the environment globally.Left PaneThe left pane of the management interface provides a tree control that displays the current GMS view and a listof managed appliances within the current view. The left pane is only displayed for the FIREWALL, SMA, ES,MONITOR, CONSOLE, appliance views. The current category and view are indicated by a blue highlighting.The left pane tree control provides the ability to switch between views and displays the current state of eachappliance under management. A single box in the tree control indicates a node at appliance or unit level. Twoboxes in the tree control indicates a node at a group level. A global node at the top of the tree control isindicated by a three-box icon. The color and additional images superimposed on these icons provide usefulstatus information. For detailed information about appliance states, refer to Description of Managed ApplianceStates on page 15.NOTE: If there is only one appliance visible in the Left Pane, then the Left Pane automatically collapses topresent a larger screen for the rest of the UI.Center PaneThe center pane displays additional configuration options in the appliance views: FIREWALL, MONITOR, ES,SMA, and CONSOLE. A navigational tree control that provides access to the configuration options availablebased on navigational view and left pane selections.At the top of the Center pane there are three panels: Manage – Provides policy configuration options for managed appliances. Reports – Provides customizable reports and data visualization for usage, activity, attacks and more onthe global or appliance level. This panel is only available for the Firewall and SMA views. Flows – Provides IPFIX-based Flow Reporting on the global, g
NOTE: For SQL Server deployments in countries in which English is not the default language, set the default language to English in the Login Properties of the GMS database user in the SQL Server configuration. NOTE: A database user with "DB Creator" privileges must be provided to GMS during the Role Configuration process of any GMS Server.