Transcription
The Bria Softphoneuser Guidethe bria softphone user guide1
contentsIntroduction3System Requirements and Devices3Login4Emergency Calling6Basics on Using Your Bria Softphone7Placing a Call10Answering a Call11Controlling Calls12Turn on/off the speakerphone12Adding video to your call15Three Way Calling16Voicemail17Contacts Tab18Favorites Tab22History Tab22Call History Tab23Service Management Tab25Group Directory Tab26Preferences27the bria softphone user guide2
introductionThe Bria Softphone from CounterPath is a powerful desktop application that, when integrated with your Comcast ManagedBusiness Class Voice services, is a feature-rich communications tool. The Bria Softphone allows a user’s computer toact as their work telephone, whether you’re in the office or traveling. The Bria Softphone is ideal as a primary phone for aremote office user or a secondary device for someone frequently on the go.Note: Some of the functions of the Bria Softphone such as instant messaging and presence information are not available.These functions will show up as options on the Bria Softphone but will not be active.System Requirements and Devicessystem requirementsProcessorMinimum: Pentium 4 2.4 GHz or equivalentOptimal: Intel Core 2 Duo or equivalent. Video card with DirectX 9.0c support.Recommended to support HD video: Intel Core 2 Duo or equivalent with minimum 3.0 GHz,or a triple- or quad-core processor; Video Card with DirectX 9.0c support.MemoryMinimum: 1 GB RAMOptimal: 2 GB RAMHard Disk SpaceOperating system50MBMicrosoft Windows XP Service Pack 2Microsoft Windows Vista, 32-bits and 64-bits archMicrosoft Windows 7ConnectionIP network connection (broadband, LAN, wireless); Constant Internet connectionSound CardFull-duplex, 16-bit or use USB headsetMultimedia Device RequirementsBria requires both speakers and a microphone to make calls. Any of the following configurations are acceptable: External speakers and microphoneBuilt-in speakers and microphoneDual-jack multimedia headsetBluetooth multimedia headsetUSB multimedia headsetUSB phoneFor a list of compatible devices please see the asp?W345Video CamerasCalls made with Bria will work without a video camera, but a video camera is necessary to allow other parties to see yourimage. Bria will work with most USB video cameras.the bria softphone user guide3
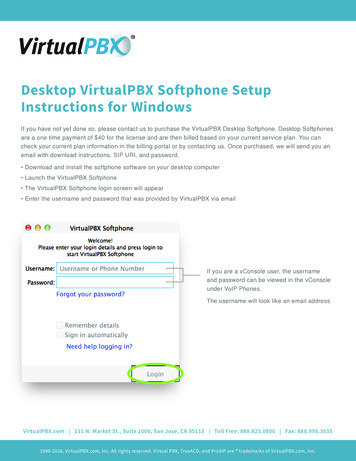
loginfirst time login1. Download the software from a Win32 3.1.2.33 61408.exe2. Install the downloaded software by double clicking on the icon3. Click on “Next” on the install wizard on the install wizard4. Read and check your acceptance of the terms of the end user license agreement, then click “Next”5. On the Destination Folder, accept the Destination folder provided:a. Select “Create a shortcut for this program on the desktop” if you’d like an icon on desktop to launch the programb. Select “Launch this program when Windows starts” to have this program run every time you log into Windowsc. Select “Create a shortcut in Quick Launch” if you want this available in the “Start” menuthe bria softphone user guide4
6. Select “Next” to continue installation when you have completed your selections7. Click “Install” to begin the installation process8. Click the “Finish” button to complete installationNOTE: The User name above is just an example, please log in with your portal/toolbar user name.9. In the username field enter your username (the same as for the portal and/or toolbar for your service)10. In the Password field enter the password11. To have your computer remember your username and password select “Remember login information”12. To have your computer automatically login and launch the application, check “Log In Automatically”the bria softphone user guide5
emergency callingThe Bria Softphone uses the emergency location of your address provided for emergency 911 calls.The Bria Softphone uses Voice-over-Inter Protocol (VoIP) Service. Emergency calling services/911 may be limited orunavailable from this device under certain circumstances including but not limited to the following: When there is an electrical power outage, an internet/broadband service outage and/or degradation ofinternet connectivity. When the phone device is not configured properly . When the phone device is located at a different address than the registered order address or mobile updateaddress you provided. To update your address, click on the “Click here for 911 Notice” banner for instructionson how to update your registered location. The number to update your registered location is 1-866-207-5515. Prior to changing your address or moving your service, or if you have any 911-related questions, refer to youruser guide for instructions contacting the support center. Updating your address can take up to several businessdays to update your new service address in the E911 system. When due to technical factors, network design, or network congestion, calls experience busy signals or unexpectedanswering wait times and/or take longer to answer than 911 calls placed via traditional telephone networks. If your internet service is suspended.Please note that when you call 911 from this device, you may have to instruct the Emergency Operator of your location.911 calls will route to the PSAP associated to last successful address update.To update your address, click on the “Click here for 911 Notice” banner for instructions on how to update your registeredlocation. The number to update your registered location is 1-866-207-5515.the bria softphone user guide6
Basics on Using Your Bria SoftphoneBria Softphone MenuCall PanelAdditional Panel Selectionsthe bria softphone user guide7
The Bria Softphone MenuSoftphone Preferences: These settings define the options for the Bria Softphone and how it works. Log Out: To log off and minimize the Bria Softphone to the system tray. Exit: To shut down the Bria SoftphoneViewChange how the Bria Softphone looks. Select the panel selections you want available, increase or decrease the size of thetext with zoom options. View your instant message archives.contactsProvides options for your address book to add groups of people to make them easy to find, Import contacts, add contactsto your contacts panel.helpProvides access to troubleshooting and service related features.the bria softphone user guide8
modifying the look of your softphoneMinimize to the task baror system trayChange Panel ViewDetach PanelMinimize or Display in Desk BarMinimize the application in the Taskbar by pressing the button with the button with the line, or press the button with the “X”to place it in the system tray. You can still answer calls when the Bria Softphone is in the task bar or system tray.If you exit the Bria Softphone while it is minimized or in the Deskbar mode, when you restart Bria Softphone it will startminimized or in Deskbar mode just as you exited.change panel viewNavigate between your panels such as your personal contacts, favorite contacts and your company directory (BWContacts)detach panelThis allows you to make a separate window out of any panel you want to move on the screen.the bria softphone user guide9
placing a callYou can use the Bria Softphone to place calls; there are many ways to place calls using the Bria Softphone.MethodDial a NumberWhereCall Panel Dial padinstructions1. If the Dial pad isn’t visible, press “Show or Hide Dial pad”button to view dial pad2. Use the Dial pad to enter in the extension or the ten digitnumber and press the call buttonCall Panel3. Type in a number using your keyboard and press ‘enter’4. To make a video call select the call options in the call buttonAddress Book Contacts,History and FavoritesDrag and entry from the address book tab into the call panel andthe call shall be placed immediatelyDouble Clicka ContactAddres Book Contacts1. Double-click on the name to immediately place a call inthese tabs2. Alternately, right click and select video or audio call fromthe menuClick a NumberCall History, Group DirectoryClick the underlined number to immediately place a callKey in NumberDrag and DropContactPlace a Concurrent CallIf you want to place a concurrent call while you have an active call, just dial another number and the first call will be put onhold and the new call will dial out.Note: Place a Remote Office CallA remote office call cannot be placed using the Softphone dialer. To place a remote office call you must use the toolbar.Ending a CallPress the red End Call button on the call panel.the bria softphone user guide10
answering a callThe Bria Softphone must be running to answer incoming calls. When the Softphone rings a box alerting you of an incomingcall, with this box you can accept to answer or decline the call. Declining the call will treat the call like an unanswered call(for example it will send you call into voicemail if you have a voice mailbox).auto answerIf you select Auto Answer from the More Call Options Menu then the Bria Softphone will automatically answer and connectyou to any incoming calls. An icon will appear on your Softphone under the More Call Options menu that looks like this:More Call Options MenuThe auto answer feature is automatically turned off when you shut down or log off, you’ll need to manually turn it back oneach time you log back in.the bria softphone user guide11
controlling callsThe following are options that are available during a call in progress. Raise or lower volumeMute the callTurn on/off speakerphoneHold CallAdd the other party as a contactTransfer the callAdd video to callraise or lower volumeClick on the volume icon on the active call and either drag the volume up or down or use the arrows on your keyboard.mute the callClick on the microphone icon to mute your voice on the call.Turn on/off the speakerphoneIf your computer is equipped with a speaker phone, click the speaker icon to turn on or off.the bria softphone user guide12
hold callTo hold call click the “Hold” button, the call information will then be minimized within the Softphone, to unhold the call click“Resume.”add party as contactClick the yellow plus sign next to the active calling party’s name to add them to your contact list. A dialog box will appearto allow you to add additional information.transfer callClick on the call transfer button to transfer a call.Clicking on this icon will put the caller on hold and change the window to allow you to enter in the party to transfer.There is a box to enter in a phone number or drag a contact into the box (note: click to dial in your group directory will notwork as a transfer address, you’ll need to enter in the number in the transfer box).the bria softphone user guide13
consultative transferClick the “Call First button” when the call is connected and you will be able to tell the person who you are transferring towho the party is you are transferring. When you are ready to transfer the call then hit the “Transfer Now” button and the twoparties will be speaking. Note: your calling line ID will be delivered to the party you are transferring to. Press Cancel to stopthe transfer and then you can reconnect with the original party.blind transferA blind transfer will allow you to transfer the call to the other party without speaking to that party first. The calling line IDinformation will show up as the transferred party when you use this capability.Click the transfer button as described above and populate the number you are transferring to.Click the arrow next to the green box that is populated as call first and select Transfer Now, which will automatically sendthe call and end your call with the transferred party.the bria softphone user guide14
Adding video to your callEither you or the other party can add video to your active call at any time during the call. To add video click the “StartSending Your Video”. This will send the video to the other party (if they have video capability).A video panel will open and show the video being sent in the corner and if the other party is sending video they will be inthe larger image. The video panel is separate from the Softphone panel.Pausing and Resuming VideoTo pause or resume video, click the camera icon to stop sending your video.the bria softphone user guide15
three way callingTo add another caller onto an existing call for a three-way call, in the bottom right corner click the arrow and select “Inviteto Conference Call”.A dial box will show up where you can either drag a contact to the box or type in the number.When your three-party call is established your Bria Softphone will show Conference Call 3 Participants and list thosewhom are on the call in the active call window.the bria softphone user guide16
Merging Two Active CallsIf you have two active calls (with one on hold) use the call options in the lower right hand corner and select merge calls,and it will allow you to merge the two active parties into a three way call.Splitting a Three-Way CallClick the arrow next to any participant and it will allow you to split the call or end the call with both parties. Upon splitting,one party will be active and the other will be on hold.voicemailIf your service includes voicemail, then when you have voicemail messages, an envelope icon will appear near the topof your Softphone and will indicate the number of voice messages you have. Click the icon to automatically connect tovoicemail to listen to your messages. Note: to enter in your passcode for the voicemail system you must click in the callstatus window prior to entering in your passcode.the bria softphone user guide17
Shared Call AppearanceIn some instances the Softphone may be implemented as a Shared Call Appearance (SCA) to another phone. In the caseof Shared Call Appearance you may only be able to use one phone simultaneously; therefore the other phone shall not beable to place or receive calls (i.e., get dial-tone) while the SCA phone is on a call. If you need to transfer a call from an SCAphone to the other line then you can put the call on hold and then un-hold from the other phone.Contacts TabThe contacts tab displays your personal contacts and lets you specify multiple contact methods including Softphone,work, home, and mobile phone numbers for calling. You can also specify an email address which will open your defaultemail program (if available) and a website address that will take you to their website.Contacts are organized into groups. Default groups include family, friends and work. You may also add your own groups byclicking Contacts New Group on the Bria Softphone Menu.You can assign a contact with a primary contact method (e.g., home phone) that will be dialed by dragging that contactinto the call bar.the bria softphone user guide18
adding contactsYou may add a contact in the following ways:MethodWhereinstructionsAdding while onan active callActive Call Window1. When on an active call, click the “ ” sign next to theusers name.2. The Contact Profile dialog box will appear and you can fillout additional contact methods and assign primary contactmethod and group for that contact.Adding from History TabHistory TabRight click on call in the history tab and select “Add Contact”Import ContactsBria Softphone Menu1. Select Contacts Import Contacts2. Options include Comma-Separated Values, vCards (vcf file)or Outlook or Exchange server.Add fromGroup DirectoryGroup Directory TabClick on the add contact icon in the group directory tab for theContact Profile dialog box.Add fromContacts TabContacts TabClick the “Add a New Contact Icon” in the contacts tab for theContact Profile dialog box.the bria softphone user guide19
Contact Profile Dialog BoxThe contact profile dialog box allows you to put in the contact information, group and primary method for your contacts.fielddescriptionDisplay AsThis is a required field and is the name that will appear in the call display and calleralert when you receive a call from this contact.First Name/Last NameOptional fields for the contact’s first and last nameGroupClick to show the list of groups and check the groups to add this contact toContact MethodsAt least one contact method must be populatedNOTE: The “See this person’s Softphone online presence” feature is disabledDouble-Click ActionChoose the desired method to call if you double click this contact in the contact tabthe bria softphone user guide20
Modifying ContactsRight click on the contact and select Edit Profile from the menu.Moving a Contact to a different GroupSelect Contact and drag the contact to a different group.Deleting ContactsRight click on the contact and select delete from the menu.Dialing ContactsThe following methods can be used to call the contact in the contacts tab: Double click the contact to start a phone call Drag the contact to the call display to start a phone call Right click the contact and select “Start a Call” or “Start a Video Call”Find a ContactTo search by name, use the type a name or number in the search field pictured below:the bria softphone user guide21
favorites TabThe favorites tab allows for a subset of the contacts for easy access to dial. To add someone as a favorite the followingoptions are available: Right click on the contact in the contacts tab and select “add to favorites” Select “Actions” from the Bria Softphone Menu and select “Add to Favorites” while the contact is highlightedRemove from FavoritesTo remove from favorites right click the contact in the favorites tab and select “remove from favorites.”History TabThis tab is the list of calls your Softphone has made, received or missed while the Softphone is active (it will not identifycalls made from another phone (if applicable) or missed calls while the Bria Softphone was inactive.the bria softphone user guide22
You may filter with the following settings in the Filter Options menu box next to the search field. You may select from thefollowing:fielddescriptionAllShow all callsMissedShow incoming missed callsReceivedShow incoming received callsDialedShow outbound dialed callsHistory Panel IconsCalls in the history log have the following icons:Missed Calls:Received Calls:Dialed Calls:Call History TabThe call history tab is a more detailed account of the all the calls for your service and includes calls missed when yourSoftphone was not on as well as any remote office, call forwards or Anywhere calls.the bria softphone user guide23
Updating the List of CallsTo update the list of calls press the F5 button on your keyboard to refresh.Filter IconsThe following is a list of icons in the Call History list.icon typedescriptionMissed Call FilterPress this icon to view all missed callsReceived Call FilterPress this icon to view all received callsPlaced Call FilterPress this icon to view all placed callsAll CallsPress this icon to view all callsCall Type IconsIcons similar to the filter icons are in grey next to the called or calling number to identify call types.icon typedescriptionReceived CallsPlaced CallsMissed or Blocked CallPlacing CallsClick on the underlined number to place a call to any item in the call history panel.the bria softphone user guide24
Service Management TabThe service management tab allows for the setting of common call handling functions from the Softphone. Services thatcan be changed from the service management tab include: Be AnywhereCall Forward AlwaysCall Forward BusyCall Forward No AnswerDo Not DisturbRemote OfficeSimultaneous RingNote: These features must be assigned to you to set or change. Please see the service guide for details on how thesefeatures work.the bria softphone user guide25
Group Directory TabThe Group Directory Tab provides you with your company directory to easily dial persons you work with. You can also addgroup directory contacts to your contacts to store alternate numbers and find quickly.Use the search field by typing in the first letters of the last name to quickly find a contactClick on a blue underlined number to dial someone from the directory Press on the add contact iconsomeone from the group directory to your contacts.the bria softphone user guideto add26
PreferencesTo modify your preferences of the Bria Softphone choose Softphone Preferences.Preferences – ApplicationThis panel lets you set your preferences for general application behavior.the bria softphone user guide27
Preferences – Alerts and SoundsThe Alerts & Sounds folder lets you control the call alerts.For a visual alert for an incoming call check Enable Alert Displays. The alert display will allow you to answer using yourBria Softphone.the bria softphone user guide28
The sounds tab allows you to identify when you receive audio notifications.the bria softphone user guide29
Preferences – DevicesThe Devices area allows you to change and modify settings for the headset, speakerphone and cameras.the bria softphone user guide30
Preferences – Shortcut KeysThe Shortcut Keys area allows you to set and customize keyboard commands for basic call answering and in callfunctions.the bria softphone user guide31
Preferences – networkThe Network Preferences allow for the toggling of the bit-rate for the applications based on bandwidth. The default settingis Fast Cable, DSL or ADSL.the bria softphone user guide32
Preferences – Media QualityThe Media Quality preferences allow you to modify the settings on your audio and video.the bria softphone user guide33
selectiondescriptionAudio QualityReduce echo from speakersTurning on this feature improves sound quality. The default is on.Reduce background noiseAutomatically removes background noise, typically used with speaker phones.Automatic gain controlThis feature is typically on.Preserve bandwidth duringsilent periodsThis is typically off, but if you’re on a low bandwidth connection, like ISDN, youmay want to turn it on.Volume controlChoose your preference of volume control.Video QualityEnable this optionClick this if your video is upside down.Limit available resolutionsIf this is enabled the Bria Softphone will determine the video resolution basedon your monitor settings.Resolution optionsRecommended to set at standard resolution as default. Adjust to preferencedue to computer and netowrk conditions.Preferences – DirectoryThe default is none. See your system administrator for network directory options.Preferences – Call AutomationSettings for auto-answering are be set in this section. Comcast 2011 Comcast Business Services. All Rights Reserved.the bria softphone user guideMBCV Bria Softphone User Guide 10.1134
The Bria Softphone from CounterPath is a powerful desktop application that, when integrated with your Comcast Managed Business Class Voice services, is a feature-rich communications tool. . In the username field enter your username (the same as for the portal and/or toolbar for your service) 10. In the Password field enter the password