Transcription
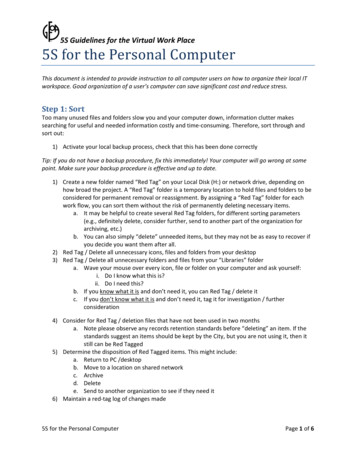
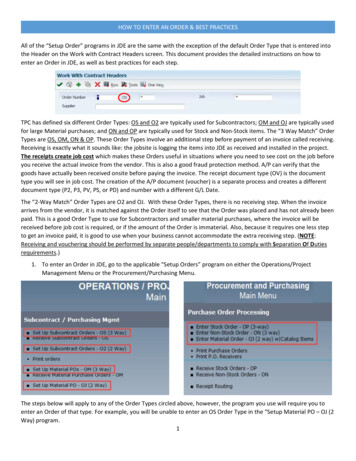
HOW TO ENTER AN ORDER & BEST PRACTICESAll of the “Setup Order” programs in JDE are the same with the exception of the default Order Type that is entered intothe Header on the Work with Contract Headers screen. This document provides the detailed instructions on how toenter an Order in JDE, as well as best practices for each step.TPC has defined six different Order Types: OS and O2 are typically used for Subcontractors; OM and OJ are typically usedfor large Material purchases; and ON and OP are typically used for Stock and Non-Stock items. The “3 Way Match” OrderTypes are OS, OM, ON & OP. These Order Types involve an additional step before payment of an invoice called receiving.Receiving is exactly what it sounds like: the jobsite is logging the items into JDE as received and installed in the project.The receipts create job cost which makes these Orders useful in situations where you need to see cost on the job beforeyou receive the actual invoice from the vendor. This is also a good fraud protection method. A/P can verify that thegoods have actually been received onsite before paying the invoice. The receipt document type (OV) is the documenttype you will see in job cost. The creation of the A/P document (voucher) is a separate process and creates a differentdocument type (P2, P3, PV, PS, or PD) and number with a different G/L Date.The “2-Way Match” Order Types are O2 and OJ. With these Order Types, there is no receiving step. When the invoicearrives from the vendor, it is matched against the Order itself to see that the Order was placed and has not already beenpaid. This is a good Order Type to use for Subcontractors and smaller material purchases, where the invoice will bereceived before job cost is required, or if the amount of the Order is immaterial. Also, because it requires one less stepto get an invoice paid, it is good to use when your business cannot accommodate the extra receiving step. (NOTE:Receiving and vouchering should be performed by separate people/departments to comply with Separation Of Dutiesrequirements.)1. To enter an Order in JDE, go to the applicable “Setup Orders” program on either the Operations/ProjectManagement Menu or the Procurement/Purchasing Menu.The steps below will apply to any of the Order Types circled above, however, the program you use will require you toenter an Order of that type. For example, you will be unable to enter an OS Order Type in the “Setup Material PO – OJ (2Way) program.1
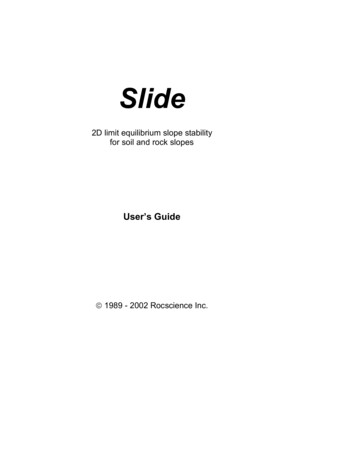
HOW TO ENTER AN ORDER & BEST PRACTICES2. On the “Work with Contract Headers” screen, click the Green Add button (“ ”) at the top of the screen.3. This is the Order Header. The fields circled in the screen shot below are the fields that are typically entered onthe Order Header. The only fields that are required are the Supplier Number, Job Number and Ship To Address.You will not be able to save the Order Header without entering these fields. If the Supplier Number field is notentered first, you will see a Red Error on that field. This error should go away when you enter the SupplierNumber. The system will validate the Supplier Number entered against the Supplier Master. Ensure you areusing a valid Supplier and not a Customer or an inactive Vendor. Do not enter an Order Number. It will beautomatically assigned by the system. Below the screen shot are the descriptions of each of the circled fields.2
HOW TO ENTER AN ORDER & BEST PRACTICESJob – The Project Number should be entered in the Job field. This is not the Job Number where the Order will be coded,but only which Job it will be grouped with. (Order coding is entered in the Order Detail Lines – See #5 below). All Orderinquiry programs (i.e. Setup Orders shown below or View Open Purchase Orders or Commitment Inquiry, not shown)contain a Branch/Project/Job search field in the Header that will look for the Job in the Order Header. Entering theProject Number in the Order Header allows users to inquire, voucher and report at the Project Level and return thecommitments on the sub job level.Supplier – This is the Address Book number for the Vendor to whom the Order is being sent. This will also be the Payeeon the eventual voucher against the Order, so it should be the Address Book number that contains the correct Remit Toaddress in it. The Remit To address is where the check should be sent. If an Address Book number with an incorrectRemit To address is used, A/P can change the Payee on the voucher as long as it is the same vendor with only adifferent Remit To address. The Supplier field cannot be changed once an Order is saved. If you make a mistake andsave the Order, you will need to cancel the Order and re-enter it. A Payee can only be changed by A/P in instanceswhere the Supplier is correct, but the Remit To address is incorrect or for joint checks.Ship To – This is the Address Book number that corresponds to where the goods are being shipped/installed. If theOrder is taxable, the Vendor will add tax based on where the goods are shipped. Early in conversion to JDE, this wouldoften correspond to the first 6 digits of the Job Number. This was because the Site Addresses were new records thatwere setup first, with the Job Number being setup immediately after. Now, because TPC does work for many repeatclients on the same jobsites, an older Address Book entry that matches the Site Address may be used when setting upthe Job Number instead. It is important on taxable Orders that the correct Ship To Address Book Number is used. If thecorrect number does not exist, complete a Vendor Maintenance Form (VMF) and have the correct number setup byJDESETUP.Dates – Order Date is the date the Order is placed and will default as the date it is entered in the system. This dateappears on the printed Purchase Order if applicable. Requested Date and Promised Date can be entered and used totrack actual delivery dates (via receipts on 3 Way Orders) versus projected or promised delivery dates. These dates willbe stored in the system, but do not print on the Purchase Order.Pmt. (Payment) Remark – This 22 character field is free-form and can be used to print something on the checks, sent tothe Vendor, that are received/vouchered through the Order. The field will accept 30 characters, but only 22 will print onthe check. If this field is not completed prior to saving the Order, there is a program on the Operations ProjectManagement Menu, in the Order Maintenance & Inquiries section, to revise it called “Update Order Header”. Vouchersentered after the update is made will reflect the change. Existing vouchers will need to be updated by A/P or CorporateFinance via the Speed Status Change program on the Accounts Payable Menu.Tax Code and Area – If applicable to the entire Order, the tax information can be entered on the Header so it willautomatically be applied to the detail lines. If different lines in the Order may be taxed differently, you can enter the taxon each line individually. To enter tax, first enter the type in the “Tax Expl Code” field (i.e. Sales Tax S, Use Tax U, seebelow for an explanation of each), then click the Visual Assist in the Tax Rate/Area field. This will automatically pull upthe tax code for the Zip Code on the Address Book record in the Ship To field. If tax is added on the Header, the OrderDetail Line(s) must be updated with a “Y” in the Tax Y/N field prior to receiving or vouchering. If the Tax Y/N field is N,3
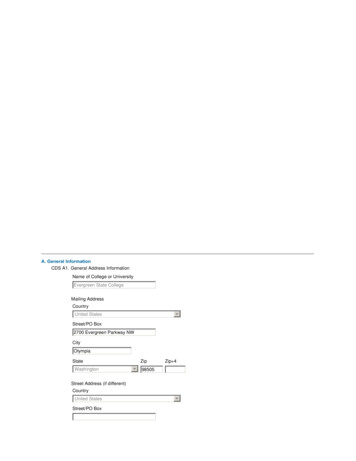
HOW TO ENTER AN ORDER & BEST PRACTICESthe voucher system will not calculate tax even if there is a Tax Code and Area populated. Never use a Tax Y/N of “N”and a Tax Explanation Code of S or U.When you click on the Visual Assist on the Tax Rate/Area field, the Geocoder program should launch and the “RetrieveGeocode” screen shown above should appear. If it does not and instead the “Tax Rate/Area Search” screen appears, thismeans there is an error with the Address Book entry entered in the Ship To field. Oftentimes the error has to do with theZip Code of the jobsite address. Ensure that the Address Book entry contains the 4 digit extension to the Zip Code (i.e.12345-XXXX). If your job has a special tax rate, click the Red “X” on the “Retrieve Geocode” screen, and select yourspecial tax rate from the “Tax Rate/Area Search” screen. If your job requires a special tax rate that is not already setup,contact the I/S Helpdesk for assistance.Sales/Use Tax ExplanationSales tax is a transaction tax, calculated as a percentage of the purchase price, and levied by the State, based on the areawhere the goods will be used. Sales tax is usually collected by the Seller, and remitted to the State. The tax can vary bystate and even by project, but it is normally applied to tangible personal property. When purchasing goods from out ofstate, sometimes the out of state vendor is not authorized to collect sales tax. If, in this instance, the goods should havesales tax applied, the Buyer is responsible for paying the tax to the State. This is called Use Tax. When entering an Order,it is important to know whether the goods being ordered are subject to Sales Tax or Use Tax. If Sales Tax is applicable,use a Tax Expl Code of “S”, and if Use Tax is applicable, use a Tax Expl Code of “U”. Contact your Business Unit Controllerfor questions about which tax should be applied to your Order.Retainage – The retainage field determines the default retention to be held on an Order during the vouchering process.If there is to be retention held on an Order, enter the retention percentage as a whole number (10% “10” in this field).There is no validation of this field so you can hold any percentage of retention on an Order. If the retention needs to bechanged at any time after the Order is saved, there is a program on the Operations Project Management Menu, in theOrder Maintenance & Inquiries section, that can be used to revise it called “Update Order Header”. Otherwise, changesin retention held will need to be made on each voucher.Order Taken By – The “Ordered By” field defaults to the person entering the Order. This also prints on the PurchaseOrder as the “Originator Name”. If it is necessary to have a record of who actually placed the Order, it can be entered onthis field. The field accepts the Username (first letter of First Name and full Last Name) of the applicable person. Thisname will be stored in the system, but does not print on the Purchase Order.Payment Terms – Terms will default in from the Supplier record. The terms are used to calculate the Due Date assignedto the voucher. These Due Dates may not actually impact when a voucher gets paid. If a different set of Payment Termsis required for this Order on this job, enter it in this field. There are a standard set of Payment Terms that this fieldvalidates against. Use the Visual Assist to see what Payment Terms can be used. Contact the I/S Helpdesk to get newterms added. The terms on the Order Header overwrite the terms that default in from the supplier, however, what is inthe Header only applies to the lines entered on the Order after the Payment Terms are changed on the Header.4
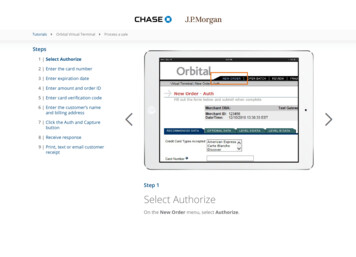
HOW TO ENTER AN ORDER & BEST PRACTICESAdding Text (i.e. Delivery Instructions) to a Purchase OrderThe Form Exit in the Contract Header can be used to add additional text to a Purchase Order. Go to Form – Attachmentswhile in the Order Header, click Text and enter the desired information. This information will print at the bottom of thePurchase Order as shown below. Additional Text can be added to each line of the Order by using the Attachment fieldsto the far left of each line in the Order Detail.4. When all fields are entered as needed, click the Save button to move on to the Order Details. Review yourentries carefully because some fields cannot be changed after saving the Order Header. If you make a mistakeand want to start over again, clicking the Red “X” will exit back to the Work With Contract Headers screenwithout saving any information.5. This is the Order Detail. This screen is where the line item or lump sum details of the Order are entered includingUnits, Unit Costs, Order Amounts and Cost Codes/Accounts. The screen shot below shows a standardizedcustom grid called “TPC” that has been published to all users. This grid contains the required and mostimportant fields to enter in the Order Detail. Other fields can be accessed by selecting “Show All Columns” in thedrop down box where “TPC” appears at the top right of the grid. Below is a description of each field of the OrderDetail contained in the custom grid. The additional fields are not be explained in this document.5
HOW TO ENTER AN ORDER & BEST PRACTICESOrder Details should not be changed after they are saved. It is not the proper process to change saved items. Insteadthe line should be cancelled and re-entered. Changing previously saved detail lines will lead to incorrect commitmenttracking and EAC calculations. These errors can only be corrected by the I/S Helpdesk. See the document titled “Howto Cancel an Order or an Order Line” for details.Change Order – Original Order line items should be labeled “000”. This will group base work or change orders togetheras the total Original Order in applicable Order reporting. Change Orders should be labeled as “001”, “002” and so onsequentially to differentiate them from the Original Order. The Original Order can be as many lines as needed. As long asall are labeled with the same Change Order, they will group together in Order reporting (the Subcontract StatusSummary Report or Financial Status Inquiry, for example). The same is true for multiple line item Change Orders.Entering the same Change Order will group them together in Order reporting.Item Number – This field is only relevant to Stock and Non-Stock Orders (OP & ON). The Item Number refers to the ItemNumber in the Item Price Catalog. If you are not entering an Order Type OP or ON or using the Item Price Catalog, thisfield can be left blank or populated with whatever you would like.Quantity Ordered, Tr. UoM (Unit of Measure), Unit Cost – Enter the Quantity ordered, Unit of Measure and Unit Cost. Ifyou enter a Quantity, UoM and Unit Cost, do not enter an Extended Cost. The system will calculate it for you. If you areentering a Lump Sum order (UoM LS) DO NOT enter a quantity. If you are entering a quantity of 1 EACH, you shouldbe using Lump Sum. Quantities entered on an Order change the way the system accounts for that Order. A quantity of“1” that is subsequently received or vouchered in full will close the line item regardless of how much cost wasreceived/vouchered. The system will look at quantities before cost and will consider the line closed because there is nomore quantity to be received/vouchered. Units of Measure are validated against a set of pre-determined values. Use theVisual Assist to see these values that can be used. Contact the I/S Helpdesk to get new Units of Measure added.Extended Cost - If you are not using quantities and unit cost, enter the Lump Sum (LS) amount for the line. If you areusing quantities and unit cost, leave this field blank and the system will calculate it.Ln Ty (Line Type) – The available Line Types are included in a Visual Assist within this field. The most often used LineTypes are: J – Job Cost, validates against an Account Number, B – Bulk, validates against in Inventory Item Number andan Account Number, S – Stock, validates against Inventory, F – adds the entered amount as Freight on the PurchaseOrder print and T –the entered Text appears on the printed Purchase Order only and is not reflected as a commitment.The most often used Line Type is J and this is the type that should be used on Job Cost Orders.Description 1 and 2 – These two 30 character fields are free-form and can be used as seen fit. Generally, these fieldscontain a description of the item being ordered. They are not required to be completed. Description 1 appears on aprinted Purchase Order, Description 2 does not.Account Number – This field is required to be entered as Job Number.Object Account.Subsidiary(XXXXXXXX.XXXX.XXXXXXXX). There is a Visual Assist that can be used to search the Accounts on a given job. Leaving thisfield prior to completing the code can create a Red Error that requires using the Visual Assist to fix. It is possible tocustomize the grid to have these 3 items (BU.OBJ.SUB) broken out into 3 separate fields. With Line Types that require anAccount Number, this is a required field.Sub (ledger) Type & Subledger (Number) – If the Order, receipts and/or vouchers need to be tied to a Work Order orother type of Subledger enter the Subledger Type and Number. This is not a required field.Line Number – This field will be populated automatically by JDE. They will incrementally count the Lines starting with 1.0and increasing in increments of 1.6
HOW TO ENTER AN ORDER & BEST PRACTICESTax Y/N, Expl Code, Tax Rate/Area – See the explanation of the Tax fields above in the Order Header. These are thesame fields and operate the same way. These fields on the Order Detail lines allow for different taxes to be applied todifferent lines if applicable. Ensure that the proper Tax Rate/Area code is used based on where the items are shipped.The Tax Y/N field must have a “Y” in it for the voucher to populate the tax. In addition to the Tax Y/N field of Y, theTax Expl code should be an S or a U, and the Tax Area needs to be populated.Asset ID – This field will be populated automatically when a Work Order Subledger is used. The field is populated withthe Unit Number that is populated on the applicable field in the Work Order. It is not a required field.6. When all required Order Detail lines are entered, click the Save button to save the Order.7. Clicking Save on the Order Detail page will bring you back to the Order Header screen with an additional fielddisplaying the Order Number of the Order you just saved (“Previous Contract”). At this point, you can enteranother Order, or click the Red “X” to leave the Order Entry program.8. To print an Order after entering it, go to the “Print Orders” program on the Operations/Project ManagementMenu or the “Print Purchase Orders” program on the Purchasing & Procurement Menu. Choose the version thatapplies to the Doc Type and scenario you want to print (i.e. Original Order, Change Orders, Open Lines, etc.),enter the Order Number(s) in the Data Selections and click the Green Checkmark.7
HOW TO ENTER AN ORDER & BEST PRACTICESImportant Notes & Best Practices Choose the Order Type that is best applicable to the Order you are entering and your Business Unit process. 3Way Orders are good for large material orders that will require recognition of Job Cost prior to receiving aninvoice. This is increasingly important at the end of accounting periods when Job Cost should as closely matchthe amount of work complete as possible. (This will allow for revenue to be recognized up to this percentcomplete of the overall project). However, Separation of Duties (SOD) requirements dictate that Order Entry,Receiving and Vouchering be completed by different people or departments. If your Business Unit process doesnot allow for Receiving to be performed by a different person or department, then perhaps a 2 Way Ordershould be used. (If you use a 2 Way Order, be sure to accrue large parts of the Order to mimic what would bereceived on a 3 Way Order).Once an Order is setup as a 3 Way Match, it must always be received and vouchered using the “Receipts toMatch” program and not the “Orders to Match” vouchering program. Orders need to be cancelled and reentered with the correct Order Type before the receipt/voucher process used with them is changed.Once the Order is saved, only 3 fields in the Header can be changed: Retention Percentage, Payment Terms andPayment Remarks. These can be changed via the Update Order Header program on the Operations/ProjectManagement Menu. See separate instructions for how to use this program. If an Order is saved in error, itshould be cancelled and re-entered correctly. See the instructions on Cancelling an Order or Order Detail Linefor instructions on cancelling an Order. Do not change Order Detail lines once they are saved. Cancel the lineand re-enter it correctly.Enter the Order the way that the eventual invoice will be received by A/P and entered into the system. The A/Pprocess when entering vouchers associated with Orders should be very quick and require minimal changes tothe details that pull in from the Order or Receipts. Ensure that the proper type of tax is entered on the Order,Sales or Use Tax, and ensure the proper Tax Area is used. The system contains 10 or 10 unit Thresholds onreceipts and vouchers that prevent them from being changed if the Order does not match the invoice. Thesedifferences will require the invoice to be returned, delaying payment and causing more work for everyoneinvolved.Do not enter Orders in the system “for show”. Orders entered in the system with Line Types other than “T”(Text) will create a commitment in the system that needs to be relieved prior to the associated Job or Projectbeing closed. It can also re-calculate EAC Values. Lines with quantities but no dollars, or text lines that use a “J”Line Type (for example), should not be entered just to have the Purchase Order look a certain way when itprints. Use the Order Header Attachment, Order Detail Attachment, or Text Lines to add things like shippinginstructions or contact information to an Order. When an Order is complete, ALL LINES need to bereceived/vouchered in full or cancelled before the Order is closed.Lump Sum Order lines DO NOT have quantities. When you enter a quantity, the system will evaluate the entireOrder based on those quantities. When a Lump Sum quantity of 1 is received, the line will close regardless ofhow much money is left. If you will be receiving part of an Order of 1 EA (for example), use a Lump Sum valueinstead and not a quantity.8
HOW TO ENTER AN ORDER & BEST PRACTICES All of the "Setup Order" programs in JDE are the same with the exception of the default Order Type that is entered into the Header on the Work with Contract Headers screen. This document provides the detailed instructions on how to enter an Order in JDE, as well as best practices for each step.