Transcription
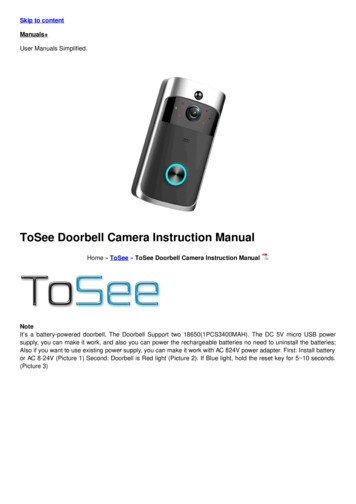
2K QHD Video DoorbellQuick Start GuideB451AJ SeriesENB451AJ QSG EN R1.indd 1lorex.com2020-11-03 11:42:25 AM
Welcome!Thanks for your purchase of the2K Video Doorbell. Here’s how toget started.B451AJ QSG EN R1.indd 22020-11-03 11:42:25 AM
ContentsSection123456789101112B451AJ QSG EN R1.indd 3Package contentsOverviewStatus indicatorConnect to the appPreparationWiring the chimeSecure the mounting bracket(s)Wiring the doorbellConnect the doorbellLorex Home app overviewTroubleshootingFrequently asked questions2020-11-03 11:42:25 AM
1 Package contentsVideo doorbellMountingbracketHorizontalbracket 15 Verticalbracket 5 USB cableAnchors (x2)Screws (x2)Wire caps (x3)PinmicroSD card(pre-inserted)*Chime KitWire harnessBackup cableExtra wires (x2)15/64” Drill bitUser-supplied ToolsDrillScrewdriver* See product packaging for configuration details.B451AJ QSG EN R1.indd 42020-11-03 11:42:34 AM
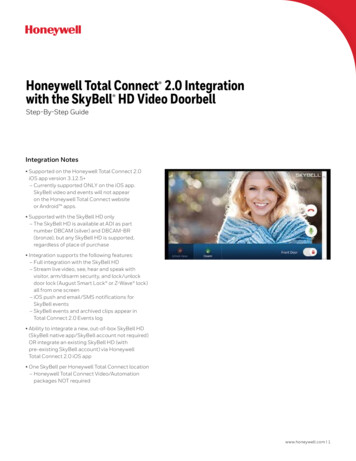
2 OverviewFront PanelCameraBack PanelMicro-USB portMicrophoneReset holemicroSD card slotStatus indicatorPower portsCall buttonWarning / night lightSpeakerBottom ViewB451AJ QSG EN R1.indd 52020-11-03 11:42:37 AM
3 Status indicatorSolid blueThe video doorbellis powering on orthe video doorbellis restarting.Flashing blueslowlyThe video doorbellis ready to connect.Flashing blue, red,and greenA firmware updateis in progress.Solid redThe video doorbellis resetting tofactory default.Flashing bluerapidlyThe video doorbellhas detectedmotion.Spinning redThe video doorbellis connected to thenetwork, but unable toaccess the internet.Solid greenThe video doorbellis operatingcorrectly.Flashing redThe video doorbellfailed to connect tothe network.Spinning greenThe calling functionon the videodoorbell is in use.Flashing greenThe talking functionon the videodoorbell is in use.B451AJ QSG EN R1.indd 62020-11-03 11:42:37 AM
4 Connect to the appConnect to the Lorex Home app to access the doorbell’s installation videos.1. If you already have the app, skip this step. Scan the QR code on the right using yourmobile device’s camera. Install the free Lorex Home app from the App Store orGoogle Play Store .2. Tap the Lorex Home icon to launch the app.3. If you already have an account, skip this step. Tap Sign up, then follow the onscreen prompts to create an account. Record your account details below:Email:Scan QR code forLorex Home appAccount Password:4. Tap on the icon on the top right of the screen to add a device.5. Scan the device QR code found in the box or on the back of the doorbell.Note: If your mobile device cannot scan the QR code, tap Manually enter Device ID.6. Follow the in-app instructions to complete the installation OR refer to sections 5 through 9 inthis Quick Start Guide for a written description of the installation steps.B451AJ QSG EN R1.indd 72020-11-03 11:42:39 AM
5 PreparationBefore beginning setup, there are some essential preparations to make.To prepare for installation:Figure 1Step 1TURN OFF THE POWER RUNNING TOYOUR EXISTING DOORBELL AND CHIMEBOX AT THE BREAKER (See Figure 1).Test that power has been disconnected forboth the doorbell and chime box power bypressing the doorbell. There should be nochime sound.Always be careful when handling electricalwiring. If you’re not comfortable doing ityourself, then consult a licensed electrician.Figure 2Step 2Remove your existing doorbell anddisconnect wiring (see Figure 2). Make sureto bend the power cables so they do not fallthrough the hole in the wall.IMPORTANT: 16-24 VAC is required. If your house does not have this voltage, you willneed a 16-24 VAC doorbell transformer or you can consult with a licensed electrician.B451AJ QSG EN R1.indd 82020-11-03 11:42:43 AM
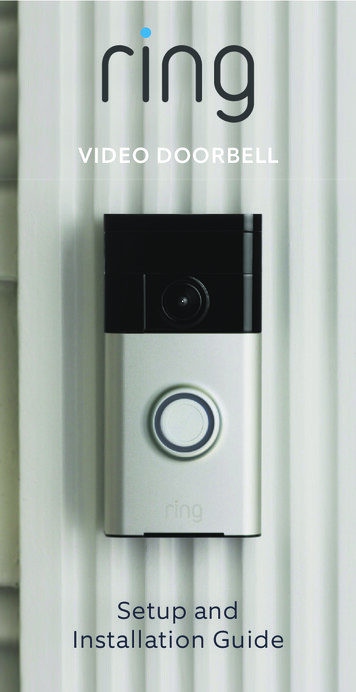
6 Wiring the chimeYou must determine the type of doorbell chime you have in your home: electronic or mechanical.Not sure? If your doorbell chime is a classic *ding-dong* sound, chances are your chime is mechanical.If your doorbell sounds more like a melody, then your chime is electronic. If you are still not sure, removethe cover panel of your chime box - if you find springloaded levers and a physical metal chime, you have amechanical chime.For users with a mechanical chime, follow the extra step below to complete the installation.For mechanical chime owners:1. Remove the cover panel of your doorbellchime box.Figure 12. Loosen the screws labeled FRONT andTRANS using a Philips head screwdriver. Donot remove the screws, and be sure to detachany connected wiring (see Figure 1).3. Connect the included chime kit to the greenterminal on the end of the included wireharness (see Figure 2).Figure 2B451AJ QSG EN R1.indd 92020-11-03 11:42:46 AM
4. Connect the wiring from the chime kit tothe FRONT and TRANS connectors inthe chime box. Ensure that the existingwiring stays connected as well (seeFigure 3).Figure 3Note: You may connect eitherwire to either connector.5. Mount the chime kit to the inside of yourchime box, or along the cover plate of thechime box, using the includeddouble-sided tape (see Figure 4).IMPORTANT: Use the includeddouble-sided tape to ensure the chime kitand wires are not touching the chimesor any moving components inside thechime box, or the doorbell chime will notsound correctly.Figure 4Chime kitB451AJ QSG EN R1.indd 102020-11-03 11:42:48 AM
7 Secure the mounting bracket(s)Use the mounting accessories specified below depending on the mounting location.Step 1: Mark mounting holesPlace the mounting bracket to fit yourexisting doorbell wiring. Then mark thescrew holes according to the mountingbracket.Figure 1IMPORTANT: Ensure that thearrow on the mounting bracket is alwayspointing up.B451AJ QSG EN R1.indd 112020-11-03 11:42:50 AM
Step 2 (Optional): Attach an angled bracket to the mounting bracketIf you want to change the angle of the doorbell for a better view, attach one of the optional angledbrackets to the mounting bracket.1. Select either the horizontal or vertical bracket according to the direction you want your doorbell toface (see Figures 2&3).2. To change the direction of the angle, simply flip the horizontal or vertical bracket upside down.Whichever direction you choose, make sure the attached mounting bracket is always facing.Option 1: Horizontal bracketFigure 2 (bottom view)15 rightOption 2: Vertical bracketFigure 315 leftOR5 down5 upB451AJ QSG EN R1.indd 122020-11-03 11:42:54 AM
3. Insert the four tabs from the horizontalor vertical bracket into the the mountingbracket as shown in Figure 4. Make sure toinsert in the desired direction.Figure 44. Press the mounting bracket down. A *click*sound will indicate that the brackets arelocked in.Notes: You can only attach one angledbracket to the mounting bracket. If you would like to change thedirection of the angled bracketafter attaching it to the mountingbracket, gently but firmly pullthem apart.B451AJ QSG EN R1.indd 132020-11-03 11:42:55 AM
Step 3: Secure the mounting bracketWhen installing only the mounting bracket, refer to Figure 5-a. When installing the angled bracketattached to the mounting bracket, refer to Figure 5-b.1. For wood, drywall or soft surfaces:Secure the mounting bracket(s)to the mounting surface using aPhilips-head screwdriver and thesupplied mounting screws.Figure 5-a2. For concrete, stucco or brick:Use the supplied 15/64” drillbit todrill holes where marked. Use thesupplied anchors and screws tosecure the mounting bracket(s) tothe wall.B451AJ QSG EN R1.indd 142020-11-03 11:42:57 AM
Notes:Figure 5-b Ensure that thearrow on themounting bracket is always pointingup. The (optional) angled bracket mustbe attached to the mounting bracketbefore installation. Ensure the power cables from thewall fit comfortably through the holein the mounting bracket.B451AJ QSG EN R1.indd 152020-11-03 11:42:59 AM
8 Wiring the doorbellTo wire the doorbell:1. Loosen the power port screws of thedoorbell with a Philips-head screwdriver.Figure 2Note: Do not fully remove thepower port screws.2. Loop the power wires underneath thepower port screws (see Figure 1).3. Tighten the power port screws to securethe power wires (see Figure 2).Figure 1B451AJ QSG EN R1.indd 162020-11-03 11:43:00 AM
To extend short wires (optional):Figure 3Figure 4B451AJ QSG EN R1.indd 171. If your existing doorbell wiring is too short,remove the power port screws completely, thenthread the screws through the supplied extrawires. Use the supplied wire caps to extend yourwiring (see Figure 3).2. To attach the wire cap, align the ends of yourexisting wiring and extra wires, place the wirecap over the exposed wiring and twist the wirenut clockwise to tighten (see Figure 4). Pull onthe wires slightly to make sure that they areproperly fastened inside the wire cap.3. Ensure there is enough space to fit the cableconnectors and wire caps into the hole in yourwall.2020-11-03 11:43:03 AM
9 Connect the doorbellTo attach the doorbell to the bracket:1. Push the wiring back into the wall.2. Insert the two tabs from the mounting bracket into the doorbell (see Figure 1).3. Press the doorbell downwards. A *click* sound will indicate that it is locked in.Figure 1Note - If you need to remove the doorbell fromthe bracket:1. Insert the supplied pin into the hole at thebottom of the mounting bracket until theinner buckle is reached (see Figure 2).2. Then slide the doorbell up and remove it.Figure 2B451AJ QSG EN R1.indd 182020-11-03 11:43:06 AM
You may now reconnect powerto the doorbell and chime at thebreaker (see Figure 3).Figure 3Wait 5 minutes for the doorbell to fullypower on and press the doorbell’sbutton to ensure that the chime isoperating correctly. Check section 11for troubleshooting if needed.B451AJ QSG EN R1.indd 192020-11-03 11:43:07 AM
10 Lorex Home app overviewTo customize the video doorbell, go to your Lorex Home app and select the doorbell. Tap on the icon on the top right of the screen to access the doorbell’s settings.Person DetectionTap on Motion Detection Settings to customize person detection. Draw designated areasto alert for person detection and adjust how sensitive the detection level will be.Activate StatusLED on DetectionTap on Motion Detection Settings Light Settings to enable Activate Status LEDon Detection. The LED color on the doorbell’s status indicator can be customized forperson detection alert.Night LightModeTap on Motion Detection Settings Light Settings to enable Night Light Mode.The LED light below the doorbell will illuminate the front door when it gets dark.Shared UsersTap on Shared Users to let family or friends answer live events and view recordings.Any additional users must sign up for a Lorex Home account to be added.Doorbell QuickResponsesTap on Doorbell Quick Responses to record or select a pre-recorded voice message.The Lorex video doorbell can speak to a visitor if you’re not able to come to the door.Video SettingsTap on Video Settings to change HDR (High Dynamic Range) settings and set thevideo quality. For optimal streaming the video quality is set to 1080p by default.B451AJ QSG EN R1.indd 202020-11-03 11:43:07 AM
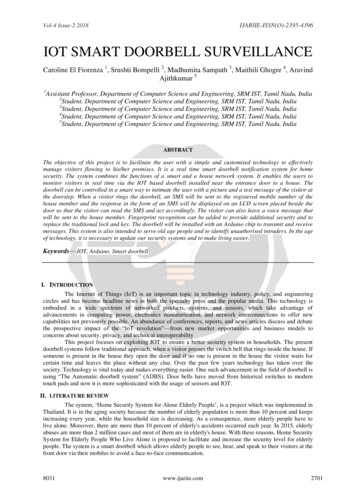
Camera Live ViewDevice nameBackShared usersSettingsDate & timePause Live ViewViewing modesStreamingSnapshotFullscreen viewMute/unmuteManualRecording2-Way talkWarning lightSirenPrivacy modeB451AJ QSG EN R1.indd 212020-11-03 11:43:11 AM
Calling screenFor a complete overviewof controls available on theLorex Home app, scan theQR code below using yourmobile device’s camera.FullscreenListen-in:Tap to listen-in on a visitorwhile your audio is muted.Ignore / end callB451AJ QSG EN R1.indd 22QuickresponsesAnswer call2020-11-03 11:43:16 AM
11 Troubleshooting1.The video doorbell is not turning on. Make sure the breaker is turned back on. Make sure the power source that supplies the video doorbell is 16-24 VAC. Check if thevoltage is printed on your doorbell transformer or use a milimeter to test the voltage. Check to see if the video doorbell can be powered on using the supplied USB power cable. This willrequire a 2A (amp) USB power adapter (not included). If the video doorbell does power on with theUSB cable, then carefully go over the installation setup again.2.The video doorbell’s chime is not working. Make sure to select the correct chime box in the app. You can modify these settings at any time inDevice Settings Doorbell Chime. Check to make sure that the chime kit is wired correctly. Allow for the video doorbell to power on for 5 minutes before testing the chime.3.How to reset the video doorbell to factory settings. Pull back the reset/microSD card slot cover located on the back of the video doorbell. Use the supplied pin and insert it into the tiny hole labelled RESET for 10 seconds. Wait foran audible sound to confirm that the video doorbell is restarting.4.How to insert or remove the microSD card from the video doorbell. Pull back the reset/microSD card slot cover located on the back of the video doorbell. If inserting, slide the microSD card into the slot (with the label side down) until it *clicks* into place. If removing, push down gently on the microSD card. It will pop out and can then be removed.B451AJ QSG EN R1.indd 232020-11-03 11:43:16 AM
12 Frequently asked questions1.How come I am receiving so many notifications? The amount of notifications you receive can be adjusted in the Lorex Home app for eachsetting or mode. For example, you can draw Motion Zones for certain areas that you wantyour doorbell to ignore while effectively monitoring the area you want and reducing falsealert notifications. Adjusting Motion Sensitivity will also help. You can even manage notifications in Device Settings Notifications and set a scheduleto receive alerts at specific periods in the day.2.How do I get the video doorbell’s light to stay on at night?In Device Settings Motion Detection Settings Light Settings, enable Night Light Mode.Then select Edit Schedule to set a start time and end time for each given day of the week.Make sure to save your settings.3.Can the video doorbell be powered through USB permanently?Yes, the video doorbell can operate permanently using the included USB but it will not be ableto connect to a chime box. Use it with a 2A (amp) USB power adapter (not included).4.How do I record a custom quick response for the video doorbell?5.What’s the wireless range of the video doorbell?In Device Settings Doorbell Quick Responses, tap the on the top right and record yourcustom quick response. Tap Next to name and save the recorded message.It depends on the strength of your Wi-Fi network. If the location where the video doorbell isinstalled has a weak signal, consider adding a Wi-Fi extender between your router and doorbell.B451AJ QSG EN R1.indd 242020-11-03 11:43:16 AM
Safety precautions: Read this guide carefully and keep it for future reference.Follow all instructions for safe use and handling of the product.Risk of electrical shock. Disconnect the power at the fuse box before installation.Use the product within given temperature, humidity and voltage levels noted in the camera’sspecifications. Do not disassemble the doorbell. Try to avoid installing the doorbell pointed directly at the sun or a source of intense light. Periodic cleaning may be required. Use a damp cloth only. Do not use any harsh, chemical-basedcleaners.Disclaimers: The Lorex video doorbell requires a constant power supply with a voltage between 16V-24V. If yourresidence does not have this voltage, you will need a 16-24 VAC doorbell transformer or youcan consult with a licensed electrician. Not intended for submersion in water. Installation in a sheltered location recommended. This camera includes an Auto Mechanical IR Cut Filter. When the camera changes between Day/Nightviewing modes, an audible clicking noise may be heard from the camera. This clicking is normal, andindicates that the camera filter is working. Audio recording without consent is illegal in certain jurisdictions. Lorex Corporation assumes noliability for use of its products that does not conform with local laws.B451AJ QSG EN R1.indd 252020-11-03 11:43:16 AM
Copyright 2020 Lorex CorporationAs our products are subject to continuous improvement, Lorex reserves the right to modify product design,specifications and prices, without notice and without incurring any obligation. E&OE. All rights reserved.This device complies with part 15 of the FCC Rules. Operation is subject to thefollowing two conditions:(1) This device may not cause harmful interference, and(2) This device must accept any interference received, including interference thatmay cause undesired operation.For up-to-date information andsupport please visit:help.lorex.com/doorbell2B451AJ QSG EN R1B451AJ QSG EN R1.indd 262020-11-03 11:43:17 AM
4 Connect to the app 1. If you already have the app, skip this step. Scan the QR code on the right using your mobile device's camera. Install the free Lorex Home app from the App Store or Google Play Store . 2. Tap the Lorex Home icon to launch the app. 3. If you already have an account, skip this step. Tap Sign up, then follow the on