Transcription
2020Accounts Payable
Table of Contents 1How to Enter a Claim 2Daily In State Template 6Federal Transport Template .9In State Overnight Travel FY Template .11Mileage Template FY .14Miscellaneous Template 17Tuition Template .19Save For Later .21Rejections 23Status for Claims .25
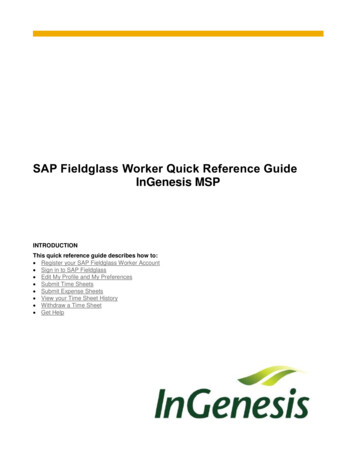
EMPLOYEE EXPENSE REPORT‐ HOW TO ENTER A CLAIM1. To access the Expense Report, navigate to Employee Self Service (ESS)https://www.livgov.com2. For Train Use:https://selfservice.livgov.com/msstrain/(Note the user name and Password are the same as live ESS)3. Log into ESS as you normally do.4. Select Expense Reports on the right toolbar.2
5. Select Add Claim either from the right toolbar or underneath the title.6. Claim entry.3
A. Select a Claim Type from the dropdown menu.Claim Types1. Daily In State Travel Reimbursement should be used for any in state travel that is notovernight. An agenda/ schedule/ class listing including: dates, times, and if meals areprovided, must be include in the attachment to receive this type of reimbursement. Noteitemized receipts no longer required.2. Federal Transport is for the Sheriff Department only.3. In State Overnight Travel FY should be used for any overnight in state travel only. Thiswill change on an annual basis (per the GSA standard) make sure to use the correct FY(Fiscal Year) for this expense. An agenda/ schedule/ class listing including: dates, times,and if meals are provided must be include to receive this type of reimbursement.4. In State Travel only used for in state travel prior to December 10 2019. Will be deactivatedMarch 1st 2020.5. Mileage Reimbursement is for mileage only. We are now using the standard IRS mileagereimbursement. Make sure to choose the correct Mileage template FY for your County travels.(Page 17)6. Misc EE Reimbursement is any expense that your supervisor/director approved that is notrelated to travel or mileage.7. Out of State Travel FY is the same as In State Overnight Travel FY, but occurredOUTSIDE of Michigan. Follow the In State Overnight FY template.8. Out of State Travel only used for out of state travel prior to December 10 2019. Will bedeactivated March 1st 2020.9. Transcript Services Compensation - Taxable Transcription Service. (Special Use.)10. Tuition Reimbursement per approved additional reimbursable higher education only.B. Select your Department (not the building) from the Department dropdown menu.4
C. Type a Description for your Expense Report.Note: Be as descriptive as possible and include the where to and purpose for travel.For Mileage: Include the business purpose and locationFor Training or Conference expenses: Use the training or conference name and location.D. Select an Event from the dropdown menu. (OPTIONAL)Event Types1. In State Conference should be used for any in state conference or trainingincluding meals, hotels, and or mileage.2. Inmate Transports will be used by Sheriff Department only.3. IT Work Order Mileage will be used by IT for mileage associated with work ordersonly.4. Out Of State Travel should be used for any out of state conference or trainingincluding meals, hotels, or mileage.E. Enter the Start Date/Time and End Date/Time for your report reimbursement. Time isnow required for most expense report types. This is based upon a 24-hour clock.F. Destination City / State are required. Country is optional.G. Select Continue once finished.H. Refer to your specific chosen template from the Table of Contents for the instruction pagenumber.5
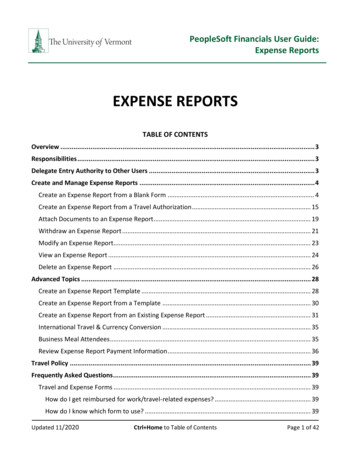
Daily In State Travel1. You are now looking at the detail page for your report.2. To enter meals, expand the Per Diem Expenses. Click the check boxes corresponding withthe day and meals you purchased. (Meals can no longer be combined or use a Maximum perdaily allowance).6
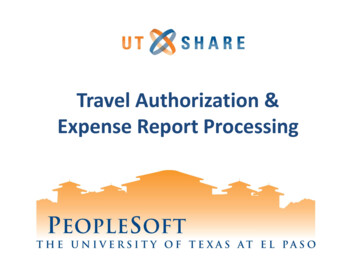
3. Meal amounts are per diem and can’t be updated. Breakfast is 8, Lunch is 12, and Supperis 20. In order to be eligible for a meal, one must begin travel before and extend past the timeperiod listed below and in the Business Expense Policy.Note: Meals can’t be combined. Receipts are no longer required. Must attach anagenda/schedule/ listing detailing the event, dates, times, whether meals were provided, andany other appropriate information.4. To enter other expenses (mileage and misc.) expand the Unit Expenses tab and click Add anExpense.5. A pop-up box will appear for your expense information. Select your expense from the dropdown box for Expense Type. You may choose Mileage or Misc. Reimbursement.For Mileage enter total traveled per day. Separatemileage per each day and/or map(s). In Commentadd Conference/Training/Purpose of travel. Provideas much detail as possible. Choose the correct FY.This will change annually per IRS standard.Click Save Expense.6.7For Misc. Reimburse add Quantityand price per unit. Date is thepurchased date. In Comments addas much description as possible.Click Save Expense.Attachments include but are not limited to: Training/Seminar/or class brochure/ agenda/ or schedule that includes name of event,date, times, whether meals are provided and any other appropriate information. Map of starting and ending points for each mileage entry. If necessary appropriate approvals prior to travel. (May use an email confirmation). Other necessary documents.
7. To submit the claim Click Review.8. Verify the expenses are correct and all your documents are attached. Click Submit Claim. 8Once your claim has been submitted you will not be able to edit or add attachments.You are only able to edit claims with a status of Entering.
Federal Transport1. Only used for the Sheriff Department.2. Good for reimbursable meals only.3. May use one Expense Claim over a period. See Example below.4. Meal amounts are per diem and can’t be updated. Breakfast is 8, Lunch is 12, andSupper is 20. In order to be eligible for a meal, one must begin travel before and extendpast the time period listed below and in the Business Expense Policy.Note: Note: Meals can’t be combined. Receipts are no longer required. Must attach anagenda/schedule/ listing detailing the event, dates, times, whether meals were provided, andany other appropriate information.5. To submit the claim. Click Review.9
6. Verify the expenses are correct and all your documents are attached. Click Submit Claim. 10Once your claim has been submitted you will not be able to edit or add attachments.You are only able to edit claims with a status of Entering.
In State Overnight Travel FY1. You are now looking at the detail page for your report2. To enter meals, expand the Per Diem Expenses. Click the check boxes correspondingwith the day and meals you purchased. (Meals can no longer be combined or use aMaximum per daily allowance).3. Meals are based upon the GSA set standard and can’t be updated. Breakfast is 13,Lunch is 14, and Supper is 23. In order to be eligible for a meal, one must begin travelbefore and extend past the time period listed below and in the Business Expense Policy.Note: Meals can’t be combined. Receipts are no longer required. Must attach anagenda/schedule/ listing detailing the event, dates, times, whether meals were provided, andany other appropriate information.11
4. To enter other expenses (mileage and misc.) expand the Unit Expenses tab and clickAdd an Expense.5. A pop-up box will appear for your expense information. Select your expense from thedrop down box for Expense Type. You may choose one of the following:For Mileage enter total traveled per day. Separatemileage per each day and/or map(s). In Commentadd Conference/Training/Purpose of travel. Provideas much detail as possible. Choose the correct FY.This will change annually per IRS standard.Click Save Expense.For Misc. Reimburse add Quantityand price per unit. Date is thepurchased date. In Comments addas much description as possible.Click Save Expense.6. Attachments include but are not limited to: Training/Seminar/or class brochure/ agenda/ or schedule that includes name of event,date, times, whether meals are provided and any other appropriate information.12 Map of starting and ending points for each mileage entry. If necessary appropriate approvals prior to travel. (May use an email confirmation). Other necessary documents.
7. To submit the claim. Click Review.8. Verify the expenses are correct and all your documents are attached. Click SubmitClaim. 13Once your claim has been submitted you will not be able to edit or add attachments.You are only able to edit claims with a status of Entering.
Mileage Template FY1. You are now looking at the detail page for your report. For County Mileage – Use Howell, MI for the destination, even if you might havetravelled outside of the county. For multiple locations it is appropriate to use Howell, MI.2. To start entering expenses, expand the Unit Expenses tab and click Add an Expense.You will enter a new expense for each new trip per day. Note for round trips (several stops within the same day) may be grouped together andMUST have an all-encompassing map attached. See example below in #4.Days may not be grouped together.3. A pop-up box will appear for your expense information.Enter the number of miles you accrued, the dateof the travel, and in the comments enterdepartment or location you visited and thepurpose. When finished, click Save Expense.14
Your entry will appear on your report detail screen. Here, you can update the entry ordelete it.4. A map associated with your mileage reimbursement MUST be uploaded and included inthe Attach Supporting Documents tab. It must state the starting and ending points. 15For County travel in between County buildings a map is not required.If County travel to several County buildings within the same trip (same day) a map isrequired. For Example if you travel from Administration Building to Judicial Center tothe Airport to Hartland EMS and then return to Administration Building, you will berequired to supply a map with all visited locations. One expense entry can be enteredfor the total trip.
5. To submit the claim Click Review6. Verify the expenses are correct and all your documents are attached. Click Submit Claim. 16Once your claim has been submitted you will not be able to edit or add attachments.You are only able to edit claims with a status of Entering
Miscellaneous Template1. You are now looking at the detail page for your report. Enter Department, a DetailedDescription, and Event (if applicable)2. MUST include Start and End Date. Both can be the same date. Please use the date fromthe receipt. For multiple expenses include the date range of all receipts.3. Continue and Expand Unit Expenses- Add an Expense17
4. Add separately each MISC Expense.5. Quantity, Total price per Item, Date purchased, and in Comments detailed description ofitem. Save Expense6. To submit the claim, Click Review7. Verify the expenses are correct and all your documents are attached. Click Submit Claim. 18Once your claim has been submitted you will not be able to edit or add attachments.You are only able to edit claims with a status of Entering
Tuition Reimbursement Template12345Choose Tuition Reimbursement for the Claim Type andChoose from the drop down your correct Department.Description should include: Year, Semester and Class Title.Start date should be the start of the ClassEnd date the Conclusion of the class.Note: Start and end time do not need to be entered6Destination City is the location of the school. If this is an online class Howell, MIis appropriate to use.Click Continue719
89Click the “ ” next to Unit expenses and add an expensei. Note: There is only one Expense Typeii. The Quantity should be 1 and the amount entered should be the totalamount that is allowable by the County. You can find this amount on theHR Employee Tuition Reimbursement Form.iii. Date Incurred is the class start date.iv. Comments should include the name of the class(es) taken.v. Save the ExpenseAttach supporting documents to include the HR Employee TuitionReimbursement Form, Receipt of payment of classes, and Final Grade. Click Review.10 Verify the expenses are correct and all your documents are attached.Submit Claim.20Click
Save For Later1. You can save your report and access it later by clicking Save For Later.2. To enter your Saved For Later claim, navigate to ESS and click Expense Report on theright toolbar. You will see all your claims. To resume working on your claim that has astatus of entering, click the claim’s ID #.21
3. You’ll now see your report details and entry. To resume, click Update or Expenses &Receipts on the Right Toolbar.4. To submit the claim Click Review.5. Verify the expenses are correct and all your documents are attached. Click Submit Claim. 22Once your claim has been submitted you will not be able to edit or add attachments.You are only able to edit claims with a status of Entering.
Rejections 23If your claim is rejected, you will be notified by your designated Allocator and have theability to make any necessary changes.Do not start a new claim unless you have an incorrect Template or have been instructedto start a new one.Make the changes by entering your claim through ESS and choose the rejected claimID#. Note it will be returned to the Entering Status.To enter your claim, navigate to ESS and click Expense Report on the right toolbar.You will see all your claims. To resume working on your claim that has a status ofentering, click the claim’s ID #. Update missing or incorrect information and or add documents.To resume, click Update or Expenses & Receipts on the Right Toolbar. To submit the claim Click Review.
Verify the expenses are correct and all your documents are attached. Click SubmitClaim.Once your claim has been submitted you will not be able to edit or add attachments24
Status for Claims11 – Actual, Entering:The employee has started a claim but has not yet submitted.14 – Actual, Allocated: The employee has submitted the claim and it is ready for Allocator to reviewand forward to the person’s Supervisor or release into the set workflow.15 – Actual, Release: The Allocator has released the claim to the Supervisor or workflow. The claimwill stay on this stage throughout the approval process until the final approver has approved the claim.18 – Actual, Approved: The claim has completed work flow. It is waiting to be converted, so it may beadded to the person’s pay check.20 – Reimbursed/ Closed: The Claim has been converted and sent to Payroll. It is either completewaiting to be reimbursed in the Payroll system or the claim has been reimbursed on their paycheck.This is the final process.16 – Actual, Rejected: Approver or Allocator has rejected the claim.12‐ Actual, Created:An Employee has submitted the claim, but an allocation error has occurred.Emails may not be sent through Munis to notify of this claim at this level. (We are working to correctthrough HR Payroll). AP will notify the .25
Expense. 5. A pop-up box will appear for your expense information. Select your expense from the drop down box for Expense Type. You may choose Mileage or Misc. Reimbursement. For Mileage enter total traveled per day. Separate For Misc. Reimburse add Quantity mileage per each day and/or map(s). In Comment and price per unit. Date is the