Transcription
Connecting SoftwareConnect Bridge - Exchange Server SyncUser manualDocument HistoryVersion DateAuthorChanges1.002 Mar 2015KKCreation1.117 Apr 2015KKUpdate1.227 July 2015KKUpdate1.33 March 2016DMIUpdate of the changesin UI and loggingSummaryInstallation and configuration of CB Exchange Server SyncAll rights reserved. No part of the document may be reproduced or transmitted in any form or byany means, electronic or mechanical, for any purpose, without the written permission of ConnectingSoftware s.r.o. & Co. KG. Company or product names mentioned in this document may be trademarksor registered trademarks of their respective companies.
Connect Bridge – Exchange Server Sync – User manualConnecting SoftwareTable of Contents1 Overview . 32 How it works . 53 System Requirements . 64 Synchronization process description . 65 Installation . 75.1 Uninstall .106 Configuration . 106.1 Initial setup .106.2 Tenants setup .126.3 Creating the connection string .126.4 Setup the synchronization.136.3.1 Setup window description .136.3.2 Set up the synchronization pairs .166.3.4 one way synchronization .176.3.5 Other settings .177 Running the synchronization . 177.1 Synchronization activity .177.2 Synchronization features .187.2.1 Emails folders .187.2.2 Contacts folder .197.2.3 Tasks folder .207.2.4 Calendar folder .227.3 Additional information .237.3.1 Synchronization conflicts .237.3.2 Running multiple instances .237.3.3 Synchronized folder space .237.3.4 Exchange server connection failure .237.3.5 Stop/pause synchronization .247.3.6 Stop the service .248 Troubleshooting . 258.1 Log files .258.2 Quick help .2503 March 2016Page 2/26
Connect Bridge – Exchange Server Sync – User manualConnecting Software1 OverviewMicrosoft Exchange Server is the most popular communication, collaboration and emailmessaging application today. It delivers the must have services like mail server, calendar,task manager and contacts manager. Companies can use it by installing it on their serversor can take advantage of the cloud services.Usually a user has his own email account with mails, tasks, contacts and appointments butis not uncommon the scenario when a user has two or more mailbox accounts within sameor different instances and versions of Exchange Server. The demand to keep mailboxesitems synchronized leads to a problem. Connecting Software proposes a solution to thisissue providing a tool which allows to synchronize multiple Exchange Mailboxes. Forexample if you need to synchronize one user on two or more exchange servers, evendifferent versions of Exchange Server so that the user and the external party(in most casescustomers) are not aware about that you are using two Exchange Servers or two mailboxesand for this purpose CB Exchange Server Sync Tool is an ideal solution.The CB Exchange Server Sync Tool is an application dedicated to synchronize MicrosoftExchange user folders. Users and folders can be located either on the same version andinstance of Exchange Server or they can be located on different instances.The tool uses a windows service which performs the synchronization between mailboxes inperiodic runs. The tool also provides a graphical user interface to set up the synchronizationproperties such as connection string to the data source, target folders and synchronizationperiod.The synchronization process runs in parallel with Microsoft Exchange Services in a nonblocking mode, therefore not influencing whatsoever in the general performance ofExchange Server itself.Key features Synchronize emails foldersSynchronize contactsSynchronize tasksSynchronize calendarSynchronization between different Exchange versionsEasy to install and to maintainCustom configuration for each synchronized user apartProvides run-time information about the executed synch operationsQuality of ServiceOne-way and two-way synchronizationSupported Exchange Server versions:Microsoft Exchange Server: 2007 SP1Microsoft Exchange Server: 201003 March 2016Page 3/26
Connect Bridge – Exchange Server Sync – User manualConnecting SoftwareMicrosoft Exchange Server: 2013Microsoft Office 36503 March 2016Page 4/26
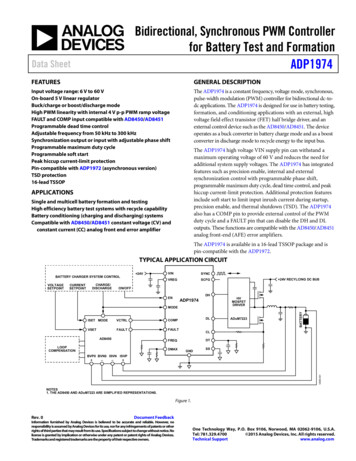
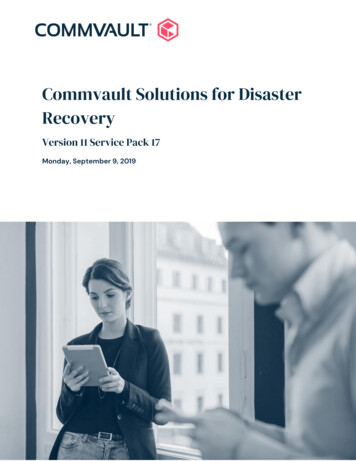
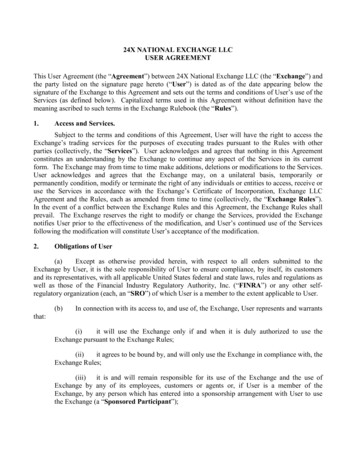
Connect Bridge – Exchange Server Sync – User manualConnecting Software2 How it worksThe CB Exchange server sync consists of 3 basic components: CB Exchange Server Synchronization ServiceCB Exchange Server Sync graphical user interfaceConnect Bridge serviceCB Exchange Server Synchronization Service is the core of the application. It runs as aWindows service which role is to check the synchronization pairs for changes.This service uses the Connect Bridge service to connect to the Exchange Servertransparently making all the required operations such as insert, delete, and update.CB Exchange Server Sync graphical user interface is a simple application that allows youto configure the CB Exchange Server Synchronization Service and displays you the activityof synchronization in real-time. In this application you have to configure the connectionstrings to Exchange Servers and the users and folders pairing.What is pairing?Pairing is necessary for the CB Exchange Server Synchronization Service to know whichusers/folders have to be synchronized. The CB Exchange Server Sync graphical userinterface gives you a list of every user’s folders and you can choose to synchronize allfolders or just specified folders between the users. You can add as much pairs as you wantso that the setup meets all your needs. Your setup is then saved so that if you need to doa restart you have all the previous settings loaded.In order for synchronization to work it is necessary to configure the permission settingsof the synchronized accounts and also to set a master user with ‘Owner’ permission levelto the folders you need to synchronize.Root userSynchronized user’sfoldersSynchronizationSynchronized user’sfoldersRoot user is the user on each side of the synchronization part which are granted accessto all the other synchronized users which are to participate in the synchronization. Thus03 March 2016Page 5/26
Connect Bridge – Exchange Server Sync – User manualConnecting Softwareeach user wishing to participate in the synchronization process needs to grant this rootuser Owner permissions.Any exchange user can become a root user if other users grant him the ‘Owner’permission level of their folders.This principle with a single root user is implemented in order to simplify the process andto avoid password-exposure of participating users.3 System RequirementsPrerequisites: .NET Framework (4.5)single windows machine (at least Windows 7 Service Pack 1, Windows 8 orhigher)Connect Bridge Server with Exchange connector. CB Server can be installed onthe host machine or on a remote machine. By default the installer containsalready this component which is automatically installed and configured.One Exchange account for each Exchange server (login and password)4 Synchronization process descriptionThe synchronization process is periodically executed after start. Application seeks forinserted, updated or deleted items on every side of the synchronization pair on each shotof the execution. When it finds a change in one side of the synch-pair it reflect this changeon the other side. When deleted or updated items are being synchronized, it performsaction according the last change by date/time.Synchronization is done in cycles, here named as iterations which runs periodicallyaccording to the application setup.The synchronization tool has connection credentials only of the two users who have beendelegated to Owner items to multitude user’s folders within their exchange. On thisprinciples the root users can determine changes for each delegated mailbox and refer thischanges to the other users which makes appropriate actions.03 March 2016Page 6/26
Connect Bridge – Exchange Server Sync – User manualConnecting Software5 InstallationThe installation package contains all components: the CB Exchange Server SynchronizationService, CB Exchange Server Sync graphical user interface and the Connect Bridge ServerLite.To start the installation, run CB Synch setup.exe from delivered package (administratorprivileges will be required during installation).First step is the installer introduction screen. Click Next to continue.If the prerequisites are missing on your computer the installer will give you the possibilityto install them. The Connect Bridge Server will be automatically installed. After you installthe prerequisites you must restart the machine.Install the required prerequisites and then click on button Next.The License Terms are displayed. Please read carefully the license terms, scroll down inthe license window, click on I accept and then click on Next button to continue with theinstallation.03 March 2016Page 7/26
Connect Bridge – Exchange Server Sync – User manualConnecting SoftwareA window about the installation details is displayed. Choose the installation path or leaveit by its default. By clicking on button Next the Installer will do a check of your systemand give you the possibility to install the CB Synch components.Click on Install to start the installation. During installation the required files are copied,the services are installed and shortcuts in the Start menu and on the Desktop are created.03 March 2016Page 8/26
Connect Bridge – Exchange Server Sync – User manualConnecting SoftwareWhen clicking on Install button a Windows notification may appear to confirm theinstallation, click on Yes to continue. When installation is finished, the CB Exchange ServerSynchronization Service and Connect Bridge Server Lite is started automatically so you canrun the application right away.When installation is done, by clicking on Close you can close the installer. Clicking on RunCB Exchange Server Sync you can start the application. You can view also release notesby clicking on View Readme File.03 March 2016Page 9/26
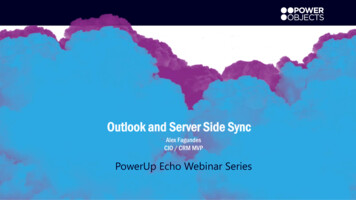
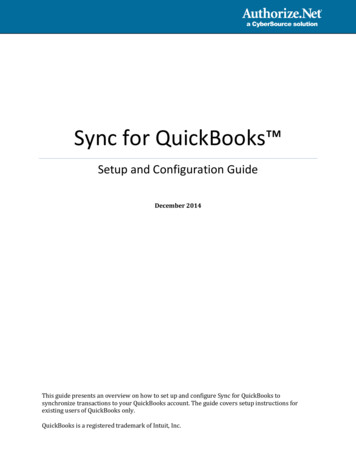
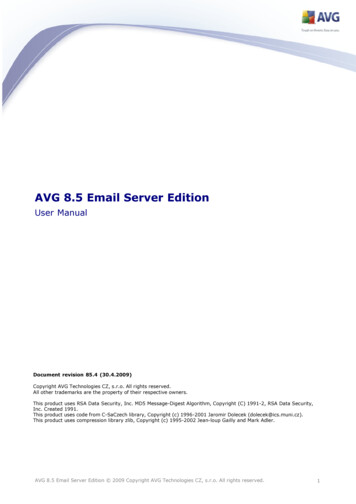
Connect Bridge – Exchange Server Sync – User manualConnecting Software5.1 UninstallYou can uninstall the application from Control Panel – Programs and features. Find theapplication and click on uninstall.Warning: by uninstalling the application all files including the database and licenseinformation will be removed.6 ConfigurationBefore you start working with CB Exchange Sync you have to configure Connect BridgeServer with your Exchange Server.6.1 Initial setupIn order that the application to work properly the individual synchronized users have togrant appropriate permissions (Owner) to the root user. This can be done either fromMicrosoft Outlook, Microsoft Web Access, Connect Bridge Stored procedures or aPowerShell script.For example, we want to synchronize the folder Inbox between user1 and user3. We needto have then a third user, let say user2 which is the Root user.To setup the required permissions we have to set up the permissions to Owner for user2on the folder Inbox on both synchronized users: user1 and user3.Please see the following image from our example. Setting this permissions was done usingMicrosoft Outlook.03 March 2016Page 10/26
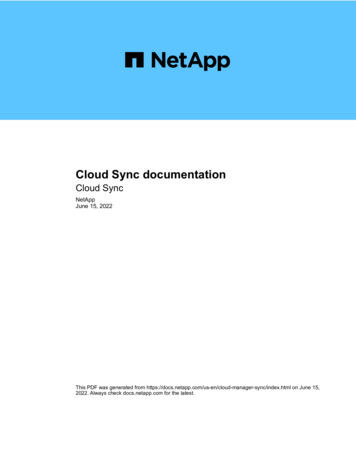
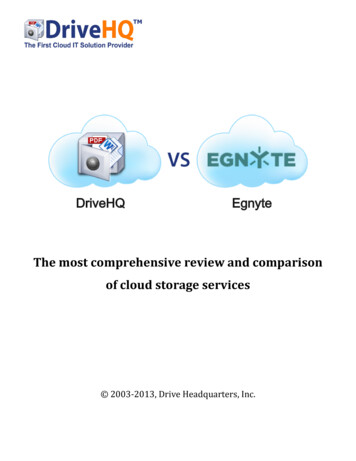
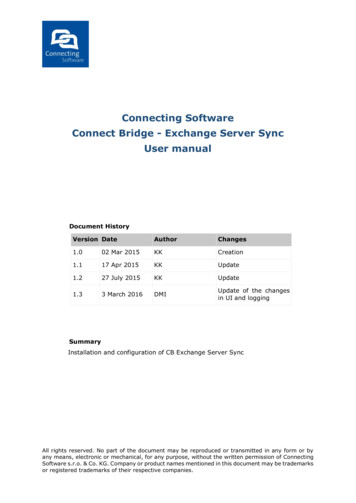
Connect Bridge – Exchange Server Sync – User manualConnecting SoftwareIf you want that private items to be fully synchronized you need to set up the permissionso that the Delegate can see your private items. In Outlook you can set up thispermission in the account settings and Delegate Access like in the picture bellow:03 March 2016Page 11/26
Connect Bridge – Exchange Server Sync – User manualConnecting Software6.2 Tenants setupThe application can work with multiple Exchange tenants in parallel.An Exchange tenant consists from a synchronization setup, between two Exchange servers,which runs independently from other tenants.You can set as many tenants as you want. For example between Exchange1 and Exchange2,other tenant between Exchange 3 and Exchange4, between Exchange1 and Exchange3 etc.For each tenant apart you have to set up the connection strings for connection tocorresponding Exchange servers, set up the synchronization pairs and the rest of thesettings.All settings are saved for each tenant apart and are automatically loaded at applicationstart.6.3 Creating the connection stringThe application needs two connection string: If using one Exchange server, you need to create two connection strings with thesame ServerURL and put the credentials for the Root UsersIf using two Exchange servers, you need to create two connection strings with theServerURL of each Exchange server and put the credentials for the Root Users.The previous image shows the start of the application.The first step is the creation of the connection strings which automatically created by theapplication. The parameters (1, 2) needed for creation of the connection string are:03 March 2016Page 12/26
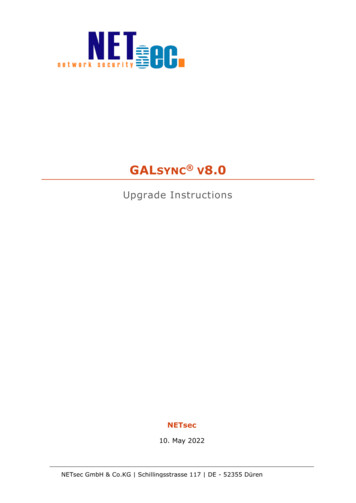
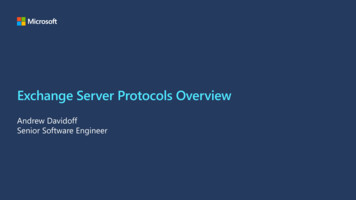
Connect Bridge – Exchange Server Sync – User manual Connecting SoftwareUserName the Exchange User Name of the Root Exchange UserPassword the password of the Root Exchange UserServerUrl https://192.192.192.192/ews/Exchange.asmx this is the address of theExchange ServerRequestServerVersion the Exchange Server Version identifier: for example:Exchange2010SP1 for Exchange Server 2010 with SP1. See the Connect BridgeExchange plugin for more details and all the identifiers.After you put the required parameters you can test the connection by pressing button 3.If connection is successful you can press next (4) and set up the synchronization.6.4 Setup the synchronizationAfter you put the correct connection strings for the Root users you can go to the next stepin setting up the synchronization.The following screen will appear:6.3.1 Setup window descriptionThe previous image is the main screen of the application. Its components are marked withnumbers:1. This icon is showing that the synchronization is running.03 March 2016Page 13/26
Connect Bridge – Exchange Server Sync – User manualConnecting Software2. The state of the synchronization: Stopped – synchronization is not running,Running –the synchronization is running. StopRequested – synchronization isbeing stopped by user.Error – an error occurred during synchronization, please check the log window orlog files for details.3. First filter – This is used to find the user(s) you want to synchronize. Here youhave to put a part of the user’s name for the first Root User.4. Second Filter – This is used to find the user(s) you want to synchronize. Here youhave to put a part of the user’s name for the second Root User.5. Find users – by pressing this button the application starts to look for users whichcontain the text from 3 and 4 in their name.6. Selected – displays you the actual selected user and folder you select in part 10left side. This folder will be later added to pairing.7. Selected – displays you the actual selected users and folders you select in part 19right right side. This folder will be later added to pairing8. Define Start Date for initial Synch – if this is checked only items with the newermodification date than the selected date will be synchronized.9. Include sub folders – if checked all the subfolders (actual and new folders) of theselected folder in window 10 will be synchronized. The same for the right side.10. Available Users – after you perform a search using button 5, the application willgive you a list and a folder structure of the found users using the filter from 3. Hereyou can select the users and folders which should be later on added to pairing.11. Make Pair button – this button is used for to create a pair of selected folders.After you do a search and application gives you the folder structure for the bothsides (10, 19) you have to do a selection by clicking on one folder in window 10 andon one folder in window 19. The selections are then displayed in the text box 6 and7. By clicking this button the selections from 6 and 7 will be added to the list ofpairs (13)12. Remove Pair button – this button is used to remove a selected par from the listof pairs (13)13. Defined Pairs – this windows shows all the defined pairs that will be synchronized.You can add pairs or remove pairs.14. Synch Period – you can set how often should the application check the servers fornew items or changes.15. Start – by pressing this button you start the synchronization process. There mustbe at least one pair defined in window 13.16. Pause- by pressing this button you pause the synchronization process. You canresume it by pressing button 15. If the application is processing items then you willreceive a warning message that the synchronization cannot be stopped. You haveto wait until the synchronization cycle is finished then the pause will be activated.17. Back button – go to previous part of the application (setting up the connectionstrings)18. Forward button – go to the following part of the application (activity log)03 March 2016Page 14/26
Connect Bridge – Exchange Server Sync – User manualConnecting Software19. Available Users – after you perform a search using button 5, the application willgive you a list and a folder structure of the found users using the filter from 4. Hereyou can select the users and folders which should be later on added to pairing.20. Use last stamp if available – the application is using a database to track all theoperations and the state of the synchronization. This should be checked by default.By unchecking this option a full synchronization will be done without taking intoconsideration the last state of the synchronization process.21. Number of items and number of synchronized items – count of the currentitems in the selected folder. The synchronized items is counting the items that weresynchronized.22. ReadOnly – if this is checked while creating a synchronization pair, the folder ofthe checked user will be read only – no changes will be made to that folder. This isused for one way synchronization – just from one user to other.24. Save settings – Save the defined settings to be loaded at next start.03 March 2016Page 15/26
Connect Bridge – Exchange Server Sync – User manualConnecting Software6.3.2 Set up the synchronization pairsThe following picture shows the synchronization pairs definition screen.After you perform a search for users accounts using the First Filter and Second Filter theapplication shows you the available user and the folder structure of each user.To add a synchronization pair follow the following steps:-Do a search for one user and the second userSelect one folder on the left side for the first userSelect one folder on the right side for the second userCheck the textbox 6 and 7 to be sure your selection is correctClick on button Add pairs (11) to add a pair to Defined Pairs listYou can also add all folders of the users by selecting the root folder and by checking theInclude sub folder checkmark (9).The search parameters to find users can either be partial (incomplete names but mustalways start with the beginning of the user name) or complete mailbox address name ofthe user.There is a delay in the update of textboxes 6 and 7 depending on the number of items inthe selected folder. This occurs because the application is counting the total items and thesynchronized items (21) when you click on a folder.03 March 2016Page 16/26
Connect Bridge – Exchange Server Sync – User manualConnecting Software6.3.4 one way synchronizationThere is also the possibility to do just one way synchronization – synchronize items fromone folder to another and not vice versa. To achieve this you have to check the ReadOnlycheckbox before setting the pair for synchronization. The read only attribute is then set onthe folder that belongs to the user on which the ReadOnly checkbox is checked. Usingthis, the application won’t do any changes to that folder and items will be synchronizedonly towards the folder without read only attribute set.6.3.5 Other settingsIf you are going to deal with a lot of items (more than 1000) it is necessary to change theEWS count limit on Exchange server: EWSFastSearchTimeoutInSeconds andEWSFindCountLimit properties. Please refer to Microsoft documentation on how to changethese parameters.7 Running the synchronizationAfter you set up the accounts permissions, the connection strings for root users and youdefine the synchronization pairs you can press the Start button (15) to start thesynchronization.CB Exchange Server Synchronization Service must be running.The first synchronization may take a longer time, depending on the amount of items thatare present in the user’s folders.7.1 Synchronization activityIf you want to change the synchronization period (14) you can do it before starting thesynchronization process or even during the synchronization process.During the synchronization process you can view the actions that the CB Exchange ServerSynchronization Service performs:03 March 2016Page 17/26
Connect Bridge – Exchange Server Sync – User manualConnecting SoftwareIn process log window 3 you can see all the actions performed: Deletion, Inserted Items,Deleted Items and errors. The items with errors are items that were not synchronized.These items have to be synchronized manually.Check boxes in section 2 and 3 are used to filter the information showed in the grid no. 3.To clear the actions table press the button 4.Button 5: previous window.7.2 Synchronization featuresDepending on which folders you choose to synchronize the following items can besynchronized:7.2.1 Emails foldersThe application is synchronizing the Inbox folder, Deleted Items folder and Sent Itemsfolder and their subfolders (if the option is selected).The following synchronizations are done:ItemFeaturesEmailfolderUpdate-Rename onlyyesMove to other folderyesDeleteyes03 March 2016SupportedPage 18/26
Connect Bridge – Exchange Server Sync – User manualItemEmailitemFeaturesConnecting SoftwareSupportedCreateyesAdd new subfolderyesWith html body (pictures, tables, formatted text,WordArt, links etc.)yesWith attachmentsyesWith changed Reply To attributeyesWith categoryyesWith follow upyesWith importanceyesWith sensitivityyesWith voting buttonsyesWith hidden copyyesWith CcyesMove to other folderyesDelete emailyesDraft emailsyesNew emailsyesEdit emailsyesAssign email as taskyesForwarded email attributeyesMissed call emailnoAutomatic reply emailsnoVoice emails and other Microsoft Exchange UnifiedMessaging itemspartialNote that synchronized emails that are protected with Information Rights Managementmay not open on the second user to which this email was synchronized. For moreinformation please see Microsoft documentation: Information Rights Management inExchange Server.7.2.2 Contacts folderThe application is synchronizing the Contacts folderThe following synchronizations are done:03 March 2016Page 19/26
Connect Bridge – Exchange Server Sync – User manualConnecting SoftwareItemFeaturesSupportedContactitemWith html Notes (pictures, tables, formatted text,WordArt, links etc.)yesWith attachmentsyesWith all fieldsyesWith contact pictureyesWith follow upyesWith a new field defined by useryesWith sensitivityyesWith categoriesyesWith private attributeyesEdit contactyesDelete contactyesCreate contactyes7.2.3 Tasks folderThe application is synchronizing the Tasks folderThe following synchronizations are done:ItemFeaturesTask itemWith html body (pictures, tables, formatted text,WordArt, links etc.)yesWith attachmentsyesWith assign task attributesyesWith categoryyesWith follow upyesWith priorityyesWith sensitivityyesWith daily recurrence – every x daysyesWith daily recurrence – every weekdayyesWith daily recurrence – regenerate new taskyesWith daily recurrence – No end date, End after, Endbyyes03 March 2016SupportedPage 20/26
Connect Bridge – Exchange Server Sync – User manualItemFeaturesConnecting SoftwareSupportedWith weekly recurrence – every x weeksyesWith weekly recurrence – selected daysyesWith weekly recurrence – regenerate new taskyesWith weekly recurrence – No end date, End after,End byyesWith monthly recurrence – On day x of every ymonthyesWith monthly recurrence – on specified day of monthyesWith monthly recurrence – regenerate new taskyesWith monthly recurrence – No end date, End after,End byyesWith yearly recurrence – on a date in a specifiedmonthyesWith yearly recurrence – on a day in a specifiedmonthyesWith yearly recurrence – regenerate new taskyesWith yearly recurrence – No end date, End after, EndbyyesWith all the detailsyesPercentage of completionyesStatus of the taskyesWith reminderyesWith importanceyesMark completeyesEdit taskyesDelete taskyesCreate taskyesEdit one occurrence from a recurrence taskyesDelete one occurrence from a recurrence taskyesMicrosoft Exchange Unified Messaging items03 March 2016partialPage 21/26
Connect Bridge – Exchange Server Sync – User manualConnecting Software7.2.4 Calendar folderThe application is synchronizing the Calendar folderThe following synchronizations are done:ItemFeaturesAppointmentitemWith html body (pictures, tables, formatted text,WordArt, links etc.)yesWith attachmentsyesWith Show As: Free, Busy, Tentative, Out ofOffice etc.yesWith categoryyesWith all the detailsyesWith priorityyesWith sensitivityyesWith daily recurrence – every x daysyesWith daily recurrence – every weekdayyesWith daily recurrence – No end date, End after,End byyesWith weekly recurrence – every x weeksyesWith weekly recurrence – selected daysyesWith weekly recurrence – No end date, End after,End byyesWith monthly recurrence – On day x of every ymonthyesWith monthly recurrence – on specified day ofmonthyesWith monthly recurrence – No end date, Endafter, End byyesWith yearly recurrence – on a date in a specifiedmonthyesWith yearly recurrence – on a day in a specifiedmonthyesWith yearly recurrence – on a date in a specifiedmonthyes03 March 2016SupportedPage 22/26
Connect Bridge – Exchange Server Sync – User manualItemConnecting SoftwareFeaturesSupportedWith yearly recurrence – No end date, End after,End byyesWith reminderyesWith importanceyesTime ZonesyesMark completeyesEdit appointmentyesDelete appointmentyesCreate appointmentyesEdit one occurrenceappointmentDelete one enceyes7.3 Additional information7.3.1 Synchronization conflictsThe synchronization is running in cycles (iteration) and in one cycle multiple actions areprocessed.There is the possibility that during one cycle two operations are done on one item. Forexample:-One user deletes the email and at the same time other user changes the categoryof the email.The actions priority are: Insertion, Update, and Deletion of items.In this example case, the email will be deleted but will appear again with the new categoryas the update operation has a higher priority.7.3.2 Running multiple instancesBe aware of running multiple instances of the synchronization tool. There is the risk that ifyou set the same folder pairing on multiple instances then duplicates of items can becreated!7.3.3 Synchronized folder spaceWhile synchronizing folders please make sure that the synchronized folder has enough freespace to synchronize the items otherwise some items may not be synchronized.7.3.4 Exchange server connection fail
CB Exchange Server Sync graphical user interface is a simple application that allows you to configure the CB Exchange Server Synchronization Service and displays you the activity of synchronization in real-time. In this application you have to configure the connection strings to Exchange Servers and the users and folders pairing. What is pairing?