Transcription
Fountas & Pinnell Benchmark Assessment SystemData Management Software (DMS)User’s Guide
PrefaceWelcome to the Fountas & Pinnell (F&P) Benchmark Assessment System DataManagement Software (DMS). This User Guide provides a quick and easy reference onthe use of the Data Management Software complimenting the Fountas & PinnellAssessment system.The User Guide presumes that you have already completed the online Fountas & PinnellDMS Tutorial. The Tutorial walks you through every step of using this data managementsoftware to collect, store, manage and review your benchmark reading assessment data.Should you have additional questions, after completing the Tutorial and consulting thisUser’s Guide, please technical support.
Table of ContentsInstallation. 5Starting the program . 6Logging In. 8Log In screen. 8Teacher Registration . 10Password Reminder screen . 11Help screen. 12Classes. 13Adding Classes. 13Class List screen . 13Class Profile Step 1 of 2. 15Class Profile Step 2 of 2. 17Class List for a newly defined class. 19Adding Students. 20Student Profile screen . 20Importing Students. 22Import Students message . 22Import file dialog . 23Import Error message. 24Class List imported . 25Customize Columns screen. 27Assessments . 28Class Assessment Summary screen new. 28Student Assessment Summary screen new . 29Adding a Text Reading . 30Text Reading Profile Step 1 of 4. 30Text Reading Profile Step 2 of 4. 32Text Reading Profile Step 3 of 4. 34Text Reading Profile Step 4 of 4. 36Student Assessment Summary screen completed . 38Class Assessment Summary screen completed. 40Reports . 41Student Benchmark Reading Levels table . 41Student Reading Comprehension table. 43Student Benchmark Reading Levels graph. 44Student Benchmark Reading Levels graph detail. 45Student Reading Comprehension graph. 46Class Profile table . 47Class Profile graph. 48Class Benchmark Reading Levels table. 49Class Benchmark Reading Levels graph . 50Class Benchmark Reading Levels graph detail . 51Class Reading Comprehension table . 52
Class Reading Comprehension graph . 53Additional Information and Support. 54
InstallationTo install the Fountas & Pinnell Benchmark Assessment System Data ManagementSoftware (DMS), insert the DMS CD into the CD or DVD drive of your computer.If using a Mac, double click the CD icon on the desktop and then double click on “Setup”to start the installation Wizard.On a PC the installation Wizard should begin automatically. If the installation Wizarddoes not begin automatically, use My Computer to view the contents of the CD drive anddouble click on the Setup.exe file.Follow the on-screen instructions to complete the installation. If your computer has morethan one hard drive, you can select the drive on which to install the software.On a PC, files are installed to an “F and P Assessment” folder within the “Program Files”folder on the drive you chose for installation. On the Mac, the “F and P Assessment”folder is created within your Applications folder. The “F and P Assessment” foldercontains a ReadMe.txt file with important information about importing and exportingdata to and from the DMS.To uninstall the DMS from a PC, go to Control Panel, click on Add Remove Programs,and then click on ‘F and P Assessment’. The Wizard will walk you through the uninstallprocess. To uninstall from a Mac, double click the Uninstall program in the “F and PAssessment” folder to start the Wizard. In both cases, if you select the ‘Automatic’uninstall option, the Wizard will uninstall the F and P software, but will leave behind thedatabase files containing all your information.Return to Table of ContentsPage 5
Starting the programStart the program by double clicking the icon on your desktop, or by double clicking the‘FPAssessment.exe’ file within the F and P Assessment folder. On a PC, you will alsofind an “F and P Assessment” group in your Start Menu.The program will take a few seconds to initialize.When ready, the program will display the Start button.Page 6
Click the Start button to begin using the software.Return to Table of ContentsPage 7
Logging InLog In screenTo use the DMS, you must log in. Click the arrow on the Teacher Name dropdown list toselect your name. Then type your password and click Log In.First time users must first create a log in account. Clicking the Register Now link takesyou to the TTeeaacchheerr RReeggiissttrraattiioonn screen.If you forget your password, clicking the Remind Me link takes you to the PPaasssswwoorrddRReemmiinnddeerr screen. If you can answer the password reminder question correctly, the DMSwill tell you your password.The ‘Remember me’ checkbox allows you to preset your Teacher Name as the default.The next time you start the DMS, your name will appear in the Teacher Name field. Allregistrants will still be available from the dropdown list.Page 8
The small question mark symbols here and throughout the program indicate that Help isavailable for that item. Click the question mark to see the Help.To exit the software and close the DMS, click the EXIT button in the upper right cornerof each screen.Return to Table of ContentsPage 9
Teacher RegistrationTo create your log in account, you must complete all fields on this screen.Select a password Reminder Question from the dropdown list. You must use one of theoffered questions.If you forget your password, clicking the Remind Me link on the LLoogg IInn screen takes youto the PPaasssswwoorrdd RReemmiinnddeerr screen. If you can answer the password reminder questioncorrectly, the DMS will tell you your password.Passwords and the Reminder Answer are not case sensitive; all characters are treated aslower case.Click the Save button to save your log in account information and return to the LLoogg IInnscreen. Click Cancel to return to your previous location without saving any information.Return to Table of ContentsPage 10
Password Reminder screenIf you forget your password, clicking the Remind Me link on the LLoogg IInn screen bringsyou here. If you can answer the password reminder question correctly, the DMS will tellyou your password when you click the Get Password button.After seeing your password, click Cancel to return to the LLoogg IInn screen where you cannow complete your log in.Return to Table of ContentsPage 11
Help screenWhen you first log in, this HHeellpp screen pops up on top of the Class List.Click the Do not show at startup box to prevent the HHeellpp screen from popping up in thefuture.Click the Continue button to close the HHeellpp screen.To see the HHeellpp screen at any time, click the Help button at the top of each screen, next tothe Exit button.Return to Table of ContentsPage 12
ClassesAdding ClassesClass List screenUse this screen to create and manage student rosters for each of your classes.Use the Account link next to your name at the top of all screens to return to the TTeeaacchheerrRReeggiissttrraattiioonn screen and edit any of your account log in information. Use the Log Outlink to exit your account and return to the LLoogg IInn screen.After you have added one or more classes, use the ‘Selected Class’ dropdown to choosethe class information with which to work.Click Edit Class to change Class Profile information for the selected class. The buttonbecomes active after one class has been added.The Add Class button takes you to the CCllaassss PPrrooffiillee screen.Page 13
The Add Student button takes you to the SSttuuddeenntt PPrrooffiillee screen. The button becomesactive after you have added one class.The Import Students button allows you to import an entire class roster at once. Thebutton becomes active after you have added one class.The roster to be imported must be stored as either a tab delimited file (.txt) or a commaseparated values file (.csv). The import file must use the format defined in the fileImportTemplate.csv which is located in the F & P Assessment folder on your hard drive.See Importing Students on pg. 22 for more information.The Export Class button allows you to save class information in either a tab delimited orcomma separated values file. The saved file may then be imported into other software.Please note that the exported file includes benchmark information and therefore is not inthe same format required for re-importation via the Import Students function.The Print Class button allows you to print class information. The information printedmay be selected though the CCuussttoommiizzee CCoolluummnnss screen.mnnss screen where youThe Customize Columns button takes you to the CCuussttoommiizzee CCoolluumClamay select up to 8 categories of information to display on this Classss LLiisstt screen. Selectedcolumn choices remain in effect until you change them.Sort order of tabular data may be changed. Clicking on a column header on this or anyother tabular screen will sort the table data according to the information in that column.Clicking the column header a second time will reverse the order of the sort. Sort-bycolumn and sort order remain in effect until you change them.Column width may be changed. Position the mouse over the chiseled-out separatorbetween columns. When the pointer turns into a double-headed arrow, click and drag themouse right or left to change the width of the column. Column width changes remain ineffect only while you are on the screen. Column widths revert to default when you leavethe screen.Return to Table of ContentsPage 14
Class Profile Step 1 of 2Use this screen and the next to add a new class, or to edit or delete an existing class. TheDelete Class button becomes active after one class has been defined.Enter a class name in the ‘Class Name’ field. Click a checkbox to identify the classgrade. K – 12 are typical US grade designations; P1 – S4 are common outside the US.Change the September and June default school year start and end dates by clicking thecalendars. With a calendar open, select a year by clicking the double arrowhead; select amonth by clicking the single arrowhead; select a day by clicking a number.Click Cancel to leave this screen without saving any new or changed information.Click Delete Class to delete all information about the class. Deleting a class here willalso delete all the information about benchmark assessments associated with the class, aswell as all class and student reports. A warning message is displayed before the deletion.There is no ‘undo’ function for this deletion. If you click OK on the warning message,the data is gone.Page 15
Click Next to continue to Step 2 and complete adding the class.Return to Table of ContentsPage 16
Class Profile Step 2 of 2Note that the class name and school year dates defined on the previous screen appear atthe top of this screen.Click the radio button corresponding to your choice for how many times you willadminister assessments to this class. As stated on the screen, once you click Save, youcannot change the frequency of assessments. If you make a mistake, your only recourseis to delete the class and start over.The beginning date(s) of the assessment period(s) are assigned automatically. You maychange the dates for all but the initial period by clicking the calendars. Only dates withinthe defined school year are allowed. With a calendar open, select a year by clicking thedouble arrowhead; select a month by clicking the single arrowhead; select a day byclicking a number.For each assessment period, select a reading level expectation, or range of expectations,for both Independent and Instructional benchmarks. Click each dropdown arrow andclick a reading level from the list that appears. When you set the first dropdown in eachPage 17
range, the second is set to the same value. Create a range by choosing a different levelfor the second dropdown.Click Cancel to return to the CCllaassss LLiisstt screen without saving any new or changedinformation about this class.Click Delete Class to delete all information about the class. Deleting a class here willalso delete all the information about benchmark assessments associated with the class, aswell as all class and student reports. A warning message is displayed before the deletion.There is no ‘undo’ function for this deletion. If you click OK on the warning message,the data is gone.Click Back to leave this screen and return to the previous screen, CCllaassss PPrrooffiillee SStteepp 11 ooff22. Choices made on this SStteepp 22 screen will be lost and will need to be made again tocomplete adding this class.Click Save to save the information you have entered for this class and return to the CCllaassssLLiisstt. Once you have saved this class, you may return to these two screens later and editany of the class information except for the frequency of assessments.Click Save and Add to save the information you have entered for this class and return to anew CCllaassss PPrrooffiillee SStteepp 11 screen where you may begin to add another class.Return to Table of ContentsPage 18
Class List for a newly defined classAfter adding a new class, you are returned to the CCllaassss LLiisstt screen with the newly addedclass selected. All buttons are now active.Click the Add Student button to go to the SSttuuddeenntt PPrrooffiillee screen where you may addstudents one at a time.Click the Import Students button to import a student roster from an external file. SeeImporting Students for more information.Return to Table of ContentsPage 19
Adding StudentsStudent Profile screenEnter the required information for each field.The Grade level is already predefined by the CCllaassss PPrrooffiillee.The Services/Programs Description field becomes active only when the AdditionalReading Services: checkbox has been selected.Click Cancel to return to the CCllaassss LLiisstt screen without saving any new or changedinformation about this student.The Delete button is active only for previously saved student records. Click Delete todelete all information about this student. Deleting a student here will also delete all theinformation about benchmark assessments associated with the student, as well as allstudent reports. A warning message is displayed before the deletion. There is no ‘undo’function for this deletion. If you click OK on the warning message, the data is gone.Page 20
Click Save to save the information you have entered for this student and return to theCCllaassss LLiisstt. Once you have saved this student, you may return to this screen later and editany of the information except for Grade.Click Save and Add to save the information you have entered for this student and returnto a new SSttuuddeenntt PPrrooffiillee screen where you may begin to add another student.Return to Table of ContentsPage 21
Importing StudentsImport Students messageClicking the Import Students button brings up this Import Students message. Theimported data will be appended to any students currently listed. No existing student datawill be overwritten. If a student is duplicated in the imported data, you will haveduplicate records in your CCllaassss LLiisstt.Click the OK button to open the file selection dialog box.Return to Table of ContentsPage 22
Import file dialogIn Windows, the dialog box defaults to show only tab-delimited files (.txt). Click thedropdown arrow and choose comma-separated-value file types if you are importing a .csvfile.Navigate to the location on your hard drive containing the import data file. Select the fileand click Open.Return to Table of ContentsPage 23
Importing and Exporting FilesIn the F & P Assessment folder in Program Files on your hard drive you will find aReadMe.txt file and an Import Template.csv file.The ReadMe file contains complete instructions for importing and exporting files to andfrom the Data Management Software.The Import Template provides a properly formatted csv file showing the required columnheaders, in the proper order, to allow a successful import. Any spreadsheet program maybe used to create and/or edit an import file.Return to Table of ContentsPage 24
Class List importedWhen student records have been added to a class, each record has an Edit link in the firstcolumn. Click the Edit link to go the SSttuuddeenntt PPrrooffiillee screen for that student where youmay edit the student’s information.The Export Class button allows you to save class information in either a tab delimited orcomma separated values file. The saved file may then be imported into other software.Please note that the exported file includes benchmark information and therefore is not inthe same format required for re-importation via the Import Students function.The Print Class button allows you to print class information. The information printedmay be selected though the CCuussttoommiizzee CCoolluummnnss screen.miizzee CCoolluummnnss screen where youThe Customize Columns button takes you to the CCuussttoomClamay select up to 8 categories of information to display on this Classss LLiisstt screen. Selectedcolumn choices remain in effect until you change them.Page 25
Sort order of tabular data may be changed. Clicking on a column header on this or anyother tabular screen will sort the table data according to the information in that column.Clicking the column header a second time will reverse the order of the sort. Sort-bycolumn and sort order remain in effect until you change them.Column width may be changed. Position the mouse over the chiseled-out separatorbetween columns. When the pointer turns into a double-headed arrow, click and drag themouse right or left to change the width of the column. Column width changes remain ineffect only while you are on the screen. Column widths revert to default when you leavethe screen.Return to Table of ContentsPage 26
Customize Columns screenUse this screen to change the columns displayed on the CCllaassss LLiisstt screen, and in printoutsof the screen.You may select up to 8 columns to display. If 8 boxes are already checked, uncheck abox to activate the remaining choices.Click Cancel to return to the CCllaassss LLiisstt screen without altering the column selection.Click Reset To Default to set the column selections to the ones you see checked here andreturn to the CCllaassss LLiisstt screen.Click Save to return to the CCllaassss LLiisstt screen and save the column choices you havechecked.Return to Table of ContentsPage 27
AssessmentsClass Assessment Summary screen newClick the Assessments tab (between Classes and Reports) to open this CCllaassss AAsssseessssmmeennttSSuummmmaarryy screen.Use this screen to enter, edit, review and print benchmark assessment data for your class.To enter data, first select a student by clicking the dropdown arrow and then clicking astudent name.Return to Table of ContentsPage 28
Student Assessment Summary screen newAfter selecting a student from the dropdown list, an Add Text Reading button and aComments box appear.If you add comments, remember to click the Save link before leaving this student’srecord or leaving this screen. If you don’t click the Save link, your comments will belost. You may add, edit or delete your comments any time you are on this screen.To add a new reading assessment for this student in the selected class, click the Add TextReading button.Return to Table of ContentsPage 29
Adding a Text ReadingText Reading Profile Step 1 of 4Click to select the appropriate assessment period. The number of choices is determinedby the assessment frequency you defined on the CCllaassss PPrrooffiillee screen when you added thisclass.Use the Interim choice for additional, supplemental assessments beyond those planned onthe CCllaassss PPrrooffiillee screen.Set the date by clicking the calendar. Only dates within the defined school year areallowed. With the calendar open, select a month by clicking the single arrowhead; selecta day by clicking a number.Click Cancel to return to the SSttuuddeenntt AAsssseessssmmeenntt SSuummmmaarryy screen without saving anyinformation about this reading assessment.Page 30
Click Delete Text Reading to delete all the information about this assessment. TheDelete Text Reading button becomes active when at least one assessment is recorded.Click Next to continue recording assessment information.Return to Table of ContentsPage 31
Text Reading Profile Step 2 of 4Click Fiction or Non Fiction to select the genre of the book read for this assessment.Click the dropdown arrow to select the book level of this reading. Clicking a letter in thedropdown list will display the title of the corresponding book.Click Cancel to return to the SSttuuddeenntt AAsssseessssmmeenntt SSuummmmaarryy screen without saving anyinformation about this reading assessment.Click Delete Text Reading to delete all the information about this assessment. TheDelete Text Reading button becomes active when at least one assessment is recorded.Click Back to return to the TTeexxtt RReeaaddiinngg PPrrooffiillee SStteepp 11 screen. Until you have movedbeyond this step, choices made here on SStteepp 22 will be lost and will need to be made againto complete this reading assessment. When editing an existing record, the Next and Backbuttons simply move you through the screens; no information is lost or changed unlessyou explicitly alter it.Page 32
Click Next to continue recording assessment information.Return to Table of ContentsPage 33
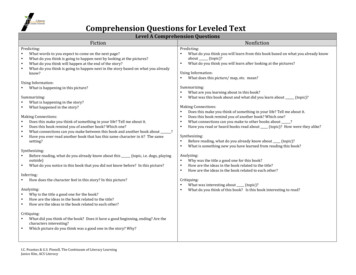
Text Reading Profile Step 3 of 4From your assessment conference worksheets, enter the accuracy score for this reading.You must enter a whole number between 1 and 100.Click the appropriate radio buttons to record comprehension scores both Within the Textand Beyond the Text. For book levels K and above, an additional rating for About theText becomes available. When present, click the appropriate radio button to record thecomprehension score for About the Text.Click the checkbox, if appropriate, to indicate Additional Understanding.The Total comprehension score and Reading Level will be displayed.Click Cancel to return to the SSttuuddeenntt AAsssseessssmmeenntt SSuummmmaarryy screen without saving anyinformation about this reading assessment.Click Delete Text Reading to delete all the information about this assessment. TheDelete Text Reading button becomes active when at least one assessment is recorded.Page 34
Click Back to return to the TTeexxtt RReeaaddiinngg PPrrooffiillee SStteepp 22 screen. Until you have movedbeyond this step, choices made here on SStteepp 33 will be lost and will need to be made againto complete this reading assessment. When editing an existing record, the Next and Backbuttons simply move you through the screens; no information is lost or changed unlessyou explicitly alter it.Click Next to continue recording assessment information.Return to Table of ContentsPage 35
Text Reading Profile Step 4 of 4Enter the student’s Self-Correction score in the field. You must enter a whole numberbetween 0 and 99.For books at Level C or above, click the appropriate radio button to record the student’sfluency for this reading. For books at Levels A and B, the Fluency score radio buttonsare disabled.If a reading rate was recorded, enter it in the Rate field. You may enter a whole numberbetween 0 and 999.If a writing score was recorded, click the appropriate radio button. If writing was notrequired, click the N/A radio button.Click Cancel to return to the SSttuuddeenntt AAsssseessssmmeenntt SSuummmmaarryy screen without saving anyinformation about this reading assessment.Page 36
Click Delete Text Reading to delete all the information about this assessment. TheDelete Text Reading button becomes active when at least one assessment is recorded.Click Back to return to the TTeexxtt RReeaaddiinngg PPrrooffiillee SStteepp 33 screen. Until you have saved thisrecord, choices made here on SStteepp 44 will be lost and will need to be made again tocomplete this reading assessment. When editing an existing record, the Next and Backbuttons simply move you through the screens; no information is lost or changed unlessyou explicitly alter it.Click Save to save the information you have entered for this reading assessment andreturn to the SSttuuddeenntt AAsssseessssmmeenntt SSuummmmaarryy screen. Once you have saved thisassessment, you may return to these screens later and edit any of the information.Click Save and Add to save the information you have entered for this reading assessmentand return to a new TTeexxtt RReeaaddiinngg PPrrooffiillee SStteepp 11 screen where you may begin to addscoring information for another assessment for this student.Return to Table of ContentsPage 37
Student Assessment Summary screen completedWhen assessment records for a student have been added, each record has an Edit link inthe first column. Click the Edit link to go the TTeexxtt RReeaaddiinngg PPrrooffiillee screens for thatassessment where you may edit the student’s information.As you add assessment scores over the course of the school year, the RecommendedPlacement Level (right hand side, above the columns) will change. The DMSautomatically suggests a placement level equal to the highest Instructional benchmarkrecorded. You may alter that choice by clicking the dropdown arrow and choosinganother level. If the student later scores at a higher level, the higher level will replaceyour selection.The Print button allows you to print the information shown in the table.Sort order of tabular data may be changed. Clicking on a column header on this or anyother tabular screen will sort the table data according to the information in that column.Clicking the column header a second time will reverse the order of the sort. Sort-bycolumn and sort order remain in effect until you change them.Page 38
Column width may be changed. Position the mouse over the chiseled-out separatorbetween columns. When the pointer turns into a double-headed arrow, click and drag themouse right or left to change the width of the column. Column width changes remain ineffect only while you are on the screen. Column widths revert to default when you leavethe
Welcome to the Fountas & Pinnell (F&P) Benchmark Assessment System Data Management Software (DMS). This User Guide provides a quick and easy reference on the use of the Data Management Software complimenting the Fountas & Pinnell Assessment system. The User Guide presumes that you have already completed the online Fountas & Pinnell DMS Tutorial.