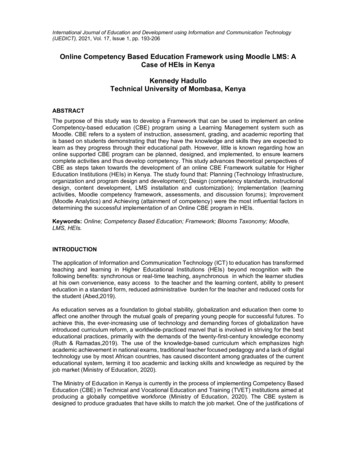
Transcription
Poll EverywhereMoodle IntegrationSystem Administrator GuideVersion 1.0.0This guide is intended for Moodle System Administrators and describes how to use thePoll Everywhere integration with any Moodle LMS system. This guide is intended foruse with Moodle 2.8 onwards.Note that the installation screens may appear slightly different depending on your Moodleversion and browser.Authentication and Authorization . 2Request LTI registration link . 2Add Poll Everywhere as an External Tool . 3Integration Features . 6Course Roster Import. 6Gradebook Export. 8
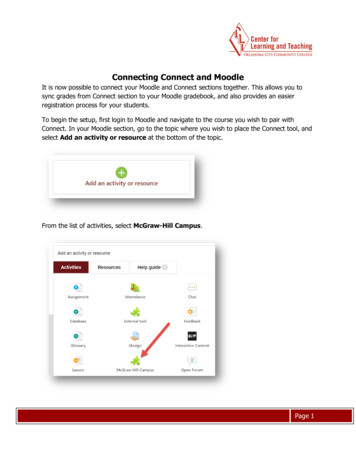
Poll Everywhere Moodle Integration GuideAuthentication and AuthorizationRequest LTI registration linkYou will need to request an LTI tool provider registration link with token in order forPoll Everywhere to create a Tool Proxy for your users. To do this, start by logging intothe appropriate Poll Everywhere account at polleverywhere.com/login.In the Poll Everywhere account, go to polleverywhere.com/lms/lti/roster imports/newNext, select the link to Request a Moodle registration. This will notify the PollEverywhere support staff to send you the registration link.If you do not have access to the Poll Everywhere account and are setting this up foranother user, you may request the Moodle registration link by emailing support directly atsupport@polleverywhere.com. Please include the email address of the owner of thePoll Everywhere account in the email.We will get back to you with the Moodle registration link within 1-2 business days.Learn more about Moodle’s LTI 2.0 support: https://docs.moodle.org/dev/LTI 2 supportVersion 1.0.02
Poll Everywhere Moodle Integration GuideAdd Poll Everywhere as an external toolIn your Moodle portal, navigate to the Site administration view. Select the Plugins taband then select the “Manage tools” link.Within the plugins registration form, enter the LTI tool provider registration link that thePoll Everywhere support staff sent you in the “Add tool” field.Version 1.0.03
Poll Everywhere Moodle Integration GuideYou will first see a button in the frame redirecting you to your LMS URL. Once you haveredirected, you should see a screen requesting access to certain information for ourintegration to work. After agreeing to this, you should see the Poll Everywhere Porterappear under your Tools list.NOTE: We do not recommend adding the connection via “Configure a tool manually”.Version 1.0.04
Poll Everywhere Moodle Integration GuideConfigure the Poll Everywhere Porter toolSelect the gear icon on the top right of the Poll Everywhere Porter to configure the tool.Set the “Default launch container” to “New window” and add the Poll Everywhere iconfor quick identification:Icon URL: /pe logo icon.pngVersion 1.0.05
Poll Everywhere Moodle Integration GuideIntegration featuresCourse Roster ImportFaculty may import their course rosters from Moodle into Poll Everywhere. This willautomatically register each student as a Poll Everywhere participant. Registering studentswith Poll Everywhere lets educators easily identify how students responded to their polls.From Moodle, navigate to the course you would like to use with Poll Everywhere. Then“Turn editing on” for that course by selecting the gear icon in the top right.Version 1.0.06
Poll Everywhere Moodle Integration GuideTo the right side of the Course view, select “Add an activity or resource.”This will open the “Add an activity or resource” modal. From this modal select “Externaltool” and then click Add.Now you can configure the Poll Everywhere tool for this specific course. Select the PollEverywhere Porter from the “Preconfigured tool” drop down menu. Then navigate toVersion 1.0.07
Poll Everywhere Moodle Integration Guide“Common module settings” and set the tool to “Hide.” This will prevent students fromseeing the Poll Everywhere tool.Finally, select “Save and return to course.”Once the tool is saved, click on the Poll Everywhere link in the course to open the PollEverywhere tool. Doing so will open a new window and navigate you to a PollEverywhere page. On that page, click the red Import Roster button and Poll Everywherewill import the student roster for the selected Moodle course.Version 1.0.08
Poll Everywhere Moodle Integration GuideWhen this is done, a new Poll Everywhere account will be created for each student whodid not already have one.Students must set their own password by requesting a password reset email frompolleverywhere.com/login (unless they already have a Poll Everywhere account). Youcan edit and manage the imported students at polleverywhere.com/participants.Gradebook ExportExporting grades from Poll Everywhere to Moodle saves educators time by letting themquickly record how students responded to their polls. For this feature to work properly,educators must first register their students will Poll Everywhere by following thesteps outlined above.Once students are registered, and have responded to one or more polls, you will need toadd the Poll Everywhere tool to the Moodle topic you wish to associate with thegradebook report.In Moodle, start by navigating to the chosen Topic. Then “Turn editing on” for that topicby selecting the gear icon to the top right.Next, on the right side of the Topic, select “Add an activity or resource.”This will open the “Add an activity or resource” modal. From this modal, select “Externaltool” and then click Add.Version 1.0.09
Poll Everywhere Moodle Integration GuideNext you can configure the Poll Everywhere tool for this specific course. Select the PollEverywhere Porter from the “Preconfigured tool” drop down menu. Then navigate to“Common module settings” and set the tool to “Hide.” This will prevent students fromseeing the Poll Everywhere tool. Save these settings using “Save and return to course.”Version 1.0.010
Poll Everywhere Moodle Integration GuideNow you will see a new link in the course to open the Poll Everywhere tool. Click thatlink. A new page will open and automatically navigate to the Poll Everywhere website.From here, select “Create Gradebook for exporting.”In the new modal, select the poll questions you want to add for the gradebook report.Then click “Finish” to create you report.Version 1.0.011
Poll Everywhere Moodle Integration GuideOnce the report is created, select the “Export” button on the bottom right of the page.This will export the Gradebook report to the selected Moodle topic. It may take severalminutes to complete this report depending on your internet connect, number of responses,and number of poll questions in the Gradebook report. When it’s finished, the report willappear in Moodle automatically.Version 1.0.012
Moodle Integration System Administrator Guide Version 1.0.0 This guide is intended for Moodle System Administrators and describes how to use the Poll Everywhere integration with any Moodle LMS system. This guide is intended for use with Moodle 2.8 onwards. Note that the installation screens may appear slightly different depending on your Moodle