Transcription
Welcome to theConfiguring NextGen Signatures(Blobulizer and MACROS)The presentation will begin shortly.Please note that all attendees are in listen only mode.A recording of this webinar will be sent out to all attendees.Presented by:
Inquiries may be submitted using the Questions window.
About eMedAppseMedApps is a Healthcare Information Technology Services company providingpractices, clinics and hospitals with a full range of services, as well as a suite ofproducts designed to increase efficiency and facilitate communication. Founded in 1999 Working as partner with NextGen since 2001 Worked as subcontractor for NextGen Serving healthcare clients across USA Services and Products for NextGen clients
Follow Us!Be sure to follow us on Facebook, Instagram, Twitter and LinkedInand Subscribe to our YouTube Channel! Just search eMedApps
About Our PresenterVictoria (Vicky) Wieronski hasbeen with eMedApps for sixyears. She is a SeniorApplication Specialist and hasover twenty-eight years ofexperience in healthcare. Sheloves boating, jet skiing, beingoutdoors and playing with herEnglish Mastiffs, Steve andNorris.
Preparing the Signature
Preparing the Signature Identify the document imagesfolder path from UniversalPreferences–––––Open and login to System AdministratorSelect your Enterprise/PracticeNavigate to the VIEW menu and click onUniversal PreferencesClick on the “Documents” left navigationfolder and search for “Document ImagePath”Usually located under the NextGenrootfolder path, ocImages
Preparing the Signature Obtain the “wet” signature––––Create/Use a master signature sheetEach provider signs twiceUse two different pensStay within 2 x 3“ block size Scan the entire signature/s sheetas a .bmp, .jpeg, .jpg, .png or .tiff
Preparing the Signature Use a graphic software to crop thesignature, e.g., MS Paint, Krita, IrfanView,staying within that 2 x 3”– Variety of free software out there or you already mayhave one of your choice, https://ninite.com/Save the signature/s (.bmp, .tiff or .jpg) tothe file path identified above.
DEMO
Blobulizing
Blobulizing BLOB – Binary LargeObjectOnly needed for CrystalReportsLocate the SignatureBlobulizer––Usually in the C:\NextGenfolderIf not present, it may need tobe copied from\\ImageServer\Nextgenroot\PROD\Components folderfile path to the C:\NextGen
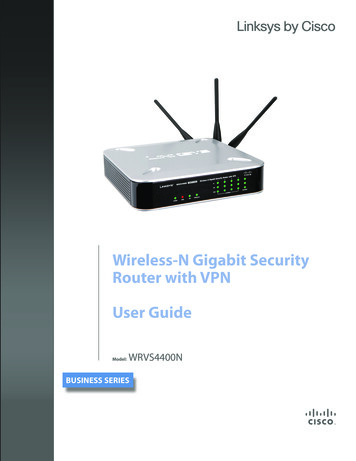
Blobulizing Log into Signature BlobulizerBlobulizer Key Areas1. Find – Search for providersin list or under Existing tab2. Show Rendering Only –Checkbox to excludereferring physicians3. Total Providers – Count ofsignatures blobulized4. New/Existing – Tabsindicating unblobulizedsignatures and existingblobulized signatures
Blobulizing File Maintenance:Provider Master BlobulizerProviders’ List
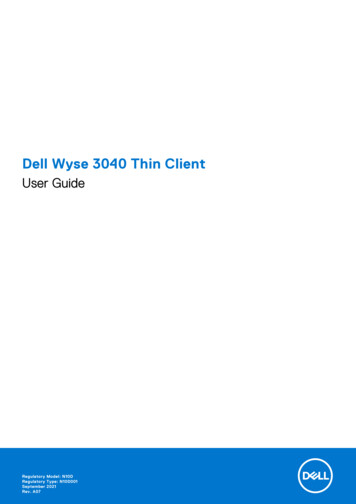
Adding a SignatureTo add a new signature:1.Click the New Tab2.Double click theProvider Name on theleft-hand side3.Click the yellow openfile button4.Browse to the path inthe system to connectto the .bmp filepreviously saved for thisprovider5.Click Add
DEMO
Crystal Report Configuration
Adding a Signature to a Report Identify and Open up theReport in SAP Crystal Reportsor create a new report–– If an existing report, best practice is tomake a copy of the originalCommon Report with signatures –RXPrint, RXFax, Lab or RadiologyRequisitions, eyeglass RX, contact lensRXUnder the Database Menu,Open Data Expert
Adding a Signature to a Report Under the data tab, verifyyour connection to thedatabase source*Add ‘Provider Signature’table (left to right), clickOKCrystal will want you toverify the table links orapply the relationshipconnection to the othertablesClick OK to exit out of theDatabase Expert*Note – you may need yourAdministration or IT assistance
Adding a Signature to a Report Under Field Explorer,expand the DatabaseFields for“provider signature’Locate the“signature’ fieldDrag and Drop‘signature’ field toreport locationSave the report
DEMO
NextGen Document Configuration
Document Macro Open Document Builder– From EHR Tools Menu,Document Builder, or– C:\NextGen“DocumentBuilder.exe”Log in under your Enterprise andPractice accountOpen the document you wish toinsert a signature
Document MacroMacro Favorites andSearch View (ViewMenu) Quick access to commonmacros or custom builtAvoids duplicationMacro search engine– Use wildcard elements“*”
Document MacroCreate New Macro Open Macro Builder underToolsClick on Norton icon and selectNew–––Standard Macro – BasicDB/Template Tables, e.g.,referrals, lab requisitionsFM Macro – File MaintenanceTables, e.g, payers, locationsSummary Macro – Summariese.g., Allergy, Meds grids
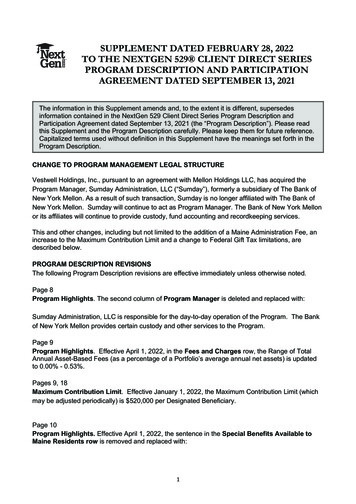
Document MacroCreate New Macro1.2.3.4.5.Give the Macro a NameGive it a descriptionLocate the tableLocate the fieldEnter your key values Best practice is using unique identifiershowever you may need your IT to assist6. Save the Macro
Document MacroInsert Macro into Document Add a BEGIN/ENDDrag and Drop the Macro into the DocumentCompile and Save the Macro–––Tool, CompileFile, SaveOr, use the “Compile/Save” icon
DEMO
Troubleshooting tips
TroubleshootingEncounter Properties – Correct Rendering Provider?
TroubleshootingEnsure the crystal report’s database data link is up to date
TroubleshootingEnsure the table links are valid
TroubleshootingEnsure the table links are valid, continued
TroubleshootingEnsure the correct report is modified
TroubleshootingDocument Macro – Did the provider name change? Consult with yourAdministration/IT Department on using GUIDs for these cases.
TroubleshootingNextGen Success Community f3000000KzFM?srPos 2&srKp kaB&lang en US
Q&AA recording of this webinar will be sent outto all attendees.847-490-6869info@emedapps.com
Worked as subcontractor for NextGen Serving healthcare clients across USA Services and Products for NextGen clients. Follow Us! Be sure to follow us on Facebook, Instagram, Twitter and LinkedIn . \\ImageServer\Nextgenroot\PROD\EMR\ Documents\DocImages. Preparing the Signature Obtain the "wet" signature - Create/Use a .