Transcription
SPM050INSTRUCTIONMANUALFORRUGER REDHAWK DOUBLE-ACTION REVOLVERS357 MagNUM45 AUTO–45 COLT– Rugged, Reliable Firearms –READ THE INSTRUCTIONS ANDWARNINGS IN THIS MANUAL CAREFULLYBEFORE USING THIS FIREARM 2018 Sturm, Ruger & Co., Inc.This manual may not be reproduced in whole or in part without the express writtenpermission of Sturm, Ruger & Co., Inc.For Service on This Model Please Call:(336) 949-5200 (See p. 30)THIS INSTRUCTION MANUAL SHOULD ALWAYS ACCOMPANY THIS FIREARM AND BETRANSFERRED WITH IT UPON CHANGE OF OWNERSHIP, OR WHEN THE FIREARM IS LOANEDOR PRESENTED TO ANOTHER PERSONwww.ruger.comKH 1/19 R27
State-By-State WarningsCertain states require by law that their own specified warningnotices in larger-than-normal type be conspicuously included bythe manufacturer, distributor or retailer with firearms sold in thatstate. Sturm, Ruger & Co., Inc. sells its products in compliancewith applicable laws and regulations. Because our products may besold in these states, we include the following:California:WARNING“Firearms must be handled responsibly and securely stored toprevent access by children and other unauthorized users. Californiahas strict laws pertaining to firearms, and you may be fined orimprisoned if you fail to comply with them. Visit the Web site of theCalifornia Attorney General at https://oag.ca.gov/firearms forinformation on firearm laws applicable to you and how you cancomply.Prevent child access by always keeping guns locked away andunloaded when not in use. If you keep a loaded firearm where a childobtains and improperly uses it, you may be fined or sent to prison.”ADVERTENCIA“Las armas de fuego deben manipularse de manera responsable ysegura para evitar el acceso de niños y otros usuarios no autorizados.California tiene leyes estrictas relacionadas con armas de fuego, yusted puede ser multado o encarcelado si no las cumple. Visite el sitioweb del Procurador General de California enhttps://oag.ca.gov/firearms para obtener información sobre las leyesde armas de fuego que le son aplicables y cómo puede cumplirlas.A los niños los atraen las armas de fuego y las pueden hacer funcionar.Ellos pueden causarses lesions graves y la muerte. Evite que los niñostengan accesso a las armas de fuego guardándolas siempre con llave ydescargadas cuando no las esté utilizando. Si usted tiene un arma defuego cargada en un lugar en que un niño tiene acceso a ella y la usaindebidamente, le pueden dar una multa o enviarlo a la carcel.”2
Connecticut:“UNLAWFUL STORAGE OF A LOADED FIREARM MAYRESULT IN IMPRISONMENT OR FINE.”Florida:“IT IS UNLAWFUL, AND PUNISHABLE BYIMPRISONMENT AND FINE, FOR ANY ADULT TOSTORE OR LEAVE A FIREARM IN ANY PLACE WITHINTHE REACH OR EASY ACCESS OF A MINOR UNDER 18YEARS OF AGE OR TO KNOWINGLY SELL OROTHERWISE TRANSFER OWNERSHIP OR POSSESSIONOF A FIREARM TO A MINOR OR A PERSON OFUNSOUND MIND.”Maine:“ENDANGERING THE WELFARE OF A CHILD IS ACRIME. IF YOU LEAVE A FIREARM AND AMMUNITIONWITHIN EASY ACCESS OF A CHILD, YOU MAY BESUBJECT TO FINE, IMPRISONMENT OR BOTH. KEEPFIREARMS AND AMMUNITION SEPARATE. KEEPFIREARMS AND AMMUNITION LOCKED UP. USETRIGGER LOCKS.”Maryland:“WARNING: Children can operate firearms which may causedeath or serious injury. It is a crime to store or leave a loadedfirearm in any location where an individual knew or shouldhave known that an unsupervised minor would gain access tothe firearm. Store your firearm responsibly!”3
Massachusetts:“WARNING FROM THE MASSACHUSETTS ATTORNEYGENERAL: This handgun is not equipped with a device thatfully blocks use by unauthorized users. More than 200,000firearms like this one are stolen from their owners every year inthe United States. In addition, there are more than a thousandsuicides each year by younger children and teenagers who getaccess to firearms. Hundreds more die from accidentaldischarge. It is likely that many more children sustain seriouswounds, or inflict such wounds accidentally on others. In orderto limit the chance of such misuse, it is imperative that you keepthis weapon locked in a secure place and take other stepsnecessary to limit the possibility of theft or accident. Failure totake reasonable preventive steps may result in innocent livesbeing lost, and in some circumstances may result in yourliability for these deaths.”“IT IS UNLAWFUL TO STORE OR KEEP A FIREARM,RIFLE, SHOTGUN OR MACHINE GUN IN ANY PLACEUNLESS THAT WEAPON IS EQUIPPED WITH A TAMPERRESISTANT SAFETY DEVICE OR IS STORED OR KEPT INA SECURELY LOCKED CONTAINER.”New Jersey:“IT IS A CRIMINAL OFFENSE TO LEAVE A LOADEDFIREARM WITHIN EASY ACCESS OF A MINOR.”New York City:“THE USE OF A LOCKING DEVICE OR SAFETY LOCK ISONLY ONE ASPECT OF RESPONSIBLE FIREARMSTORAGE. FOR INCREASED SAFETY, FIREARMSSHOULD BE STORED UNLOADED AND LOCKED IN ALOCATION THAT IS BOTH SEPARATE FROM THEIRAMMUNITION AND INACCESSIBLE TO CHILDREN ANDUNAUTHORIZED PERSONS.”4
North Carolina:“IT IS UNLAWFUL TO STORE OR LEAVE A FIREARMTHAT CAN BE DISCHARGED IN A MANNER THAT AREASONABLE PERSON SHOULD KNOW ISACCESSIBLE TO A MINOR.”Texas:“IT IS UNLAWFUL TO STORE, TRANSPORT, ORABANDON AN UNSECURED FIREARM IN A PLACEWHERE CHILDREN ARE LIKELY TO BE AND CANOBTAIN ACCESS TO THE FIREARM.”Wisconsin:“IF YOU LEAVE A LOADED FIREARM WITHIN THEREACH OR EASY ACCESS OF A CHILD YOU MAY BEFINED OR IMPRISONED OR BOTH IF THE CHILDIMPROPERLY DISCHARGES, POSSESSES, OR EXHIBITSTHE FIREARM.”* * * * * * * * * * * * * * * * * * * * * *Please check with your licensed retailer or state police foradditional warnings which may be required by local law orregulation. Such regulations change constantly, and localauthorities are in the best position to advise you on such legalmatters.5
FIREARMS SAFETY IS YOUR RESPONSIBILITYSAFETY MUST BE THE FIRST AND CONSTANTCONSIDERATION OF EVERY PERSON WHO HANDLESFIREARMS AND AMMUNITION.This Instruction Manual is designed to assist you in learning how to useand care for your RUGER REDHAWK revolver properly. Pleasecontact us if you have any questions.Only when you are certain you fully understand the manual and canproperly carry out its instructions should you practice loading, unloading,etc. with live ammunition. If you have any doubts about your ability tohandle or use a particular type of gun safely, you should seek supervisedinstruction. Such personalized instruction often is available from localgun retailers, gun clubs or police departments. If none of these sourcescan help visit www.nra.org or write to the following address:National Rifle Association11250 Waples Mill RoadFairfax, VA 22030-7400The person possessing a gun has a full-time job. You cannot guess; Youcannot forget; You must know how to use your firearm safely. Do not useany firearm without having a complete understanding of its particularcharacteristics and safe use. Remember: There is no such thing as afoolproof gun.6
TABLE OF CONTENTSPageState-By-State Warnings . . . . . . . . . . . . . . . . . . . . . . . . . . . . . . . . . . . . . . . . . .2Nomenclature . . . . . . . . . . . . . . . . . . . . . . . . . . . . . . . . . . . . . . . . . . . . . . . . . .8Locking Device Installation Instructions . . . . . . . . . . . . . . . . . . . . . . . . . . . . .9General Information and Mechanical Characteristics . . . . . . . . . . . . . . . . . 11Ammunition . . . . . . . . . . . . . . . . . . . . . . . . . . . . . . . . . . . . . . . . . . . . . . . . . . 12Ammunition Information – Redhawk 45 AUTO – 45 COLT . . . . . . . . . . . .13Handling . . . . . . . . . . . . . . . . . . . . . . . . . . . . . . . . . . . . . . . . . . . . . . . . . . . . . 14Dry-Firing . . . . . . . . . . . . . . . . . . . . . . . . . . . . . . . . . . . . . . . . . . . . . . . . . . . .14Special Instructions For Moon Clips . . . . . . . . . . . . . . . . . . . . . . . . . . . . . . .15To Load and Fire . . . . . . . . . . . . . . . . . . . . . . . . . . . . . . . . . . . . . . . . . . . . . . 16To Uncock (Decock) The Revolver . . . . . . . . . . . . . . . . . . . . . . . . . . . . . . . . . 18To Unload or Eject Cartridge Cases . . . . . . . . . . . . . . . . . . . . . . . . . . . . . . . . 19Disassembly . . . . . . . . . . . . . . . . . . . . . . . . . . . . . . . . . . . . . . . . . . . . . . . . . . 21Disassembly Instructions - Revolvers Numbered Below 500-09367 . . . . . . 22Reassembly . . . . . . . . . . . . . . . . . . . . . . . . . . . . . . . . . . . . . . . . . . . . . . . . . . . 23Care and Cleaning . . . . . . . . . . . . . . . . . . . . . . . . . . . . . . . . . . . . . . . . . . . . . 25Ejector Cleaning Instructions . . . . . . . . . . . . . . . . . . . . . . . . . . . . . . . . . . . .26Storage . . . . . . . . . . . . . . . . . . . . . . . . . . . . . . . . . . . . . . . . . . . . . . . . . . . . . . .27Care of Stainless Steel Revolvers . . . . . . . . . . . . . . . . . . . . . . . . . . . . . . . . . . 28Attaching Ruger Scope Rings . . . . . . . . . . . . . . . . . . . . . . . . . . . . . . . . . . . . .28Sights . . . . . . . . . . . . . . . . . . . . . . . . . . . . . . . . . . . . . . . . . . . . . . . . . . . . . . . 29Service and Parts Policy . . . . . . . . . . . . . . . . . . . . . . . . . . . . . . . . . . . . . . . . . 30Shipping Firearms for Repair . . . . . . . . . . . . . . . . . . . . . . . . . . . . . . . . . . . . .30Ordering Parts . . . . . . . . . . . . . . . . . . . . . . . . . . . . . . . . . . . . . . . . . . . . . . . . .31Parts List . . . . . . . . . . . . . . . . . . . . . . . . . . . . . . . . . . . . . . . . . . . . . . . . . . . . .33Exploded View . . . . . . . . . . . . . . . . . . . . . . . . . . . . . . . . . . . . . . . . . . . . . . . . 35Redhawk Revolver Mechanism . . . . . . . . . . . . . . . . . . . . . . . . . . . . . . . . . . .36Redhawk 45 AUTO – 45 COLT Parts List & Exploded View . . . . . . . . . . . .37Sleeve & Shroud Barrel Models Parts List & Exploded View . . . . . . . . . . . .37The Basic Rules of Safe Firearms Handling . . . . . . . . . . . . . . . . . . . . . . . . . 38Warranty Information . . . . . . . . . . . . . . . . . . . . . . . . . . . . . . . . . . . . . . . . . . 44“Ruger” is a registered U.S. trademark.WARNINGS OF GREAT IMPORTANCE AREFOUND ON THE FOLLOWING PAGES:Locking DevicesAlterationsLead ExposureAmmunitionHandlingCylinder orageShippingParts PurchasersOTHER CAUTIONS AND WARNINGS APPEARTHROUGHOUT THE MANUAL.7182025273031
NOMENCLATUREFigure 1Figure 2DISASSEMBLED VIEW8
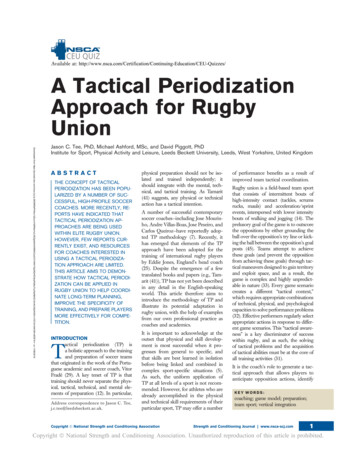
LOCKING DEVICEINSTALLATION INSTRUCTIONSWARNING – USE OF LOCKING DEVICES Always keep your firearm pointed in a safe direction,including when you are installing or removing yourlocking device. Always verify that your firearm is completely unloadedbefore installing your locking device. Do not install locking devices in the trigger guard;always keep your fingers and locking device outside thetrigger guard during device installation and removal. Store firearms, ammunition and keys separately andsecurely, away from children and careless adults; do notstore your firearm with the keys in the locking device.Do not store keysin lock. Do not attempt to work the action of your firearm withthe locking device in place; this may damage yourfirearm. While locking devices are an important aid to securitymeasures, they are not a substitute for safe firearmhandling and proper storage. Remember that anymechanical device can be bypassed with enough time,knowledge, determination and equipment.LOCKING DEVICES MUST BE USEDSAFELY AND RESPONSIBLYIt is important to use the locking device on your Ruger firearm whenthe firearm is stored or immediate use is not planned.Keep the muzzle pointed in a safe direction and your fingers outside thetrigger guard at all times!To Install the Factory-Supplied Locking Device:1. Be sure the firearm is completely unloaded and contains no cartridgesor cartridge cases!2. Completely swing out the cylinder.9
3. Insert the cable through the cylinder as shown below.4. To lock: With the key turned to the farthest clockwise position, insertthe loose end of the cable into the lock. Turn the keycounterclockwise and remove the key.5. Once the lock is securely closed, pull firmly on the lock to test theconnection and be sure it is locked. Do not leave or store yourfirearm with the key in the lock! Store your locked, unloaded firearmand the key in secure, separate locations, away from ammunition,children, and unauthorized adults.Correct Installation of LockFor Ruger Redhawk Revolvers Only10
FIREARMS ARE DANGEROUS WEAPONSREAD THE INSTRUCTIONS AND WARNINGS IN THISMANUAL THOROUGHLY AND CAREFULLY BEFORE USING.WARNING–ALTERATIONSThis product was designed tofunction properly in its originalcondition. Alterations can make itunsafe. Do not alter any part or addor substitute parts or accessories notmade by Sturm, Ruger & Co., Inc.DO NOT ALTER ANY GUNGENERAL INFORMATIONAND MECHANICAL CHARACTERISTICSThe RUGER REDHAWK revolver is a double-action firearm which isspecifically designed for heavy Magnum cartridges and embodies manyadvanced features. The crane and cylinder assembly of the REDHAWK revolver locks directly into the frame, both at the rear of the cylinder and atthe front of the crane. The ejector rod serves as an ejector - it does not rotatewith the cylinder. The hammer and trigger are powered by opposite ends ofthe same coil spring which is in the frame behind the trigger. Thecomponents which link the trigger and hammer to this spring transmitspring energy with minimum friction loss. All of this mechanism is readilyremovable without tools and dismantles, along with the cylinder/crane group,into a small number of subassemblies for inspection and cleaning (SeeFigure 1 and Figure 2, p. 8). The internal parts are installed either throughthe top or bottom of the grip-frame; therefore, no side plate is needed. Theresulting double solid frame contributes greatly to the extraordinary strengthand reliability of these revolvers.The RUGER REDHAWK revolver has a transfer bar which is connecteddirectly to the trigger. The transfer bar - which is raised into firing positionas the trigger is pulled to the rear - transmits the energy of the hammer blowto the firing pin. The transfer-bar safety system provides that the hammerblow can be transmitted to the firing pin only when the trigger is pulled allthe way to the rear. This is a positive internal safety feature.Despite their many highly desirable features, Ruger revolvers–as with allfirearms–must at all times be handled with strict attention to correct safetypractices, and be inspected frequently to assure the gun is working properly.11
WARNING – LEAD EXPOSUREDischarging firearms in poorlyventilated areas, cleaning firearms, orhandling ammunition may result inexposure to lead and other substancesknown to the State of California tocause birth defects, reproductiveharm, and other serious physicalinjury. Have adequate ventilation at alltimes. Wash hands thoroughly afterexposure.SHOOTING OR CLEANING GUNSMAY EXPOSE YOU TO LEADAMMUNITIONRUGER REDHAWK revolvers are marked on the barrel with the nameof the cartridge for which the revolver is chambered. Revolvers marked forthe .44 Magnum cartridge will chamber the .44 Rem. Magnum cartridge andthe .44 S&W Special cartridge. Revolvers marked for the .45 Colt cartridgewill chamber only .45 (“Long”) Colt ammunition. Caliber .45ACP (AutomaticColt Pistol) ammunition should not be used in these revolvers. See page 12for 45 AUTO-45 COLT ammunition information. Revolvers marked for 357Magnum can fire factory loaded 357 Mag, 38 Spl and 38 Spl P ammunition.Ruger revolvers are designed for use with cartridges of the correct caliberwhich are manufactured in accordance with the U.S. Industry Standards. Becertain to use proper cartridges of the correct caliber. See “Care andCleaning,” p. 25 for important information on chamber cleaning.WARNING – AMMUNITIONDeath, serious injury, and damagecan result from the wrongammunition, bore obstructions,powder overloads or incorrectcartridge components. Always wearshooting glasses and hearingprotection.IMPROPER AMMUNITIONDESTROYS GUNS12
AMMUNITION (CARTRIDGES) NOTICEWE SPECIFICALLY DISCLAIM RESPONSIBILITY FOR ANY DAMAGEOR INJURY WHATSOEVER OCCURRING IN CONNECTION WITH,OR AS THE RESULT OF, THE USE IN THE SUPER REDHAWKREVOLVER OF FAULTY OR NON-STANDARD OR “REMANUFACTURED” OR HAND LOADED (RELOADED)AMMUNITION OR OF CARTRIDGES OTHER THAN THOSE FORWHICH THE FIREARM WAS ORIGINALLY CHAMBERED.AMMUNITION INFORMATIONRUGER REDHAWK REVOLVERSCHAMBERED IN 45 AUTO–45 COLTNOTE: A package of three 45 AUTO moon clips is supplied withREDHAWK revolvers chambered for the 45 AUTO-45 COLT cartridge.The moon clip is required to allow proper ejection of the 45 AUTO rimlesscases. 45 AUTO cartridges cannot be fired without using the moon clip.See “SPECIAL INSTRUCTIONS FOR MOON CLIPS” on page 15. RUGER REDHAWK revolvers are designed for use with cartridges of the correctcaliber which are manufactured in accordance with the U.S. IndustryStandards. Be certain to use proper cartridges of the correct caliber. See“Care and Cleaning,” p. 25 for important information on chamber cleaning.Because 45 AUTO cartridges are manufactured worldwide for use in pistols,revolvers, and submachine guns, it is possible to encounter cartridges which,when fired, develop pierced primers. If this occurs, discontinue the use ofthe particular brand or type of ammunition. The possibility of a piercedprimer is another reason why a shooter should always wear eye protection.Also note that some ammunition may not securely crimp the bullet in thecartridge. An improperly crimped bullet will move forward in the cartridge.This will only become an issue if the round moves forward enough toprotrude out of the front of the cylinder. Should this happen, the cylinderwill not be able to index to fire as the nose of the bullet will hit the outsideof the barrel or frame. Should this happen, discontinue use of that particularbrand or type of ammunition.13
HANDLINGCARRYING: The Redhawk revolver can be carried with all chambers loaded.When the hammer and trigger are fully forward, the transfer-bar is loweredout of its firing position and the hammer rests directly on the frame.WARNING – HANDLINGIf the trigger is held to the rear, the guncan fire if the hammer strikes thetransfer bar. Note that it need not be adeliberate effort to pull the trigger. Anysituation where the trigger attains itsrearward position and permits thetransfer bar to be interposed between thehammer and the firing pin can cause thecartridge under the firing pin todischarge.NEVER DROP OR STRIKE THEREVOLVER – COCKED OR UNCOCKED.CARRY AND HANDLE THE REVOLVERIN SUCH A MANNER THAT THEHAMMER AND TRIGGER WILL NOT BESTRUCK.NEVER CARRY ANYREVOLVER WITH THEHAMMER COCKED OR THETRIGGER HELD TO THE REARDRY-FIRING“Dry Firing” is practicing the trigger pull of the empty revolver for practiceand familiarity. The Redhawk revolver can be dry-fired without damage tothe firing pin or internal components.Be sure that the revolver is unloaded before handling. Be sure you alwayspoint the revolver in a safe direction, even when dry-firing for practice. Donot dry-fire the revolver with the plastic ‘safety disc’ on the cylinder.14
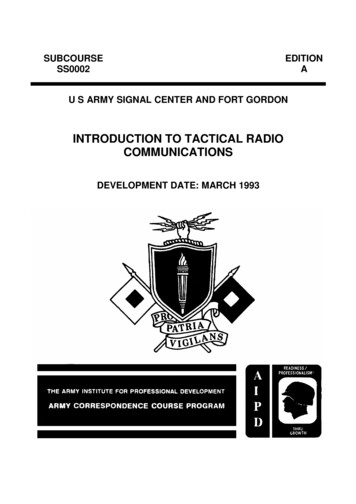
SPECIAL INSTRUCTIONS FORMOON CLIPSTO LOAD MOON CLIP (For 45 AUTO & 357 Mag Redhawk Revolvers):NOTE: 45 AUTO Redhawk revolvers require special moon clips to extract thecartridges using the ejector rod because this type of cartridge has no rim for the ejectorto act against. 45 AUTO cartridges cannot be fired without using the moon clip.Hold moon clip on the outside diameter in one hand. With thumb and forefinger of theopposite hand, press the cartridge’s extractor groove into the moon clip until it snapsinto place (see Figure 3). Continue until the moon clip is fully loaded. Load cartridges,along with the moon clip, into the cylinder (see Figure 4).Figure 3Figure 4TO UNLOAD MOON CLIP:Eject the moon clip and cases from the cylinder (see Figure 5). While holding themoon clip on the outside diameter, pull the empty cases out of the moon clip forremoval (see Figure 6). The moon clip is now ready to be reloaded. Inspect themoon clip after each use. If broken, bent or cracked, discard and replace.Additional moon clips can be purchased from our Newport, New HampshireService Department.Figure 5Figure 615
TO LOAD AND FIREBe sure the revolver is pointed in a safe direction and isnever cocked while loading.1. Press the crane latch and guide cylinder out of frame to the left to itsloading position (See Figure 7).Figure 7LOADING THEREVOLVER.2. Insert cartridges and gently close cylinder, making sure it is securelylatched. Do not “flip” the cylinder open or shut. WARNING – CYLINDER INTERLOCKWhen correctly operated, the cylindercannot be opened when the hammer iscocked, and the hammer/triggermechanism is not able to be operateduntil the cylinder is locked shut.However, this safety interlock can beintentionally defeated if the crane latch isdepressed and the hammer is thencocked while the cylinder opened. If thecylinder is then shut when the hammeris cocked, the hammer may fall and thegun may fire.NEVER CLOSE OR OPENTHE CYLINDER WHILETHE HAMMER IS COCKED16
3. The revolver is now ready to fire, either “double-action” by pulling thetrigger through its complete arc for each shot, or “single-action” bycocking the hammer and then pulling the trigger for each shot. Thetrigger pull is somewhat shorter and lighter when the revolver is firedsingle action, and this is the preferred mode for precise shots or targetshooting.4. DO NOT TOUCH THE TRIGGER UNTIL YOU ARE READY TO FIRE.CAUTION–DOUBLE ACTION FIRINGWhen firing in the double actionmode, be sure that the trigger isreleased completely to its fullyforward position before pulling thetrigger for a subsequent shot. Ifthe trigger finger is allowed tointerfere with the full recovery ofthe trigger (preventing it frommoving through about the lastone-eighth inch of its forwardmovement), the trigger cannot bepulled again for another discharge.The trigger must be fully releasedafter each shot is fired. Thischaracteristic is found in allmodern double action revolversand “double action only” pistols.FULLY RELEASETRIGGERBETWEEN SHOTS5. DO NOT HOLD THE REVOLVER BY THE BARREL OR CYLINDER WHENFIRING.17
WARNING–FIRINGWhen firing the Redhawk revolver, besure all persons are a safe distance to therear of the shooter. When fired, allrevolvers discharge hot gas and particlesof lead, powder grains, or lubricantthrough the clearance gap between thecylinder and the rear of the barrel at highspeed. This can injure a person who isstanding too close to the revolver.When firing the Redhawk revolver (orany revolver), always be certain thatnothing – including your hands – is inthe path of the hot gas and particleswhich are discharged from the front andsides of the cylinder.When shooting, adequate eye protectionis essential. Shooters and bystandersmust wear shooting glasses. Hearingprotection must also be worn. Exposureto shooting noise can damage hearing.HOT GASES EXITBARREL/CYLINDER GAPTO UNCOCK (DECOCK) THE REVOLVERIf your revolver is cocked, and you wish to let the hammer down to its forwardposition (against the frame), proceed as follows: USE EXTREME CARE WHENATTEMPTING TO DECOCK THE REVOLVER, AS THE THUMB SLIPPINGDURING THIS PROCESS CAN RESULT IN AN ACCIDENTAL DISCHARGE IF THETRIGGER IS HELD TO THE REAR.1. Make certain that the revolver is pointed in a safe direction (See Rule 2, p. 38).2. Make certain both hands are dry and not impeded in any way – gloves,bandages, cold, etc.3. Grasp the revolver (if right handed) so that the thumb and forefinger of yourleft hand are firmly holding the frame, forward of the trigger guard. Thus,your left hand is in full control of the revolver (See Figure 8A, p. 19).4. Place your right thumb firmly on the hammer spur and, with your thumbsecurely in control of the hammer, squeeze the trigger only enough to permitthe hammer to ‘break free’ of the trigger. At that instant, IMMEDIATELYRELEASE THE TRIGGER and then slowly permit the hammer, STILLSECURE UNDER YOUR THUMB, to move fully forward to its resting positionagainst the frame. NOTE: It is imperative that finger pressure be removedfrom the trigger just as soon as it is free of the hammer. Then, properly, thetrigger and hammer will move towards their fully forward rest positionstogether (See Figure 8B, p. 19).18
Practice this important gun handling skill with an unloaded revolver untilyou have developed the proper control and ‘touch’ to decock your revolversafely. The key to safe decocking is having the weight of the revolvercontrolled with one hand, while the thumb and forefinger of the ‘shootinghand’ control the hammer and trigger. Improperly restraining the triggerduring this procedure may result in the hammer not resting fully against theframe. If this should occur, carefully repeat the procedure for decocking,steps 1–4 again.AUNCOCKING THE REVOLVERB4123Figure 8A. With the thumb controlling the hammerB. When hammer is free, IMMEDIATELYas shown (1), squeeze trigger to permitrelease trigger (3). Then lower hammerhammer to ‘break free’ (2).slowly to its resting position completelydown against frame (4).TO UNLOAD OR EJECT CARTRIDGE CASESKEEP THE REVOLVER POINTED IN A SAFE DIRECTION!DO NOT ATTEMPT TO UNLOAD WHEN THE HAMMER IS COCKED.1. Uncock the revolver (See pp. 18 - 19).2. Press crane latch. Guide cylinder out left of frame as for loading. Therevolver now cannot be fired.3. Push head of ejector rod smartly toward rear of cylinder until it stops.This action will extract cartridges or fired cases. Do not eject livecartridges onto any surface where a primer might strike a solid objectand discharge the cartridge.4. Check to be sure all chambers are empty.19
NOTE: When ejecting fired cartridge cases, position the revolver at ahigh angle so the cases will come fully out of the chambers and not slipunder the ejector. This high angle positioning is not necessary whenejecting unfired cartridges.CORRECT UNLOADING SEQUENCE3214WARNING – DISASSEMBLYAlways unload a firearm beforecleaning, lubrication, disassemblyor assembly.Never remove or install a loadedcylinder – it can fire if dropped orstruck.3214UNLOAD BEFORE CLEANING20
DISASSEMBLYRead instructions before disassembling a gun.An on-line video demonstrating the disassembly and reassembly of the doubleaction revolvers can be viewed by going to Ruger.com/TechTips.1. BE CERTAIN THE REVOLVER IS UNLOADED BEFORE DISASSEMBLY.2. Using a properly fitting screwdriver,remove grip screw and lift grip panelsfrom frame.NOTE: For the 4” barrel models, use thesupplied wedge to remove the Hogue Bantam grip. Follow separatemanufacturer’s instructions includedwith the revolver.Figure 9b.3. Cock the hammer. Insertdisassembly pin about one half itslength into the hole at the rear ofthe mainspring strut. (Thedisassembly pin is carried in thehole in the grip panel locator).Lacking a disassembly pin, anysimilar instrument will serve (SeeFigure 9).a.4. With thumb on hammer spur,Figure 10squeeze trigger allowing hammerto go fully forward. Remove the hammer pivot assembly. With the gunmuzzle pointing down, slowly lift the hammer upward and out of theframe (See Figure 11, p. 22). It may be necessary to move the mainspringlever forward in order to cause the hammer link hook to detach from themainspring lever (See Figure 10 a.). If careful manipulation of thehammer and trigger does not disengage the hook, disengage it with the tipof a jeweler’s screwdriver or similar device when the hook is in a near-offposition.5. Push the lever pivot pin out with a small punch or nail and remove themainspring lever from the frame with mainspring and strut intact.Removal can best be accomplished by twisting the lever slightly as theassembly is drawn from the frame toward the rear (See Figure 10 b.).CAUTION: Do not remove disassembly pin at this point! Doing so willpermit the mainspring to fly off its strut with great force and may causeinjury. The pin is to be removed only after the assembly is correctlyinstalled in the revolver during reassembly.21
6. Pull trigger guard latch to the rear (using mainspring lever) andsimultaneously pull trigger guard assembly, intact, out from bottom offrame (See Figure 12).Figure 11Figure 127. Open cylinder and pull cylinder and crane assembly out of frame to thefront.8. Further disassembly is not essential for normal cleaning purposes. Anyfurther disassembly should only be undertaken by factory servicepersonnel.SPECIAL DISASSEMBLY INSTRUCTIONSREVOLVERS NUMBERED BELOW 500-09367The information below applies only to those revolvers in which the HammerLink (KH06900) is assembled to the hammer with the link hook pointingdownward, as illustrated in Figure 10 below.If your revolver has a hammer link with the hook-opening pointingdownward, follow the Disassembly instructions only through the firstsentence of numbered paragraph 4 on page 18. At that stage of disassembly(with the hammer forward) proceed as follows:1. Unlatch the hook of the hammer link from the top end of the mainspringlever (See Figure 13 a., below).2. With the trigger pulled, remove the hammer pivot assembly and hammer(See Figure 14). At this stage of disassembly, return to the Disassemblyinstructions on page 21 and pick up with numbered paragraph 5.b.a.Figure 13Figure 1422
NOTE: For improved performance the hammer link should be assembled tothe hammer with the hook-opening positioned upward (towards thehammer).A gun owner can readily change the hammer link to the ‘pointing upward’position. Use proper size punch to drive out the hammer cross pin. Removethe hammer link and reposition it. Then, carefully hammer in the cross pinso that it is flush with both sides of the hammer. The pin must not protrudefrom either side!For those who would prefer the link to be repositioned by the factory, sendthe hammer only via Insure
RUGER REDHAWK REVOLVERS CHAMBERED IN 45 AUTO-45 COLT NOTE:A package of three 45 AUTO moon clips is supplied with REDHAWK revolvers chambered for the 45 AUTO-45 COLT cartridge. The moon clip is required to allow proper ejection of the 45 AUTO rimless cases. 45 AUTO cartridges cannot be fired without using the moon clip. RUGER REDHAWK