Transcription
Installation GuideForcepoint DLPv 8.7. 1
2020 ForcepointForcepoint and the FORCEPOINT logo are trademarks of Forcepoint. Raytheon is a registered trademark of Raytheon Company. All othertrademarks used in this document are the property of their respective owners.Published 2020Every effort has been made to ensure the accuracy of this document. However, Forcepoint makes no warranties with respect to thisdocumentation and disclaims any implied warranties of merchantability and fitness for a particular purpose. Forcepoint shall not be liablefor any error or for incidental or consequential damages in connection with the furnishing, performance, or use of this manual or theexamples herein. The information in this documentation is subject to change without notice.Last modified 27-Feb-2020
ContentsTopic 1Installing the Management Server . . . . . . . . . . . . . . . . . . . . . . . . . . . . . . . . . . . 1Management server system requirements . . . . . . . . . . . . . . . . . . . . . . . . . . . . . . . 1Preparing for management server installation . . . . . . . . . . . . . . . . . . . . . . . . . . . . 2Install the management server . . . . . . . . . . . . . . . . . . . . . . . . . . . . . . . . . . . . . . . . 4Topic 2Installing Supplemental Forcepoint DLP Servers. . . . . . . . . . . . . . . . . . . . . . 15Supplemental server system requirements . . . . . . . . . . . . . . . . . . . . . . . . . . . . . . 16Supplemental server prerequisites . . . . . . . . . . . . . . . . . . . . . . . . . . . . . . . . . . . . 16Supplemental server installation steps . . . . . . . . . . . . . . . . . . . . . . . . . . . . . . . . . 17Step 1: Download and launch the installer . . . . . . . . . . . . . . . . . . . . . . . . . . . 17Step 2: Configure the installation . . . . . . . . . . . . . . . . . . . . . . . . . . . . . . . . . . 17Step 3: Install and activate the new server software . . . . . . . . . . . . . . . . . . . . 19Topic 3Installing Forcepoint DLP Agents . . . . . . . . . . . . . . . . . . . . . . . . . . . . . . . . . . 21Installing the mobile agent . . . . . . . . . . . . . . . . . . . . . . . . . . . . . . . . . . . . . . . . . . 22Mobile agent system requirements . . . . . . . . . . . . . . . . . . . . . . . . . . . . . . . . . 22Integration agent. . . . . . . . . . . . . . . . . . . . . . . . . . . . . . . . . . . . . . . . . . . . . . . . . . 29The crawler. . . . . . . . . . . . . . . . . . . . . . . . . . . . . . . . . . . . . . . . . . . . . . . . . . . . . . 31Troubleshooting Forcepoint DLP agent installation . . . . . . . . . . . . . . . . . . . . . . 34Topic 4Installing the Protector . . . . . . . . . . . . . . . . . . . . . . . . . . . . . . . . . . . . . . . . . . . 37Protector installation prerequisites . . . . . . . . . . . . . . . . . . . . . . . . . . . . . . . . . . . . 37Installation steps for ISO/Appliance Protector. . . . . . . . . . . . . . . . . . . . . . . . . . . 38STEP 1: Accept license agreement . . . . . . . . . . . . . . . . . . . . . . . . . . . . . . . . . 39STEP 2: Select the hardware to install and confirm hardware requirements . 39STEP 3: Set administrator and root passwords . . . . . . . . . . . . . . . . . . . . . . . . 39STEP 4: Set the NIC for management server and SSH connections . . . . . . . 40STEP 5: Define the hostname and domain name . . . . . . . . . . . . . . . . . . . . . . 41STEP 6: Define the domain name server . . . . . . . . . . . . . . . . . . . . . . . . . . . . 42STEP 7: Set the date, time and time zone . . . . . . . . . . . . . . . . . . . . . . . . . . . . 42STEP 8: Register with a Forcepoint DLP Server . . . . . . . . . . . . . . . . . . . . . . 43Final step: Verify the protector installation. . . . . . . . . . . . . . . . . . . . . . . . . . . 43Installing the Forcepoint DLP Protector software package . . . . . . . . . . . . . . . . . 44Pre-installation requirements. . . . . . . . . . . . . . . . . . . . . . . . . . . . . . . . . . . . . . 44Installing Forcepoint DLP Protector software package . . . . . . . . . . . . . . . . . 45Uninstalling Forcepoint DLP Protector software package . . . . . . . . . . . . . . . 46Configuring the protector . . . . . . . . . . . . . . . . . . . . . . . . . . . . . . . . . . . . . . . . . . . 46Forcepoint DLP Installation Guide i
ContentsTopic 5Installing Web Content Gateway . . . . . . . . . . . . . . . . . . . . . . . . . . . . . . . . . . . 47Preparing the operating system for Content Gateway . . . . . . . . . . . . . . . . . . . . . 47Topic 6Adding, Modifying, or Removing Components . . . . . . . . . . . . . . . . . . . . . . . . 59Adding or modifying Forcepoint DLP components. . . . . . . . . . . . . . . . . . . . . . . 59Recreating Forcepoint DLP certificates . . . . . . . . . . . . . . . . . . . . . . . . . . . . . . . . 59Repairing Forcepoint DLP components . . . . . . . . . . . . . . . . . . . . . . . . . . . . . . . . 60Changing the Forcepoint DLP service account . . . . . . . . . . . . . . . . . . . . . . . . . . 61Configuring encrypted connection to SQL Server . . . . . . . . . . . . . . . . . . . . . . . . 61Removing Forcepoint DLP components . . . . . . . . . . . . . . . . . . . . . . . . . . . . . . . 62ii ForcepointDLP
1Installing the ManagementServerThe first step in installing Forcepoint DLP is to install the management server. Themanagement server hosts both the Forcepoint Security Manager (the graphical userinterface used to manage Forcepoint security solutions) and core Forcepoint DLPcomponents. Installation must be completed on the management server before other ForcepointDLP components (supplemental servers, protectors, and endpoints, for example)can be installed. The management server serves as the primary Forcepoint DLP server.There are 2 parts to installing Forcepoint DLP components on the management server:1. Install the Forcepoint Infrastructure, page 7.The management infrastructure includes the Forcepoint Security Manager and itssettings database.2. Install Forcepoint DLP management components, page 12.The Forcepoint DLP management server components include the policy engine,crawler, fingerprint repository, forensics repository, and endpoint server.Forcepoint DLP may be installed on hardware or virtual machines (VMs).After the management components have been installed, additional Forcepoint DLPagents, servers, and crawlers may be installed to add functionality and for systemscaling. See Installing Supplemental Forcepoint DLP Servers, page 15, and InstallingForcepoint DLP Agents, page 21, for more information.Management server system requirementsFind system requirements for the Forcepoint management server in the Deployment &Installation Center, as described below: For operating system, hardware, virtualization (VM), and database requirements,see System requirements for this version. For port requirements, see Forcepoint DLP ports (the “Forcepoint managementserver” section).Forcepoint DLP Installation Guide 1
Installing the Management ServerPreparing for management server installationBefore installing Forcepoint DLP, complete all of the preparatory steps in this section.Windows considerations1. Make sure all Microsoft updates have been applied. There should be no pendingupdates, especially any requiring a restart of the system.2. Make sure that the .NET Framework v3.5 and v4.6-4.8 are installed on themanagement server.Domain considerations The servers running Forcepoint DLP software can be set as part of a domain or asa separate workgroup. If there are multiple servers, or if the system will beconfigured to run commands on file servers in response to discovery, it is bestpractice to make the servers part of a domain.Do not install Forcepoint DLP on a domain controller machine. Strict GPOs may interfere with Forcepoint DLP and affect system performance, oreven cause the system to halt. To avoid this issue, when adding Forcepoint DLPservers to a domain, make them part of an organizational unit that does notenforce strict GPOs. Certain real-time antivirus scanning can downgrade system efficiency. Thisproblem can be reduced by excluding some directories from that scanning (seeAntivirus, page 2). Please contact Forcepoint Technical Support for moreinformation on enhancing performance.Synchronizing clocksIf you are distributing Forcepoint components across different machines in yournetwork, synchronize the clocks on all machines where a Forcepoint component isinstalled. It is a good practice to point the machines to the same Network TimeProtocol server.NoteIf the deployment will include one or more ForcepointV Series appliances, synchronize the management server’ssystem time to the appliance system time.AntivirusDisable any antivirus software on the machine prior to installing management servercomponents. Be sure to re-enable antivirus software after installation. Exclude the2 Forcepoint DLP
Installing the Management Serverfollowing Forcepoint files and folders from antivirus scans to avoid performanceissues: The product installation folder, which, by default, is one of the following: *:\Program Files\Websense *:\Program Files (x86)\Websense *:\Program files\Microsoft SQL Server\*.* C:\Documents and Settings\ user \Local Settings\Temp\*.* %WINDIR%\Temp\*.* The forensics repository (configurable; defaults to the Websense folder)No underscores in FQDNDo not install Forcepoint components on a machine whose fully-qualified domainname (FQDN) contains an underscore. The use of an underscore character in anFQDN is inconsistent with Internet Engineering Task Force (IETF) standards.NoteFurther details of this limitation can be found in the IETFspecifications RFC-952 and RFC-1123.Disable UAC and DEPBefore beginning the installation process, disable User Account Control (UAC) andData Execution Prevention (DEP) settings, and make sure that no Software RestrictionPolicies will block the installation. The UAC settings can be re-enabled followinginstallation.Microsoft SQL Server Standard or EnterpriseIf Forcepoint DLP will be used with Microsoft SQL Server Standard or Enterprise, dothe following before running the Forcepoint Security Installer:1. Install Microsoft SQL Server according to the product’s instructions. Refer toMicrosoft for more information.See the Certified Product Matrix for supported versions of SQL Server.TipTo install the database in a custom folder, see theseinstructions. Starting with Microsoft SQL Server 2012, thedatabase engine service must have access permissions forthe folder where database files are stored.2. Make sure that SQL Server is running.Forcepoint DLP Installation Guide 3
Installing the Management Server3. Make sure the SQL Server Agent is running.4. Obtain account information for one of the following: A SQL Server administrator An account that has the db creator server role, SQLAgent role, anddb datareader in msdb, as well as a sysadmin role.The account name and password are required during Forcepoint DLP installation.For more information, see Administering Forcepoint Databases.5. Restart the SQL Server machine after installation.6. Make sure the management server machine can recognize and communicate withSQL Server.7. Install the SQL Server client tools on the management server. Run the SQL Serverinstallation program, and select Connectivity Only when asked whichcomponents to install. See the Microsoft SQL Server documentation for details.8. Restart the management server machine after installing the connectivitycomponents.Getting the Forcepoint Security InstallerDownload the Windows-only Forcepoint Security Installer from the ForcepointSupport website:1. Go to support.forcepoint.com and click Downloads in the toolbar at the top of thepage.2. On the Member Login page, enter your Forcepoint Support account credentials,then click Login.3. If the Data Security section of the downloads page is not displayed, click AllDownloads.4. Under Data Security Forcepoint DLP, click 8.7.1.5. On the list of installers, click Forcepoint DLP 8.7.1.6. On the Product Installer page, click Download.The Forcepoint Security Installer executable is namedForcepointDLP871xSetup.exe.When extracted, the installation files occupy approximately 4 GB of disk space.Install the management serverUse the steps below to install Forcepoint DLP management server components.4 Forcepoint DLP
Installing the Management ServerLaunch the installer1. Log on to the installation machine with an account that has local administratorprivileges.ImportantUse a dedicated account, and do not change the accountafter installation. Installed services use this account (theservice account) when interacting with the operatingsystem. If the account must later be changed, contactForcepoint Technical Support first.2. Double-click ForcepointDLP871xSetup.exe to launch the setup program.This process may take several minutes. A progress dialog box appears, as files areextracted.TipOn exit, the installer offers the option to Keep installationfiles. This greatly reduces the time needed to launch theinstaller in the future (for example, to add components orotherwise modify the installation).To launch the installer from saved files, click ForcepointSecurity Setup on the Start screen, or in the Forcepointfolder in the Start menu.Forcepoint DLP Installation Guide 5
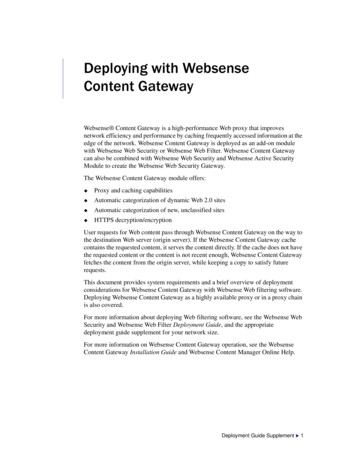
Installing the Management Server3. On the Welcome screen, click Start.4. On the Subscription Agreement screen, select I accept this agreement and thenclick Next.5. On the first Installation Type screen, select Forcepoint Security Manager, thenselect Forcepoint DLP.The following image shows the Installation Type screen:Click Next. The second Installation Type screen displays.6 Forcepoint DLP
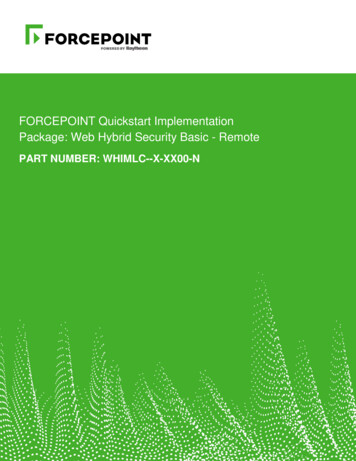
Installing the Management Server6. Review the second Installation Type screen, as shown in the following image: If you do not already have an instance of SQL Server installed, clickInstalling Microsoft SQL Server. Click Supported versions of Microsoft SQL Server to verify the supportedversions before installation. Then, click Next.7. On the Pre-installation Summary screen, click Next to continue the installation.8.On the Summary screen, click Finish.The Forcepoint Infrastructure Setup wizard launches.NoteIf using the local SQL Express, it is recommended that youupdate to the latest cumulative update (CU).Install the Forcepoint Infrastructure1. On the Forcepoint Infrastructure Setup Welcome screen, click Next.2. On the Installation Directory screen, accept the default installation path(recommended) or browse to a custom installation path, then click Next.ImportantThe full installation path must use only ASCII characters.Do not use extended ASCII or double-byte characters.3. On the SQL Server screen, specify the location of the database engine.The following two options are available.Forcepoint DLP Installation Guide 7
Installing the Management Server If Microsoft SQL is installed on your machine: If Microsoft SQL was not installed in your machine, or is installed on anothermachine: Select Use the SQL Server database installed on another machine tospecify the location and connection credentials for a database server locatedelsewhere in the network.Enter the Hostname or IP address of the SQL Server machine, including theinstance name, if any. If you are using a named instance, the instance must already exist.If you are using SQL Server clustering, enter the virtual IP address of thecluster.Also provide the Port used to connect to the database (1433, by default).See Management server system requirements, page 1, to verify your versionof SQL Server is supported.8 Forcepoint DLP
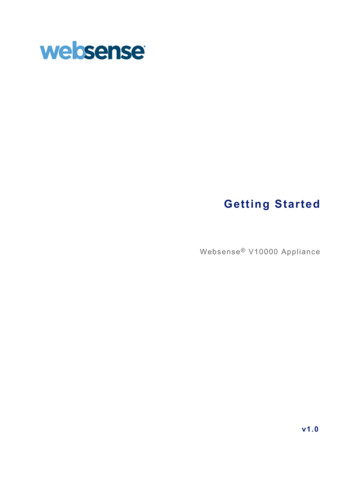
Installing the Management Server4. Specify an authentication method and account information for connecting to theSQL Server database:a. Select SQL Server Authentication to use a SQL Server account or WindowsAuthentication to use a Windows trusted connection.b. Enter the User Name or Account and its Password.For SQL Server Express, sa (the default system administrator account) isautomatically specified.NoteThe system administrator account password cannot containsingle or double quotes.c. Forcepoint DLP can use SSL to encrypt communication with the database. Ifencryption is already configured within Microsoft SQL Server, selectEncrypt connection to enable SSL encryption.For more information, see Administering Forcepoint Databases.d. Click Next.The installer verifies the connection to the database engine. If the connection testis successful, the next installer screen appears.If the test is unsuccessful, an “Unable to connect” message is displayed. Click OKto dismiss the message, verify the connection information, and click Next to tryagain.5. On the Server & Credentials screen, provide the following information:a. Select an IP address for this machine. If the machine has a single networkinterface card (NIC), only one address is listed.Administrators will use the selected IPv4 address to access the SecurityManager via a web browser. This is also the IP address that remote Forcepointcomponents will use to connect to the management server.Forcepoint DLP Installation Guide 9
Installing the Management Serverb. Specify the Server or domain of the service account to be used by theForcepoint Infrastructure and Security Manager components. The hostnamecannot exceed 15 characters.c. Specify the User name and Password for the service account.d. Click Next.6. On the Administrator Account screen, enter an email address and password for thedefault Security Manager administrator account: admin. This account has fullaccess to all Security Manager features and functions for all products.The password must: Be at least 8 characters Contain upper case characters Contain lower case characters Contain numbers Contain non-alphanumeric charactersSystem notification and password reset information is sent to the email addressspecified (once SMTP configuration is done; see the next step).When you are finished, click Next.10 Forcepoint DLP
Installing the Management Server7. On the Email Settings screen, configure the SMTP server to use for systemnotifications, then click Next. SMTP settings can also be configured afterinstallation.ImportantSMTP server configuration must be completed beforepassword recovery email messages can be sent.a. Enter the IP address or hostname of the SMTP server through which emailalerts should be sent. In most cases, the default Port (25) should be used.b. Enter the Sender email address that will appear in notification emailmessages.c. Enter a descriptive Sender name to use in notification email messages. Thiscan help recipients identify that a message originates from the SecurityManager.8. On the Pre-Installation Summary screen, verify the information, then click Nextto begin the installation.a. Forcepoint Security Installer starts again. In the Forcepoint InfrastructureSetup Welcome screen, click Next.b. The Ready to Resume. screen appears. Click Next.NoteWhen you click Next, it may take a couple minutes for thenext screen to appear. Wait for the next screen, thencontinue with the next step.9. The Installation screen appears. Wait until all files have been installed.If the following message appears, determine whether port 9443 is in use on themachine:Forcepoint DLP Installation Guide 11
Installing the Management ServerError 1920. Server ‘Websense TRITON Central Access’ (EIPManagerProxy)failed to start. Verify that you have sufficient privileges to start systemservices.If port 9443 is in use, release it and then click Retry to continue installation.10. On the Installation Complete screen, click Finish.The Installer Dashboard displays. After a few seconds, the Forcepoint DLPcomponent installer launches. Continue with the next section.Install Forcepoint DLP management components1. When the Forcepoint DLP installer is launched, a Welcome screen appears. ClickNext to begin Forcepoint DLP installation.NoteIf any prerequisites are missing, the Forcepoint DLPinstaller attempts to install them.If prompted, click OK to allow services such as SMTP to be enabled and requiredWindows components to be installed. Access to the operating system installationdisc or image may be required.2. On the Destination Folder screen, accept the default installation directory(C:\Program Files (x86)\Websense\Data Security), or click Browse to selectanother location.To continue, click Next.3. On the Local Administrator screen, specify the User Name and Password for alocal administrator account with complete access to all servers that includeForcepoint DLP components. As a best practice, use the same account information for all servers that hostForcepoint DLP components. If the local administrator is also a domain account, enter the user name in the“DOMAIN\user name” format. The domain name must not exceed 15characters. If the local administrator is a local account, use the “hostname\user name”format. The hostname must not exceed 15 characters. The password must: 12 Forcepoint DLPBe at least 8 charactersContain uppercase charactersContain lowercase charactersContain numbersContain non-alphanumeric characters
Installing the Management Server4. If the SQL Server database is on a remote machine, use the Temporary FileLocation screen to enable incident archiving and system backups, then specifywhere the system stores temporary files during archive processing and systembackup and restore.Before proceeding, create a folder in a location that both the database andmanagement server can access. On average, this folder will hold 10 GB of data.Complete the fields on the Temporary Folder Location screen as follows:a. Select Enable incident archiving and system backup to allow archiving ofold or aging incidents, as well as system backup or restore.b. Under From SQL Server, enter the Path that the SQL Server should use toaccess the temporary folder. A remote UNC path is recommended, but localand shared network paths are supported. Make sure the account used to runSQL has write access to this folder.To grant this permission, issue the following T-SQL commands on the SQLServer instance:USE masterGRANT BACKUP DATABASE TO user GOAfter installation of Forcepoint DLP components, you can revoke thispermission:USE masterREVOKE BACKUP DATABASE TO user GOc. Under From Forcepoint Management Server, enter the UNC Path themanagement server should use to access the temporary folder, then entercredentials for an account authorized to access the location.5. On the Fingerprinting Database screen, accept the default database directory(C:\Program Files (x86)\Websense\Data Security\PreciseID DB\), or clickBrowse to select another local path.Forcepoint DLP Installation Guide 13
Installing the Management ServerTo continue, click Next.6. On the Installation Confirmation screen, first verify that the current time and datadisplayed are correct, then click Install to start installing Forcepoint DLPcomponents.7. The Installation Progress screen is displayed.During installation, the setup program may display a prompt to: Install required third-party services. Free port 80. Free port 443.Click Yes to continue the installation (No cancels the installation).8. When the Installation Complete screen appears, click Finish to close theForcepoint DLP installer.Depending on whether or not other modules have been selected for installation, whenthe Forcepoint DLP installer completes, either the next module installer or the ModifyInstallation dashboard is displayed.For information on installing other Forcepoint DLP components, such as the protector,mobile agent, or endpoint client, see: Installing Supplemental Forcepoint DLP Servers, page 15 Installing Forcepoint DLP Agents, page 21 Installing the Protector, page 37 Installing Web Content Gateway, page 47To later add, change, or remove components from a Forcepoint DLP machine, seeAdding or modifying Forcepoint DLP components, page 59.If you are installing Forcepoint DLP components in Amazon AWS or MicrosoftAzure, see the Forcepoint DLP Deployment Guide for more information.14 Forcepoint DLP
2Installing SupplementalForcepoint DLP ServersAfter Forcepoint DLP has been installed on the management server (as described inInstalling the Management Server, page 1), supplemental Forcepoint DLP servers canbe installed to distribute analysis load.ImportantBefore installing a supplemental server, make sure that theForcepoint Management Infrastructure and ForcepointDLP management components are already installed.Do not install any Forcepoint DLP component on adomain controller.Medium to large organizations may require more than one Forcepoint DLP server toperform content analysis efficiently. Having multiple Forcepoint DLP serversimproves performance and allows for custom load balancing, as well as providing fororganizational growth.The following components are included on supplemental Forcepoint DLP servers: Policy engine Secondary fingerprint repository (the primary is on the management server) Endpoint server Optical Character Recognition (OCR) server CrawlerNoteIn production environments, do not install a ForcepointDLP server on a Microsoft Exchange, Forefront TMG, orprint server. These systems require abundant resources.Forcepoint DLP Installation Guide 15
Installing Supplemental Forcepoint DLP ServersSupplemental server system requirementsFind system requirements for supplemental Forcepoint DLP servers in theDeployment & Installation Center, as described below: For operating system, hardware, virtualization (VM), and database requirements,see System requirements for this version. For port requirements, see Forcepoint DLP ports (the “Supplemental ForcepointDLP server” section).Supplemental server prerequisitesBefore installing a Forcepoint DLP server, ensure that all of the followingprerequisites are met:1. For optimized performance, verify that the operating system is set to use a 4096byte cluster size.For more information, refer to the knowledge base article “File SystemPerformance Optimization” at support.forcepoint.com.2. Set the installation partition to 1 NTFS Partition.3. Configure Regional Settings to match the primary location (the location of themanagement server). If necessary, add supplemental language support and adjustthe default language for non-Unicode programs.4. Configure the network connection to have a static IP address.5. Make sure that the server hostname does not include an underscore sign.6. Enable Short Directory Names and Short File Names (see support.microsoft.com/kb/121007).7. Create a local administrator to be used as a service account.If the deployment includes more than one Forcepoint DLP server, use adomain account (preferred), or the use same local user name and password oneach machine. Do not change the service account.8. Be sure to set the system time accurately on the server.9. Exclude the following directories from antivirus scanning: The folder where Forcepoint DLP was installed. For supplemental servers,this is Program Files (x86)\Websense\, by default. *:\Inetpub\mailroot\*.* - (typically at the OS folder) *:\Inetpub\wwwroot\*.* - (typically at the OS folder) C:\Documents and Settings\ user \Local Settings\Temp\*.* %WINDIR%\Temp\*.* The forensics repository (configurable; defaults to the product installationdirectory)16 Forcepoint DLP
Installing Supplemental Forcepoint DLP Servers10. If a Lotus Notes client is installed on the machine (to allow fingerprinting anddiscovery on a Lotus Domino server), be sure to:a. Create at least one user account with administrator privileges for theDomino environment. (Read permissions are not sufficient.)b. Be sure that the Lotus Notes installation is done for “Anyone who uses thiscomputer.”c. Connect to the Lotus Domino server from the Lotus Notes client.Supplemental server installation stepsStep 1: Download and launch the installer1. Copy the Forcepoint Security Installer (ForcepointDLP87Setup.exe) from themanagement server machine to the current server, or download a copy fromsupport.forcepoint.com/Downloads. (This requires a Forcepoint Support loginaccount.)2. Launch the installer.3. Click through the Welcome page and accept the license agreement.4. Select Custom.5. Click the Install link for Forcepoint DLP.6. On the Welcome screen, click Next to begin the installation.Step 2: Configure the installation1. Use the Destination Folder screen to either accept the default installation folder(C:\Program Files\Websense\Data Security) or specify a custom folder. If the machine has multiple drives, and one is larger than the C drive, thelarger drive is used instead.Forcepoint DLP Installation Guide 17
Installing Supplemental Forcepoint DLP Servers Large removable drives may be detected by the system as a local drive andused as the default. Do not install on removable media!ImportantThe full installation path must use only ASCII characters.Do not use extended ASCII or double-byte characters.NoteRegardless of what drive you specify, the machine musthave a minimum of 4 GB of free disk space on theWindows partition for the Forcepoint Security Installer.2. On the Select Components screen, select Forcepoint DLP Server.3. On the Fingerprinting Database screen, accept the default database location, orclick Browse to select another location.4. Use the Server Access screen to select the IP address to use to identify thismachine to other Forcepoint components.5. Use the Register with the Forcepoint DLP Server screen to specify the locationand logon credentials for the management server. FQDN is the fully-qualified domain name of the management server machine. Provide the credentials of a Forcepoint DLP administrator with SystemModules permissions.6. In the Local Administrator screen, supply an administrator user name andpassword as instructed. The server/hostname portion of the user name cannotexceed 15 characters.7. If a Lotus Notes client is installed on this machine (to allow fingerprinting
The servers running Forcepoint DLP software can be set as part of a domain or as a separate workgroup. If there are multiple servers, or if the system will be configured to run commands on file servers in response to discovery, it is best practice to make the servers part of a domain. Do not install Forcepoint DLP on a domain controller machine.