Transcription
Getting StartedWebsense V10000 Appliancev1.0
1996–2009, Websense, Inc.10240 Sorrento Valley Rd., San Diego, CA 92121, USAAll rights reserved.Published 2009 Revision 2Printed in the United States of America and IrelandThe products and/or methods of use described in this document are covered by U.S. Patent Numbers 5,983,270; 6,606,659; 6,947,985; 7,185,015;7,194,464 and RE40,187 and other patents pending.This document may not, in whole or in part, be copied, photocopied, reproduced, translated, or reduced to any electronic medium or machinereadable form without prior consent in writing from Websense, Inc.Every effort has been made to ensure the accuracy of this manual. However, Websense, Inc., makes no warranties with respect to thisdocumentation and disclaims any implied warranties of merchantability and fitness for a particular purpose. Websense, Inc., shall not be liable forany error or for incidental or consequential damages in connection with the furnishing, performance, or use of this manual or the examples herein.The information in this documentation is subject to change without notice.TrademarksWebsense is a registered trademark of Websense, Inc., in the United States and certain international markets. Websense has numerous otherunregistered trademarks in the United States and internationally. All other trademarks are the property of their respective owners.Microsoft, Windows, Windows NT, Windows Server, Windows Vista and Active Directory are either registered trademarks or trademarks ofMicrosoft Corporation in the United States and/or other countries.Novell, Novell Directory Services, eDirectory, and ZENworks are trademarks or registered trademarks of Novell, Inc., in the United States andother countries.Pentium and Xeon are registered trademarks of Intel Corporation.This product includes software developed by the Apache Software Foundation (www.apache.org).Copyright (c) 2000 The Apache Software Foundation. All rights reserved.Other product names mentioned in this manual may be trademarks or registered trademarks of their respective companies and are the sole propertyof their respective manufacturers.WinPcapCopyright (c) 1999 - 2009 NetGroup, Politecnico di Torino (Italy).Copyright (c) 2009 CACE Technologies, Davis (California).All rights reserved.Redistribution and use in source and binary forms, with or without modification, are permitted provided that the following conditions are met: Redistributions of source code must retain the above copyright notice, this list of conditions and the following disclaimer. Redistributions in binary form must reproduce the above copyright notice, this list of conditions and the following disclaimer in the documentationand/or other materials provided with the distribution. Neither the name of the Politecnico di Torino, CACE Technologies nor the names of its contributors may be used to endorse or promote productsderived from this software without specific prior written permission.THIS SOFTWARE IS PROVIDED BY THE COPYRIGHT HOLDERS AND CONTRIBUTORS "AS IS" AND ANY EXPRESS OR IMPLIEDWARRANTIES, INCLUDING, BUT NOT LIMITED TO, THE IMPLIED WARRANTIES OF MERCHANTABILITY AND FITNESS FOR APARTICULAR PURPOSE ARE DISCLAIMED. IN NO EVENT SHALL THE COPYRIGHT OWNER OR CONTRIBUTORS BE LIABLE FORANY DIRECT, INDIRECT, INCIDENTAL, SPECIAL, EXEMPLARY, OR CONSEQUENTIAL DAMAGES (INCLUDING, BUT NOTLIMITED TO, PROCUREMENT OF SUBSTITUTE GOODS OR SERVICES; LOSS OF USE, DATA, OR PROFITS; OR BUSINESSINTERRUPTION) HOWEVER CAUSED AND ON ANY THEORY OF LIABILITY, WHETHER IN CONTRACT, STRICT LIABILITY, ORTORT (INCLUDING NEGLIGENCE OR OTHERWISE) ARISING IN ANY WAY OUT OF THE USE OF THIS SOFTWARE, EVEN IFADVISED OF THE POSSIBILITY OF SUCH DAMAGE.
ContentsTopic 1Introducing the Websense V10000 . . . . . . . . . . . . . . . . . . . . . . . . . . . . 5Websense V10000 environment. . . . . . . . . . . . . . . . . . . . . . . . . . . . . . . . 5Windows Server 2003 . . . . . . . . . . . . . . . . . . . . . . . . . . . . . . . . . . . . . 6Database Engine . . . . . . . . . . . . . . . . . . . . . . . . . . . . . . . . . . . . . . . . . 6Directory Service. . . . . . . . . . . . . . . . . . . . . . . . . . . . . . . . . . . . . . . . . 7Other . . . . . . . . . . . . . . . . . . . . . . . . . . . . . . . . . . . . . . . . . . . . . . . . . . 8Deployment scenarios . . . . . . . . . . . . . . . . . . . . . . . . . . . . . . . . . . . . . . . 8Single appliance deployment . . . . . . . . . . . . . . . . . . . . . . . . . . . . . . . 9Multiple appliance deployment. . . . . . . . . . . . . . . . . . . . . . . . . . . . . 10Topic 2Setting up the Websense V10000. . . . . . . . . . . . . . . . . . . . . . . . . . . . . 13Set up the appliance hardware . . . . . . . . . . . . . . . . . . . . . . . . . . . . . . . .Failover and hardware redundancy . . . . . . . . . . . . . . . . . . . . . . . . . .Clustering . . . . . . . . . . . . . . . . . . . . . . . . . . . . . . . . . . . . . . . . . . . . .Perform initial command line configuration . . . . . . . . . . . . . . . . . . . . .Configure the V10000 . . . . . . . . . . . . . . . . . . . . . . . . . . . . . . . . . . . . . .Install Websense Manager and Log Server . . . . . . . . . . . . . . . . . . . . . .Add or install optional components . . . . . . . . . . . . . . . . . . . . . . . . .Configure Websense Manager . . . . . . . . . . . . . . . . . . . . . . . . . . . . . . . .Special directory service considerations . . . . . . . . . . . . . . . . . . . . . .Configure Websense Content Gateway . . . . . . . . . . . . . . . . . . . . . . . . .Test and refine your policies . . . . . . . . . . . . . . . . . . . . . . . . . . . . . . . . .Recovering the V10000 appliance . . . . . . . . . . . . . . . . . . . . . . . . . . . . .Online Help . . . . . . . . . . . . . . . . . . . . . . . . . . . . . . . . . . . . . . . . . . . . . .Technical Support. . . . . . . . . . . . . . . . . . . . . . . . . . . . . . . . . . . . . . . . . .1313141415182223252728293030Websense Manager Help3
Contents4Websense Web Security and Websense Web Filter
1Introducing the WebsenseV10000The Websense V10000 appliance is a high-performance platform for Websense WebSecurity Gateway, combining Websense Web Security filtering and Websense ContentGateway proxy cache on a single, high-powered machine. The V10000 solution alsouses a separate Windows 2003 Server in the network, which houses WebsenseManager, the configuration interface for Websense Web Security, and Log Server,which processes filtering log records into a separate Microsoft SQL Server database.This security solution offers: V10000 Console, a Web-based configuration interface that offers appliancemanagement features like: System dashboard, with up-to-the-minute status of the software modules andsystem resources Appliance configuration and network settings System administration, including patch management and backup and restoreEvents related to appliance configuration and patching are logged. The log entriescan be viewed in the V10000 Console, or the entire log file can be downloaded forviewing through another program.Command line interface for basic appliance settings, available through a USBkeyboard and monitor or a serial port connection, that provides basic appliancecontrol commandsBasic proxy caching and Web filtering after minimal initial configurationFull customization of proxy caching and Web filtering available through theseseparate Web-based configuration interfaces: Websense Content Manager — proxy caching Websense Manager — Web filteringWebsense V10000 environmentThe V10000 solution uses additional hardware and software in your network. Someelements are required, such as the Windows 2003 server. Others are optional, such as adirectory service, which enables you to apply Web filtering policy to individual usersand groups in your organization.Getting Started5
Introducing the Websense V10000Windows Server 2003In addition to the V10000 appliance, you must have a separate server machine thatmeets the requirements listed below. This is the machine where you install WebsenseManager, the configuration interface for Web filtering, and Log Server, the componentthat receives Internet activity information and processes it into the Log Database.ImportantSelf-signed certificates are created to securecommunications between Websense components. In orderfor these certificates to be valid, and for communication tosucceed, all the machines running Websense componentsmust have the same date.Please set the appliance time and the time on the Windowsserver machine before installing Websense Manager andLog Server.Hardware Quad-Core Intel Xeon processor, 2.5 GHz or greater 4-16 GB RAM 100 GB free disk space utilizing a disk array High speed disk accessOperating System Windows Server 2003, R2 (Standard or Enterprise) Windows Server 2003, SP1 (Standard or Enterprise) Windows Server 2003 (Standard or Enterprise)Additional Software Browser: Internet Explorer 7 or Firefox 2Database EngineOne of the following supported database engines is required to store log data forreporting. Although this software can run on the same Windows 2003 Server machinethat runs Websense Manager and Log Server, better performance is achieved when itruns on a dedicated server. 6Microsoft SQL Server 2005 SP2 (Workgroup, Standard or Enterprise, or64-bit edition) (recommended)Microsoft SQL Server 2000 SP4Microsoft SQL Server Desktop Edition (MSDE) SP 4 - suitable for smallernetworksWebsense V10000
Introducing the Websense V10000The following recommendations apply to the machine running the database engine,especially if it runs on the same Windows 2003 Server as Websense Manager and LogServer. You can improve I/O performance by installing the Log Database on a disk arrayrunning RAID level 10.The amount of required RAM depends on the total number of requests beingstored and the number of requests per second being processed. To optimize RAMusage, use the Enterprise Edition of Microsoft SQL Server on a machine runningWindows Server 2003 Enterprise Edition.Directory ServiceIf your network includes one of the supported directory services listed below, you canapply Web filtering to individual users, groups, and domains (OUs). Additionally, youcan install an optional transparent identification agent to ensure clients in a supporteddirectory service are filtered without being prompted to log on when they open abrowser. (If no directory service is installed, Websense Web Security uses IPaddresses for Web filtering.)For organizations where multiple administrators may access Websense ContentManager or Websense Manager, the Web-based configuration interfaces for WebsenseContent Gateway and Websense Web Security, administrators with accounts in mostsupported directory services can log on with their network credentials.NoteIf your network uses a Windows NTLM directory service,or Active Directory in mixed mode, you must createWebsense accounts for any administrators who must logon to Websense Manager (see Websense Manager Help forinstructions). This configuration does not support loggingon to Websense Manager with network credentials. Windows Active Directory Windows NT Directory Novell eDirectory 8.51 or later NMAS authentication is supported. Recommend Novell Client v4.83 or v4.9 (v4.81 and later are supported) Other LDAP-based directory services Most standard RADIUS serversThe following RADIUS servers have been tested: Livingston (Lucent) 2.x Cistron RADIUS server Merit AAA Microsoft IASGetting Started7
Introducing the Websense V10000OtherIn some networks, additional machines may be used to deploy additional instances ofNetwork Agent or other, optional components. For example, in a large, segmentednetwork, you may need a separate Network Agent for each segment, and a separateFiltering Service for these Network Agents. Or, you might deploy the RemoteFiltering Server to enable filtering of laptops and other computers that are outside theorganization’s network.BImportantIf you change the policy source (machine running PolicyBroker and Policy Server) after deploying components onadditional machines, you must reconfigure thosecomponents to communicate with the new policy source.Go to the Websense Knowledge Base, and search for thearticle titled v7: Changing the Policy Server (or PolicyBroker) IP address.For information about system requirements and appropriate placement of machinesfor additional or optional components, see the Websense Deployment Guide.Deployment scenariosOne or more Websense V10000 appliances can be deployed in a network, dependingon the traffic volume and security goals. Review the diagrams and information forthese deployment scenarios before implementing the V10000 in your network.All deployments should be well planned. Please contact your Websense SalesEngineer, or your authorized Websense reseller, for assistance in planning yourdeployment.8Websense V10000
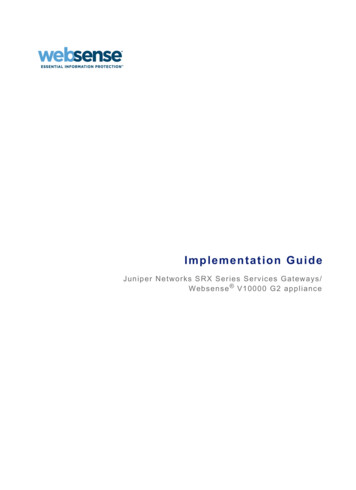
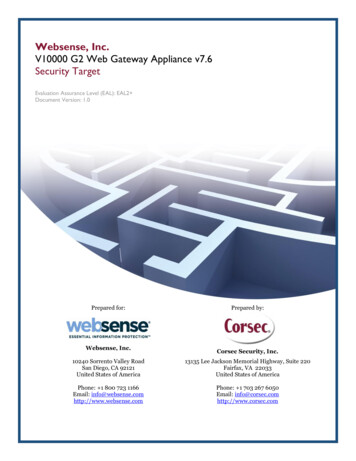
Introducing the Websense V10000Single appliance deploymentWhen you deploy a single Websense V10000 appliance to host all major features, oneadditional Windows server is required to run Websense Manager and Log Server.Typically, they are deployed in the network as shown below.In all environments, the cable for network interface N must be connected to a spanport, monitor port, or mirror port on the router or switch. This enables it to see trafficfrom all clients being filtered.Network interfaces C and P1 must both be able to access a DNS server and theInternet.If network interface C is used to send protocol blocking information, as it is bydefault, C must be able to communicate with client machines.Network interface P2 can be connected the same way as P1, if you need 2 interfaces.But, keep in mind that P2 is optional.If you plan to implement explicit proxy, interface P1 must be connected to the sameVLAN as the clients.If you plan to implement transparent proxy for Websense Content Gateway: WCCP must be enabled on the router.The cable to network interface P1 must be connected to a different VLAN than theclients.See the Websense Content Gateway Administrator’s Guide for additional informationabout deploying transparent or explicit proxy.Getting Started9
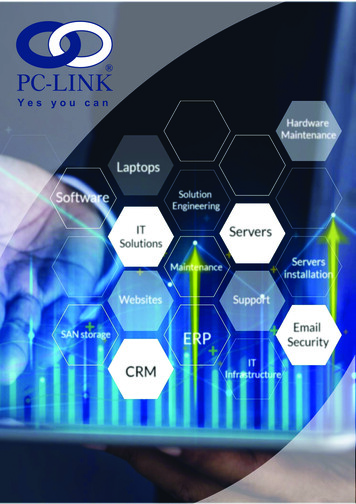
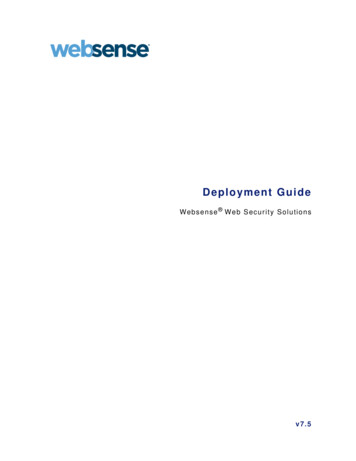
Introducing the Websense V10000Multiple appliance deploymentOrganizations that need to filter more users or a larger volume of Internet traffic maydeploy multiple Websense V10000 appliances. One appliance is designated asprimary, and the others point to the primary appliance for policy and configurationsettings.The cable for network interface N must be connected to a span port, monitor port, ormirror port on the router or switch. This enables it to see traffic from all clients beingfiltered.Network interfaces C and P1 must both be able to access a DNS server and theInternet.If network interface C is used to send protocol blocking information, as it is bydefault, C must be able to communicate with client machines.Network interface P2 can be connected the same way as P1, if you need 2 interfaces.But, keep in mind that P2 is optional.If you plan to implement explicit proxy, interface P1 must be connected to the sameVLAN as the clients.If you plan to implement transparent proxy for Websense Content Gateway: WCCP must be enabled on the router.The cable to network interface P1 must be connected to a different VLAN than theclients.See the Websense Content Gateway Administrator’s Guide for additional informationabout deploying transparent or explicit proxy.10Websense V10000
Introducing the Websense V10000When you deploy multiple V10000 appliances, one appliance is designated as primary(that is, the policy source). It becomes the centralized source for policy andconfiguration information for the other appliances.To implement a multiple appliance deployment, configure the primary V10000 to useitself as the policy source. Then, configure all other V10000 appliances to use theprimary appliance as their policy source by entering the IP address assigned tonetwork interface C on the primary appliance. See Configure the V10000, page 15, formore information.BImportantIf you change the policy source (machine running PolicyBroker and Policy Server) after deploying components onadditional machines, you must reconfigure thosecomponents to communicate with the new policy source.Go to the Websense Knowledge Base, and search for thearticle titled v7: Changing the Policy Server (or PolicyBroker) IP address.Implementing clusteringTo implement clustering with V10000 appliances, choose a dedicated clusteringinterface, and then add a route rule to specify that communications between WebsenseContent Gateway and the Clustering Multicast Group Address will go through thededicated clustering interface. This process is described in detail in the WebsenseKnowledge Base in an article titled: V10000 Clustering.Getting Started11
Introducing the Websense V1000012Websense V10000
2Setting up the WebsenseV10000Setting up the Websense V10000 involves the following tasks, which are detailed inthis chapter.1. Set up the appliance hardware, page 132. Perform initial command line configuration, page 14.3. Configure the V10000, page 15.4. Install Websense Manager and Log Server, page 18.5. Configure Websense Manager, page 23.6. Configure Websense Content Gateway, page 27.7. Test and refine your policies, page 28.Set up the appliance hardwareThe Quick Start guide, which comes in the box with your appliance, providesinformation on the contents of the Websense V10000 box, how to set up the hardware,and how to connect the cables to the appliance and to your network.Network interface C and the outbound proxy interface (typically P1) must be able toaccess a DNS server and must have continuous access to the Internet. Essentialdatabases are downloaded from Websense servers through these interfaces. Ensurethat C and P1 are able to access the download servers at download.websense.com.Make sure that this address is permitted by all firewalls, proxy servers, routers, or hostfiles that control the URLs that the C and P1 interfaces can access.Failover and hardware redundancyRefer to the Websense Knowledge Base on the Websense Support Portal,www.websense.com/kb for instructions on setting up multiple V10000 appliances toaccomplish redundancy and failover. Search for the exact phrase: V10000 redundancy.Getting Started13
Setting up the Websense V10000ClusteringRefer to the Websense Knowledge Base on the Websense Support Portal,www.websense.com/kb for instructions on setting up the V10000 appliance as part ofa proxy cluster. Search for the exact phrase: V10000 clustering.After hardware setup, connect directly to the appliance through the serial port or themonitor, keyboard, and mouse ports. The activation script, called firstboot, runs whenyou start the appliance. See Perform initial command line configuration, page 14.Perform initial command line configurationThe first time you start the appliance, a brief script prompts you to supply settings forthe network interface labeled C and a few other general items.Gather the following information before running the script. Some of this informationmay have been gathered on the Quick Start during hardware setup.HostnameIP address for network interface CSubnet mask for network interface CDefault gateway for network interface C(IP address)Primary DNS server for network interface C(IP address)Secondary DNS server for network interface C(IP address) OptionalTertiary DNS server for network interface C(IP address) OptionalPassword for V10000 Console(8 or more characters, at least 1 letter and 1 number)When you have gathered the necessary information, run the initial command lineconfiguration, as follows.1. Access the appliance through the a USB keyboard and monitor or a serial portconnection.NoteTo configure the appliance, you must connect through theserial port or the keyboard/video/mouse ports andcomplete the firstboot script.2. Accept the subscription agreement when prompted.3. When asked if you want to begin, enter y to launch the firstboot activation script.14Websense V10000
Setting up the Websense V10000If the activation script does not launch automatically, enter the followingcommand:firstboot4. Follow the onscreen instructions to provide the information collected above.5. After the activation script has been completed successfully, go to a differentmachine and use a Web browser to access the V10000 Console. See Configure theV10000, page 15.Configure the V10000The V10000 Console is the Web-based configuration interface for the appliance.Through it you can view system status, configure network and communicationsettings, and perform general V10000 administration tasks.After completing the initial configuration required by the firstboot script, use theV10000 Console to configure important settings for network interfaces N and P1 (andoptionally P2), which are used for communications by Network Agent and WebsenseContent Gateway.Gather the following information before running the V10000 Console. Some of thisinformation may have been gathered on the Quick Start during hardware setup.Primary NTP server, (domain) OptionalSecondary NTP server, (domain) OptionalTertiary NTP server, (domain) OptionalIP address for network interface P1Subnet mask for network interface P1IP address for network interface P2, OptionalSubnet mask for network interface P2Default gateway for network interfaces P1 and P2,(IP address)Primary DNS server for network interfaces P1 andP2, (IP address)Secondary DNS server for network interfaces P1and P2, (IP address) OptionalTertiary DNS server for network interfaces P1 andP2, (IP address) OptionalIs network interface N connected to a bidirectionalspan port?YES or NOIP address for network interface NSubnet mask for network interface NGetting Started15
Setting up the Websense V10000Default gateway for network interface N(IP address)(Not required if interface N is connected to abidirectional span port.)Primary DNS server for network interface N(IP address)Secondary DNS server for network interface N,(IP address) OptionalTertiary DNS server for network interface N, (IPaddress) OptionalAfter collecting the information needed, access the V10000 Console through asupported browser.The following procedure summarizes the settings that must be configured to enabledefault proxy caching and filtering. See the V10000 Console Help for detailedinstructions on any field or area, or for information about other available settings.1. Open a supported browser, and enter the following URL in the address bar:https:// IP address :9447/appmngReplace IP address with the address assigned to network interface C duringinitial configuration of the V10000. (See Perform initial command lineconfiguration, page 14.)2. Log on with the user name admin and the password set during initial applianceconfiguration.3. In the left navigation pane, click Configuration General.a. Set the time zone.b. Select Internet Network Time Protocol (NTP) servers for timesynchronization, or specify the system time and date. (Use of an NTP server isrecommended, to ensure that database downloads and time-based policies arehandled precisely.)c. Click Save in the Time and Date area.4. In the left navigation pane, click Configuration Network Interfaces.a. Configure network interfaces P1 (and optional P2) for Websense ContentGateway. Then, click Save in the Websense Content Gateway Interface area.ImportantWhen you use the P2 interface, the P1 interface is bound toeth0, and the P2 interface is bound to eth1. Keep this inmind when you configure Websense Content Gateway.For example, suppose you are using transparent proxy, andthe P1 interface is connected to the WCCP router. In thiscase, you must configure Websense Content Gateway touse eth0 for WCCP communications (in Content Manager,see Configure Networking WCCP, WCCP versiontab).16Websense V10000
Setting up the Websense V10000These network interfaces can accept users’ Internet requests (inbound traffic)and communicate with Web servers (outbound traffic).One common configuration is to use P1 for traffic into and out of the proxymodule. Another common configuration uses P1 for inbound traffic and P2for outbound traffic. To enable this configuration, be sure to set an appropriaterouting rule for P1 and P2 on the Configuration Routing page. Forexample, you might set inbound traffic to come through P1 and outboundtraffic to go through P2.Additionally, you can use P2 as a communication channel for multiple proxyservers in a cluster. In this scenario, P2 cannot be used for outbound traffic.For additional information on clusters, see the Websense Content GatewayAdministrator’s Guide.b. Configure network interface N for Network Agent. Then, click Save in theNetwork Agent Interface area.Network interface N monitors all Internet requests, and enforces policy forprotocols other than HTTP and HTTPS.NoteThe V10000 appliance does not send block messages tousers who are blocked from non-HTTP and non-HTTPSprotocols.5. In the left navigation pane, click Configuration Routing.a. Use the appropriate Add Route button to specify customized, static routesfrom client computers to the Websense Content Gateway software module.b. Use the Edit and Delete buttons to modify existing routes, as needed.6. In the left navigation pane, click Configuration Policy Source.a. Specify the location of Websense Web Security policy information. Choose This V10000 appliance if the policy for your deployment islocated on the V10000 being configured.Choose Another V10000 appliance or server on your network if theV10000 currently being configured is not the location of the policyinformation. Then, enter the IP address of the other server (networkinterface C if the policy source is another V10000 appliance that isconfigured as primary).b. Click Save.7. Click Log Off, at the top right, to close the Websense V10000 Console.8. Configure Websense Content Gateway for default operation. See ConfigureWebsense Content Gateway, page 27.Getting Started17
Setting up the Websense V10000Install Websense Manager and Log ServerDeploying the Websense V10000 appliance requires installing a database engine,Websense Manager and Log Server on a separate Windows server machine in thenetwork. A supported database engine must also be installed, either on the sameWindows server machine or a different machine in the network.Websense Manager is the interface for Websense Web Security configuration andpolicy management.Log Server receives records of Internet filtering activity and sends them to the LogDatabase, which is installed on a database engine.ImportantThe database engine must be installed and running beforeyou install Log Server.If you do not have a supported database engine, you can download and install MSDEfor free. Refer to the Websense Knowledge Base on the Websense Support Portal,www.websense.com/kb for a download link and further instructions. Search for theexact phrase: Installing MSDE with Websense software, version 7.See the Websense Installation Guide for more details on configuring the databaseengine, including prerequisites such as setting up user roles, and the database rightsneeded for the account specified during Log Server installation.Before installing the policy and reporting components, be sure your server machinemeets the hardware and software requirements. See Websense V10000 environment,page 5.Gather the following information before running the installer. Some of thisinformation may have been gathered on the Quick Start during hardware setupPolicy Server IP address(IP address of the policy source machine.Typically, this is the IP address fornetwork interface C on the appliance)Database engine location(IP address or machine name)Database user nameDatabase password18Websense V10000
Setting up the Websense V10000The following procedure summarizes the steps required to install the requiredcomponents. See the Websense Installation Guide for more detailed instructions.1. Log on to the installation machine with administrative privileges.If you will use a Windows trusted connection to communicate with the databaseengine, your logon user account must also be a trusted account with localadministration privileges on the database machine.2. Make sure the date and time are synchronized with the date and time on theV10000 appliance.ImportantSelf-signed certificates are created to securecommunications between Websense components. In orderfor these certificates to be valid, and for communication tosucceed, all the machines running Websense componentsmust have the same date.Please set the appliance time and the time on the Windowsserver machine before installing Websense Manager andLog Server.3. Download the installation package from www.mywebsense.com.4. Close all applications and stop any anti-virus software.5. Double-click the installation package to extract the files and start the installation.6. Follow the onscreen instructions to the Subscription Agreement screen.7. Select Yes, and click Next.8. Select a Custom installation, and click Next.9. In the list of components, mark the check boxes for Log Server and WebsenseManager and any other optional components to be installed on this machine.BImportantIf you change the policy source (machine running PolicyBroker and Policy Server) after deploying components onadditional machines, you must reconfigure thosecomponents to communicate with the new policy source.Go to the Websense Knowledge Base, and search for thearticle titled v7: Changing the Policy Server (or PolicyBroker) IP address.See the Websense Deployment Guide and Installation Guide for descriptions ofthe available components, and associated installation requirements.Getting Started19
Setting up the Websense V1000010. Clear all other check boxes, and then click Next.BImportantBe sure to clear the check boxes for these components: Policy Broker Policy Serve
browser. (If no directory service is installed, Websense Web Security uses IP addresses for Web filtering.) For organizations where multiple administrators may access Websense Content Manager or Websense Manager, the Web-ba sed configuration interfaces for Websense Content Gateway and Websense Web Security, administrators with accounts in most