Transcription
E-FACSFingerprint Access Control SystemUser ManualVersion: 1.1Date: February 2018About This GuideThis document introduces the operations of the access control device. For theproduct installation, see related installation guide.
User Manual V1.0Notational ConventionsThis document includes such notational conventions as tips, important notices andprecautions. The notations contained in this manual include:: indicates important information, including precautions, which must be readcarefully to achieve the optimal equipment performance.: indicates the voice prompt generated by the device. In the event ofdiscrepancy between the voice prompts in this document and those generated by theactual products, the latter shall prevail.Reserve the right to amend and interpret this document2
Table of ContentsTable of Contents1 Instruction for Use . 11.1 Finger Placement. 11.2 Instruction for Card Swipe . 21.3 Precautions. 22 Introduction to Our Access Control Device . 32.1 Overview of Device Functions . 32.2 Product Appearance . 42.3 Use of an External USB Keyboard . 62.4 Verification State . 72.5 Management Card. 82.6 System Password. 92.7 Operation Timeout. 103 Device Operations . 113.1 Management card . 113.1.1 Enroll a Management Card113.1.2 Enroll an Ordinary User123.1.3 Delete a Single User19Reserve the right to amend and interpret this documentI
User Manual V1.03.2 USB Keyboard Operations. 213.2.1 Set Keyboard Password223.2.2 Enroll a User Through Keyboard233.2.3 Delete a Specified User273.2.4 Delete All Users303.2.5 Restore Factory Defaults.303.3 User Verification. 313.4 U-disk . 343.5 Tamper Switch. 364 Appendix . 384.1 List of Parameters. 384.2 Statement on Human Rights and Privacy . 384.3 Environment-Friendly Use Description. 41Reserve the right to amend and interpret this documentII
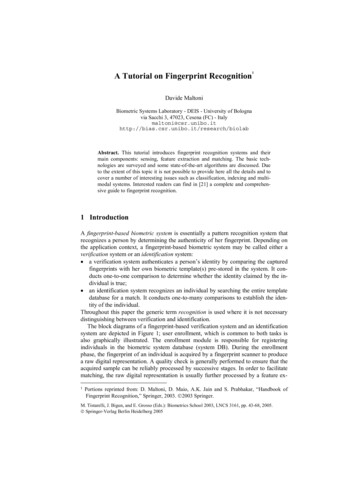
1 Instruction for Use1 Instruction for Use1.1 Finger PlacementRecommended fingers: The index finger, middle finger or the ring finger; thethumb and little finger are not recommended (because they are usually clumsy onthe fingerprint collection screen).1.Proper finger placement:2.Improper finger placement:Reserve the right to amend and interpret this document1
User Manual V1.01.2 Instruction for Card SwipeIntegrated with a non-contact RF card reader module, this device supports the IDcards and MIFARE cards (optional and only used as PIN cards). By offeringmultiple verification modes such as fingerprint verification and RF card verification,this device can accommodate to diversified user needs.Swipe your card across the sensor area following the voice prompt and remove yourcard after the device has sensed it. For the swipe area, see 2.2 Product Appearance.1.3 PrecautionsProtect the device from exposure to direct sunlight or strong beam as strong beamgreatly affects the fingerprint collection and leads to fingerprint verification failure.It is recommended to use the device under a temperature of 0–50 C so as to achievethe optimal performance. In the event of exposure of the device to the outdoors forlong periods of time, it is recommended to adopt sunshade and heat dissipationfacilities because excessively high or low temperature may slow down the deviceoperation and result in high false rejection rate (FRR) and false acceptance rate(FAR).When installing the access control device, please connect the power cable afterconnecting other cables. If the device does not operate properly, be sure to shutdown the power supply before performing necessary inspection. Note that anylive-line working may cause damage to the device and the device damage arising outof live-line working falls beyond the scope of our normal warranty.For matters that are not covered in this document, please refer to related materialsincluding the Device Installation Guide, Access Control Management Software UserManual.Reserve the right to amend and interpret this document2
2 Introduction of Access Control Device2 Introduction of Access Control Device2.1 Overview of Device FunctionsAs an integrated fingerprint & access control device, our product can be connectedwith either an electronic lock or an access controller. This device features simple andflexible operations and supports the use of management cards. With a managementcard, you can perform such functions as offline enrollment, user enrollment and pendrive management. The voice prompts will guide you through all the operationswithout screen display. This device comes without a keyboard, but it allows you toconnect an external keyboard and offers multiple operation modes. It supportsmultiple communication modes. The pen drive features simple and convenientoperations. The waterproof design and metal case of the device allow it to withstanda heavy impact without damage.Featuring a compact and simple design, this device allows users to connect severaldevices through a PC and perform realtime monitoring.Reserve the right to amend and interpret this document3
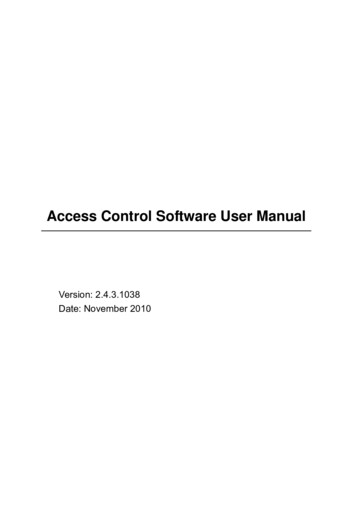
User Manual V1.02.2 Product AppearanceFront view:LED indicatorSwipe areaFingerprint sensorvLED indicator: The LED indicator is used to display device operationresults and exceptional statuses which are defined as follows:Reserve the right to amend and interpret this document4
2 Introduction of Access Control DeviceCommon rules: If an operation succeeds, the green indicator is solid on for onesecond; otherwise, the red indicator is solid on for one second.Enrollment state: The green LED blinks three times every other three second.Single user deletion: The red LED blinks three times every other three second.Verification state: The green LED blinks once every other two second.vSwipe area: refers to the area in the red dashed-line box as shown in the figureabove.vFingerprint sensor: Used to collect and match fingerprints and delete users.Bottom view:vUSB interface: used to connect with a pen drive or a keyboard.vReset button: used to restart the device.vSpeaker: used to play the BEEP sound and voice prompts. If a user passes theverification, the speaker beeps once; if the user fails to pass the verification,the speaker produces one short beep and one long beep. The default promptsduring operation: Beep voice prompts.Rear view:Reserve the right to amend and interpret this document5
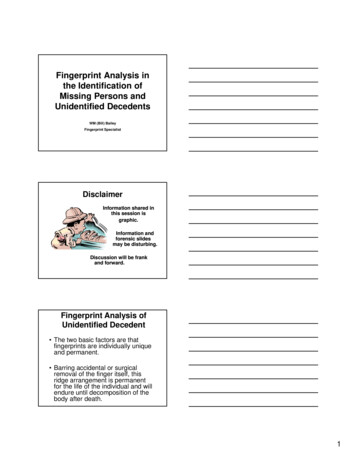
User Manual V1.0Wiring terminalTCP/IP interfaceTamper switchDIP switchvWiring terminal: connects with locks and power supply through cables.vTCP/IP interface: The TCP/IP interface connects with a PC through anetwork cable (for detailed connection, see the Installation Guide).vTamper switch: used to generate a tamper alarm. For details, see 3.5 TamperSwitch.vDIP switch: The DIP switch has four pins numbered 1, 2, 3 and 4. In theRS485 communication mode, the first 1, 2 and 3 pins are used to set hardwaredevice number and the fourth pin is used to select the break-make status ofterminal resistance. For detailed settings, see the Installation Guide.2.3 Use of an External USB KeyboardTo facilitate device operations, you can connect the device with an external USBkeyboard (purchased by users) and conveniently perform such operations as userenrollment, deletion and restoring factory defaults, especially when specifying userIDs during user enrollment and deletion.Reserve the right to amend and interpret this document6
2 Introduction of Access Control DeviceAn external USB keyboard is shown above (please refer to the actual product):NumLock is a numeric keypad toggle key. It is activated by default. If it is activated,the LED indicator is on. When the device is connected with an external keyboard,you can only use the numerical keys, backspace key and Enter key in the NumLockactivated state.2.4 Verification StateVerification state: After the device is powered on, the device enters the verificationstate if you have enrolled or successfully enrolls a management card or in the eventof timeout of any operation.In the verification state, all users are allowed to verify their identity and unlock (theadministrator bearing a management card can only unlock using his/her fingerprint(s)previously enrolled); the administrator can perform such operations as userenrollment/deletion, pen drive management and keyboard operation.Reserve the right to amend and interpret this document7
User Manual V1.02.5 Management CardThe device users are classified into administrators and ordinary users.Administrators: An administrator is allowed to perform all operations includinguser enrollment/deletion (deleting all the other users except him/her) and pen drivemanagement. The privileges of the device administrators are implemented throughthe management cards.Ordinary users: Ordinary users are only allowed to verify their identity and unlock.A management card is a card specially allocated for a super administrator. Eachdevice must at least enroll one management card. If no management card is enrolled,you cannot perform any operation and the system will generate a voice prompt “—:Please register the management card”.@You can implement different functions by swiping a management cardfor different times in a row:No pen drive and external keyboard are connected:ŸBy swiping the management card once, you can go into the single userenrollment state.ŸBy swiping the management card five times in a row, you can enter the singleuser deletion state.Pen drive is connected:ŸBy swiping the management card once, you can go into the pen drivemanagement state.Reserve the right to amend and interpret this document8
2 Introduction of Access Control DeviceAn external keyboard is connected:ŸBy swiping the management card once, you can activate the externalkeyboard.Consecutive swipes: Consecutive swipes mean the interval between two swipes in arow is less than 5 seconds.The management cards can be deleted through the “Clear All” function of thekeyboard, or have their administration privileges cleared through software beforethey are deleted as ordinary ID cards. For details, see the Access Control SoftwareOperating Instruction.The fingerprints of the user who bears a management card can only be enrolledthrough software. For details, see the Access Control Software OperatingInstruction.@Tip: Users who bear management cards can only verify their identityand unlock using their fingerprints previously enrolled.2.6 System PasswordA system password is a password used to enhance the security of device data inTCP/IP or RS485 communications.@Tip: The system password can be modified through the access controlsoftware. For details, see the Access Control Software OperatingInstruction.Reserve the right to amend and interpret this document9
User Manual V1.02.7 Operation TimeoutThe default operation timeout time is 30 seconds. When you enroll a managementcard or delete/enroll a user (including in the external keyboard enrollment and userdeletion states), the system automatically prompts you once every other 10 second ifthere is no operation and returns to the verification state after prompting you threetimes. The voice prompt is “Operation timeout. The system returns to verificationstate”.@Tip: You can set the timeout time through the access control software.Reserve the right to amend and interpret this document10
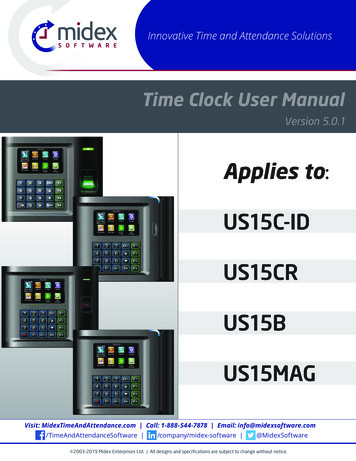
3 Device Operations3 Device Operations3.1 Management card3.1.1 Enroll a Management CardTo enroll a management card, proceed as follows:1.The device automatically detects whether there exists a management card.2.If the device fails to detect the presence of a management card, it enters themanagement card enrollment state. Then proceed with step 3; otherwise skipto step 5.3.After the system generates the voice prompt “—: Please register themanagement card”, you can swipe your card across the sensor area.4.If enrollment fails, the system generates the voice prompt “—: The cardnumber is repeated” and returns to step 3; if enrollment succeeds, the systemgenerates the voice prompt “—: Registration is successful. The system returnsto verification state”.5.After returning to the verification state, the system generates the voice prompt“—: Verify users. Please press your finger or punch your card”.@Tip: The system returns to the verification state if any operation in step3 times out and only prompts you to enroll the management card againafter you power on the device again.The management card enrollment flow chart is shown below:Reserve the right to amend and interpret this document11
User Manual V1.0—: Verify users. Please pressyour finger or swipe your card—: Pleaseregister themanagementcard—: The cardnumber is repeated—: Registration is successful.The system returns to theverification state.3.1.2 Enroll an Ordinary UserThe mode for you to enter the enrollment state using the management card is knownas the management card enrollment mode. In this mode, you can only enroll oneuser. When you enroll a new user, the system automatically assigns a minimum idleID to the user. Furthermore, you can also use the external keyboard enrollmentmode (for details, see 3.2.2 Enroll a User Through Keyboard) to implementenrollment of the user with ID.In both these two enrollment modes, you can enroll new users. Each user is allowedto enroll 10 fingerprints and one ID card at most.To enroll a user, proceed as follows:Reserve the right to amend and interpret this document12
3 Device Operations1.In the verification state, the system goes into the ordinary user enrollment stateafter you swipe a management card once (In the enrollment state, swiping amanagement card once will return you to the verification state).2.After the system generates the voice prompt “—: Register users. Please pressyour finger or swipe your card”, you can start user enrollment. There are thefollowing two cases:—“Register users. Pleasepress your finger orswipe your card.(1)Swipe ID card firsta. When you swipe your new ID card and succeed in enrolling a user, thedevice will generate a voice prompt “—: User number **. Registration issuccessful!” (** refers to the ID automatically assigned to the user bythe system; same below) and you can proceed to step b; if userenrollment fails, the system generates the voice prompt “—: The cardnumber is repeated” and returns to the enrollment state, waiting for youto press your finger or swipe your card.Reserve the right to amend and interpret this document13
User Manual V1.0b. After the device generates the voice prompt “—: Register. Pleasepress your finger”, the system enters the specified fingerprint enrollmentstate. Press the same finger over the sensor three times following thevoice prompts.c. If fingerprint enrollment succeeds, the system generates the voiceprompt “—: Registration is successful. Register. Please press yourfinger” and directly enters the next fingerprint enrollment state; iffingerprint enrollment fails, the system generates the voice prompt “—:Please press your finger again” and repeats step b.d. The system automatically returns to the verification state when both10 fingers and ID card are enrolled, the management card is swiped onceor operation times out.(2)Press finger(s) firsta. Press the same finger over the sensor three times following the voiceprompts by adopting the proper fingerprint placement. If fingerprintenrollment succeeds, the system generates the voice prompt “—: Usernumber **. Registration is successful” and you can proceed to step b; iffingerprint enrollment fails, the system generates the voice prompt “—:Please press your finger again” and returns to the enrollment state,waiting for your to press your finger or swipe your card.b. After generating the voice prompt “—: Register. Please press yourfinger or swipe your card”, the system enters the specified userinformation enrollment state, waiting for you to swipe your new ID cardor press your finger.Reserve the right to amend and interpret this document14
3 Device Operationsc. If the ID card enrollment succeeds, the system generates the voiceprompt “—: Registration is successful. Please press your finger” andenters the fingerprint enrollment state directly; if you press a finger thatis not enrolled before and succeeds in enrollment of this finger, thesystem generates the voice prompt: “—: Registration is successful.Please press your finger or swipe your card” and you can continueenrolling new fingerprints and card. After you enroll 10 fingerprints, thesystem will generate the voice prompt “—: Please swipe your card” toenroll your ID card if your ID card is not enrolled.d. The system automatically returns to the verification state when both10 fingers and ID card are enrolled, the management card is swiped onceor operation times out.3.If you are already assigned with an ID, then there are the following two casesfor you to enroll your fingerprint(s) or card:(1)Enroll fingerprint(s) when you have already enrolled carda. After you swipe the enrolled card, the system will generate the voiceprompt “—: User number **. Register. Please press your finger” (**refers to the ID assigned to you; same below) and enter the fingerprintenrollment state. Your enrolled fingerprint(s) will overwrite all previousfingerprints.b. Press the same finger over the sensor three times following the voiceprompts by adopting the proper fingerprint placement. If fingerprintenrollment succeeds, the system generates the voice prompt “—: UserReserve the right to amend and interpret this document15
User Manual V1.0number **. Registration is successful” and gets ready for enrollment ofnext fingerprint.c. The system automatically returns to the verification state when both10 fingers and ID card are enrolled, the management card is swiped onceor operation times out.@Tips:1. The fingerprint(s) enrolled in this step will overwrite all yourpreviously enrolled fingerprints.2. In this mode, the fingerprint of the user who bears the managementcard cannot be enrolled because swiping the management card willreturn the system to the verification state automatically.(2)Enroll card and fingerprint(s) when you have already enrolledfingerprint(s)a. Press the finger with fingerprint already enrolled three times followingthe voice prompts. If you are identified as the same person in each ofverification attempt, the system enters the fingerprint enrollment state.b. After generating the voice prompt “—: User number **. Register.Please press your finger or swipe your card”, the system starts to enrollyour fingerprint. Your fingerprint(s) enrolled in this step will overwriteall your previous fingerprints.c. If the ID card enrollment succeeds, the system generates the voiceprompt “—: Registration is successful. Register. Please press yourReserve the right to amend and interpret this document16
3 Device Operationsfinger” and enters the fingerprint enrollment state directly; if you press afinger that is not enrolled before and succeeds in enrollment of thisfinger, the system generates the voice prompt: “—: Registration issuccessful. Please press your finger or swipe your card” and you cancontinue enrolling new fingerprints and card. After you enroll 10fingerprints, the system will generate the voice prompt “—: Please swipeyour card” to enroll your ID card if your ID card is not enrolled.d. The system automatically returns to the verification state when both10 fingers and ID card are enrolled, the management card is swiped onceor operation times out.Reserve the right to amend and interpret this document17
User Manual V1.0The flow chart is shown below:—: The number of users isfull. The system returns toverification state.Enrollment state—: Register users. Pleasepress your finger orswipe your card.The numberof users is fullYesReturn to theverification stateNo—: Please swipe your card again—: User number **.Register. Please pressyour finger.NoPress finger orswipe card?(Please press your finger again)YesNew fingerprintor card?—: Register. Please pressyour finger or swipe yourcard//Please press yourfinger/Please swipe your card—: The number of enrolledcards is full/The card hasbeen registered/The cardnumber is repeatedNoYesIs new userenrollmentsuccessful?Yes—:User number**. Registration issuccessfulNoSwipe cardPress fingerIs the card enrollmentsuccessful?Is the fingerprintenrollment successful?Yes—: Registration issuccessfulNoNo—: The number ofenrolled fingerprints isfull/The fingerprint isrepeatedEnrollment issuccessful—: The system returnsto the verification stateNoAre both 10fingers and cardenrolled?YesReserve the right to amend and interpret this documentReturn to theverification state18
3 Device Operations3.1.3 Delete a Single UserDeleting a user by using a management card is called the simple single-userdeletion mode. Deleting a user by using an external keyboard is called the specifieduser deletion mode. (See 3.2.3 Delete a Specified User)The operation steps for simple single-user deletion:1.In verification state, swipe your management card for five consecutive times toenter the simple single-user deletion state (swipe your card one more time toreturn to the verification state).Swipe your management cardfor five consecutive times—“Delete users. Pleasepress your finger orswipe your card.”2.The system checks whether the user has been enrolled. If not, the system willgenerate the voice prompt “—: Unregistered user. The system returns toverification state.”; otherwise, the system will generate the voice prompt “—:Delete users. Please press your finger or swipe your card.”3.Press your finger onto the fingerprint sensor or swipe your card over the cardreader.Reserve the right to amend and interpret this document19
User Manual V1.0(1)Press your finger onto the sensor to delete a user.Press one of your enrolled fingers properly onto the sensor. If theverification succeeds, the system will generate the voice prompt “—:User number **. Deletion is successful. Delete users. Please press yourfinger or swipe your card.” (** indicates the ID number of the user) andautomatically return to the deletion state. If the verification fails, thesystem will generate the voice prompt “—: Please press your fingeragain.”(2)Swipe your card over the reader to delete a user.Swipe a registered card over the reader. If the verification succeeds, thesystem will generate the voice prompt “—: User number **. Deletion issuccessful. Delete users. Please press your finger or swipe your card.”and automatically return to the deletion state. If the verification fails, thesystem will generate the voice prompt “—: Please swipe your cardagain.”4.If you swipe your management card one more time or your operation times out,the system will return to the verification state.@Tip: In simple single-user deletion mode, management card users cannotbe deleted because swiping the management card will return the systemto the verification state.Simple Single-User Deletion Procedure:Reserve the right to amend and interpret this document20
3 Device Operations—: Unregistered user.The system returns toverification state.—: Delete users. Press yourfinger or swipe your card.—: Please swipeyour card again.—:Please pressyour finger again.—: User number**. Deletion issuccessful.3.2 USB Keyboard OperationsThe keyboard operations flow chart is shown below:Reserve the right to amend and interpret this document21
User Manual V1.03.2.1 Set Keyboard PasswordIf the user needs an external keyboard, he/she can connect the keyboard to thedevice and then swipe his/her management card to activate the external keyboard.The system enables the user to set a dedicated password for the external keyboard.Operation steps:1.In verification state, connect an external keyboard with the device through theUSB interface.2.Swipe your management card once to activate the keyboard. The systemgenerates the voice prompt “—: Please press the keyboard.”3.Type in “8” and press Enter. Then type in “8” and press Enter again. Thesystem generates the voice prompt “—: Please set password.” Type in yourdesired password and press Enter. The system generates the voice prompt“—: The operation is successful. The system returns to verification state.” Ifthere are no keystrokes within 30 seconds, the system will generate the voiceReserve the right to amend and interpret this document22
3 Device Operationsprompt “—: Operation timeout. The system returns to verification state.”(The password must be between 4 and 6 digits long.)The user can enter this password to activate the functions of the external keyboard atthe next use, or swipe a management card once (which is mandatory for the first useof the external keyboard).3.2.2 Enroll a User Through KeyboardEnrolling a user by using a USB keyboard is called keyboard based enrollmentmode. In this mode, the user can enroll a user with the specified user ID.Operation steps:1.As shown in 3.2 USB Keyboard Operations flow chart, type in “1” and pressEnter to enter the enrollment state.2.When the system generates the voice prompt “—: Register users. Please inputthe user number.”, enter a user ID.Reserve the right to amend and interpret this document23
User Manual V1.03.The system generates the voice prompt “—: User number **. Register. Pleasepress your finger or swipe your card.” (** indicates the ID number of the user;same below) The system enters the specified ID enrollment state.@Tips: 1. If a user has enrolled in the system with a management card, thesystem will generate the voice prompt “—: User number **. Pleasepress your finger.”2. If a user has enrolled in the system with a user ID and 10 fingerprints,the system will generate the voice prompt “—: User number **. Pleaseswipe your card.”4.The user enroll operation in the specified ID enrollment state is similar to thespecified ID enroll operation in the management card enrollment mode. Fordetails, see 3.1.2 Enroll an Ordinary User.5.In the enrolled user ID standby state, press ESC to return to the verificationstate. In the specified user ID enrollment state, press ESC twice to return tothe verification state.@Tip: In keyboard based enrollment mode, you can enroll usersconsecutively. Upon successful enroll, the system automatically returnsto the enrollment state.The keyboard based enrollment flow chart is shown below:Reserve the right to amend and interpret this document24
3 Device Operations—: The system returnsto verification state.Enrollment statePress ESC?—: Register user.Please input theuser number.YesReturn toverification stateNoNoEnter ID?YesValid ID?—: User number **.Register. Please pressyour finger or swipeyour card. (Pleasepress your finger.)NoYesYesPress backspace?No—: The number ofrecords is full./The cardnumber is repeated./Thecard has beenregistered./Thefingerprint is repeated.—: Register. Please pressyour finger or swipe yourcard./Please press yourfinger./Please swipe yourcard.User enrollmentoperationNoEnrollmentsuccessful?—: Registration issuccessful.YesNoAre both 10fingerprints and cardenrolled?YesReserve the right to amend and interpret this document25
User Manual V1.0&1.Important Statement:In keyboard based enrollment mode, if any operation times out, the systemautomatically prompts you of this operation once every other 10 second andreturns to the verification state after prompting you three times.2.Newly enrolled fingerprints will overwrite all the original ones in managementcard based enrollment mode, and keyboard based enrollment mode likewise.3.A user can only enroll one card. When the user with an enrolled card enrolls inthe system, the system generates the voice prompt “—: Register. Please pressyour finger.” When the user swipes the card, the system generates the voiceprompt “—: The card has been registered.”4.One card cannot be enrolled repetitively, otherwise the system will generatethe voice prompt “—: The card number is repeated.” during card swiping.Different users cannot enroll the same fingerprint, otherwise the system willgenerate the voice prompt “—: The fingerprint is repeated.” duringfingerprint enrollment. A user’s new fingerprints will overwrite the existingones.Reserve the right to amend and interpret this document26
3 Device Operations3.2.3 Delete a Specified UserDeleting a user by using an external keyboard is called the specified user deletionmode.Operation steps:1.Connect a USB keyboard to the device, and swipe your
they are deleted as ordinary ID cards. For details, see the Access Control Software Operating Instruction. The fingerprints of the user who bears a management card can only be enrolled through software. For details, see the Access Control Software Operating Instruction. @ Tip: Users who bear management cards can only verify their identity