Transcription
MAINTENANCE GUIDESee the Difference Quality Makes
new guidelines for constructing homes and changing environmental conditions, itCONTENTSis important how wood windows and doors are constructed in the factory and caredfor after installation. That is why Kolbe goes the extra mile to help preserve yournew windows before they leave the factory. With proper maintenance and care,your windows and doors should retain their beauty for many years to come. Usethese maintenance recommendations to guide you.We appreciate you choosing Kolbe products for your project. Should youhave any questions or need additional information please feel free to contactour service department at (715)842-5666, or you may also visit us online atwww.kolbe-kolbe.com.Anatomy of a Window and Door . . . . . . . . . . . . . . . . . . . . . . . . . . . . 4CONTENTSWood is a natural product and must be protected to ensure lasting results. WithCleaning & Maintenance Procedures forKolbe Windows & Doors:General Maintenance for all Kolbe Windows & Doors . . . . . . . . . . . . . . . .5Casement Windows. . . . . . . . . . . . . . . . . . . . . . . . . . . . . . . . . . . . . . . . . . . . . .6Awning Windows . . . . . . . . . . . . . . . . . . . . . . . . . . . . . . . . . . . . . . . . . . . . . . .7Double Hung Windows. . . . . . . . . . . . . . . . . . . . . . . . . . . . . . . . . . . . . . . . . . .8-9Sterling Double Hung Windows . . . . . . . . . . . . . . . . . . . . . . . . . . . . . . . . . . .10-11Slider Windows . . . . . . . . . . . . . . . . . . . . . . . . . . . . . . . . . . . . . . . . . . . . . . . . .12Patio Doors. . . . . . . . . . . . . . . . . . . . . . . . . . . . . . . . . . . . . . . . . . . . . . . . . . . . .13Cleaning & Caring for Bright Brass Hardware. . . . . . . . . . . . . . . . . . . . . . . .14Caring for the Exterior Finish . . . . . . . . . . . . . . . . . . . . . . . . . . . . . . . . . . . 15-16Product Assistance: . . . . . . . . . . . . . . . . . . . . . . . . . . . . . . . . . . . . . . . . . . . .16-18Tips for Combating Condensation: . . . . . . . . . . . . . . . . . . . . . . . . . . . .19-2223
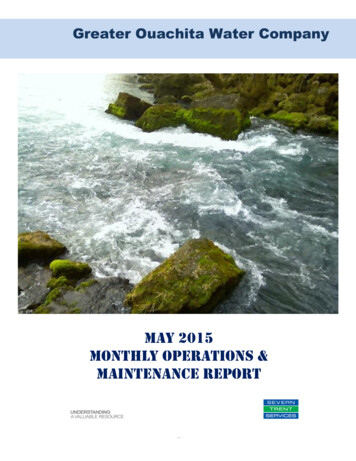
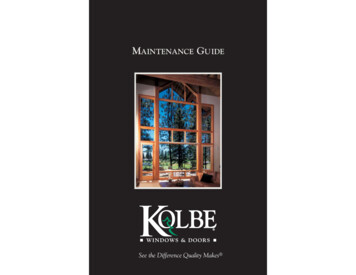
OF AWINDOWANDDOOR1. Frame – The stationary part of a window or door system whichencloses the sash or the glass. In the case of a direct set, a frameconsists of a head jamb, sill, side jambs,Double Hung Exteriorextension jambs and blind stop.12. Sill – The bottom threshold of a window ordoor frame.53. Head Jamb – The top, horizontal piece of aframe.46. Checkrail – The bottom rail of the top sashand the top rail of the bottom sash of a doublehung window which meet horizontally in thecenter of the unit.2Double Hung Interior3769. Stiles – The verticalpieces of a windowor door sash.Inspection and maintenance of Kolbe windows and doors should be done atleast two to three times a year for damage or deterioration of exterior sealantsand/or finishes. Check to see if the exterior sealants have any gaps, leaks, orsigns of damage and deterioration. Cracks in the K-Kron II finish resultingfrom joint movement that may occur during the installation process or overthe life of the product must be caulked with a high quality sealant immediately to maintain the seal integrity of this paint finish and the warranty. Sealintegrity must be maintained in order to prevent the infiltration of water and air.NOTE: Do not excessively clean or scrub cladding. Refrain from using wirebrushes, pressure washers, or cleaning tools which will mechanically harm thecoating’s surface. Always test cleaning agents on a small inconspicuous area.7. Side Jamb – The vertical pieces of a windowor door frame.8. Rails – The top and bottom horizontalpieces of a door panel or window sash.It is important to maintain windows and doors after they arrive on site. Even withfactory-applied finishes, maintenance still needs to be done to windows and doorsto preserve their beauty.A yearly cleaning with a mild unscented soap and water is recommended for thesash and frames, then rinse.4. Divided Lites/Grilles – A grid that visuallydivides a window into panes.5. Sash – The part of a window that holds theglass. The sash may be operating or fixed. Thesash consists of stiles, rails and a check rail ondouble hung units.OPERATION & MAINTENANCE PROCEDURES FORKOLBE WINDOWS AND DOORSOPERATION & MAINTENANCEANATOMYAlways consider safety when maintaining your Kolbe windows and doors. Makesure to always wear hand and eye protection and use extreme caution on ladders.When using chemicals, make sure to follow manufacturer’s instructions for useand proper disposal.Care of Your Glass – Do not use any harsh chemicals, metal or abrasivescrapers on glass. A good quality glass cleaner or mild unscented soap andwater will clean the glass. If you have a spot on the glass that is difficult toremove, mineral spirits or denatured alcohol can be used to clean it off. Thesesolvents can be purchased at most hardware stores. Be careful not to drip thecleaner or solvent on the wood or cladding.Weatherstripping – Take care when using paints, stains and varnishes. Thesesolvents can damage weatherstripping and may cause it to lose its flexiblequalities and become brittle. If exterior weatherstripping becomes damaged,replace it to ensure proper seal from the outside elements. Contact your localKolbe supplier for replacement weatherstripping.Cleaning of Window Screens – To clean window screens, remove the screenfrom the window frame. Then place it in a tub or shower if indoors, (or if outdoors lay on the lawn). Gently spray with water, and brush lightly with a softbristle brush until clean. Replace when dry. For lighter cleaning, use a vacuumcleaner with a soft brush attachment.98WARNING: Kolbe screens and StormGuard units are intended to act as a barrieragainst insects and weather related elements. They are not designed to restrainchildren. Do not allow children to sit or play on window sills, or to push or fallagainst window screens. This could result in a serious accident.Door Corner Section45
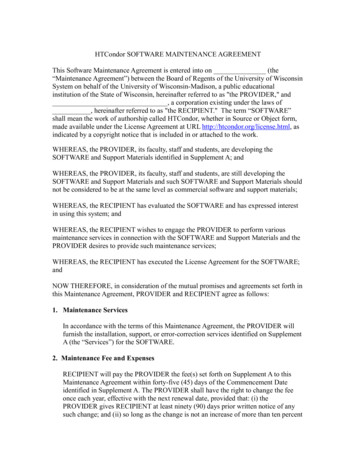
OPERATION & MAINTENANCEAWNING WINDOWSOPERATION:OPERATION:1. (CA–1) Kolbe casements feature a multi-point lockingsystem. The lock handle is located on the bottom portionof the window frame. To open, lift up on the lock handle.1. (AW–1) If unit has a multi-point locking system, unlockunit. The lock handle is located on the bottom side portionof the window frame. To open, lift up on the lock handle.2. (CA–2) Using the operating handle located on the bottominterior of the sill frame, rotate it clockwise to open window.2. (AW–2) Using the operating handle located on the bottominterior of the sill frame, rotate it clockwise to open window.CA–1Be sure to unlock the window before attempting to open,otherwise you may risk damaging the operating mechanism.Be sure to unlock the window before attempting to open,otherwise you may risk damaging the operating mechanism.3. To close unit, simply reverse the steps. Be sure not to useexcessive force while turning the handle to close the sash. Besure to lock the unit whenever it is in the closed position.3. To close unit, simply reverse the steps. Be sure to lock theunit whenever it is in the closed position. Be sure not to useexcessive force while turning the handle to close the sash.CLEANING & MAINTENANCE:CA–2In most cases, except casements with Euro hinges, follow theserecommendations for cleaning.1. Begin by removing the screen. (CA–3) On one side of thescreen, pull the clear plungers on the frame of the screentowards the center of the screen. Pull the screen towards you.After the side clears the operator, pull the screen out.AW–1AW–2CLEANING & MAINTENANCE:1. Begin by removing the screen. (AW–3) On one side of thescreen pull the clear plungers on the frame of the screentowards the center of the screen. Pull the screen towardsyou. After the side clears the operator, pull the screen out.CA–32. (CA-1) Unlock unit. (CA–2) Using the operator handle, open the windowto its maximum opening. On most casements you should now be able toeasily reach between the frame of the window and the sash to wash theouter glass surface.Casement Hardware – Be sure to keep the hardware hinges and slide tracks freefrom dirt and debris. Do not allow paint or varnish to drip into the tracks. Alight silicone spray of Teflon on the track area will make the sash operate easier.Do not use any oil base lubricant, as it will retain dust and dirt. Do not paint orvarnish any vinyl parts or components, hardware or locks. Be sure when closingwindows that excessive pressure is not applied to the operator handle6OPERATION & MAINTENANCEOPERATION & MAINTENANCECASEMENT WINDOWS2. (AW–1) Unlock unit. (AW–2) Using the operator handle,open the window to its maximum opening.AW–33. (AW–4) On the operator sash track locate the black clip atthe end of the operator track. Pull back towards you. Thiswill release the pivot slide from the operator track. Nowpush the window sash upward. On most awnings youshould be able to easily reach between the frame of thewindow and the sash to wash the outer glass surface.4. Re-attach to the operator track and close window.ClipPivotSlideAW–47
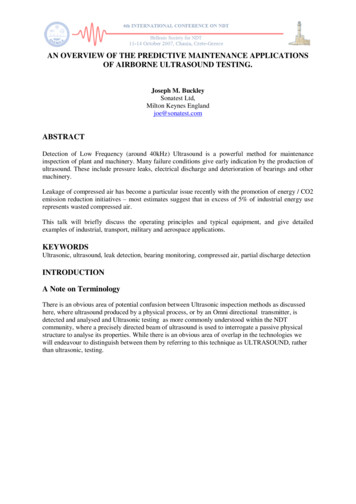
1. (RDH–1) Holding the upper sash horizontally and withone side higher than the other, position the pivot pinof the lowered side above the balance clutch(RDH–2) inside the exterior jambliner track.CAUTION: When the window is not locked, the sash are notsecured and can pivot or tilt under pressure.OPERATION:1. (DH–1) To open the unit, unlock the sash lock which islocated on the top portion of the lower sash checkrail.Larger units may have more than one lock.DH–12. Once unlocked, lift the bottom sash to open the window.(DH–2) If you have a StormGuard unit on your window,open the glass panel by pushing the two latches located onthe bottom of the sash of the StormGuard unit toward thecenter, then lift panel up. To close unit, reverse steps.WARNING: Do not use the sash to support your body weight2. (RDH–3) Bring the opposite side of the sash down so thatthe pivot pin is positioned above the balance clutch and thesash is 90 to the window frame. Lift the top portion of thesash up towards the opening and push into the jamblinersuntil it pops into position.RDH–1The jambliner may need to be compressed in order toallow the sash to swing into place.DH–2because it may pivot under pressure3. To engage the sash into clutch, slide the sash down. Youshould hear two clicks - the clutches engaging. Move the sashto the top of the opening. Repeat for the lower sash placingthe sash into the inner jambliner track.RDH–2OPERATION & MAINTENANCEREINSTALLATION OF DOUBLE HUNG SASH:OPERATION & MAINTENANCETRADITIONAL DOUBLE HUNG WINDOWSCLEANING & MAINTENANCE:1. (DH–1) Unlock the sash lock.2. (DH–3) Raise the lower sash up approximately three inches.3. (DH–4) Place both hands, one at each end, on the top of thesash. Using the sides of each hand, push sideways on thevinyl jambliner. While applying pressure to the liner, pull thetop of the sash towards you.CAUTION: Care should be taken not to pinch yourfingers between the sash and jambliner.DH–3INTERIORTRACKEXTERIORTRACKPIVOT PINDH–4NOTE: Sash removal on an improperly installed unit or asmaller unit may pose some difficulty. A jamb spreader canbe utilized to compress the jambliner allowing the sash totilt freely. Contact your local Kolbe supplier for moreinformation on a jamb spreader.4. (DH–5) Tilt the sash down until it is at a 90 angle to thewindow frame.RDH–3JAMBLINERBALANCECLUTCHDouble Hung Detailed DrawingDH–55. (DH–6) Complete the sash removal by lifting one sideof the sash upward. When the pivot pin, located on theside of the sash, has cleared the jambliner, swing the sashout. Repeat steps for upper sash (slide upper sash down towithin a couple of inches of the sill, then remove).DH–6Double Hung Jambliners – All vinyl jambliners should bekept clean. The edges of the sash that may come into contact with vinyl components should not be painted or varnished. A light coat of wax or furniturepolish (Trewax ) on the sash edge will help seal the edge and make the sashslide easier. Do not paint or varnish any vinyl parts.89
REINSTALLATION OF STERLING SASH:1. (RSTDH–1) Holding the upper sash horizontally andwith one side higher than the other, position the pivotpin of the lowered side above the (RSTDH–2) caminside the exterior jambliner track.OPERATION:1. (STDH–1)To open, unlock the sash lock by movingthe lock lever to the right, past center, until it automaticallystops. The button in the left corner of the lock willautomatically extend up. Now you may open the window.2. Once unlocked, lift the bottom sash to open the window.(STDH–2) If you have a StormGuard unit on your window,open the glass panel by pushing the two latches located onthe bottom of the sash of the StormGuard unit toward thecenter, then lift panel up. To close unit, reverse steps.STDH–1STDH–2WARNING: Do not use the sash to support your body weightbecause it may pivot under pressureCLEANING & MAINTENANCE:1. (STDH–1) Unlock the lower sash by moving the lock lever tothe right, past center, until it automatically stops. The buttonin the left corner of the lock will automatically extend up.2. Slide the lower sash up about three inches. (STDH–3)Depress the lock button with one hand while moving thelock lever all the way to the right with the other hand. Thisretracts the latches, enabling you to tilt the lower sash in.RSTDH–1RSTDH–2CAUTION: The pivot pins must be seated all the way downin the cams of the clutch housing to avoid damaging the cam.STDH–3STDH–43. (STDH–4) To completely remove the lower sash, tilt the sashdown to a 90 angle to the window frame. (STDH–5) Liftone side of the sash upward. (STDH–6) You should see thepivot pin, located on the side of the sash. When the pivotpin has cleared the jambliner, swing the sash out.4. (STDH–7) To remove the upper sash, slide the sash down farenough to reach the tilt latches comfortably. On the top ofthe sash place both hands, one at each end, over
Always test cleaning agents on a small inconspicuous area. Always consider safety when maintaining your Kolbe windows and doors. Make sure to always wear hand and eye protection and use extreme caution on ladders. When using chemicals, make sure to follow manufacturer’s instructions for use and proper disposal. Care of Your Glass – Do not use any harsh chemicals, metal or abrasive scrapers .