Transcription
3ratComodo Dome FirewallCentral ManagerSoftware Version 1.5Administrator GuideGuide Version 1.5.071619Comodo Security Solutions1255 Broad StreetClifton, NJ 07013
Comodo Dome Firewall Central Manager - Admin GuideTable of Contents1 Introduction to Dome Firewall Central Manager .41.1 Sign-up for Firewall Central Manager License.51.2 Setup Dome Firewall Central Manager.111.3 Integrate Central Manager with Comodo One / Comodo Dragon / ITarian.161.4 Login to the Admin Console.221.5 Change Password.231.6 Add Organizations.241.7 Enroll Dome Firewall Devices.252 The Main Interface.293 The Dashboard.303.1 View Details of a Firewall Device.333.2 Quick Actions on a Firewall Device.373.2.1 Backup/Restore a Firewall Device.373.2.2 Configure SSH Access for a Firewall Device.413.2.3 Network Configuration.433.3 Access Admin Console of a Firewall Device.464 Manage System Status and General Configuration.484.1 Update Firmware Version.484.2 View and Upgrade Central Manager License.504.3 View Management Tasks.515 Customer Management.555.1 Manage Organizations.565.2 Activate Firewall Licenses.586 Approve Firewall Device Enrollment.597 Add Interfaces.628 Firewall Management.738.1 Configure Firewall Policy Rules.748.2 Manage Firewall Address Objects.818.3 Manage Firewall Object Groups.848.4 Configure Destination Network Address Translation Rules.858.5 Configure Source Network Address Translation Rules.888.6 Configure System Access Rules.919 Configure Virtual Private Network Settings.939.1 Configure IPSec/L2TP Users.949.2 IPSec Configuration.959.3 Configure L2TP Server.9910 Manage Advanced Threat Protection Profile.10111 Manage URL and Content Filtering Profiles.10212 Intrusion Prevention.10612.1 Configure the Intrusion Prevention System.10712.2 Manage IPS Rulesets.108Comodo Dome Firewall Central Manager - Administrator Guide 2019 Comodo Security Solutions Inc. All rights reserved.2
Comodo Dome Firewall Central Manager - Admin Guide12.3 Manage Application Identification Rulesets.110About Comodo Security Solutions.113Comodo Dome Firewall Central Manager - Administrator Guide 2019 Comodo Security Solutions Inc. All rights reserved.3
Comodo Dome Firewall Central Manager - Admin Guide1Introduction to Dome Firewall CentralManagerComodo Dome Firewall Central Manager allows network admins to remotely manage multiple firewall devices from asingle, centralized console. Import firewall devices belonging to different organizations for collective management. Connects to firewall devices even if they are behind Network Address Translation (NAT). Configure network zone interfaces, port connections, firewall rules, SNAT/DNAT rules and more formanaged devices. Rules and profiles can be applied to individual devices or to all devices belonging to an organization.The central manager is available in two modes: Virtual Appliance - Install firewall central manager as a VM on your network Cloud Mode - The solution will be hosted on Comodo serversGuide StructureThis guide will take you through the configuration and use of Comodo Dome Firewall Central Manager. Introduction to Dome Firewall Central Manager Sign-up for Firewall Central Manager License Setup Dome Firewall Central Manager Integrate Central Manager with Comodo One / Comodo Dragon / ITarian Log- in to the Administrative Console Change Password Add Organizations Enroll Dome Firewall DevicesThe Main Interface The Dashboard View Details of a Firewall DeviceComodo Dome Firewall Central Manager - Administrator Guide 2019 Comodo Security Solutions Inc. All rights reserved.4
Comodo Dome Firewall Central Manager - Admin GuideQuick Actions on a Firewall Device Backup/Restore a Firewall Device Configure SSH Access for a Firewall Device Network Configuration Access Admin Console of a Firewall DeviceManage System Status and General Configuration Update Firmware Version View and Upgrade Central Manager License View Management TasksCustomer Management Manage Organizations Activate Firewall LicensesApprove Firewall Device Enrollment Add Interfaces Firewall Management Configure Firewall Policy Rules Manage Firewall Address Objects Manage Firewall Object Groups Configure Destination Network Address Translation Rules Configure Source Network Address Translation Rules Configure System Access RulesConfigure Virtual Private Network Settings Configure IPSec / L2TP Users IPSec Configuration Configure L2TP ServerManage Advanced Threat Protection Profile Manage URL and Content Filtering Profiles Manage URL and Content Filtering Profiles 1.1Configure the Intrusion Prevention SystemManage IPS RulesetsManage Application Identification RulesetsSign-up for Firewall Central Manager LicenseThe trial license is free and covers unlimited users for one year. The license can be upgraded at anytime forcontinued usage.There are two ways you can sign up for Firewall Central Manager: Get Central Manager as a standalone application Login to your Comodo account at https://accounts.comodo.com/login. Register for free if you don'tyet have an accountClick 'My Account' 'Sign up to Comodo Dome'.Select 'Dome Firewall Central Manager (Free)' in the product drop-down.Comodo Dome Firewall Central Manager - Administrator Guide 2019 Comodo Security Solutions Inc. All rights reserved.5
Comodo Dome Firewall Central Manager - Admin GuideComplete the application form. You will receive your license key via email.Comodo One / Comodo Dragon / ITarian customers Login to your Comodo One / Comodo Dragon / ITarian account Click 'Store' then go to the firewall central manager tile.Click the 'Free' button to begin setup.After adding to your portal account, you can open it by clicking 'Applications' 'Dome FirewallCentral Manager'. See Integrate Central Manager with Comodo One / Comodo Dragon /ITarian for more details. Dome Firewall Central Manager Stand-alone Customers Visit https://accounts.comodo.com/login Login if you have an account or create new Comodo account Click 'Sign Up to Comodo Dome Service' Select 'Dome Firewall Central Manager' in the 'Comodo Sign-up Page' section In the 'Customer Information' section, select whether you are an existing Comodo customer or not andcomplete the form. Read the EULA fully, select 'I accept the Terms and Conditions' check box and click 'Continue' The product purchase confirmation page will be shown. You will receive an order acknowledgment mail which also contains subscription ID and license key. Next, see Setup Dome Firewall Central Manager' to download the setup file and install it.Comodo One / Comodo Dragon / ITarian MSP and Enterprise Customers Login to your Comodo One / Comodo Dragon / ITarian account.The process of adding is same for Comodo One, Comodo Dragon and ITarian platforms. The followingtutorial explains how to add Firewall Central Manager to Comodo One platform.Click the 'Store' link on the top-navigation Comodo Dome Firewall Central Manager - Administrator Guide 2019 Comodo Security Solutions Inc. All rights reserved.6
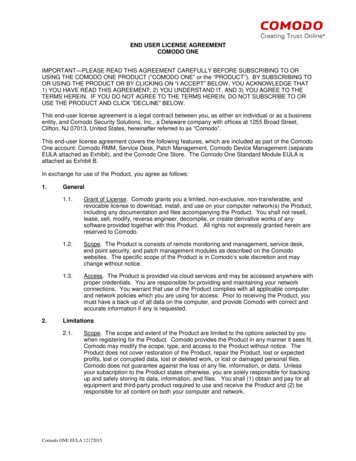
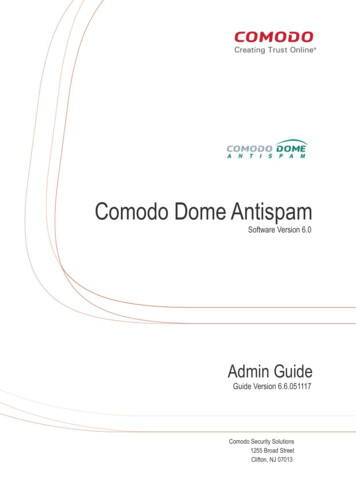
Comodo Dome Firewall Central Manager - Admin Guide Locate the 'Dome Firewall Central Manager' tile and click the 'Free' button.You will be taken to the product subscription page:Your login username will be pre-populated and cannot be changed. Enter your Comodo One account password and click 'Login'. The next step allows you purchase a new license or activate an existing license:Comodo Dome Firewall Central Manager - Administrator Guide 2019 Comodo Security Solutions Inc. All rights reserved.7
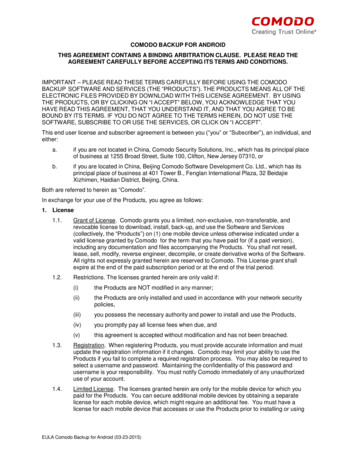
Comodo Dome Firewall Central Manager - Admin Guide Click 'Buy Now' to purchase a new license Enter your company name, website and address details in the 'Customer Information' section. Read theEULA fully, agree to the terms & conditions and click 'Next':Next, review your order details and click 'Next to confirm:Comodo Dome Firewall Central Manager - Administrator Guide 2019 Comodo Security Solutions Inc. All rights reserved.8
Comodo Dome Firewall Central Manager - Admin Guide You will see a order confirmation screen after your order has been successfully processed:Comodo Dome Firewall Central Manager - Administrator Guide 2019 Comodo Security Solutions Inc. All rights reserved.9
Comodo Dome Firewall Central Manager - Admin Guide Click 'Next' to move onto the instructions page. This provides help to setup Comodo Dome Firewall CentralManager on your network.Comodo Dome Firewall Central Manager - Administrator Guide 2019 Comodo Security Solutions Inc. All rights reserved.10
Comodo Dome Firewall Central Manager - Admin Guide There are two ways that you can setup Dome Firewall Central Manager: On premises – Download the .ova setup file and install as explained in the next section. Afterinstalling CM in your environment, you can integrate it with your portal platform if required. Click herefor help to integrate CM with C1 / Comodo Dragon (CD) / ITarian. Hosted – Comodo will host Central Manager for you. Click 'Request Provisioning'. You will receive anemail from Comodo containing the URL of your instance. This hosted service URL has to be configuredin 'C1 / CD / ITarian' 'Management' 'Applications' 'Dome Firewall Central Manager' and enteredin the 'Settings' tab. Click here for more details.Click 'Finish' to return to the C1 Dashboard. Your license will be activated. You will also receive a confirmation email for your order. 1.2Setup Dome Firewall Central ManagerThere are two ways to set up Comodo Dome Firewall Central Manager: Virtual Appliance Cloud ModeVirtual Appliance The virtual appliance setup file is available in two formats: .OVA File.ISO FileInstallation from OVA File Download the .ova file for Comodo Dome Firewall Central Manager image/domefirewallcm.ova or from the finalinstructions dialog while adding CM to your C1 / Comodo Dragon / ITarian account. Import the virtual appliance into VMs such as Virtualbox and Vmware. Assign a public IP address to the virtual appliance Once installed, you can access the central manager console at https:// IP address of the virtual appliance UN 'admin', password 'comodo' (both without quotes). You should change these credentialsComodo Dome Firewall Central Manager - Administrator Guide 2019 Comodo Security Solutions Inc. All rights reserved.11
Comodo Dome Firewall Central Manager - Admin Guide after first login.You will be asked to enter a license key after first login: Enter your license key and click 'Submit'.Tip: Comodo One / Comodo Dragon / ITarian customers can integrate the central manager appliance with theirportal accounts. See Integrate Central Manager with Comodo One / Comodo Dragon / ITarian for more details. Installation from ISO FileCentral manager is available as an .iso which can be copied to usb and installed on bare-metal appliances. Download the .iso file from /domefirewallcm.iso. Create a Ubuntu virtual machine and start installation of the virtual appliance from the .iso file Follow the installation wizard, select your installation language, country and keyboard layout Enter the root password as 'comodo' (without quotes) when asked and continue.Choose 'Guided - use entire disk and setup LVM' in the partition step Comodo Dome Firewall Central Manager - Administrator Guide 2019 Comodo Security Solutions Inc. All rights reserved.12
Comodo Dome Firewall Central Manager - Admin Guide Select the disk to be partitioned Select 'Yes' to 'Write the changes to disks and configure LVM' Select the disk partition sizeComodo Dome Firewall Central Manager - Administrator Guide 2019 Comodo Security Solutions Inc. All rights reserved.13
Comodo Dome Firewall Central Manager - Admin Guide Select 'Yes' for 'Write the changes to disks?': Continue the setupEnter the IP address of your proxy server if you are using one on your network. If not, leave thefield blank and choose 'Continue': The installation will begin. Once complete, please choose how you wish to handle updates:Comodo Dome Firewall Central Manager - Administrator Guide 2019 Comodo Security Solutions Inc. All rights reserved.14
Comodo Dome Firewall Central Manager - Admin Guide Select your preferred option and continue onto the package selection screen:Select 'OpenSSH Server' then continue. Use the Space bar to select the option. The appliance will restart when installation is complete.Assign a public IP address to the virtual appliance Once installed, you can access the Dome Firewall Central Manager console at the URL https:// IP Addressof the virtual appliance UN 'admin', password 'comodo' (both without quotes). You should change these credentialsafter first login.You will be asked to enter the license key on your first login: Enter your license key and click 'Submit'.Comodo Dome Firewall Central Manager - Administrator Guide 2019 Comodo Security Solutions Inc. All rights reserved.15
Comodo Dome Firewall Central Manager - Admin GuideTip: Comodo One / Comodo Dragon / ITarian customers can integrate the central manager appliance with theirportal accounts. See Integrate Central Manager with Comodo One / Comodo Dragon / ITarian for more details.Cloud Version Contact Comodo at provisiondome@comodo.com with your license key to setup the service. After setup, we will inform you of the IP address or domain on which the service is hosted The way you login to the console depends on how you purchased your license: 1.3Stand-alone Customers - You can access your central manager instance at the addressprovided to you. For example, https:// given I P address UN 'admin', password 'comodo' (both without quotes). You should change thesecredentials after first login.Comodo One, Comodo Dragon and ITarian MSP/Enterprise Customers - you can integrateyour central manager appliance to your portal account. You can access the central manageradministrative console directly from your portal. See Integrate Central Manager with ComodoOne / Comodo Dragon / ITarian for more details.Integrate Central Manager with Comodo One /Comodo Dragon / ITarianComodo Dome Firewall Central Manager can be integrated with your Comodo One / Comodo Dragon (CD) / ITarianaccount. Once integrated, you can access CM from portal by clicking 'Applications' 'Dome Central Manager'.The following sections explain how to integrate different versions of CM to C1 / CD / ITarian: Dome Firewall Central Manager Virtual Appliance Dome Firewall Central Manager Cloud ModeDome Firewall Central Manager Virtual ApplianceSingle Sign-on (SSO) from C1, CD and ITarian is not enabled by default in the virtual appliance version. IntegratingCM virtual appliance with your portal involves two steps: Step 1 - Enable SSO in the virtual appliance Step 2 - Add the IP Address of your CM installation as Dome Service URL for Dome Firewall CentralManager to your Comodo One / CD / ITarian account.Step 1 - Enable SSO in the virtual applianceNote: Ensure that you have assigned a public IP address to the virtual appliance Login to the root account of the linux virtual machine with default credentials:username rootpassword comodo Open the settings file of the central manager at y usingan editor. Scroll down to the 'cONE SSO settings' areaComodo Dome Firewall Central Manager - Administrator Guide 2019 Comodo Security Solutions Inc. All rights reserved.16
Comodo Dome Firewall Central Manager - Admin Guide Set the SSO flag to1 Save the 'Settings' file Restart the apache service using the Sudo command: sudo apache2ctl restartSSO with your portal is enabled in your Central Manager appliance.Step 2 - Add Dome Service URL for Dome Firewall Central Manager to your Comodo One / CD /ITarian accountYou need to add the IP Address of your appliance as Dome Service URL for Dome Firewall Central Manager to yourportal account. Login to your Comodo One / Comodo Dragon / ITarian account Click 'Manage' 'Applications' from the top to open the Application Management screen. (ComodoOne portal is shown below as an example)Comodo Dome Firewall Central Manager - Administrator Guide 2019 Comodo Security Solutions Inc. All rights reserved.17
Comodo Dome Firewall Central Manager - Admin Guide Click the 'Dome Firewall Central Manager' tileSelect the 'Settings' tab in the bottom paneComodo Dome Firewall Central Manager - Administrator Guide 2019 Comodo Security Solutions Inc. All rights reserved.18
Comodo Dome Firewall Central Manager - Admin GuideEnter the IP address of your appliance (in the form https:// given IP Address ) in the DomeService URL text box and click 'Save'.Your Firewall Central Manager appliance is now integrated with your Comodo One / CD / ITarian account. You canlogin to your Central Manager console from your portal. Dome Firewall Central Manager Cloud ModeSingle Sign-on (SSO) is enabled by default in the cloud version. You need to add your CM access URL or the IPaddress as Dome Service URL for Dome Firewall Central Manager to your portal account.To integrate your Cloud CM to Comodo One, Comodo Dragon or ITarian account Login to your Comodo One / Comodo Dragon / ITarian account Click 'Manage' 'Applications' to open the 'Application Management' screen. (Comodo One portalis shown below as an example)Comodo Dome Firewall Central Manager - Administrator Guide 2019 Comodo Security Solutions Inc. All rights reserved.19
Comodo Dome Firewall Central Manager - Admin Guide Click the 'Dome Firewall Central Manager' tileSelect the 'Settings' tab in the bottom paneComodo Dome Firewall Central Manager - Administrator Guide 2019 Comodo Security Solutions Inc. All rights reserved.20
Comodo Dome Firewall Central Manager - Admin Guide Enter the given domain or IP address (Format https:// given IP Address ) in the Dome ServiceURL text box and click 'Save'.Dome Firewall Central Manager is now integrated with your portal account.You can access CM from your portal as follows: Login to your Comodo One / Comodo Dragon / ITarian account Click 'Applications' 'Dome Firewall Central Manager'Comodo Dome Firewall Central Manager - Administrator Guide 2019 Comodo Security Solutions Inc. All rights reserved.21
Comodo Dome Firewall Central Manager - Admin GuideCentral manager will open at the dashboard in a new tab.1.4Login to the Admin ConsoleDome Firewall Stand-alone CustomersOnce setup, you can login to the central manager admin console using any web browser. Paste the IP address of your instance into any browser. Format https:// given IP address . Login with the following default credentials: Username adminPassword comodoYou can change the default password after first login. Choose a strong password that contains a mix ofupper and lower case letters, numbers and special characters. We also recommend regularly changing yourComodo Dome Firewall Central Manager - Administrator Guide 2019 Comodo Security Solutions Inc. All rights reserved.22
Comodo Dome Firewall Central Manager - Admin Guidepassword as a best security practice. See Change Password for more details.Comodo One / Comodo Dragon / ITarian MSP and Enterprise CustomersYou can login to the administrative console in two ways: Login to stand-alone Central Manager Console Enter the given URL or https:// given ip address of the central manager in the address bar of thebrowserUse the default credentials:Username adminPassword comodoYou can change these credentials anytime after your first login. See Change Password for moredetailsComodo One/ CD / ITarian Console – You can integrate your Dome Firewall Central Manager to your portaland access the administrative console from it. See Integrate Central Manager with Comodo One /Comodo Dragon / ITarian for more details. 1.5After integration, you can access the administrative console at anytime by clicking 'Applications' 'Dome Firewall Central Manager' from your portal console.Change PasswordThe 'Change Password' option at the top right allows you to change your login password at any time.Note: The change password option will be available only for stand-alone Central Manager Console. You cannotchange the password for central manager console accessed through C1 / CD / ITarian portal.To change your login password for Dome Firewall Central Manager Click 'Change Password' at the top rightComodo Dome Firewall Central Manager - Administrator Guide 2019 Comodo Security Solutions Inc. All rights reserved.23
Comodo Dome Firewall Central Manager - Admin GuideThe 'Change Password' dialog will appear. Enter your existing password in the 'Old Password' field Enter a new password in the 'New Password' field and re-enter it for confirmation n the 'New PasswordAgain' field. The new password should be of minimum eight characters length. Choose a strong passwordthat contains a mix of upper and lower case letters, numbers and special charactersTip: We also recommend regularly changing your password as a best security practice. Click 'Change Password'Your password will be changed. You should use your new password from your net login.1.6 Add OrganizationsEach firewall device you enroll to the central manager needs to be assigned to an organization. Doing sowill allow you to collectively manage and apply policies to all devices in the organization.Notes: Your C1 / CD / ITarian 'Organizations' are NOT imported into Comodo firewall central manager. You must add organizations separately in firewall central manager. You may, of course, use the sameorganization names for identification purposes.To add organizations Click 'Organizations' 'Organizations' on the left Click 'Add Organization' at the top-left of the interfaceComodo Dome Firewall Central Manager - Administrator Guide 2019 Comodo Security Solutions Inc. All rights reserved.24
Comodo Dome Firewall Central Manager - Admin GuideComplete the following items in the add organizations dialog:Name - The name of the customer organization you want add. You can make this match the nameof a C1 / CD / ITarian organization if you prefer. Remark – Description of, or comments about, the organizationClick 'Save' to add the organization. The new organization will be shown in the organization list. You can now assign devices to the organization. Repeat the process to add more organizations.1.7Enroll Dome Firewall Devices Dome Firewall devices have a built-in client which communicates with the central manager. This allows thedevice to receive commands from the manager and apply them to the firewall. Dome Firewall virtual appliances behind Network Address Translation (NAT) can also be enrolled to thecentral manager. The manager will communicate with the appliance through the NAT IP address. Note – Existing configurations (policies, objects etc) will not be imported with the FW device. Werecommend you remove these from the device before importing then configure them again in centralmanager.Enrolling firewall devices to Central Manager takes two steps:Connect the device to Dome Firewall Central Manager Approve the device and assign it to an organizationSee the following for more details: Comodo Dome Firewall Central Manager - Administrator Guide 2019 Comodo Security Solutions Inc. All rights reserved.25
Comodo Dome Firewall Central Manager - Admin GuideStep1: Connect the firewall device to Dome firewall Central Manager Login to the firewall device at https:// ip address of the Dome firewall device :10443The 'Comodo Dome Firewall' interface will open. Click 'System' 'Central Management' Switch 'Enable CM Client Service' to 'ON': Enter the parameters required to connect the firewall to Dome central managerServer IP - Enter the IP address of the DFW Central Manager interface Organization Name - Enter the name of the organization to which you want the device to belong. Youcan create organizations by logging into the central manager and clicking 'Organizations' 'Organizations' 'Add Organization'. Description (Remark)* - Enter any comments you wish to leave about the deviceClick 'Connect' Comodo Dome Firewall Central Manager - Administrator Guide 2019 Comodo Security Solutions Inc. All rights reserved.26
Comodo Dome Firewall Central Manager - Admin GuideThe device will be successfully connected to Dome Firewall Central Manager.Next, the administrator needs to approve the device in order to complete the import process.Step 2 : Approve the Dome Firewall Device Newly enrolled devices must be approved by the central manager admin before they can be imported.These devices are listed in the 'Approve Device' interface. The 'Approve Device' interface lets you approve devices and assign them to an organizationTo approve a device: Make sure you have connected the device as explained in step 1 above. Login to the DFW Central Manager console.After logging in, Click 'Approve Device' on the left.Comodo Dome Firewall Central Manager - Administrator Guide 2019 Comodo Security Solutions Inc
Comodo Dome Firewall Central Manager - Admin Guide Complete the application form. You will receive your license key via email. Comodo One / Comodo Dragon / ITarian customers Login to your Comodo One / Comodo Dragon / ITarian account Click 'Store' then go to the firewall central manager tile. Click the 'Free' button to begin setup. After adding to your portal account .