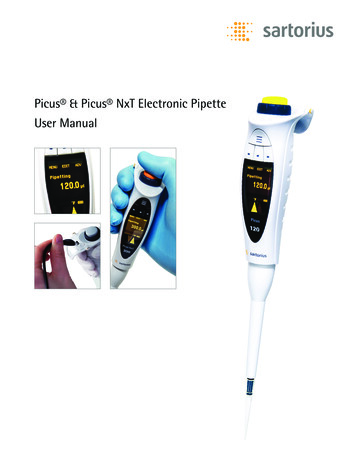
Transcription
Picus & Picus NxT Electronic PipetteUser Manual
Table of Contents1. Introduction1.1. Intended Use1.2. Product Overview1.2.1. Single and Multichannel Pipettes1.2.2. Display1.2.3. Optifit Tips and SafetySpace Filter Tips1.3. Contents of Delivery Package2. Getting Started2.1. Charging2.2. Power Up3. Operation3.1. Operating Principles3.2. Pipetting Modes3.2.1. Pipetting (Forward Pipetting)3.2.2. Reverse Pipetting3.2.3. Multi-Dispensing3.2.4. Manual Pipetting3.2.5. Diluting3.2.6. Sequential Dispensing3.2.7. Multi-Aspirating3.2.8. Titration3.2.9. Protocols (only in Picus NxT)3.2.10. Advanced Functions3.3. Saving Pipetting Programs to Memory3.4. Setup3.4.1. Adjustment3.4.2. Sound3.4.3. Backlight3.4.4. User ID3.4.5. GLP Info (only in Picus )3.4.6. Reset3.4.7. Information3.4.8. Languages3.4.9. Pipette Lock3.4.10. Passwords (only in Picus NxT)3.4.11. Date and Time (only in Picus NxT)3.4.12. Reminders (only in Picus NxT)3.4.13 Tip ejection4. Care and Maintenance4.1. Cleaning and Maintenance4.1.1. Single-Channel Pipettes4.1.2. Multichannel Pipettes4.2. Sterilizing4.2.1. Autoclaving4.2.2. UV Sterilization4.3. Performance Testing4.4. Replacing the Battery4.5. Replacement Parts4.6. Storage5. Warranty6. Hazardous Substances (RoHS II)7. Disposal (WEEE)8. Troubleshooting8.1. Hardware Reset8.2. Troubleshooting Guide9. Technical Data9.1. Performance Specifications9.2. Speed 636373838
1.IntroductionThe Sartorius Picus /Picus NxT electronic pipette brings ergonomics toa completely new level with its exceptionally lightweight and compactdesign, and its ease of operation. This versatile air displacement pipette hasbeen designed by an experienced R&D team in cooperation with laboratorypersonnel and ergonomists to ensure safe and comfortable pipetting.The Picus /Picus NxT is available in single and multichannel models (8 and12-channel). Tips can be attached and ejected safely and comfortably usingthe Optiload tip-loading feature and the electronic tip ejection function. Toimprove safety by reducing the risk of contamination, replaceable Safe-ConeFilters can be used in all Picus /Picus NxT models greater than 10 µl.The fully electronic operation, unique DC motor, and the electronic brake andpiston control system guarantee excellent accuracy and precision. The desiredvolume can be quickly selected using the light and easy-to-use adjustmentwheel on top of the pipette.Picus NxT offers advanced safety and efficiency features for highly regulatedlaboratories. These features include a certificate of accredited 3-pointcalibration, user-definable pipetting protocols, and calibration and servicereminders.Congratulations on becoming a new Picus /Picus NxT owner!Tell us what you think ofSartorius Pipettes and Tipswww.sartorius.com/lh-satisfaction3
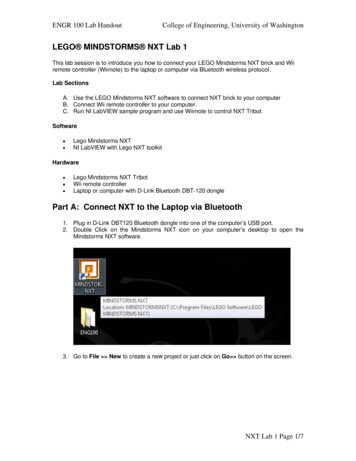
1.1.Intended UseThe Picus /Picus NxT pipette is intended, designed and manufactured fordispensing liquids in a variety of applications and to be used in combinationwith Optifit Tips or SafetySpace Filter Tips. The aforementioned pipette and tipcombination, fall within the scope of in-vitro diagnostics, and can be used asa diagnostic medical device in related applications. Thereby, Picus /Picus NxTand its accessories fulfil the relevant demands of the Directive 98/97/EC of theEuropean Parliament.The Picus /Picus NxT product range covers a volume range of 0,2 μl to10 ml. It is recommended that Sartorius Optifit Tips or SafetySpace FilterTips are used with Sartorius pipettes to ensure optimum compatibility andperformance.It is a general purpose laboratory device that fulfils ISO 9001 and ISO 13485standards.This manual contains useful information, including information on goodpipetting practice.NOTE: Prolonged pipetting can cause Work Related Upper Limb Disorder(WRULD). The manufacturer is not responsible for WRULD or any relatedinjuries caused by using pipettes.1.2.Product OverviewBefore using the Sartorius Picus /Picus NxT electronic pipette for the firsttime, please review this operating manual carefully. This manual can bedownloaded from the Sartorius website at: www.sartorius.com. Hardcopiesmay be ordered by e-mail from lhinfo.finland@sartorius.com.1.2.1. Single and Multichannel Pipettes1. Electronic tip ejector2. Charging contacts3. ON/OFF button4. USB-charging port5. Operating button & volume range colour-code6. Adjustment wheel7. Hotkey for memory places (black in Picus NxT)8. Softkeys for programming (black in Picus NxT)9. Dot-matrix display10. Maximum volume11. Dispensing head (tip ejector collar and tip-cone), autoclavable(excl. 8/12-ch 1200 µl)12. Optiload, spring-loaded tip-cones in multichannel pipettes13. Safe-Cone Filters (excl. 10 µl pipettes)14. Pipette tip15. Tip ejector collar. (When using non-Sartorius tips, it can be adjusted forsuitable tip ejection, in 10 µl, 120 µl, 300 µl and 1000 µl single-channelmodels)12345617891011121314154
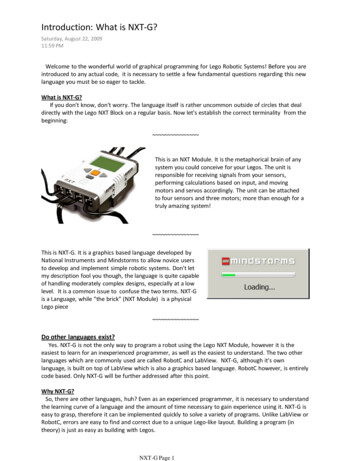
1.2.2 DisplayThe multi-colour backlit dot-matrix display is clear and is logically structured.1.2.3.4.5.6.Softkey functionsCurrent modePipetting volume and aliquots in multidispensing modesSpeedBattery charging indicatorArrows indicating aspiration and dispensing123451.2.3 Optifit Tips and SafetySpace Filter Tips6We recommend using Sartorius Optifit Tips or SafetySpace Filter Tips.These tips are designed for Sartorius pipettes and therefore ensure optimalcompatibility, accuracy, and precision.For optimum results you should also: Ensure that the liquid and the pipette/tip combination are at approximatelythe same temperature Choose the right tip volume for your pipette: the colour of the tip trayshould match the colour code on the pipette Use Optifit Tips in rack, refill, or bulk packaging, and choose the puritylevel your application requires: free of DNase, RNase and endotoxin, and/orsterilized If aerosol contamination needs to be avoided, choose Safe-Cone Filters,which are attached to the tip-cone and should be changed daily, orSafetySpace Filter Tips, which are discarded after each pipetting SafetySpace Filter Tips should also be chosen when you want to avoidsample loss due to the sample reaching the filter. The extra space betweenthe sample and the filter ensures that even foaming or viscous liquids don’treach the filter in reverse pipetting or repetitive/multiple dispensing modes Pre-rinse the tip three to five times before pipetting (this is especiallyimportant in the forward pipetting mode) Wipe the tip against the receiving vessel’s wall to catch the last dropletafter dispensing Change the tip after every pipetting]SafetySpaceair gap5
1.3.Contents of Delivery Package Picus /Picus NxT electronic pipette Universal USB charger (EU, UK, US, JPN, KOR, AUS, and CHN plugs) Sartorius tip rack (10x96 tips) of corresponding volume with up to 1000 μlsingle-channel models / 1200 μl multichannel models One tip with 5 ml and 10 ml single-channel models Safe-Cone Filters and tweezers with 10 μl models Autoclavable grease with the single-channel models QC-certificate (Picus ), certificate of accredited 3-point calibration(Picus NxT) Quick Start GuideIf any item in this delivery package is missing or damaged, please contact yourlocal Sartorius representative.6
2.Getting StartedPlease read this manual before using your Picus /Picus NxT electronicpipette.1. Your Picus /Picus NxT is delivered, with the battery partially charged. Werecommend the pipette is charged fully, before first use; charge at leastone (1) hour.2. Insert a replaceable Safe-Cone Filter into the tip-cone before use, toprevent contamination of the pipette.3. Press the ON/OFF button on the top of the pipette to turn the power on.4. Press the tip ejector button when advised by the display.5. The pipette is now ready to be programmed and used.2.1.ChargingIt is recommended that you charge the pipette before first use for one (1)hour. Charging via USB:Connect the USB cable to the pipette and plug the charger into the mainspower outlet. Charging using charging stand or carousel:Make sure that the charging stand is connected to the mains power outletvia the AC charger, and that the charging contacts of the pipette areproperly in contact with the charging grooves of the charging stand.Charging options for Sartorius electronic pipettes: USB charger, universal, included in the package Sartorius Charging Stand for one pipette, order code: 730981 Sartorius Charging Carousel for four pipettes, order code: 730991The battery sign in the bottom right corner of the display indicates thebattery’s level of charge. When the battery is low, the indicator blinks LOWand the pipette needs to be charged.NOTE! Before connecting the AC charger to the charging stand and the mainselectrical outlet, make sure that the power supply output voltage level andpower capacity are correct. The use of incorrect power supplies may damagethe device. Only use the power supplies recommended by the manufacturer.2.2.Power Up1. Press ON/OFF button: pipette will turn on.2. Press the tip ejector button as advised on the display. The pipette is nowready to be programmed and used.3. While being used and/or charged, the pipette is in active mode, all theprocessor functions are activated and the display backlight is on.4. One minute after last activity the pipette will switch to power savingmode and the backlight will dim. The pipette returns to active mode whenany buttons are pressed or if the adjustment wheel is turned.5. 10 minutes after last activity the backlight turns off, but the display is stillvisible. The pipette returns to active mode when any buttons are pressedor if the adjustment wheel is turned.6. 60 minutes after last activity the pipette turns off. To power up thepipette again, press either operating button or the ON/OFF button. Thepipette will also turn on when charged.If the pipette is turned off from the ON/OFF button, it can only be turned onby again using the same button.7
3.Operation3.1.Operating PrinciplesPipetting functions are controlled using the operating button, adjustmentwheel, and Softkeys. The Hotkey is used to store or activate programs.Operating button Confirms settings (can be used as an alternative to the Softkey for OK) andinitiates piston movement for aspiration, dispensing and repeated blow-out.Adjustment wheel Scrolls the menu and adjusts volume settings. Moves the piston in manual and titrating modes for aspiration anddispensing. Unlocks volume adjustment for editing when turned fully in one direction.Electronic tip ejector Ejects the tip(s) with the light touch of a fingerLeft Softkey MENU: Displays the main mode selection. BACK: Exits the currently displayed, MENU, EDIT, or ADV functions, withoutsaving changes. QUIT: Quits the pipetting task. LOCK: Shown when reminders are triggered. Locks the pipette.Middle Softkey EDIT: Activates the editing mode so that settings can be changed. NEXT: Active in editing mode. Confirms a setting and moves to the nextone. SAVE: Active in memory settings. Saves the current program to the selectedmemory place. ABC/abc/123/#@!/CLEAR: Active in memory settings and setup settings.Allows you to select letters, numbers, or symbols, or clear existing text. RESET: Active in the reminders menu. Resets the date and cycle counters. PREV: Active in editing mode. Moves back to the previous setting. SNOOZE: Shown when reminders are triggered. Snoozes the reminder. UNLOCK: Active when pipette is locked. Unlocks the pipette. If passwordprotection is enabled, the administrator password is required.Right Softkey ADV: Displays available advanced functions for the activated main mode. OK: Confirms the setting or selection and exits.Hotkey 10 memory places to save and activate frequently used or favorite pipettesettings.8
3.2.Pipetting ModesThe Picus NxT electronic pipette has nine (9) main pipetting modes, while thePicus has eight (8). The Picus NxT has seven (7) advanced functions and thePicus has six (6).Pipetting ModesAdvanced Functions (ADV)*TrackerPipettingReverse PipettingMulti-Dispensing Mixing Counter Excess VolumeAdjustmentAutoDispensing FastDispensing Manual PipettingDilutingSequential DispensingMulti-AspirationTitrationProtocols **/ ***RepeatedBlow-out** * Are used in conjunction with pipetting modes** Only in Picus NxT models.*** Availabilty of the advanced functions varies according to the pipetting mode selected for the protocol.9
3.2.1. Pipetting (Forward Pipetting)Pipetting mode aspirates and then dispenses the selected volume of liquid.It is recommended for aqueous liquids, liquids containing small amounts ofdetergent or proteins, and solvents.To select Pipetting mode:1. Select MENU by pressing the left Softkey.2. Confirm Pipetting mode by pressing the operating button or the rightSoftkey for OK. The latest settings used will then be displayed.To edit the volume and speed settings:1. Press the middle Softkey for EDIT or turn the adjustment wheel all the wayto the right or left. The first setting to be edited is now highlighted.2. Turn the adjustment wheel to set the desired value.3. Confirm the setting by pressinga. the operating button or the right Softkey for OK, which will exit theediting mode.ORb. the middle Softkey for NEXT, to move on to edit the next highlightedsetting.4. Repeat steps 2 and 3 for all the settings you wish to edit.5. To exit the editing mode without saving changes, press the left Softkey forBACK.To use the pipette with the selected program:1. Press the operating button to aspirate the liquid.2. Press the operating button again to dispense the liquid.3. Eject the tip by pressing the electronic tip ejector button.Advanced FunctionsCounter, Mixing, and Tracker can be used in conjunction with Pipetting mode.In Picus NxT, Repeated Blow-out can also be used. Repeated Blow-out helpsto remove residual liquid from the tip, for liquids where normal dispensingdoes not empty it sufficiently. Counter counts the number of times a liquid is dispensed. Counting can beset to start at any number. Mixing mixes liquids manually or automatically. The mixing volume can beadjusted according to the pipette’s maximum volume. Tracker displays the location to next dispense liquid in a microplate.Press the Softkey for MENUChoose the modePress the Softkey for EDITFor more information on using advanced functions see section 3.2.10.NOTE! Only one advanced function can be selected at a time. Repeated Blowout can be combined with other advanced functions.3.2.2. Reverse PipettingReverse Pipetting aspirates the selected volume as well as an excess volume.It is recommended for biological, foaming, and viscous liquids. In ReversePipetting mode the excess is left inside the tip and then discarded.To select Reverse Pipetting mode:1. Select MENU by pressing the left Softkey.2. Use the adjustment wheel to select Reverse and confirm by pressing theoperating button or the right Softkey for OK. The latest settings used willthen be displayed. To edit the volume and speed settings:1. Press the middle Softkey for EDIT or turn the adjustment wheel all the wayto the right or left. The first setting to be edited is now highlighted.10Change settings and press OK or NEXT
2. Turn the adjustment wheel to set the desired value.3. Confirm the setting by pressinga. the operating button or the right Softkey for OK, which will exit theediting mode.ORb. the middle Softkey for NEXT, to move on to edit the next highlightedsetting.4. Repeat steps 2 and 3 for all settings you wish to edit.5. To exit the editing mode without saving changes, press the left Softkey forBACK.To use the pipette with the selected program:1. Press the operating button to aspirate the liquid (selected volume excess).2. Press the operating button again to dispense the selected volume.3. To continue reverse pipetting without discarding the excess volume, pressthe left Softkey for NO and return to step 1.4. To discard the excess volume and empty the tip, press the operatingbutton twice.5. Eject the tip by pressing the electronic tip ejector button.Advanced FunctionsCounter, Excess Adjustment, and Tracker can be used in conjunction withReverse Pipetting. Counter counts the number of times a liquid is dispensed. Counting can beset to start at any number. Excess Adjustment can be used to set the excess volume. Otherwise adefault value is used. Tracker displays the location to next dispense liquid in a microplate.For more information on using advanced functions see section 3.2.10.NOTE! Only one advanced function can be selected at a time.3.2.3. Multi-DispensingMulti-Dispensing aspirates the total volume as well as an excess volume, thenrepetitively dispenses equal volumes of liquid. It is recommended for longpipetting series and microplate dispensing.To select Multi-Dispensing mode:1. Select MENU by pressing the left Softkey.2. Use the adjustment wheel to select Multi-Disp and confirm by pressingthe operating button or the right Softkey for OK. The latest settings usedwill then be displayed.To edit the settings for volume, speed, and number of dispensings:1. Press the middle Softkey for EDIT or turn the adjustment wheel all the wayto the right or left. The first setting to be edited is now highlighted.2. Turn the adjustment wheel to set the desired value.3. Confirm the setting by pressinga. the operating button or the right Softkey for OK, which will exit theediting mode.ORb. the middle Softkey for NEXT, to the next highlighted setting.4. Repeat steps 2 and 3 for all settings you wish to edit.5. To exit the editing mode without saving changes, press the left Softkeyfor BACK.To use the pipette with the selected program:1. Press the operating button to aspirate the liquid (selected volume excess).2. Press the operating button again to discard the prime excess.Dispensing 10 µl twelve times.11
3. Press the operating button repeatedly until all aliquots have beendispensed.4. To continue repetitive dispensing without discarding the excess volume,press the left Softkey for NO and return to step 1.5. To discard the excess volume and to empty the tip, press the operatingbutton twice.6. Eject the tip by pressing the electronic tip ejector button.Advanced FunctionsExcess Adjustment, timed Automated Dispensing, and Tracker can be used inconjunction with Multi-Dispensing. Excess Adjustment can be used to set the excess volume. Timed Automated Dispensing dispenses automatically without needing theoperating button to be pushed each time. Tracker displays the location to next dispense liquid in microplatedispensing.For more information on using advanced functions see section 3.2.10.NOTE! Only one advanced function can be selected at a time.3.2.4. Manual PipettingIn Manual Pipetting the piston movement in aspiration and dispensing iscontrolled manually by turning the adjustment wheel. It is ideal for measuringreagents, and for applications in which the pipetting speed needs to becontrolled manually.To select Manual Pipetting mode:1. Select MENU by pressing the left Softkey.2. Use the adjustment wheel to select Manual and confirm by pressing theoperating button or the right Softkey for OK.To edit the volume and speed settings:1. Press the middle Softkey for EDIT or turn the adjustment wheel all the wayto the right or left. The first setting to be edited is now highlighted.2. Turn the adjustment wheel to set the desired value.3. Confirm the setting by pressinga. the operating button or the right Softkey for OK, which will exit theediting mode.ORb. the middle Softkey for NEXT, to move on to edit the next highlightedsetting.4. Repeat steps 2 and 3 for all settings you wish to edit.5. To exit the editing mode without saving changes, press the left Softkey forBACK.To use the pipette with the selected program:1. Press the operating button to begin aspiration.2. To aspirate the liquid, press the operating button again and hold it down,or turn the adjustment wheel to the right. The aspiration speed can beadjusted by how far the adjustment wheel is turned. To pause aspiration,briefly release the operating button or adjustment wheel.3. To begin dispensing, turn the adjustment wheel to the left. Hold theadjustment wheel to the left or press the operating button down tocontinue dispensing.4. When the entire volume is dispensed, press the operating button to emptythe tip or press the left Softkey for NO to continue with aspiration.5. Eject the tip by pressing the electronic tip ejector button.12Manual pipetting
Advanced FunctionsRepeated Blow-out, available with Picus NxT, can be used in conjunctionwith Manual Pipetting mode for liquids where normal dispensing does notcompletely empty the tip.For more information on using advanced functions see section 3.2.10.3.2.5. DilutingIn Dilution mode liquids separated by an air gap are aspirated and thendispensed simultaneously. Diluting can be used to dilute samples and reagents.The diluent is aspirated first followed by an air gap, then the sample orreagent to avoid contamination.To select Diluting mode:1. Select MENU by pressing the left Softkey.2. Use the adjustment wheel to select Diluting and confirm by pressing theoperating button or the right Softkey for OK.To edit the volume and speed settings:1. Press the middle Softkey for EDIT or turn the adjustment wheel all the wayto the right or left. The first setting to be edited is now highlighted.2. Turn the adjustment wheel to set the desired value.3. Confirm the setting by pressinga. the operating button or the right Softkey for OK, which will exit theediting mode.ORb. the middle Softkey for NEXT, to move on to edit the next highlightedsetting.4. Repeat steps 2 and 3 for all settings you wish to edit.5. To exit the editing mode without saving changes, press the left Softkey forBACK.To use the pipette with the selected program:1. Press the operating button to aspirate the diluent.2. Press the operating button again to aspirate the air gap.3. Press the operating button a third time to aspirate the sample.4. Dispense the entire volume by pressing the operating button.5. Empty the tip by pressing the operating button again.6. Eject the tip by pressing the electronic tip ejector button.Advanced FunctionsRepeated Blow-out (Picus NxT only) and Mixing can be used in conjunctionwith Diluting. Mixing mixes liquids manually or automatically. The mixing volume can beadjusted according to the pipette’s maximum volume. Repeated Blow-out helps to remove residual liquid from the tip, for liquidswhere normal dispensing does not empty it sufficiently.For more information on using advanced functions see section 3.2.10.3.2.6. Sequential DispensingSequential Dispensing repeatedly dispenses selected volumes in any desiredorder. This is a useful mode for diluting series and making calibration curves.To select Sequential Dispensing mode:1. Select MENU by pressing the left Softkey.2. Use the adjustment wheel to select Seq. Disp. and confirm by pressing theoperating button or the right Softkey for OK. The latest settings used willthen be displayed. 13
To edit the settings for speed, number of aliquots, and aliquot volumes:1. Press the middle Softkey for EDIT or turn the adjustment wheel all the wayto the right or left. The first setting to be edited is now highlighted.2. Turn the adjustment wheel to set the desired value.3. Confirm the setting by pressinga. the operating button or the right Softkey for OK, which will exit theediting mode.ORb. the middle Softkey for NEXT, to move on to edit the next highlightedsetting.4. Repeat steps 2 and 3 for all settings you wish to edit.5. To exit the editing mode without saving changes, press the left Softkey forBACK.To use the pipette with the selected program:1. Press the operating button to aspirate the selected volume.2. Press the operating button again for pre-out to make sure that the firstaliquot will be of the correct volume.3. Dispense the set aliquots by pressing the operating button each time.4. After the last aliquot has been dispensed, press the operating buttonto empty the tip or press NO to start aspirating without emptying theremaining liquid.5. Eject the tip by pressing the electronic tip ejector button.Advanced FunctionsRepeated Blow-out (Picus NxT only) and Excess Adjustment can be used inconjunction with Sequential Dispensing. Excess Adjustment can be used to set the excess volume. Repeated Blow-out helps to remove residual liquid from the tip, for liquidswhere normal dispensing does not empty it sufficiently.For more information on using advanced functions see section 3.2.10.3.2.7. Multi-AspiratingMulti-Aspiration aspirates a selected volume a set number of times. MultiAspirating is useful for sample pooling and microplate washing. Select thevolume and the number of aspirations, aspirate until the series is completed,then discard the full aspirated volume in a single step.To select Multi-Aspiration mode:1. Select MENU by pressing the left Softkey.2. Use the adjustment wheel to select Multi-Aspiration and confirm bypressing the operating button or the right Softkey for OK. The latestsettings used will then be displayed.To edit the settings for speed, volume, and number of aspirations:1. Press the middle Softkey for EDIT or turn the adjustment wheel all the wayto the right or left. The first setting to be edited is now highlighted.2. Turn the adjustment wheel to set the desired value.3. Confirm the setting by pressinga. the operating button or the right Softkey for OK, which will exit theediting mode.ORb. the middle Softkey for NEXT, to move on to edit the next highlightedsetting.4. Repeat steps 2 and 3 for all settings you wish to edit.5. To exit the editing mode without saving changes, press the left Softkey forBACK.14
To use the pipette with the selected program:1. Press the operating button repeatedly until all the set volumes areaspirated.2. To dispense the liquid and empty the tip, press the operating button again.3. Eject the tip by pressing the electronic tip ejector button.Advanced FunctionsRepeated Blow-out, available with Picus NxT, can be used in conjunctionwith Multi-Aspiration mode, for liquids where normal dispensing does notcompletely empty the tip.For more information on using advanced functions see section 3.2.10.3.2.8. TitrationIn Titration mode, the full volume is aspirated and then dispensing speed ismanually controlled. The display shows the dispensed volume in real timeduring dispensing. Titration is used to determine the unknown concentrationof an identified analyte.To select Titration mode:1. Select MENU by pressing the left Softkey.2. Use the adjustment wheel to select Titration and confirm by pressing theoperating button or the right Softkey for OK. The latest settings used willthen be displayed.To edit the settings for speed, volume, and volume for Fast Dispensing (ifenabled):1. Press the middle Softkey for EDIT or turn the adjustment wheel all the wayto the right or left. The first setting to be edited is now highlighted.2. Turn the adjustment wheel to set the desired value.3. Confirm the setting by pressinga. the operating button or the right Softkey for OK, which will exit theediting mode.ORb. the middle Softkey for NEXT, to move on to edit the next highlightedsetting.4. Repeat steps 2 and 3 for all settings you wish to edit.5. To exit the editing mode without saving changes, press the left Softkey forBACK.Titration modeTo use the pipette with the selected program:1. Press the operating button to aspirate the set volume.2. Press the operating button again and hold it down, or turn the adjustmentwheel to the left to dispense the liquid. The dispensing speed can beadjusted by how far the adjustment wheel is turned. To pause dispensing,briefly release the operating button or adjustment wheel.3. To finish titrating, empty the tip by pressing the operating button twice.4. When the titration cycle is completed, eject the tip by pressing theelectronic tip ejector button.Advanced FunctionsFast Dispensing can be used with the Titration mode. Fast Dispensing dispensesthe first volume automatically, then subsequent volumes are dispensedmanually.For more information on using advanced functions see section 3.2.10.15
3.2.9. Protocols (Only in Picus NxT)User-definable protocols speed up routine pipetting sequences. A maximumof ten pipetting and advanced funtion combinations can be used within aprotocol. For example, pipetting with mixing counts as one combination.To set up or edit a pipetting protocol:1. Select MENU by pressing the left Softkey.2. Use the adjustment wheel to select Protocols and confirm by pressing theoperating button or the Softkey for OK.3. Use the adjustment wheel to select the desired protocol to set up or edit(P1-P3).4. Press the middle Softkey for EDIT.a. If the protocol has not yet been set up, you are first asked to enter aprotocol name.b. If the protocol already exists either:i. Continue editing by pressing the Softkey for EDIT. Then go to step6. When editing an existing protocol, it is not possible to edit theprotocol name.ORii. Clear the existing protocol by pressing the operating button or theSoftkey for OK.5. Edit the name of the protocol by pressing the Softkey for EDIT, or acceptthe name with the Softkey for OK.a. When entering editing mode, the first character becomes highlightedand can be edited.b. Capital letters are used by default. Use the middle Softkey to change thecharacter type: ABC for capital letters, abc for lower case letters, 123 fornumbers and #@! for other characters.c. Turn the adjustment wheel to select your chosen character and confirmby pressing the operating button or the right Softkey for OK.d. The next character to be edited is then highlighted. Repeat steps b and cuntil you have entered the name.e. Press the operating button or the softkey for OK to accept the changesand exit the editing mode.6. To add a step into a protocol:a. Select Add step with th
User ID 24 3.4.5. GLP Info (only in Picus ) 24 3.4.6. Reset 25 3.4.7. Information 25 3.4.8. Languages 25 . Tips are used with Sartorius pipettes to ensure optimum compatibility and performance. . One tip with 5 ml and 10 ml single-channel models