Transcription
THE Unofficiallego mindstormsnxt Inventor’sGuide david j. perdueExcerpts from “Chapter 4: Understanding the LEGOMINDSTORMS NXT Pieces” and “Chapter 14: Tag-Bot”
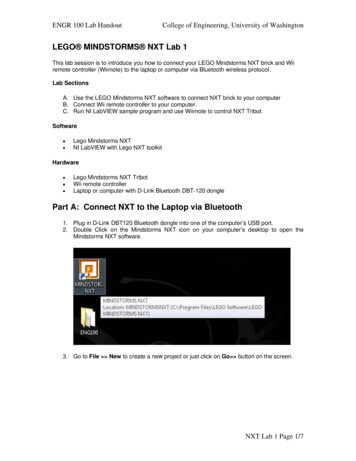
4understanding the LEGOMINDSTORMS NXT piecesOnce you’ve begun creating your own robots with the NXT set, you’ll soon ask a simple but significant question: “How do Ibuild great NXT robots?” Obviously, the NXT set is capable of producing some impressive creations, but how do you utilizethis potential? Is there a secret to constructing robust, functional, and remarkable robots? Not really. The key is simply tomaster the use of the LEGO pieces in the NXT set.In the last chapter, we focused specifically on the electronic pieces. In this chapter, we’ll broaden our scope to includeall the pieces in the NXT set, addressing how to approach the entire system and then discussing the new pieces in detail.To acquire a real understanding of the pieces, we’ll consider several basic questions: What types of pieces does the NXTset include and in what quantities? What are the names of these pieces? What are their purposes?We’ll build upon this knowledge in the next two chapters that discuss construction techniques.introduction to the piecesSince we’ll be encountering dozens of different types of pieces in a variety of quantities, our first task should be to quicklyget an overview of them. Figure 4-1 shows each type of piece included in the NXT set, followed by an x and a number,which specify the number of those pieces that are included. Briefly look over it to gain a basic understanding of the buildingelements.notePieces included in greater quantities are generally those that you’ll use most often in your creations.It’s natural to assume that all of the pieces in the NXT set are MINDSTORMS pieces (i.e., pieces that are specificto MINDSTORMS), but besides the electronic pieces, most of them are actually LEGO TECHNIC pieces. Realizing thisfact is important to understanding the nature of MINDSTORMS NXT construction. Launched in 1977, the TECHNICseries—previously known as the Technical Sets and then the Expert Builder series—enables you to create mechanical (butnot intelligent) LEGO inventions. Because TECHNIC creations employ movement, they use many pieces that deviate from thestandard brick-and-plate design. Over the years, TECHNIC has proven to be a particularly versatile and powerful subset ofLEGO building. The exact count of pieces in your NXT set may slightly differ. A LEGO set usually includes a few extra of some of its smaller pieces.
Figure 4-1: The types and quantities of pieces in the NXT setIn a sense, MINDSTORMS is an offshoot of TECHNICbecause it relies heavily on TECHNIC pieces and buildingtechniques. MINDSTORMS is actually more capable, however,because it combines the ingenuity of TECHNIC pieces with32chapter 4the power of its own robotic components. When using such apowerful construction system, it’s particularly important thatwe begin by considering three related tasks: classifying thepieces, naming the pieces, and measuring the pieces.
classifying the piecesFirst, we should classify the pieces—not only to stay organized, but also to develop a more complete understanding ofthe pieces themselves. All of the pieces fit into five primarycategories; you’ll soon learn which categories include whichpieces. The five main categories are as ntsNNBeamsGearsnaming the piecesSecond, we should name the individual pieces to facilitatecommunication. Without names, trying to describe thepieces would be a laborious (and sometimes humorous) task.Imagine that I asked you to grab the long, thin, shaft-likepiece that looks like a stick. Using a term like axle instead ismuch easier, isn’t it?The LEGO Group doesn’t give each of its thousands ofpieces an official name, which is unfortunate but understandable. As a result, LEGO fans themselves have attachednames to the pieces, resulting in more than a little confusionwhen the same piece goes by more than one name. Figure 4-2 illustrates this problem.Beam?Brick?names after conducting considerable research, and I haveattempted to choose the most concise and accurate names.measuring the piecesThird, we should measure some of the pieces. You might bethinking, “Why would I need to measure a LEGO piece? Isn’ta name all I need to identify a piece?”That’s a good question with a good answer. Becausemany LEGO pieces are similar, it’s sometimes necessaryto specify a piece’s name and a measurement in order todistinguish one piece from another. For example, imaginethat you’re helping someone build a LEGO creation, and theperson extends part of the creation toward you and says,“Make sure you use five straight beams on this section.”While this person has given you a specific name (you’lllearn about straight beams in a moment), you’re also leftwondering, “What kind of straight beams? Small ones?Medium ones? Large ones?” You wouldn’t know and youcouldn’t know. Figure 4-3 illustrates this problem.“Use a straight beam.”?Liftarm?Figure 4-2: Should we call this piece a beam, a brick, or a liftarm?I don’t want to confuse you, so I have selected a uniquename for each piece in the NXT set and will always use thesenames. I’ll introduce them in this chapter and use them consistently throughout the book. You should realize, however,that there isn’t one naming standard that everyone follows,and you’ll almost certainly hear people refer to pieces bynames other than the ones I use in this book.If you already have names with which you identifyTECHNIC pieces, feel free to continue using them. Onthe other hand, you might consider adopting the namingstandard used in this book. I selected or created theseFigure 4-3: If you’re told to use a straight beam, which kind of straight beamshould you choose?Using some simple measurements resolves this issueby allowing us to specify exactly which piece we’re talkingabout. For the most part, we’ll use the module as our unitof measure, but a few pieces in the NXT set use the LEGOUnit. In addition, gears are often measured in their own way.You’ll learn the details of how and when to measure piecesthroughout the rest of this chapter.understanding the LEGO MINDSTORMS NXT pieces33
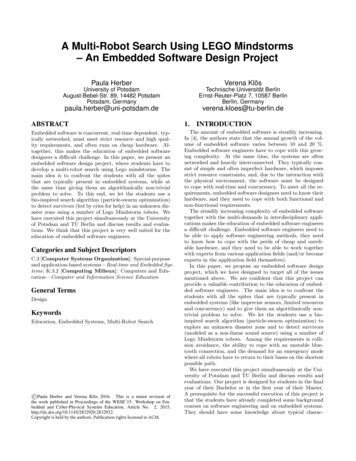
note A third criterion for identifying a piece is color;for example, you might refer to a light stone gray straightbeam. Since we’re only using the NXT set in this book, andeach type of piece in the NXT set only comes in one color(with the exception of the plastic balls), piece colors generally don’t present a problem.examining thepiecesnote Consult Appendix A for a summary of the attributes of each piece in the NXT set.the electronicsThis first category includes the NXT, the three servo motors,the four sensors, and the electrical cables. Because of theseelements’ complexity and capability, I devoted Chapter 3 tothem and will not discuss them in further detail here.the beamsArmed with an understanding of the basic issues under lying the pieces in the NXT set, we’re prepared to beginexamining the five categories of pieces presented earlier:electronics, beams, connectors, gears, and miscellaneouselements. This is a fundamental section of the book that youshould read thoroughly (and even reread), but don’t feel likeyou have to digest it all at once. At any point, move on tosomething else if you would like—you can always come backto this section later.The second category to consider is the beams category. Theterm beam encompasses a variety of pieces that composethe structures of creations. In other words, beams are toyour LEGO creations what a foundation, walls, and a roof areto a house. Figure 4-4 offers a comprehensive view of thevarious types of beams in the NXT set; match up the numbers above each of the pieces with the numbers in Table 4-1for information about each piece.We can break down these beams into foursubcategories:NNStraight beamsHalf-beamsNNAngled beamsTECHNIC bricks1412345Figure 4-4: The beams in the NXT set34chapter 467891011121315
table 4-1: the NXT beamsnumber infigure 4-4piece namepiece color(in NXT set)115M (straight) beamLight stone gray213M (straight) beamLight stone gray311M (straight) beamLight stone gray49M (straight) beamLight stone gray57M (straight) beamLight stone gray65M (straight) beamDark stone gray73M (straight) beamDark stone gray811.5M angled beamDark stone gray99M angled beamDark stone gray107M angled beamDark stone gray117M perpendicularangled beamDark stone gray125M perpendicularangled beamDark stone gray13Triangular half-beamBlack141 4 TECHNIC brickDark stone gray151 6 TECHNIC brickDark stone grayIf you observe Figure 4-4 again, you’ll notice seven different types of straight beams in the NXT set. To distinguishone straight beam from another, we measure their lengthsin modules, a basic TECHNIC unit that is abbreviated M.Between two adjacent round-holes on a straight beam is anhourglass-shaped depression. A module is the distance fromthe center of one of these depressions to the center of anadjacent depression, and it measures approximately 8 mm.Figure 4-6 shows exactly what a module is, and Figure 4-7shows how to use the module to measure a straight beam.In “The Connectors” on page 37, we’ll also use the module tomeasure other types of pieces.note The number of round-holes in a straight beamcorresponds to its module measurement, which meansyou can count round-holes as a measuring shortcut. Forexample, a straight beam with five round-holes has amodule measurement of 5M.1 module (M) 8 mmthe straight beamThe straight beam (Figure 4-5) is the most basic structuralpiece, which means that you’ll use it often. It has a smoothexterior, rounded ends, and an odd number of holes calledround-holes that run along the middle. These round-holesare chiefly used to connect the beam to other pieces withTECHNIC connectors (which we’ll discuss later in thischapter).Figure 4-6: A module (M) is about 8 mm, the distance from the center of onehourglass-shaped depression to the center of the adjacent depression.1M1M1M1M1M1M1M 7MFigure 4-7: Add up the number of modules to get a total measurement of 7M.Figure 4-5: The 7M (straight) beamTo properly describe a straight beam, you must giveboth its module measurement and its name. However, whenwe give a straight beam’s module measurement, we dropthe word straight from the name. For example, a straightbeam measuring 3M (three modules) would be called a 3Mbeam, a straight beam measuring 5M (five modules) wouldbe called a 5M beam, and so on. When only the moduleunderstanding the LEGO MINDSTORMS NXT pieces35
measurement and the word beam are given, it’s understoodthat the piece in question is a straight beam.Straight beams exist in sizes ranging from 2M to 15M,but the seven types of straight beams in the NXT set rangein sizes from 3M to 15M. Of course, the different sizes aredesigned to accommodate different situations: In one case,you may want to use a long straight beam; in another situation, you may want to use a short straight beam.Cross-holesthe angled beamThe angled beam (Figure 4-8) is primarily different fromthe straight beam in that one or more sections of the beamare angled. Sometimes this type of beam simply makesa creation more interesting, while other times it can playimportant structural roles (e.g., some angled beams workwell as “fingers” on grabbing mechanisms). Looking back atFigure 4-4 once again, you’ll notice that five types of beamsin the NXT set fall into the angled beam subcategory, ranging in sizes from 5M to 11.5M. Included among these aretwo types of perpendicular angled beams, which are beamsangled at exactly 90 degrees.Figure 4-9: Some angled beams, such as this 9M angled beam, havecross-holes.1M1M1M1M1M1M1M1M 9M1MFigure 4-10: Measure an angled beam just as you would measure a straightbeam.the half-beamFigure 4-8: The 9M angled beamA half-beam is simply a beam that is half the width (4 mm)of a regular beam (8 mm). A variety of these half-beamsexist, but the NXT set contains only one kind: the triangularhalf-beam (Figure 4-11). Uniquely shaped and possessingboth round-holes and cross-holes, the triangular half-beamenables you to solve structural and mechanical problemsin unconventional ways. We don’t measure the triangularhalf-beam.In the NXT set, most of the angled beams have anotherimportant but less noticeable characteristic: cross-holes.Figure 4-9 shows the same beam as in Figure 4-8 but pointsout its two cross-holes. A cross-hole is specifically used withconnectors known as cross-axles or simply axles, which you’lllearn about in “The Connectors” on the next page. Whenmeasuring an angled beam with or without cross-holes,proceed exactly as you would when measuring a straightbeam (Figure 4-10). The 11.5M angled beam has a half module in its measurement because of a1.5M gap between two round-holes.36chapter 4Figure 4-11: The triangular half-beam
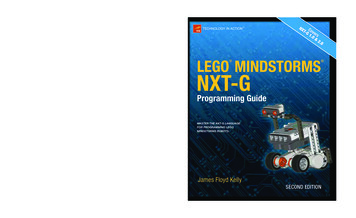
14tag-botMost NXT robots interact with their environments using the variety of available sensors, and designing a robot that interacts with humans is especially fun. You’ll create another mobile robot in this chapter; this time it’s a robot named Tag-Bot(Figure 14-1) that plays flashlight tag. In this game, your goal is to shine a flashlight on Tag-Bot’s light sensor for a shortperiod of time, which “tags” the robot.Tag-Bot’s goal is to dash around theroom in an attempt to escape the light.When tagged, the robot says, “Gameover” and then stops (don’t worry—itwon’t chase you!).Tag-Bot employs a steering drivein which the front wheels steer and theback two driven wheels are fixed. Thisconfiguration provides great stability,but it means that the robot cannot maketight turns or turn in place. Nevertheless, a steering drive is a viable solutionfor many types of projects. Positionedon the front of Tag-Bot are the lightsensor, a sound sensor for activating therobot (e.g., by clapping your hands), anda rotating ultrasonic sensor for detecting objects. We’ll begin this chapterby building Tag-Bot, and then we’llprogram and test the robot to performbasic and more advanced behaviors.buildingtag-botFigure 14-1: Tag-Bot plays a game of flashlight tag.Tag-Bot is composed of eight subassemblies and uses all three servo motors in the NXT set: Two motors are for drivingand one is for steering. Figure 14-2 shows the BOM for Tag-Bot. Ideally, Tag-Bot would use a differential gear for the backwheels. During a turn, the robot’s wheels travel different distances (the wheel on the outside travels the greater distance),and without a differential to adjust the distribution of power to the wheels, one wheel must slip. There isn’t a differential
gear in the NXT set, so Tag-Bot simply does without. Whilethis approach may not provide maximum efficiency, itdoes work!Now you’re ready to build the subassemblies and thencombine them in the final assembly. You’ll construct the following eight subassemblies in the order shown:It’s possible to build a “homemade” differentialwith pieces in the NXT set. I chose not to use one forTag-Bot, however, because of the complexity it wouldhave introduced. If you’d like to tackle that project, youcan find building instructions at NNNNFigure 14-2: A BOM for Tag-Bot158chapter 14Left Drive subassemblyRight Drive subassemblySteering subassemblySteering Motor subassemblyFrame subassemblyUltrasonic Sensor subassemblyLight Sensor subassemblySound Sensor subassembly
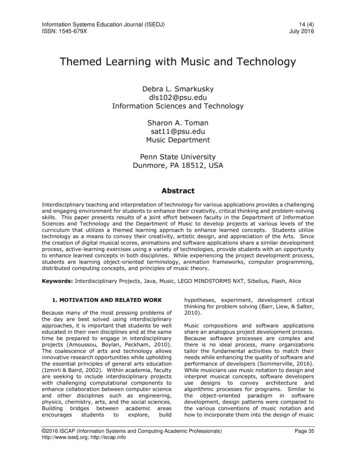
2left drive subassemblyThe Left Drive subassembly drives the left side of therobot. It has a gear train consisting of two gears—a 20tdouble bevel gear and a 12t double bevel gear—that gearup, resulting in a 3:5 gear ratio (see “Controlling a GearTrain’s Performance” on page 54 for a discussion of gearing up and down). Does this ratio provide enough torque toeffectively drive the robot? Given the strength of the servomotors and the fact that we’re using two of them to drivethe robot (one is included in the next subassembly), thisgear ratio does in fact provide sufficient torque. Completethe following seven steps to build this subassembly.1Step 2: Add a 7M angled beam, two 3M friction pegs, and a 3M axle.3Step 1: Begin by snapping a 3M pegged block and two 3M friction pegsinto a 9M beam. Next, add two friction pegs to the pegged block.Step 3: Add another 9M beam and a motor to the 7M angled beam. Thenconnect two friction pegs to the top of the motor.Tag-Bot159
45Step 5: Connect a 20t double bevel gear to the 6M axle and a 12t doublebevel gear to the 8M axle.Step 4: First, attach another 7M angled beam. Next, push a 3M axlethrough the two 7M angled beams. Finally, add bushings to 8M and 6Maxles and then push them through as shown, with the 6M axle runningthrough the motor’s output shaft and the 8M axle running through the 7Mangled beams.160chapter 14
67Step 6: Place a 3M beam over the axles, and then secure the lower axlewith a bushing. The orange shaft head on the motor wiggles around, sothe 3M beam prevents the gears from separating.Step 7: Finish by attaching a balloon wheel and a balloon tire. Make surethat the side of the wheel with spokes is facing toward the motor.Tag-Bot161
Since we're only using the NXT set in this book, and each type of piece in the NXT set only comes in one color (with the exception of the plastic balls), piece colors gen-erally don't present a problem. examining the pieces Armed with an understanding of the basic issues under-lying the pieces in the NXT set, we're prepared to begin