Transcription
Product name: Module or Service Name User ManualTruist Treasury ManagerACH Payments User Manual
Truist Treasury Manager: ACH Payments User ManualTHIS IS A CONFIDENTIAL DOCUMENT THAT YOU SHOULD MAINTAIN IN A SECURE LOCATION.The information contained in this manual is the property of Truist Financial Corporation. Reproduction, manipulation, adjustment, or transfertransmission, either in part or in whole, is prohibited without prior written permission from Truist Financial Corporation. Truist Bank, Member FDIC. 2022 Truist Financial Corporation. Truist, the Truist logo, and Truist Purple are service marks of Truist Financial Corporation. Rev. 1/22
Truist Treasury Manager: ACH Payments User ManualTable of ContentsGetting Started .5Maintaining Security . 5Your Responsibility for Maintaining Security . 5System Access . 5IDs and Passwords . 5Inactivity Time Out . 6Important Notes. 6Required Fields . 6Processing Deadlines and Cutoff Times . 6Understanding ACH Payments .7ACH Payment Types Available in Treasury Manager . 7ACH Payment Process . 9To Create an ACH Payment . 9ACH Status Lists . 10ACH Pending Payments . 10To Edit a Pending Payment . 10To Delete a Payment . 11To Approve or Reject a Payment . 12ACH Payment Templates . 13To Create an ACH Payment Template . 13To Edit a Template . 14To Delete a Template . 15To Approve or Reject a Template . 16Master Recipient List . 17To Create a Recipient . 17To Edit a Recipient . 18To Export Recipient Data . 19Payment Tools.20About Payment Import . 20Standard and User-defined Import Formats . 20Importing Templated Payments . 21Import Profiles . 21Page 3 of 38
Truist Treasury Manager: ACH Payments User ManualTo Create a New Profile for Importing Payment Data . 21To Edit or Delete an Import Profile . 23Import Payment Data . 24To Import Payments or Payment Templates . 25To View Import History . 26About Payment Export . 26Payment Export File Formats. 26Export Profiles. 27To Create an Export Profile for Payment Data. 27To Edit or Delete an Export Profile . 29To Export Payments . 29To Export Templates. 30To View Export History . 31ACH Payment Reports . 32To View a Payment Report . 32To Customize a Standard Payment Report . 33To Edit a Customized Report . 36To Delete a Payment Report. 37If You Need Assistance.38Online Help . 38Client Services Support . 38Page 4 of 38
Truist Treasury Manager: ACH Payments User ManualGetting StartedMaintaining SecurityYour company must designate at least one company security administrator (CSA,also referred to in some instances as an administrator) to control account accessand transactional capabilities of any users within your company. Using theAdministration function, any of your company’s CSAs can activate/deactivate usersand entitle any users for access to any accounts and other functions available toyour company in Truist Treasury Manager (including the CSAs themselves). Theycan also administer passwords, tokens, and designate another user as CSA. Inaddition, the CSA can manage account preferences, including nicknamingaccounts and controlling the display of accounts within Treasury Manager. AnyCSA can administer their own entitlements to include access to any accounts andother functions available to you in your company’s Treasury Manager setup.Truist recommends thatyou create a user IDwith CSA entitlementfor daily use. Keep allIDs and passwords in asecure location, and donot share passwordswith other users.Your Responsibility for Maintaining SecurityYour company must maintain appropriate internal controls over access to and useof Treasury Manager. Each CSA has access to the Audit Report for system usageand activity information. This includes exception activity, successful attempts to usethe system, and completed activities.If you discover or suspect any fraudulent activity with respect to your company’sTreasury Manager service or accounts, disable any affected user ID immediately,and contact Treasury Solutions Client Support at 800-774-8179. Representativesare available from 8 am – 8 pm ET, Monday through Friday on bank business days.System AccessTreasury Manager can be accessed on the Internet at treasurymanager.truist.com.IDs and PasswordsA combination of three elements (Company ID, User ID, and Password) is requiredto access Treasury Manager. System parameters for password usage have beendefined to help maintain the security of your company’s information. Guidelinesbased upon these parameters include: A new password must be created for new users when the system is accessedfor the first time.There is a minimum user ID length of six characters. The password length is aminimum of eight characters with a maximum length of 20. User IDs andpasswords are case-sensitive and must include at least one letter, one number,and one special character. Treasury Manager prohibits the reuse of yourprevious three passwords.To voluntarily change a password: Any user can change their own password byhovering over Tools, which is located on the main menu, and then from the SetTruist may useadditional securityprocesses andprocedures toauthenticate users.Page 5 of 38
Truist Treasury Manager: ACH Payments User Manualmenu, click Password. The Change Password page will display. Enter the oldpassword, the new password; confirm the new password and click Submit. Disabled user ID: The system will disable your user ID after five failed attemptsto sign on. Contact your CSA to reset your user ID and password.Inactivity Time OutIf your session is idle for more than 30 minutes, the system will time out due toinactivity and your access will be suspended. During a timeout period, your browsercan remain connected to Treasury Manager. If a timeout occurs, you will have tosign back onto the system. Note that data entry alone is not considered activity.Activity in Treasury Manager is recorded by page changes or the use of theSubmit button.Click the Log Off linkat the top right of anypage to end yourTreasury Managersession and close theconnection completely.Important NotesWhen using Treasury Manager, please do not use your browser’s Refresh button.In some cases, this could cause a form to be submitted twice. While clicking theBack button will return you to the previous page, it will not reverse any transactionsperformed prior to your clicking the button. Use the action buttons or top navigationmenus to navigate through the application.Required FieldsRequired data entry fields for Treasury Manager are noted to the right of the fieldwith an asterisk (*).Processing Deadlines and Cutoff TimesTo obtain processing deadlines or cutoff times for the Treasury Manager system,review the Treasury Manager Processing Deadlines document. This document islocated on the Treasury Manager page of the Treasury Resource Center, whichcan be accessed from within the system by clicking the User Material link locatedat the top right of any page.Page 6 of 38
Truist Treasury Manager: ACH Payments User ManualUnderstanding ACH PaymentsTreasury Manager offers the ability to create ACH payments. It is a cost-effectiveway to streamline your disbursement and collections process. ACH services mayreduce your handling and processing costs and may help mitigate fraudulentactivity.This manual describes how to use the functionality in the Payment Center for ACHpayments. The payments services support a wide variety of ACH payment types,reporting features, and import/export capabilities.ACH Payment Types Available in Treasury ManagerPayment TypeCCDDescription Credits to business accounts Debits to business accountsChild SupportACH credit entries that transfer funds withheld fromemployee wages to State Disbursement Units (SDU)CTX Corporate Trade Exchange credits to tradingpartnersIAT - Domestic*IAT - International* Direct deposit credits to U.S. accounts when thefunds originate from non-U.S. accounts Pre-authorized debits to U.S. accounts when thefunds originate from non-U.S. accounts Direct deposit credits to non-U.S. accounts Pre-authorized debits to non-U.S. accounts Direct deposit credits to consumer accountsPPD Pre-authorized debits to consumer accountsRCKRe-presented checksTaxTax paymentTELDebits initiated over the telephoneWEBDebits initiated over the Internet*Availability of this payment type varies by country.With the Treasury Manager ACH service you can: Build files that are formatted to conform to NACHA rules and standards Create one-time payments or build templates for reuse Receive payment confirmations after payment acceptance Generate ACH payment summary reports Enter flexible sorting parameters for pending and processed ACH paymentsPage 7 of 38
Truist Treasury Manager: ACH Payments User ManualPayments MenuTreasury Manager offers a consolidated Payment Center to process both ACH andwire payments. This user manual will only address ACH payments. Please refer tothe Wire Payments user manual for information on processing wires in theTreasury Manager system. The highlighted areas in the Payments menu referencethe ACH functions that are discussed in this user manual.ACH Payment FunctionsFunctionManageDescription View and manage pending ACH payments, templatelists, and master recipient lists with options to edit,delete, reject, or approve Review details of processed ACH payments Create and request reversals of ACH paymentsPayment Tools Create and edit import and export profiles View import and export history logsMaster Recipients – Create, modify, and deleterecipientsCreateACH Payments – Create single or recurring ACHpaymentsACH Templates – Create a reusable form that storesaccount and payment informationReportsView and export ACH payment transactions summary ordetail reportsPage 8 of 38
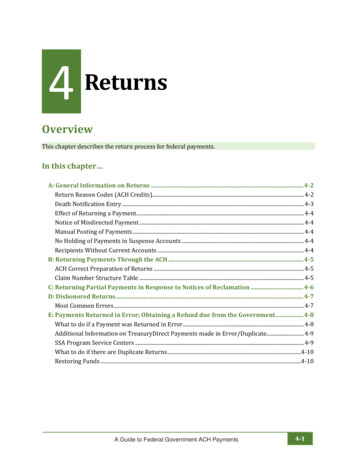
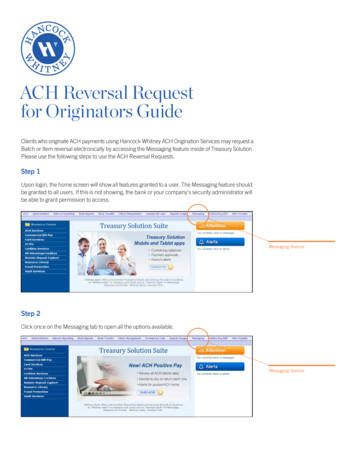
Truist Treasury Manager: ACH Payments User ManualACH Payment ProcessTo Create an ACH Payment1. From the main menu, select Payments, and in the Create ACH Paymentssection, click the ACH payment type you want to create. Choose fromthese ACH payment types: CCD Payment (CorporateCredit or Debit) PPD Payment (PrearrangedPayment and Deposit) Child Support Payment CTX Payment (CorporateTrade Exchange)RCK Payment (Re-presentedCheck Entry) Tax Payment IAT Domestic Payment IAT International PaymentTEL Payment (TelephoneInitiated Entry) From Template WEB Payment (InternetInitiated Entry)You can also initiate anACH payment basedon an existing templateby selecting theTemplate Name fromthe drop-down menu.2. On the Create Payment page for the ACH payment type, complete thepayment information.Page 9 of 38
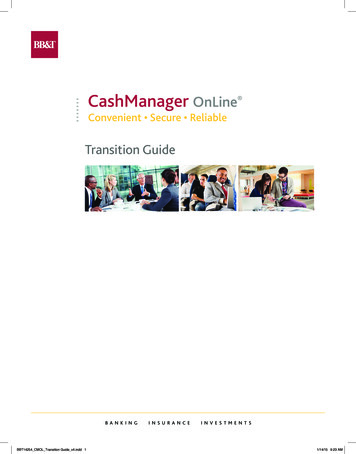
Truist Treasury Manager: ACH Payments User Manual3. From the Recipients section, click the applicable button - either SelectExisting, Create New, or Import From File, and then complete the fields.4. Click the Continue button. The Preview Payment page for the selectedpayment type displays.5. Review your input, then click the Submit Payment button to save theinstruction and return to the Payment Center page.When creating apayment, you can alsouse the SaveIncomplete button tosave the payment in itscurrent state withoutsubmitting it.ACH Status ListsTreasury Manager offers separate status pages for pending ACH transactions,processed ACH transactions, and ACH templates. Transaction status pages enablean advanced search option on a number of criteria including account, date, andamount. Pending transactions and template pages allow you to select multiple ACHbatches and transactions for easy approval, deletion, or rejection. All status pagescan be sorted by any of the attribute columns in ascending or descending order. Toaccess ACH status lists: from the main menu, select Payments, then in theManage section, click Payment Center. The Payment Center page will display.ACH Pending PaymentsPending ACH payments are in a “non-final” status such as Scheduled or PendingApproval. Because pending payments have not been fully processed, you can stillmodify the transaction—including the accounts, amounts, date or time, andfrequency. On the Payment Center page, from the Pending tab, you can delete,reject, or approve each ACH payment.To Edit a Pending PaymentYou can modify existing payments before processing starts for the payment.Page 10 of 38
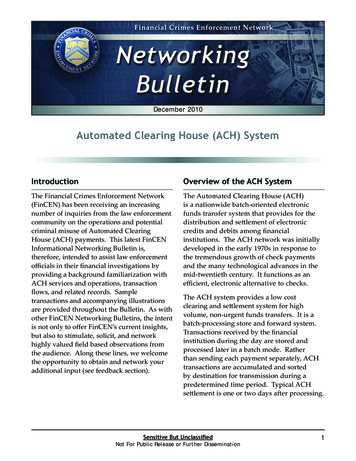
Truist Treasury Manager: ACH Payments User Manual1. From the main menu, select Payments, then in the Manage section, clickPayment Center. The Payment Center page displays pending paymentson both the Pending and All tabs. Ensure that one of these tabs isselected.2. From the Payment Number column, click the link for the payment youwant to modify. The Edit Payment page displays.3. On the Edit Payment page for the selected payment type, change thepayment details, as needed. The information that can be edited varies bythe selected ACH payment type.4. Click the Continue button. The preview page displays.5. Review the information for accuracy, then click the Submit Paymentbutton to save your changes and return to the Payment Center page.Note: Your company may require that modified payment instructions beapproved before the changes take effect. Authorizations must beperformed by employees designated as an approver. An approver cannotapprove instructions they have created or modified.To Delete a PaymentBefore processing starts, you can delete existing payments with a PendingApproval or Partially Approved status.1. From the main menu, select Payments, then in the Manage section, clickPayment Center. The Payment Center page displays pending paymentson both the Pending and All tabs. Ensure that one of these tabs isselected.Note: Use the search options to locate specific payments.2. From the Select All column, select the corresponding checkbox for one ormore payments you want to delete.3. Review your selections, and then click the Delete button. The DeletePayments page displays.Page 11 of 38
Truist Treasury Manager: ACH Payments User Manual4. Click the Delete button.To Approve or Reject a PaymentYou can approve or reject payments with a status of either Pending Approval orPartially Approved.1. From the main menu, select Payments, then in the Manage section, clickPayment Center. The Payment Center page displays pending paymentson both the Pending and All tabs. Ensure that one of these tabs isselected.2. From the Selected column, select the corresponding checkboxes for thepayments you want to approve or reject.Notes: You can select multiple payments, but you must take the same action onall selected payments. For instance, you can approve multiple paymentsor reject multiple payments, but you cannot mix the two actions.You can authorizeinstructions only if youare designated in thesystem as an approver.You cannot authorizeany instructions thatyou created or lastmodified. In addition,lack of account accessor exceeding a limit canprevent you fromsuccessfullyauthorizing aninstruction. You can also approve individual payments while viewing their details. Todisplay payments details, click the applicable Payment Number links inthe list of payments.3. Click either the Approve or Reject button, as appropriate.4. Based on your selection in the previous step, complete one of the followingoptions: On the Approve Payments page, click the Approve button. Thisapproves the request for processing by Truist. On the Reject Payments page, click the Reject button. This stopsfurther processing of the request in its current form. The request canbe edited and submitted again for approval.Page 12 of 38
Truist Treasury Manager: ACH Payments User ManualACH Payment TemplatesTreasury Manager Template Center enables you to create ACH templates formost payment types. The RCK – Represented Check payment type is not availablefor template creation. Templates can be used to create new payments with greaterease and speed. They allow you to store recipient, account, and payment amountinformation for future use. Existing and pending template information is stored inthe ACH Template status list, so you can modify, view, delete, reject, or approveACH templates.To Create an ACH Payment Template1. From the main menu, select Payments, then in the Create ACHTemplates section, click the type of payment template you want to create.Choose from these payment types: CCD Payment (CorporateCredit or Debit) PPD Payment (PrearrangedPayment and Deposit) Child Support Payment CTX Payment (CorporateTrade Exchange)RCK Payment (Re-presentedCheck Entry) Tax Payment IAT Domestic Payment IAT International PaymentTEL Payment (TelephoneInitiated Entry) From Template WEB Payment (InternetInitiated Entry)Note: You can also create templates from the Templates Center page byselecting the appropriate template type from the Template drop-downmenu.2. On the Create Template page for the selected payment type, enter theinformation for the template. The information required to create a templatevaries by the selected payment type.Page 13 of 38
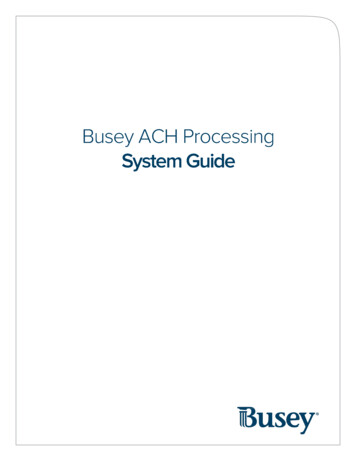
Truist Treasury Manager: ACH Payments User Manual3. Click the Continue button. The template review page displays.4. Review your input, then click the Submit Template button to save and addthe template to the list on the Template Center page. The TemplateCenter page displays with a success message.To Edit a Template1. From the main menu, select Payments, then in the Manage section, clickTemplate Center. The Template Center page displays.Page 14 of 38
Truist Treasury Manager: ACH Payments User Manual2. From the Template Name column, click the link for the template you wantto modify.Note: Use the search options to locate a specific template.3. On the Edit Template page for the selected payment type, modify thetemplate details, as needed. The information that is required for a templatevaries by payment type.To Delete a Template1. From the main menu, select Payments, then in the Manage section, clickTemplate Center. The Template Center page displays.Page 15 of 38
Truist Treasury Manager: ACH Payments User Manual2. From the Select All column, select the corresponding checkbox for eachtemplate you want to delete. You can delete multiple templates at a time.Note: Use the search options to locate a specific template.3. Click the Delete button. The Delete Templates page displays.4. Review the information. To return to the Template Center page withoutdeleting the templates, click the Cancel link.5. Click the Delete button. The Template Center page displays with asuccess message.To Approve or Reject a Template1. From the main menu, select Payments, then in the Manage section, clickTemplate Center. The Template Center page displays.2. From the Select All column, select the corresponding checkbox for one ormore templates that you want to approve or reject.Note: You can select multiple templates, but you must take the sameaction on all selected templates. For instance, you can approve multiplepayments or reject multiple payments, but you cannot mix the two actions.Use the search options to locate specific templates.When templateauthorization isrequired, it must beperformed by a userdesignated as anapprover.Page 16 of 38
Truist Treasury Manager: ACH Payments User Manual3. Click either the Approve or Reject button, as appropriate: To Approve the Template – Authorizes the selected templates for usein creating new payments. On the Approve Templates page, click theApprove button to complete the authorization.To Reject the Template – Stops further processing of the templates.On the Reject Templates page, optionally enter a reason for rejectingthe template, and then click the Reject button to complete the action.A rejected template canbe edited andsubmitted again forapproval.Note: You can also authorize individual templates while viewing theirdetails. Click the name of the template, then on the View Templates page,click the Approve or Reject button, as appropriate.Master Recipient ListTreasury Manager allows you to maintain a list of frequently used third parties—individuals, businesses, or government entities—for easy access when initiatingACH payments. When you create a Master Recipient from the Master RecipientList, it is saved and can be quickly accessed for use with future paymentinstructions. Details for Master Recipients include contact, bank account, and bankcontact information.A Master Recipient can be defined as an individual or a business that has moneytransferred into or out of its accounts through an ACH transaction. Each ACHrecipient is classified as either domestic (U.S.) or international.The Manage Recipients page provides a central location from which you can viewand manage your recipients.You can define an ACHrecipient as either anACH Domestic or anACH Internationalrecipient, but not asboth.To Create a Recipient1. From the main menu, select Payments, then in the Create MasterRecipients section, click Recipient. The Create Master Recipient pagedisplays.Note: You can also create recipients from the Manage Recipient page.2. Complete the following information: Enter a Recipient Name. The name should be clear and descriptive. Select one or more options for the Recipient Type.Page 17 of 38
Truist Treasury Manager: ACH Payments User Manual3. Click the Continue button. The page refreshes to display additionaloptions. The options available vary by the selected recipient type.4. Complete the information as needed, and then click the Preview Recipientbutton. The Preview Recipient page displays.5. Review the information, and then click the Submit Recipient button tosave your changes. The Manage Master Recipient List page displayswith a success message.To Edit a Recipient1. From the main menu, select Payments, then in the Manage section, clickMaster Recipient List. The Manage Master Recipient List page displays.2. From the Recipient Name column, click the link for the recipient you wantto edit.Page 18 of 38
Truist Treasury Manager: ACH Payments User Manual3. On the Edit Master Recipient page, you can do the following: Edit theRecipient Name field, or add to or change the options selected for theRecipient Type.Note: Once an ACH recipient is created, the domestic or internationaldesignation cannot be changed. If you need to create payments to thesame recipient at a U.S. and an international locale, then two separaterecipients must be created.4. Click the Continue button. Edit the information, as needed.5. When all details have been entered, click the Previous Recipient button.6. On the preview page, review your information, then click the SubmitRecipient button to save your changes. The Manage Master Recipient Listpage displays with a success message.To Export Recipient DataThe export option is available only for ACH recipients.1. From the main menu, select Payments, then in the Manage section, clickMaster Recipient List. The Master Recipient List page displays.2. Click the Export ACH Recipients button located at the bottom of the page.3. The Export ACH Recipient Profiles page displays a list of availableprofiles. Select a profile from the list.Note: The list shows only the profiles that are appropriate for the selectedpayment type.Page 19 of 38
Truist Treasury Manager: ACH Payments User Manual4. Click the Export button. The Export Initiated page displays while theexport is in process. A browser window will display to ask whether youwant to open or save the export file.5. Save the export file to the desired location.6. When the export is complete, click the Done button. The Export HistoryList page displays with a new entry for the export you just completed.Payment ToolsTreasury Manager provides several payment tools for working with payment data,including creating and editing import and export profiles, enabling the import andexport of files, and viewing import and export history.About Payment ImportThe Import function in Payments enables you to upload payment files intoTreasury Manager from locations on your network or local drive for ACH paymenttypes.Standard and User-defined Import FormatsPayment Import supports two general types of file formats, standard and userdefined. Both formats have their advantages, as follows: Standard – Standard formats require that the fields within a file follow aprescribed order. In addition, when using the standard format, a single importfile can contain records of different payment types. The standard format to beused depends on the type of data being imported. For ACH payments, thestandard used is the industry-standard NACHA format. User-defined – A user-defined format gives greater flexibility and more controlover the data that is included in the import. You can define exactly the fieldsthat you want to include, as well as their order within the file. For ACH data, auser-defined format has the additional benefit of enabling the import of fieldsthat are not present in a NACHA file, such as frequency and number ofpayments (for recurring payments). How fields are designated in a user-definedfile depends on the type of data being imported. For ACH data, the fields canbe delimited (separated) by a variety of different characters, such as theasterisk or comma. Fields can also be defined as a fixed length, with nocharacter delimiting each field.Page 20 of 38
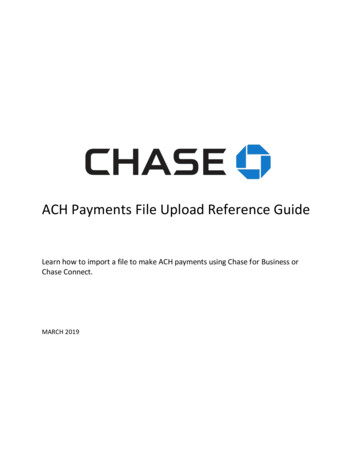
Truist Treasury Manager: ACH Payments User ManualImporting Templated PaymentsPayments can be imported to the database and associated with an existingtemplate. This is similar to when a user creates a new payment through the userinterface using a template. When importing payments based on a template, theprofile requires only the following fields: Repetitive - Template Name Repetitive - Value Date Repetitive - Amount/Debit AmountYou can import filesthat contain a mixtureof template and nontemplated (one-time)payments.The template provides the rest of the payment details. The following are the onlytwo restrictions for importing payments when using a template: Templated payments can be imported only with a user-defined profile. Each imported payment file must contain a single payment type.Import ProfilesBefore importing payment data, an import profile must be created. The profiledescribes the contents of the files that will be imported, including the fields andtheir order, so that Treasury Manager can load the payments properly. For userdefined ACH imports, you can also set default values for select fields. Theadvantage of using profiles is that after one has been created, you can execute anunlimited number of payment imports based on that profile.If you are entitled to manage import profiles, you can create profiles for your ownuse (private), as well as for use by other company users (public). After a profile hasbeen created, it can be used multiple times to import payment data.Note: Files for import must meet certain requirements and validations to ensurethat the data is imported to the database correctly and successfully.To Create a New Profile for Importing Payment Data1. From the main menu, select Payments, then in the Payment Toolssection, click Import Profiles. The Manage Payment Import Profiles pagedisplays a list of existing profiles to which you have access.Page 21 of 38
Truist Treasury Manager: ACH Payments User Manual2. Click the Create Import Profile button. The
To obtain processing deadlines or cutoff times for the Treasury Manager system, review the . Treasury Manager Processing Deadlines. document. This document is located on the Treasury Manager page of the Treasury Resource Center, which can be accessed from within the system by clicking the . User Material. link located at the top right of any .