Transcription
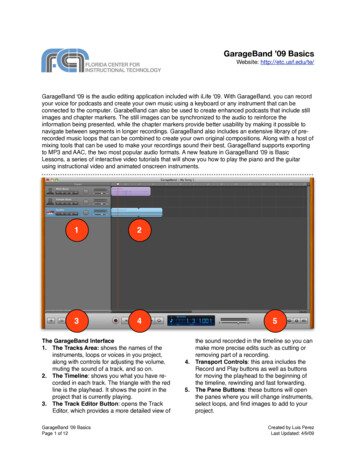
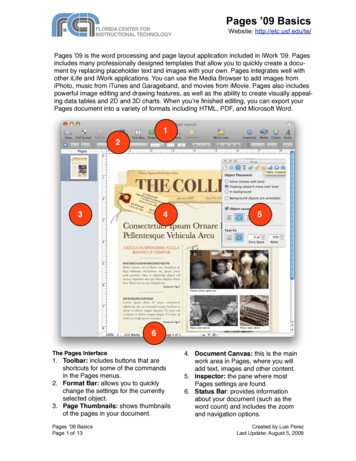
Pages ’09 BasicsWebsite: http://etc.usf.edu/te/Pages ʼ09 is the word processing and page layout application included in iWork ʼ09. Pagesincludes many professionally designed templates that allow you to quickly create a document by replacing placeholder text and images with your own. Pages integrates well withother iLife and iWork applications. You can use the Media Browser to add images fromiPhoto, music from iTunes and Garageband, and movies from iMovie. Pages also includespowerful image editing and drawing features, as well as the ability to create visually appealing data tables and 2D and 3D charts. When youʼre finished editing, you can export yourPages document into a variety of formats including HTML, PDF, and Microsoft Word.123456The Pages Interface1. Toolbar: includes buttons that areshortcuts for some of the commandsin the Pages menus.2. Format Bar: allows you to quicklychange the settings for the currentlyselected object.3. Page Thumbnails: shows thumbnailsof the pages in your document.Pages ’09 BasicsPage 1 of 134. Document Canvas: this is the mainwork area in Pages, where you willadd text, images and other content.5. Inspector: the pane where mostPages settings are found.6. Status Bar: provides informationabout your document (such as theword count) and includes the zoomand navigation options.Created by Luis PerezLast Update: August 5, 2009
Creating a New DocumentWhen you launch Pages, the TemplateChooser should open to let you select atemplate for your new document (if theTemplate Chooser does not open, choose File New).Pages ʼ09 supports two different types oftemplates: Word Processing and PageLayout. Word Processing templates areintended for linear, text-heavy documents,while Page Layout templates are fordocuments that will include a lot of imagesand other objects in a non-linear layout.To create a new document using the TemplateChooser:1. Select a template category from thecolumn on the left.2. Click on a thumbnail on the right side ofthe Template Chooser window to select atemplate. If a template includes more thanone page layout, you can preview thoselayouts by hovering over the templateʼsthumbnail and dragging to the left or rightwith your mouse. Use the slider at thebottom of the Theme Chooser to adjustthe size of the thumbnails so you can fitmore of them in the window.3. Once youʼve selected a template, click onthe Choose button.4. Save your document by selecting File Save As, entering a file name, andclicking on Save.Importing From Microsoft WordTo import a document created in MicrosoftWord:1. Choose File Open (or click on Open anExisting File in the Template Chooser).2. Navigate to the location where you havesaved your Word document and select it.3. Click on Open. Pages will then import theWord document.You can also open a Word document bydragging it from a Finder window to the Pagesicon in the Dock. You may see a warningspopup window if Pages encounters anyformatting it cannot convert in your MicrosoftWord document. You can click on the Reviewbutton to see a list of these warnings.Pages ’09 BasicsPage 2 of 13Adding Pages and SectionsEach Pages template includes different pagetypes you can add to your current document.To add a template page after the currentpage, select Insert Pages followed by thepage type you want to use (in Page Layoutmode) or Insert Sections (in WordProcessing mode). You can also usethe Pages or Sections button in thetoolbar.Views and NavigationTo change the view of yourdocument, use the zoom controls inthe lower left corner. Using thesecontrols, you can: Zoom in or zoom out by using thepopup menu and selecting azoom level. Display one page at a time orfacing pages (One Up or Two Up). Scale the document to the size ofthe window by selecting Fit Width,or display only a single page byselecting Fit Page.To view the layout of your document, selectView Show Layout. This will show you thedifferent areas of your document, such as theheader, footer, and columns. To view themarks for spaces, paragraph breaks and otherformatting, select View Show Invisibles.To navigate Pages documents: Use the scroll bar on the right to scrollthrough your document. Use the Next and Previous buttons found inthe status bar at the bottom of the screen.Click on the Action button (the gear icon) tochange how you navigate your document.For example, you can choose ParagraphStyle Heading 1 to move through yourdocument using first level headings. Display thumbnails of your documentʼspages by selecting View PageThumbnails, then click on a thumbnail to goto a page. Click on the Page Number indicator on thestatus bar and enter a page number to godirectly to that page.Created by Luis PerezLast Update: August 5, 2009
Full Screen and Outline ViewsPages ʼ09 includes a new Full Screen view tohelp you focus on your writing by hiding thetoolbars and other interface elements.To switch to the Full Screen view,click on the Full Screen button on thetoolbar. To navigate to other pages ofyour document, move your cursor to the leftedge of the screen and click on a pagethumbnail. To exit the Full Screen view, pressthe Escape key on your keyboard.Pages ʼ09 also includes an integratedoutline view for word processingdocuments. To switch between theoutline and document views, click on theOutline button on the toolbar.The following options are available for workingwith your outline: To add a new topic or subtopic at thecurrent level, press the Return key on yourkeyboard to move to a new line and begintyping. To change a topic into a subtopic, press theTab key on your keyboard. This will indentthe topic and make it into a subtopic. Youcan indent subtopics up to nine levels bypressing Tab or clicking on thePromote and Demote buttons onthe Format Bar. To expand or collapse all of thesubtopics under a topic, double-clickon the Outline control for that topic. To choose how many levels of the outlineare displayed, use the Levels menu on theFormat Bar. If the text for your topics is too long and youonly want to see the first line of each topic,click on the “Show only first line”button on the Format Bar To rearrange topics and subtopics, click anddrag on the Outline controls. Drag anOutline control up or down to reorder topicswithin the same level, or drag left or right topromote or demote topics or subtopics to adifferent level. When you move a topic, all ofits subtopics move with it.Margins and Page SetupBefore you start adding text, images, andother objects to to your document, you maywant to set up your page so that you can seePages ’09 BasicsPage 3 of 13exactly how your document will look when youprint it. To set page margins, use theDocument Inspector:1. Click on the Inspector button onthe toolbar.2. Select the Document Inspector.3. Make sure the Document pane is selectedin the Document Inspector.4. In the Document Margins section, enterthe page margins you want to use. Youcan also enter margins for the header andfooter of each page.5. If you plan to print and bind yourdocument, you can set inside and outsidemargins by choosing the Facing Pagescheckbox.The Document Inspector also lets you changeyour page setup, which includes the papersize and the orientation:1. Click on the Page Setup button in theDocument Inspector.2. Select a paper size using the drop-downmenu in the middle of the pop-up window.3. To select a page orientation,click on one of the Orientationbuttons at the bottom of thewindow.4. If you need to scale your page down,enter a percentage in the Scale text field.5. Once youʼve set your options, click onOK.Tabs and IndentsTabs can be used to align text in yourdocument, while indents can be used to markthe beginning of a paragraph or to set off longquotes.To add a tab stop using the rulers:1. Select View Show Rulers to display therulers.2. Click on the ruler in the area where youwant to add a tab stop.3. To change the tab type, control-click on atab stop and select a different tab type.You can also change the tab type in theText inspector.4. To remove a tab stop, drag it off the ruler.To add a paragraph indent:1. Click somewhere inside the paragraph.2. Open the Text Inspector and select theTabs pane.Created by Luis PerezLast Update: August 5, 2009
3. Enter a value for each type of indent (FirstLine, Left, and Right). To set off a longquote, enter the same value in both theLeft and Right fields. To indent the firstline, enter a value in only the First Linefield. To create a hanging indent, enter avalue in only the Left field.GuidesPages helps you align objects using smartguides, which are only displayed whenever animage or other object aligns with the center oredge of another object. These smart guidesare enabled by default. If you donʼt see smartguides, you can turn them on as follows:1. Select Pages Preferences.2. Click on the Rulers tab.3. Check the boxes next to “Show guides atobject center” and “Show guides at objectedges.” Click on the color well to changethe color of your guides from the default,which is blue. Guides will not be visiblewhen you print your document.You can also create more permanent guidesto help you align images, shapes, and otherelements in your document. To create guides:1. Choose View Show Rulers.2. Place the pointer on a ruler and drag intothe canvas. A blue guide will be displayedas you drag.3. Drag the blue guide to where you want it.If you drag away from the top ruler youwill create a vertical guide, while if youdrag away from the left ruler you willcreate a horizontal guide. To remove aguide, drag it off the page.Working with TextMost Pages templates include placeholdertext to show you exactly how your text will beformatted and where it will appear. To editplaceholder text in Pages, click to select theplaceholder text and then type your own textto replace it. The text you type will keep thesame style and formatting as the placeholdertext.There are several ways to format text inPages: To change the appearance of text, open theInspector and select the Text Inspector. Inthis window, you can use the buttons andPages ’09 BasicsPage 4 of 13sliders to change the alignment, color, andspacing of your text. To change the font and style, click onthe Fonts button on the toolbar andselect a font family, font typeface, andsize using the different columns. Thebuttons at the top of this window will allowyou to add underlining, a shadow, or otherstyling to your text. Pages ʼ09 includes a Format Bar which iscontext sensitive. The options on theFormat Bar will allow you to quickly changemost of the attributes of your text withouthaving to open the Text Inspector or theFonts window. To display the format bar,choose View Show Format Bar. You mayhave to resize the Pages window to see allof the buttons in the Format Bar.ListsTo add a list:1. Place the cursor in the line where youwant to start your list.2. Select a list type using the Listbutton in the Format Bar or theBullets and Numbering pulldown menu inthe List tab of the Text Inspector.3. A new list item will be created each timeyou press Return. To create a line breakwithout creating a new list item hold downthe Shift key on your keyboard as youpress Return.4. To end the list, press Return twice so thatyou end up with a blank line.StylesStyles provide a way to consistently formatyour headings, paragraphs, and lists. Thereare three types of styles in Pages: Paragraph: these apply to one or more lineof text followed by a carriage return. Character: these can be used with anindividual word or even a single letter. List: these format how your bulleted ornumbered lists are displayed. These can beeasily applied by clicking on the List buttonon the Format Bar and selecting a list style.To apply a style, select the text you want tostyle, click on one of the Style buttons on thetoolbar and select a style. The button on theleft is for paragraph styles and thebutton on the right is for characterstyles.Created by Luis PerezLast Update: August 5, 2009
The Styles drawer is used for managing thestyles used in a document. To open the Stylesdrawer, click on the blue icon to the leftof the Style buttons on the toolbar.The drawer has three sections: paragraph,character, and list. If you do not see thecharacter or list sections, click on one of thebuttons in the lower right corner ofthe drawer to display them.To create a new style using the Styles drawer:1. Select some text in your Pagesdocument.2. Apply the desired formatting for the newstyle to the selected text.3. Open the Styles drawer, click on the Add( ) button at the bottom of the drawer andselect the type of the style you wish tocreate (paragraph, character or list).4. Enter a name for the new style, makesure “Apply this new style on creation” isselected and click on OK.To redefine an existing style:1. Select some text in your Pages documentand make the desired formatting changes.2. Open the Styles drawer. The style appliedto the selected text will be highlighted andit will have a red triangle to the right of itsname.3. Click on the red triangle and choose“Redefine Style from Selection.” Theformatting changes youʼve made to theselected text will be applied to allinstances of the style throughout thePages document.Adding LinksYou can add links to web pages or emailaddresses, or use bookmarks to create linkswithin a document. To add a hyperlink:1. Select the text, shape, image, or movieyou want to turn into a hyperlink.2. Open the Link inspector.3. Select "Enable as a hyperlink."4. Select Webpage or Email Message usingthe drop-down menu.5. Enter the URL of the web page you wantto open when you click on the link.Pages ’09 BasicsPage 5 of 13If you selected Email Message, enter therecipientʼs address and a subject line.To create a bookmark:1. Select the text you want to use as thebookmark.2. Open the Hyperlink Inspector and selectthe Bookmark tab.3. Click on the Add ( ) button at the bottom.To link to the bookmark from another sectionof the document, select the desired link text,open the Hyperlink Inspector and selectBookmark from the Link To drop-down menu.Select the bookmark you want to link to usingthe Name drop-down menu.Page LayoutYou can vary the layout of your pages usingdifferent types of breaks: Page break: will continue your text on thenext page. Column break: will continue your text at thetop of the next column. Layout break: can be used to start adifferent layout with different margins,columns, etc. Section break: creates a new section with adifferent header, footer, and pagenumbering.To add a break, select the type of break youwant to add at the top of the Insert menu. Todelete a break, place your cursor after thebreak and then press Delete on yourkeyboard. You may need to display theformatting codes by selecting View ShowInvisibles.To add columns to a layout:1. Add a layout break before the text youwant to be in columns by selecting Insert Layout Break.2. Place the cursor after the break.3. Select the number of columnsusing the Columns button in theFormat bar.To resume your layout without columns:1. Insert another layout break when youreach the end of the text you want to be incolumns.2. Place the cursor after the layout break.Created by Luis PerezLast Update: August 5, 2009
3. Select 1 Column using the Columnsbutton in the Format bar.The Layout Inspector includes options forchanging a layoutʼs column widths andmargins (by default the columns are of equalwidth).In the Section tab, you can set different pagenumbering for individual sections of yourdocument, or choose to display differentheaders and footers in a section of yourdocument.Pages ʼ09 allows you to link text boxes out ofsequence when you are in Page Layoutmode.To create a link between two text boxes thatare not in sequence:1. Click on the first text box to reveal alink indicator (a blue square with anarrow on it) in the lower right corner.2. Click on the link indicator so that a plussign appears on your cursor.3. Click in the text box where you want thetext to continue. The two text boxes willbe linked with a blue line.4. To remove the link, click on the small bluesquare at the end of the blue line anddrag it off the text box.Headers and FootersHeaders and footers can be used to displayinformation such as page numbering and thedate at the bottom of each page. To insert aheader or footer:1. Select View Show Layout to display abox at the top and bottom of the page.This is where the header and footer aredisplayed.2. Enter text for the header and footer asyou would enter any other text.3. Use the Insert menu to add one of thefollowing formatted text fields which areupdated automatically by Pages as youmake changes: Auto Page Numbers: use the options inthe popup window to choose theposition of the page number (Header orFooter), the alignment, and the Format.You can set the page numbers todisplay in the entire document or only inthe current section.Pages ’09 BasicsPage 6 of 13 Page Number: inserts the current pagenumber. To change the format, controlclick on the page number and choose adifferent format. Page Count: inserts the total number ofpages. Date and Time: to choose a differentdate and time format, control-click orright-click on the date and time andchoose Edit Date & Time, then choosea different format using the pulldownmenu. To always display the currentdate and time, check the box next to“Automatically update on open.” Whenyouʼre done click anywhere in yourdocument to close the popup window. File name: inserts the file name of thedocument.Document StatisticsThe word count for your current document isshown on the status bar, to the right of thezoom menu. The word count will changewhenever you make a selection to show youthe number of words selected out of the totalwords in the document. To view moredocument statistics, double-click on the wordcount on the Status Bar to open the Info paneof the Document Inspector. You will then seethe number of pages, sections, graphics andcharacters.Table of ContentsIf youʼre working on a long document, a tableof contents would be useful for your readers.Pages can automatically create the table ofcontents for you, but you must use consistentstyling for headings throughout yourdocument. To add a table of contents:1. Select the TOC pane in the DocumentInspector.2. Check the boxes next to the styles, suchas headings and subheadings, you wantto appear in the table of contents.3. Select the box in the #ʼs column if youwant the page number to be displayed forany of the styles you selected.4. Place your cursor where you want thetable of contents to begin and selectInsert Table of Contents5. To update the table of contents after youmake changes to your headings andsubheadings, go back into the InspectorCreated by Luis PerezLast Update: August 5, 2009
and click on the Update Now button in theDocument Inspector.6. To make the page number links to eachheading, select this option at the bottomof the TOC pane of the DocumentInspector.Footnotes and EndnotesTo add footnotes or endnotes (you canʼt haveboth in Pages):1. Open the Document pane of theDocument Inspector.2. Choose Use Footnotes or Use DocumentEndnotes from the drop-down menu. Youcan also choose Use Section Endnotes ifyou have your document split intosections.3. Choose a numbering format.4. Place the insertion point where you wantto add a new footnote or endnote.5. Select Insert Footnote or Insert Endnote (or Insert Section Endnote).6. The insertion point will move to thebottom of the page, the end of thedocument, or the end of a section.7. Type in your footnote or endnote text.Adding ImagesThere are several ways to add images to aPages document: Drag and drop an image from a Finderwindow. Click on the Media button in thetoolbar, select iPhoto from thepulldown menu, and choose animage from your iPhoto library or from oneof your iPhoto albums. From the Insert menu, select Choose andnavigate to the location of your image file onyour computer. Check the box next to Shadow to add adrop shadow. Use the controls to changethe angle, offset, and set other options forthe drop shadow. Check the box next to Reflection to create areflection effect. Use the slider to changethe opacity of the reflection. Use the opacity slider to increase the levelof transparency in the image.The Metrics Inspector also has options thatapply to images: Use the flip buttons to flip the imagevertically or horizontally. Use the Angle wheel to rotate your image.Pages allows you to edit your images withouthaving to open iPhoto:1. Select the image you want to edit andchoose View Show Adjust Image.2. Use the sliders to change the overallbrightness and contrast, or fix the colorsin your image.3. The histogram at the bottom of thewindow displays tonal information for yourimage. Use the Exposure slider to changethe mid-tones in your image. To work withthe shadows or highlights individually, usethe markers below the histogram.Once you have added the image, you candrag it to a different location or use thehandles that appear around it to resize it (holddown the Shift key before you resize an imageto constrain its proportions).The Graphic Inspector can be used tocustomize the appearance of an image:Pages ’09 BasicsPage 7 of 134. Drag in from the left to make the shadowsmore pronounced (and make the imagedarker), or from the right to bring out thehighlights (and make the image brighter).5. To perform an automatic adjustment, clickon the Auto Levels button. If youʼre notCreated by Luis PerezLast Update: August 5, 2009
happy with the results, click on ResetImage to start over.WrappingWhen you add an image or other object, it canbe added inline or fixed on the page. Thedifference between the two is that inlineobjects move along with the text as you type,whereas fixed objects are fixed on the pageand can have the text wrap around them.Fixed objects can be dragged to any locationon the page, but inline objects cannot.To convert between the two types, use theWrap Inspector.1. Select the image or object by clicking on itonce.2. Open the Wrap Inspector.3. Select Inline to make an object inline, orFloating to make it fixed.4. If you make the object a fixed object, clickon “Object causes wrap” if you want thetext to wrap around it.5. Click on one of the buttons to choose howthe text wraps around your object.6. Enter a value in the Extra Space field todetermine the amount of white spacearound your fixed object.To insert an image or other object as abackground graphic, choose the InBackground option in the Wrap Inspector. Thiswill send the graphic to the back of thestacking order so that the text is in front of it.Working with ShapesPages has a number of shapes that can beused callouts, including lines, geometricshapes, and freeform curves.To add a shape:1. Click on the Shapes button in thetoolbar and choose a shape fromthe pulldown menu.2. Once the shape has been added, click onit once to select it and move it where youwant it to appear in your presentation.3. Use the handles to resize the shape (holddown the Shift key as you resize a shapeto constrain its proportions).Pages ’09 BasicsPage 8 of 134. To duplicate a shape, hold down theOption key on your keyboard as you dragit.5. Some shapes allow you to add text. Toadd text to a shape, double-click inside ofit and begin typing. You can use the TextInspector and the Fonts button to changethe appearance of the text.To draw a freeform shape, select the Freeformtool in the Shapes pulldown menu and clickon the page to add individual points. To closeyour shape, click on the first point. To add acurve between two points, click and drag on apoint to display bezier handles you can use toshape the curve. Drag in the oppositedirection of the curve you want to create usingthe handles. Shapes can be modified furtherusing the controls in the Graphics and MetricsInspectors (see the section on AddingImages).Using MasksMasks allow you to perform non-destructiveediting on an image (the part of the imagecovered by the mask is only hidden, notdeleted).To add a mask to an image:1. Click on the image to select it.2. Select Format Mask. The grayed outarea outside the square will be hiddenonce the mask is set.3. Press Enter to set your mask. If you needto start over, select Format Unmask.When you select an image that has amask attached to it, an Edit Mask popupwindow will appear. You can use the sliderto change the zoom level of the imageinside the mask, or you can click on EditMask to modify the mask.Use shapes to create more complex masks:1. Select the image you want to mask.2. Select Format Mask with Shape andchoose one of the shapes listed.3. Adjust the mask by moving the shape andresizing it with the handles.4. Press Return to set the mask.Pages allows you to use a mask to remove anobject from its background. This feature,which is called Instant Alpha, works well whenCreated by Luis PerezLast Update: August 5, 2009
the object is on a solid background. To useInstant Alpha:1. Choose the image you want to modify.2. Select Format Instant Alpha.3. Click on the color you want to maketransparent with the mask. As you drag,the area that will be made transparent willgrow. You can also click and drag multipletimes to select other areas of the imageyou want to make transparent.4. When youʼre finished, press the Returnkey on your keyboard.media file, the person viewing thedocument has to double-click on themovie preview or the speaker icon. Tostop the file from playing they have toclick outside of it. You may want to includea caption next to the movie preview orspeaker icon with these instructions.7. Open the QuickTime Inspector (lastbutton on the right when you open theInspector) to set additional options.Connection LinesConnection lines join two shapes or otherobjects. These lines can be used to add labelsthat move along with the images or shapes.To add a connection line:1. Select the two shapes you want toconnect.2. Choose Insert Connection Line.3. To edit the connection line, click on it onceto select it and then use the controls onthe Format Bar to change the line type,line thickness, color and other options.You can also add endpoints.8. The slider at the top can be used tochange the poster frame (the previewimage displayed before the movie plays inyour document). A slider for adjusting thevolume is also available.Adding Media FilesYou can add movies and music to yourdocuments to make them more interactive:1. Click on the Media button on thetoolbar.2. To add a movie, select the Moviestab at the top of the dialog box. To add anaudio file, select Audio.3. The area below the tabs will showdifferent collections you can click on tosee files saved on your computer. Onceyou select a collection, you will see a listof the files it contains. Movies will displayas thumbnails, while audio files will belisted with additional information such asthe duration and artist name.4. To preview any of the files, click on thePlay button at the bottom of the window.5. Once you find the file you want to use,drag it into the document canvas until yousee a green plus sign and release yourmouse to add it to the document.6. Use the handles to resize the moviepreview if youʼre adding a movie, or dragto move it to a different location on thecanvas. If you are adding a sound file,you will see a speaker icon. To play thePages ’09 BasicsPage 9 of 13TablesTables are useful for organizing andsummarizing information. Pages includessupport for formulas in tables. To add a tablein Pages:1. Click on the Table button in thetoolbar (or choose Insert Table).2. Use the handles to resize thetable.3. Drag the table to position it where youwant it on the slide.4. Double-click on a table cell and starttyping. Press tab or use the arrow keys tomove to other cells.Another way to add a table is by drawing it onthe document canvas. To draw a table:1. Press the Option key as you click onTable in the toolbar. The pointer changesto crosshairs.2. Drag on the document canvas whileholding down your mouse to draw thetable.3. Use the Table pane in the Table Inspectorto change the number of rows andcolumns.To format the text in a table cell, click on thecell to select it (it will have a blue outlinearound it) and use the options in the FormatBar.Created by Luis PerezLast Update: August 5, 2009
The Table pane of the Table Inspector can beused to make the following modifications to atable: add header columns, header rows or footerrows by clicking on one of the Header andFooter buttons and selecting the number ofcolumns or rows. edit rows and columns: this is a pulldownmenu with options for adding and removingrows and columns, sorting the contents ofcells, and splitting and joining cells. change cell borders and backgrounds use alternating colors for rows to make dataeasier to viewThe Format tab of the Table Inspector alsohas the following options for working withnumeric values: format cells as currency, date and time, etc. determine the number of decimal places todisplay when number is chosen as theformat and the style for negative numbers(for example, you can display them in red) apply conditional formatting so that cellsmatching specific criteria show up in adifferent color apply formulas by using the Functionpulldown menu (these formulas allow you tofind the average of the values in a range ofcells, find the min or max value, or performa sum or count). The same options can beaccessed by choosing Insert Functionfrom the menu bar.The last option in the pulldown menu allowsyou to open a Formula Editor where you canperform more advanced calculations usingcell references. To reference a specific cell,you will need to use the letter of the columnand the number of the row (for example, thefirst cell in a table is A1, the second cell in thefirst row is A2, and so on). The formula has tobegin with the equals sign and you can usetwo cell references separated by a colon toindicate a range (A1:A3, etc.).The cells in your formula will be hig
iPhoto, music from iTunes and Garageband, and movies from iMovie. Pages also includes powerful image editing and drawing features, as well as the ability to create visually appeal-ing data tables and 2D and 3D charts. When youʼre finished editing, you can export your Pages document into a variety of formats including HTML, PDF, and Microsoft .