Transcription
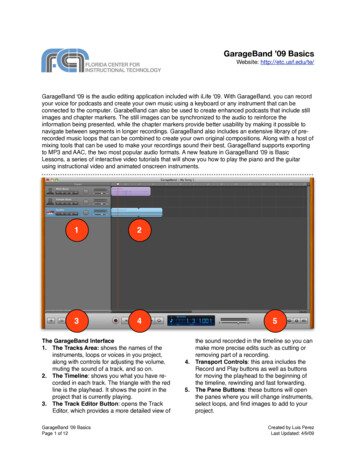
GarageBand ’09 BasicsWebsite: http://etc.usf.edu/te/GarageBand ʻ09 is the audio editing application included with iLife ʻ09. With GarageBand, you can recordyour voice for podcasts and create your own music using a keyboard or any instrument that can beconnected to the computer. GarabeBand can also be used to create enhanced podcasts that include stillimages and chapter markers. The still images can be synchronized to the audio to reinforce theinformation being presented, while the chapter markers provide better usability by making it possible tonavigate between segments in longer recordings. GarageBand also includes an extensive library of prerecorded music loops that can be combined to create your own original compositions. Along with a host ofmixing tools that can be used to make your recordings sound their best, GarageBand supports exportingto MP3 and AAC, the two most popular audio formats. A new feature in GarageBand ʼ09 is BasicLessons, a series of interactive video tutorials that will show you how to play the piano and the guitarusing instructional video and animated onscreen instruments.1234The GarageBand Interface1. The Tracks Area: shows the names of theinstruments, loops or voices in you project,along with controls for adjusting the volume,muting the sound of a track, and so on.2. The Timeline: shows you what you have recorded in each track. The triangle with the redline is the playhead. It shows the point in theproject that is currently playing.3. The Track Editor Button: opens the TrackEditor, which provides a more detailed view ofGarageBand ʼ09 BasicsPage 1 of 125the sound recorded in the timeline so you canmake more precise edits such as cutting orremoving part of a recording.4. Transport Controls: this area includes theRecord and Play buttons as well as buttonsfor moving the playhead to the beginning ofthe timeline, rewinding and fast forwarding.5. The Pane Buttons: these buttons will openthe panes where you will change instruments,select loops, and find images to add to yourproject.Created by Luis PerezLast Updated: 4/9/09
Hardware SetupTo record your voice using GarageBand, connecta microphone directly into your computerʼs audioline in port or use a USB microphone. Once youconnect the microphone to the audio line in orUSB port, you may have to change your audiopreferences to make the microphone available toGarageBand:1. Select Apple Preferences to open up theSystem Preferences window.2. Click on Audio and select the Input tab.3. Select the microphone from the list at the topof the window.To enable the microphone in GarageBand:1. Select GarageBand Preferences.2. Click on the Audio/Midi button at the top of thewindow.3. Select the microphone using the Audio Inputpulldown menu.Most musical instruments will first connect to anaudio interface that will then connect to yourcomputer using either a USB or Firewire cable (ifyour computer includes a Firewire port). Electricguitars with a 1/4” guitar lead can be directlyconnected to the audio line in port on yourcomputer using a 1/4” to 1/8” adapter. The stepsfor setting up a musical instrument using a USBor Firewire audio interface are the same as forsetting up a microphone.2.3.4.Once you have the hardware set up, there areseveral ways to make music in GarageBand: Record sound from a microphone connected toyour computer. Record sound from an electric guitar connectedto your computer. Play the software instruments built intoGarageBand through a USB or MIDI keyboardconnected to your computer. Arrange the Apple loops included withGarageBand into a new composition. Create a Magic GarageBand project. Play along with a Learn to Play lesson.Getting StartedTo get started with GarageBand:1. Launch GarageBand by clicking on itsicon in the Dock or in your Applicationsfolder. This will open the GarageBandsplash screen with the following choices: New Project: displays a series of templatesthat will set up the GarageBand interfaceGarageBand ʼ09 BasicsPage 2 of 125.6.according to the kind of project you will becreating. There are templates for recordingmusic from an electric guitar, recordingpodcast episodes with a microphone,working with Apple loops, and more. Learn to Play: opens interactive tutorials forlearning how to play the piano or guitar. Youcan purchase additional Learn to Playlessons featuring professional recordingartists by selecting Lesson Store on the leftside of the GarageBand splash screen. Magic Garageband: allows you to previewsongs from a number of different genresusing a virtual band. These songs can becustomized by changing the instruments inthe virtual band, and they can be openedfor editing in GarageBand just like any otherproject. iPhone Ringtone: allows you to createringtone files that can be sent to iTunes andtransferred to an iPhone.Select the icon for desired project type on theright side of the splash screen and click onChoose. For New Project and iPhoneRingtone, the Save As dialog window willopen (for Learn to Play and MagicGarageBand, clicking on Choose will openthe interactive lesson or the virtual stage,respectively).Enter a name for your project file in the SaveAs dialog window.Choose a save location using the pulldownmenu. If you do not see the location youneed, click on the down arrow next to theSave As field to display more locations.Set the tempo, time signature and key.Click on Create.To open an existing GarageBand project, click onOpen an Existing File at the bottom of the splashscreen.As you work on your GarageBand project, makesure to save frequently by selecting File Save orusing the keyboard shortcut Command S.Magic GarageBandGarageBand ʼ09 gives you a head start on anyproject by allowing you to use a virtual band tocreate a composition with all the instruments youneed. To create a new project using MagicGarageBand:1. Launch GarageBand by clicking on its icon inthe Dock.Created by Luis PerezLast Updated: 4/9/09
2. Select Magic GarageBand on theGarageBand splash screen.3. Click on a thumbnail to select a genre.4. To hear a preview, hover over the thumbnailwith your cursor and click on Preview, thenclick on Preview again to stop the music.5. When you find a genre you like, select itsthumbnail and click on Choose to open theMagic GarageBand stage.6. Choose to preview a Snippet or the Entiresong using the rocker button to the left of theRecord and Play buttons. You can selectwhich part of the song you want to hear byselecting a section on the timeline below thestage (that section will be highlighted inyellow).7. Click on the Play button to start the preview.Use the slider to the right of the play button toadjust the volume.8. To change an instrument in your virtual band,click on the instrument to spotlight it andchoose a different instrument from the list thatappears below the stage. You can take out aninstrument by choosing No Instrument.9. Clicking on any of the instruments in yourvirtual band you will display a popup withsome controls.Use the volume slider to control the volume ofan individual instrument, or click on thespeaker icon to mute that instrument. Theheadphones icon allows you to solo theinstrument by muting the rest of the band.10. To record your own instrument along with theband, click on the instrument in theforeground (My Instrument) and choose yourinstrument using the My Instrument pulldownmenu. Next, click on the Record button andstart playing your instrument. When youʼrefinished, click on the Record button again.11. To tune a guitar, click on the Tunerbutton. The tuner will appear below thestage. Play a note on your guitar. Whenthe guitar is in tune the note in the middle ofthe tuner will turn blue.12. To hear the other genres included withGarageBand 09, click on Change Genre.When you find one you like, click on Auditionto hear the virtual band play the MagicGarageBand song for that genre.GarageBand ʼ09 BasicsPage 3 of 1213. When youʼre happy with your selections inMagic GarageBand, click on Open withGarageBand to open the project for editing inGarageBand.Project TemplatesChoosing New Project from the GarageBandsplash screen will show you a number oftemplates for creating new projects. Eachtemplate will include the tracks needed for a givenproject type and change the layout of theGarageBand interface to match the intendedworkflow: Piano: will add a piano track and open the LoopBrowser on the right side of the screen to letyou choose other loops for your composition. Electric Guitar: will add an electric guitar trackand open the Track Info pane on the right sideof the screen to let you choose different ampand stompbox effects. Vocals: will add two tracks (one optimized for amale voice and one optimized for a femalevoice) and open the Track Info pane on the rightside of the screen to let you choose from a listof presets for different types of vocals. Loops: will not add any tracks to the project, butwill open the Loop Browser on the right side ofthe screen and show the loops you can add tothe project to create a new composition. Keyboard Collections: will add a series ofkeyboard tracks and open the Track Info paneon the right side of the screen and show you thesoftware instruments available in GarageBand. Acoustic Instrument: will add a single basictrack (one that has no effects applied to it) andopen the Track Info pane on the right side of thescreen and show you a list of softwareinstruments available in GarageBand. Songwriting: will add a basic set of tracks(voice, acoustic guitar, piano, bass and drums)and open the Track Info pane on the right sideof the screen and show you a list of realinstruments. The drums track will alreadyinclude a basic drum beat. Podcast: similar to the Vocals template, but willalso add a Jingles track for includingbackground music and a Podcast track foradding still photos that can be synchronized tothe audio. The interface will open with theMedia Browser on the right side of the screen tolet you choose the photos that will appear onthe podcast episode.Created by Luis PerezLast Updated: 4/9/09
The Track ControlsThe track controls determine how a trackbehaves. From left to right, these controls are: Enable recording: this button must be turned onbefore you can record to the track. Mute: turns off playback on the track. Solo: allows you to mute all other tracks andplay back the track by itself. Lock: disables editing on the track so you donʼtmake unwanted changes once you have allyour settings the way you need them. View/Hide Automation: displays volume, panand automation (effects) curves below eachtrack. By adding keyframes to these curves, youcan create fade in and fade out effects, or lowerthe volume over just a section of your recording. Pan Wheel: allows you to adjust which stereochannel (left or right) will play the sound. Volume Slider: adjusts the volume level of theentire track.Working with TracksA GarageBand project is created by adding atrack for each instrument or voice you want to usein your recording. GarageBand supports threetypes of instruments: Real Instruments: voice and other sound thatcan be recorded with a microphone or anyinstrument you can connect to your computer,with the exception of a MIDI keyboard. IncludesGarageBand loops as well as sound importedfrom external files in any format supported byGarageBand (such as MP3 or AAC). Software Instruments: sound created byGarageBand and playable on any USB or MIDIkeyboard. An onscreen keyboard can also beused to play these instruments (select Window Keyboard to display it). Electric Guitar: sound recorded with an electricguitar and played back with GarageBand 09ʼsbuilt in amps and stompbox effects.The Track menu allows you to perform thefollowing track-related actions:Add a Track:1. Select Track New Track.2. Select the track type you wish to create(Software Instrument, Real Instrument orElectric Guitar) and click on Create.GarageBand ʼ09 BasicsPage 4 of 123. GarageBand will add a track with the defaultinstrument and the Track Info pane willdisplay to the right. To change the instrument,click on the Browse tab, choose an instrumentcategory on the left side of the pane, thenselect an instrument on the right side of thepane.4. If youʼre recording your voice or a realinstrument, make sure the correct inputsource is selected using the Input Sourcepulldown menu at the bottom of the Track Infopane.5. If you want to hear your microphone orinstrument as you play, choose On or On withFeedback Protection from the Monitor menu.6. Adjust the recording level using the slider, orcheck the box next to “Automatic LevelControl” to let GarageBand automaticallylower the level to avoid clipping or raise thelevel to avoid excessive noise whilerecording.7. Click on the Edit tab of the Track Info pane toadd effects and change other instrumentoptions.8. Click on Save Instrument at the bottom of theTrack Info pane if you want to save yoursettings as a custom instrument you canreuse.Duplicate a Track:To create a new track with the same settings asan existing track, select Track Duplicate Trackor hold down the Command key and press theletter D.Create a Basic Track:Select Track New Basic Track to create a trackthat does not have an instrument assigned to it.You can assign an instrument of your choice byclicking on the Track Info button and selecting itfrom one of the categories in the Browse tab.Delete a Track:Select the track (the icon for the instrument willhave a glow around it) and choose Track DeleteTrack or hold down the Command key while youpress Delete on your keyboard.RecordingOnce you have created a new track, youʼre readyto record:1. Make sure the track is enabled for recordingby clicking on the Enable Recording button inthe track controls.2. To view the time in the LCD at thebottom of the GarageBand window, clickon the LCD mode button and chooseCreated by Luis PerezLast Updated: 4/9/09
3.4.5.6.7.Time. To view the beats and measures,choose Measures.Click the Record button in the controlsarea that appears below the timeline orpress the letter R on your keyboard.Speak into the microphone or start playingyour instrument.When youʼre done recording, click the Recordbutton again, or press the letter R on yourkeyboard.To preview your recording, move theplayhead to the beginning by using the buttonin the controls area or press the letter Z onyour keyboard.Press the Space Bar on your keyboard tobegin playing your recording. Press theSpace Bar to stop the playhead.If youʼre recording from an electric guitar, you willfirst set your amp and stompbox effect settings asfollows:1. Select the Electric Guitar track and clickon the Track Info button.2. Choose a guitar preset using the pulldownmenu at the top of the Track Info pane.3. To change the amp model, hover over theamp icon at the top of the Track Info pane andclick on one of the arrows on either side of theicon to select a different amp.4. To adjust the amp settings, click once on theamp icon to display the amp controls belowthe stage in the Track Info pane, then clickand drag up or down on a each control tomake your adjustments.5. To set the recording level and adjust themaster effects (echo and reverb) for an ampmodel, double-click on the amp icon. Theamp icon on the stage will flip over and theamp settings will appear in the area below thestage. To turn off the amp, uncheck the box tothe right of the Amp Model pulldown menu.6. To adjust the settings for a stompbox, click onthe stompbox icon and use the controls belowthe stage to make your adjustments.GarageBand ʼ09 BasicsPage 5 of 127. To add a stompbox effect, select an existingstompbox and click on Edit at the top of theTrack Info pane. This will display icons for theavailable stompbox effects below the stage inthe Track Info pane. Drag the desiredstompbox effect into one of the emptystompbox slots on the stage, then click onDone. Adjust the settings for the newstompbox as described in step 5.8. Once youʼve set up your amp and stompboxeffects, play your guitar to make sure it hasthe desired sound. To tune the guitar, click onthe icon on the left side of the LCD and selectTuner. Play a single note on your guitar.When the note name in the LCD turns blue,the guitar will be in tune.9. Click on the Recording button and startplaying your guitar. Click on the Recordingbutton again to stop recording.Working with RegionsEach time you press the Record button,GarageBand creates a new region in the trackyou have selected. The color of the region willindicate what type of region it is: Purple: real instrument you record Blue: real instrument created from a loop Orange: imported audio file Green: software instrumentYou can edit these regions in a number of ways: Move: Click on it and drag it to another locationin the timeline (either on the same track or ondifferent track.). Trim: Place your pointer over the lower half ofone of the edges until it turns into a bar with anarrow on it. Drag in to trim the region. Onsoftware instrument regions, drag out to addsilence at the beginning or end of the region. Loop: Place your pointer over the upper part ofthe right edge until it turns into a bar with acurved arrow on it, then drag to the right. Duplicate: Hold down the Option key as youdrag the region and it will be duplicated. Delete: Select the region and press the Deletekey on your keyboard. Split: Place the playhead where you want tosplit the region and select Edit Split. Join: Select the two regions by holding downthe Command key on your keyboard as youclick on each region, then select Edit Join.Created by Luis PerezLast Updated: 4/9/09
GarageBand supports cycle regions to allow youto do multiple takes of a recording. To Create acycle region:1. Click on the Cycle button in the controlsarea.2. The cycle region will appear as a yellow areaabove the timeline. Drag the region and moveit to the point where you want to startrecording. To resize the cycle region, drag inon the edges of the cycle region.3. Place your cursor at the beginning of thecycle region and record your first take.4. Press the record button again to stoprecording.5. Repeat steps 3 and 4 to record additionaltakes.6. To preview each take, click on the circle withthe number in the upper left corner of theregion and select the desired take, then clickon the Play button.7. To keep just one take, click on the circle withthe number of takes, choose the take youwant to keep (it should have a check marknext to its name), and then choose DeleteUnused Takes from the same menu.Another feature in GarageBand ʼ09 is the ability toarrange regions into sections such as intro, verse,and chorus using the arrange track in theGarageBand timeline:1. Choose Track Show Arrange Track.2. Click on the Add Region button in the ArrangeTrack to create a newarrange region.3. To rename the arrange region, click on itsname, wait a few seconds, then type thename you want to assign to it.4. To resize the arrange region, select it anddrag in on an edge.5. To move an arrange region, drag it to anotherlocation in the arrange track. If you move anarrange region over another one in thearrange track, the two regions are swapped.6. To copy an arrange region, hold down theoption key as you drag it to another location inthe arrange track. When you move or copy anarrange region, the music in all of the tracksincluded in that region are moved or copied.The Track EditorThe Track Editor is used to edit the contents of aregion. The display on the Track Editor willdepend on what type of region you have selected.GarageBand ʼ09 BasicsPage 6 of 12For real instrument regions, the Track Editor willdisplay a waveform of the recording.To remove a section of the waveform in the TrackEditor:1. Select the region you want to edit in thetimeline.2. Click on the Track Editor button.3. When the Track Editor opens, positionyour pointer somewhere in the lower part ofthe waveform (until it turns into crosshairs)and make a selection by clicking anddragging.4. Select Edit Cut or hold down the Commandkey and press X on your keyboard.Notation ViewWhen you open up the Track Editor with asoftware instrument region selected, you can editthe individual notes in that region in notation view:1. Select the region you want to edit and click onthe Track Editor button.2. Switch to Score view by clicking on the Scoretab on the left side of the Track Editor.3. To move a note, select it and drag it toanother spot in the notation area. You candrag the note up and down to change itspitch.4. To add a note, hold down the Command keyand click in the notation area where you wantto add the desired note. To change the notevalue, click on the note to select it and choosea different note value using the Insert menuon the left side of the Track Editor.5. To copy a note, hold down the Option key asyou drag the original note to another locationin the notation area.6. To change a noteʼs duration, click onthe round part of the note to display agreen duration bar to the right of it. Click anddrag on the edge of this bar to change thenoteʼs duration.7. To change a noteʼs velocity, select the noteand use the Velocity slider on the left side ofthe Track Editor to make your velocityadjustments.8. To add pedal symbols, select “Ped” from theInsert menu, then Command-click at the pointwhere you want to add the pedal downsymbol and drag to the point where you wantto add the pedal up symbol.9. To delete a note, click on it to select it andpress Delete on your keyboard.Created by Luis PerezLast Updated: 4/9/09
10. To print the notation for a track, select thetrack and choose File Print.Adding LoopsGarageBand includes loops of prerecorded musicthat can be used to add drum beats and otherrepeating elements to a composition.To add a loop to a project:1. Click on the Loop Browser button.2. The Loop Browser supports three views(column, musical buttons and podcastsounds). Change the view to display musicalbuttons by clicking on the middle view buttonat the top of the Loop Browser.3. Select a category by clicking on one of thebuttons in the Loop Browser.4. The loops in that category will be listed in thearea below the musical buttons. Double-clickon a loop to preview it.5. When you find one you like, drag it into thegray area in the timeline. GarageBand willcreate a new track with a loop region in it.6. To extend the loop, place your pointer overthe upper part of the right edge until it turnsinto a bar with a curved arrow on it, then dragto the right.Importing MusicGarageBand supports the MP3, MIDI, WAV, andAAC file formats. There are two ways to import anaudio file: using the Media Browser or from aFinder window.To import a file using the Media Browser:1. Click on the Media Browser button.2. Select the Audio tab at the top of theMedia Browser.3. Click on iTunes and select a file from the list.Click on the Play button to hear a preview.4. Drag the file into the gray area in the timeline.GarageBand will create a new track when yourelease the mouse.To import a file using the Finder:1. Resize the GarageBand window so you cansee the file you want to import.2. Drag the file from the Finder window until thepointer has a plus sign on it.3. Release the mouse to create a new track withthe audio from your file.GarageBand ʼ09 BasicsPage 7 of 12Adjusting Volume and PanThe volume indicators on the right side of thetrack controls area will indicate your volume levelas two bouncing green bars (only one bar if youʼrerecording in mono). These two bars will hit a redpoint if your volume is too high.To adjust the volume level and pan on any track:4. Use the slider below the volume indicators toadjust the volume level. The pan wheel isused to to place instruments in the stereofield. Drag the wheel to either side to haveinstruments play out of either the left or rightchannel.5. To adjust the volume or pan dynamically overtime, display the volume or pan curve byclicking on the down arrow in the trackcontrols, then choosing Track Volume orTrack Pan using the pulldown menu.6. Click on the curve to add points (keyframes)you can use to change the shape of thecurve. These points can be used to createfades and other effects.When youʼre finished editing a track, you can lockit to prevent it from being accidentallychanged. To lock a track, select the lock iconin the track controls area.Each GarageBand project also includes a MasterTrack which determines the volume level for theentire project. To adjust the volume of the MasterTrack, first choose Track Show Master Track,then make sure Master Volume is selected in thepulldown menu on the left side of the track. Youcan then drag the volume curve up to raise theoverall volume or set points in the volume curveto change the volume over time.EffectsGarageBand includes studio-quality effects youcan use to enhance your audio. The effects areavailable in the Edit tab of the Track Info pane.To add an effect to a track:1. Select the track and click on the Track Infobutton.2. Select the Edit tab at the top of the Track Infopane to show the trackʼs effects settings.3. To add an effect, click on one of the emptyeffect slots and select the effect from thepopup menu that appears. .Created by Luis PerezLast Updated: 4/9/09
4. To adjust the effectʼs settings, click on theicon on the left side of the effectʼs slot.This will open a popup window with slidersand other controls you can use to adjust theeffectʼs settings. To save your changes as apreset, click on the menu at the top of thepopup window and choose Make Preset, thenenter a name for the preset and click onSave.5. To turn off an effect, click on the LED buttonto the left of the effectʼs icon.6. To change the order in which effects areapplied, use drag and drop to move effects upor down in the Track Info pane. Changing theorder of effects will change the sound.The Visual EQ effect allows you to modify thedifferent frequencies in a recording. The VisualEQ is not available for guitar tracks, which use theamp and stompbox effects instead. To use theVisual EQ:1. Turn on the effect by clicking on the LEDbutton to the left of the Visual EQ icon.2. To bring up the Visual EQ settings window,click on the Visual EQ icon.3. Check the box next to Analyzer to see a afrequency curve (showing which frequenciesare louder or softer) as you play your project.Make sure to turn off the Analyzer when youdonʼt need it, as it takes up a lot of CPUresources when it is on.4. To adjust a band (bass, low mid, high mid,and treble) click on the area for that band anddrag up or down to make your adjustment.You can drag to the left and right to changethe pitch.With GarageBand some effects can be applieddynamically over time using an automation curvesimilar to the volume and pan curves. To useautomation:1. Click on the down arrow in the track controls.2. Choose Add Automation from the pulldownmenu below the track controls.3. Click on the triangle next to Bass Reduction,Visual EQ or Echo and Reverb to see theeffects in each category, then check the boxnext to the effects you want to add and clickon OK.GarageBand ʼ09 BasicsPage 8 of 124. To modify an effect, choose it using thepulldown menu below the track controls, thenclick on the automation curve that is displayedbelow the trackʼs regions to set points youcan use to change the shape of theautomation curve.Learn to PlayLearn to Play is a new feature introduced withGarageBand ʼ09 to help beginners learn how toplay music using interactive video-based lessons.GarageBand ʼ09 ships with two basic lessons(piano and guitar), but you can download morelessons by selecting Lesson Store on theGarageBand splash screen. Artist lessons, taughtby popular artists such as Sting and Norah Jones,can be purchased for 4.99.To use Learn to Play:1. Select Learn to Play on the left side of theGarageBand splash screen and choose alesson type (piano or guitar). The lesson willstart in full screen mode. To exit the lesson,click on the X in the upper left corner of thescreen or press the Escape key on yourkeyboard.2. As you hover over the video at the top of thescreen, you will see chapters displayed.These chapters allow you to choose whetheryou want to just see the instructor playthrough the lesson or start learning along withhim or her.3. To play/pause the movie, click on the Playbutton at the bottom of the screen. If you wantto loop one of the segments, click on theCycle region button. The region that will loopwill be highlighted in yellow.4. To change the speed at which a lesson willplay back, use the slider to the left of theRecord and Play buttons. To adjust thevolume level, use the slider to the right ofthese buttons.5. To record yourself as you play along with theinstructor, first make sure you are on theLearn chapter of the lesson, then click on theRecord button at the bottom of the screen.Click on the Metronome button to the left ofthe Record button to hear a metronome asyou play along.6. To adjust the volume levels of the teacherʼsvoice and the other instruments included inthe lesson (as well as your own), click on theMixer button on the upper right corner of thescreen and use the sliders to make yourCreated by Luis PerezLast Updated: 4/9/09
adjustments. This is also where you can soloa track (by clicking on the headphones icon)or mute a track (by clicking on the speakericon).7. To change the appearance of the lesson, clickon Settings at the top of the Learn to Playscreen. Here you can determine the screenlayout as well as how the notation isdisplayed. An option to turn on captions isalso available.8. When youʼre done with your recording, clickon Open with GarageBand to edit the projectwith all of the tools available in GarageBand.Recording a Podcast EpisodeTo record a new podcast episode:1. Select New Project Podcast from theGarageBand splash screen.2. Enter a file name for your podcast episodeand choose a save location.3. Click on Create.GarageBand will open up with a few tracksalready created for you: Podcast Track: This is the track where
11. To tune a guitar, click on the Tuner button. The tuner will appear below the stage. Play a note on your guitar. When the guitar is in tune the note in the middle of the tuner will turn blue. 12. To hear the other genres included with GarageBand 09, click on Change Genre. When you find one you like, click on Audition