Transcription
The iMovie ’11Project BookStuff you cando with iMovieJEFF CARLSONPEACHPIT PRESS
The iMovie ’11 Project BookJeff CarlsonPeachpit Press1249 Eighth StreetBerkeley, CA 94710510/524-2178510/524-2221 (fax)Find us on the Web at: www.peachpit.comTo report errors, please send a note to errata@peachpit.comPeachpit Press is a division of Pearson Education.Copyright 2011 by Jeff CarlsonEditor: Clifford ColbyCopyeditor: Scout FestaProduction editor: Lisa BraziealCompositor: Jeff CarlsonIndexer: Ann RogersCover design: Mimi HeftCover compositor: Andreas deDanaanInterior design: Peachpit PressNotice of RightsAll rights reserved. No part of this book may be reproduced or transmitted in any form byany means, electronic, mechanical, photocopying, recording, or otherwise, without theprior written permission of the publisher. For information on getting permission forreprints and excerpts, contact permissions@peachpit.com.Notice of LiabilityThe information in this book is distributed on an “As Is” basis without warranty. Whileevery precaution has been taken in the preparation of the book, neither the author norPeachpit shall have any liability to any person or entity with respect to any loss or damagecaused or alleged to be caused directly or indirectly by the instructions contained in thisbook or by the computer software and hardware products described in it.TrademarksApple, Apple TV, iMovie, iLife, iDVD, GarageBand, iPad, iPhoto, iPod touch, iTunes, andSafari are Trademarks of Apple Inc.Many of the designations used by manufacturers and sellers to distinguish their productsare claimed as trademarks. Where those designations appear in this book, and Peachpitwas aware of a trademark claim, the designations appear as requested by the owner of thetrademark. All other product names and services identified throughout this book are usedin editorial fashion only and for the benefit of such companies with no intention ofinfringement of the trademark. No such use, or the use of any trade name, is intended toconvey endorsement or other affiliation with this book.ISBN-13: 978-0-321-76819-3ISBN-10:0-321-76819-19 8 7 6 5 4 3 2 1Printed and bound in the United States of America
For Emily, Peter, Dana, David, Jennifer, Brett, Kellie,Jeff, Christine, Michael, Suzanne, Ty, and Kimberly
About the AuthorJeff Carlson gave up an opportunity to intern at a design firmduring college because they really just wanted someone tall toplay on their volleyball team. In the intervening years, he’s beena designer and writer, authoring best-selling books on theMacintosh, Web design, video editing, and digital photography.His most recent book is The iPad 2 Pocket Guide. He’s currently acolumnist for the Seattle Times, a frequent contributor to Macworld,and a senior editor of TidBITS (www.tidbits.com), and heconsumes almost too much coffee—almost. Find more informationabout him at jeffcarlson.com and neverenoughcoffee.com; followhim on Twitter at @jeffcarlson.
AcknowledgmentsWriting this book about iMovie projects was, as I hope you canimagine, quite the project itself. It wouldn’t have been a successfulproject at all without the assistance of the following people:Cliff Colby guided the project from the beginning and listened toboth my ideas and my concerns (the latter usually when I wasn’tproperly caffeinated).Jeff Tolbert helped immeasurably by writing sections ofChapters 5 and 6 when I suddenly had to drop everything andwrite The iPad 2 Pocket Guide in the middle of production.Lisa Brazieal is the coolest, calmest production editor on earth.Ann Rogers turned my random writings into a useful index.Scout Festa copyedited the book and kept me on my editing toes.Kim and Ellie keep me sane and happy.Agen Schmitz didn’t actually work on this title, but he did updatepart of my iPad 2 book. I was so rushed to get it done that I didn’tinclude him in the acknowledgments for that book, making me beers.
ContentsIntroductionxiAbout the iMovie Projects . . . . . . . . . . . . . . . . . . . . . . . . . . . . . . . . xiiA Note About Conventions . . . . . . . . . . . . . . . . . . . . . . . . . . . . . . . xiiiGetting iMovie ’11 . . . . . . . . . . . . . . . . . . . . . . . . . . . . . . . . . . . . . . . . xiiiCHAPTER 1A Primer on Shooting Video1Gear Up. . . . . . . . . . . . . . . . . . . . . . . . . . . . . . . . . . . . . . . . . . . . . . . . . . 2Types of cameras. . . . . . . . . . . . . . . . . . . . . . . . . . . . . . . . . . . . . . . 2Understand video formats . . . . . . . . . . . . . . . . . . . . . . . . . . . . . . 6Go Shooting . . . . . . . . . . . . . . . . . . . . . . . . . . . . . . . . . . . . . . . . . . . . . . 8Capture good video . . . . . . . . . . . . . . . . . . . . . . . . . . . . . . . . . . . . 8Capture good audio . . . . . . . . . . . . . . . . . . . . . . . . . . . . . . . . . . . 12Get plenty of coverage . . . . . . . . . . . . . . . . . . . . . . . . . . . . . . . . . 14CHAPTER 2iMovie Fundamentals17Get Acquainted with iMovie . . . . . . . . . . . . . . . . . . . . . . . . . . . . . . 18Tour iMovie’s interface. . . . . . . . . . . . . . . . . . . . . . . . . . . . . . . . . 18Preview and play video . . . . . . . . . . . . . . . . . . . . . . . . . . . . . . . . 20Customize iMovie’s appearance . . . . . . . . . . . . . . . . . . . . . . . . 21Switch to a “traditional” timeline. . . . . . . . . . . . . . . . . . . . . . . . 23Add Video to Your iMovie Library . . . . . . . . . . . . . . . . . . . . . . . . . 24Import video from a memory-based camera . . . . . . . . . . . . . 24Access video from iPhoto or Aperture. . . . . . . . . . . . . . . . . . . 28Import video from a tape-based camcorder. . . . . . . . . . . . . . 29Import video from the hard disk . . . . . . . . . . . . . . . . . . . . . . . . 30Create a New iMovie Project . . . . . . . . . . . . . . . . . . . . . . . . . . . . . . 31Add Clips to the Movie . . . . . . . . . . . . . . . . . . . . . . . . . . . . . . . . . . . 32Add clips to the project . . . . . . . . . . . . . . . . . . . . . . . . . . . . . . . . 32Rearrange clips. . . . . . . . . . . . . . . . . . . . . . . . . . . . . . . . . . . . . . . . 34
ContentsCreate a Movie Trailer . . . . . . . . . . . . . . . . . . . . . . . . . . . . . . . . . . . . 34Choose a trailer style . . . . . . . . . . . . . . . . . . . . . . . . . . . . . . . . . . 35Edit titles and add clips to the trailer . . . . . . . . . . . . . . . . . . . . 36Master Video Editing Basics . . . . . . . . . . . . . . . . . . . . . . . . . . . . . . 38Trim in the Project browser. . . . . . . . . . . . . . . . . . . . . . . . . . . . . 38Fine-tune trim in place . . . . . . . . . . . . . . . . . . . . . . . . . . . . . . . . .40Edit in the Clip Trimmer . . . . . . . . . . . . . . . . . . . . . . . . . . . . . . . . 41Master Audio Editing Basics . . . . . . . . . . . . . . . . . . . . . . . . . . . . . . 42Add a background song. . . . . . . . . . . . . . . . . . . . . . . . . . . . . . . . 42Add an audio clip . . . . . . . . . . . . . . . . . . . . . . . . . . . . . . . . . . . . . 46Change clip volume . . . . . . . . . . . . . . . . . . . . . . . . . . . . . . . . . . . 47Fade audio in or out . . . . . . . . . . . . . . . . . . . . . . . . . . . . . . . . . . . 48Adjust volume within a clip . . . . . . . . . . . . . . . . . . . . . . . . . . . . 49Add Titles . . . . . . . . . . . . . . . . . . . . . . . . . . . . . . . . . . . . . . . . . . . . . . . 50Add a title . . . . . . . . . . . . . . . . . . . . . . . . . . . . . . . . . . . . . . . . . . . . 50Customize the text appearance . . . . . . . . . . . . . . . . . . . . . . . . . 52Add Transitions . . . . . . . . . . . . . . . . . . . . . . . . . . . . . . . . . . . . . . . . . . 55Add a transition . . . . . . . . . . . . . . . . . . . . . . . . . . . . . . . . . . . . . . . 55Edit transition settings . . . . . . . . . . . . . . . . . . . . . . . . . . . . . . . . . 56Apply One-Step Effects. . . . . . . . . . . . . . . . . . . . . . . . . . . . . . . . . . . 58CHA PT E R 3Organize Your Video Library59Organize Events Project . . . . . . . . . . . . . . . . . . . . . . . . . . . . . . . . . . 60Rename, merge, or split Events . . . . . . . . . . . . . . . . . . . . . . . . . 60Move or copy Events to a different hard disk . . . . . . . . . . . . . 62Copy or move projects (and related footage)to a different hard disk . . . . . . . . . . . . . . . . . . . . . . . . . . . . . . . . . 64Mark Favorite Videos Project. . . . . . . . . . . . . . . . . . . . . . . . . . . . . . 65Mark favorites . . . . . . . . . . . . . . . . . . . . . . . . . . . . . . . . . . . . . . . . 65Hide rejected clips . . . . . . . . . . . . . . . . . . . . . . . . . . . . . . . . . . . . 66Find people in your videos. . . . . . . . . . . . . . . . . . . . . . . . . . . . . . 68Tag Your Videos Project . . . . . . . . . . . . . . . . . . . . . . . . . . . . . . . . . . 69Apply keyword tags . . . . . . . . . . . . . . . . . . . . . . . . . . . . . . . . . . . 69Use keyword tags to locate footage . . . . . . . . . . . . . . . . . . . . . 71Use tags to identify people . . . . . . . . . . . . . . . . . . . . . . . . . . . . . 72vii
viiiContentsCHA PTER 4iMovie Beyond the Basics73Learn Advanced Editing Techniques Project . . . . . . . . . . . . . . . . 74Insert a clip into the middle of another clip . . . . . . . . . . . . . . 74Replace clips. . . . . . . . . . . . . . . . . . . . . . . . . . . . . . . . . . . . . . . . . . 75Edit with the Precision Editor . . . . . . . . . . . . . . . . . . . . . . . . . . . 77Detach audio from a video clip . . . . . . . . . . . . . . . . . . . . . . . . . 82Create a Photo Slideshow Project. . . . . . . . . . . . . . . . . . . . . . . . . . 84Import photos . . . . . . . . . . . . . . . . . . . . . . . . . . . . . . . . . . . . . . . . 84Adjust Ken Burns Effect settings . . . . . . . . . . . . . . . . . . . . . . . . 86Fit or crop a photo. . . . . . . . . . . . . . . . . . . . . . . . . . . . . . . . . . . . . 87Change a photo’s duration . . . . . . . . . . . . . . . . . . . . . . . . . . . . . 89Edit the rest of the slideshow . . . . . . . . . . . . . . . . . . . . . . . . . . . 90Create a Cutaway Project . . . . . . . . . . . . . . . . . . . . . . . . . . . . . . . . . 90Add the cutaway clip . . . . . . . . . . . . . . . . . . . . . . . . . . . . . . . . . . 90Edit the cutaway clip settings . . . . . . . . . . . . . . . . . . . . . . . . . . 92Create a Picture in Picture orSide by Side Scene Project . . . . . . . . . . . . . . . . . . . . . . . . . . . . . . . . 92Add the Picture in Picture or Side by Side clip . . . . . . . . . . . . 93Edit the clip settings . . . . . . . . . . . . . . . . . . . . . . . . . . . . . . . . . . . 93Stabilize Shaky Footage Project. . . . . . . . . . . . . . . . . . . . . . . . . . . . 95Analyze for image stabilization . . . . . . . . . . . . . . . . . . . . . . . . . 95Apply image stabilization . . . . . . . . . . . . . . . . . . . . . . . . . . . . . . 96Compensate for rolling shutter . . . . . . . . . . . . . . . . . . . . . . . . . 97Correct Color Project . . . . . . . . . . . . . . . . . . . . . . . . . . . . . . . . . . . . . 98Correct a clip’s color. . . . . . . . . . . . . . . . . . . . . . . . . . . . . . . . . . . 98Apply video effects . . . . . . . . . . . . . . . . . . . . . . . . . . . . . . . . . . . 101Change How a Clip Sounds Project . . . . . . . . . . . . . . . . . . . . . . . 102Apply audio effects. . . . . . . . . . . . . . . . . . . . . . . . . . . . . . . . . . . 102“Duck” a clip. . . . . . . . . . . . . . . . . . . . . . . . . . . . . . . . . . . . . . . . . 103Change equalizer settings. . . . . . . . . . . . . . . . . . . . . . . . . . . . . 104Reduce background noise . . . . . . . . . . . . . . . . . . . . . . . . . . . . . 105CHAPTER 5Creative iMovie Projects107Make a Music Video Project . . . . . . . . . . . . . . . . . . . . . . . . . . . . . 108Use beat markers . . . . . . . . . . . . . . . . . . . . . . . . . . . . . . . . . . . . 108
ContentsRecord a Voiceover Project. . . . . . . . . . . . . . . . . . . . . . . . . . . . . . . .112Record audio using the Voiceover tool. . . . . . . . . . . . . . . . . . .112Create a Travel Highlights Movie Project . . . . . . . . . . . . . . . . . . .115Create a travel themed project . . . . . . . . . . . . . . . . . . . . . . . . .115Add a map. . . . . . . . . . . . . . . . . . . . . . . . . . . . . . . . . . . . . . . . . . . .116Create a Sports Highlights Movie Project. . . . . . . . . . . . . . . . . . .118Build the sports team database . . . . . . . . . . . . . . . . . . . . . . . . .118Add Sports theme elements. . . . . . . . . . . . . . . . . . . . . . . . . . . .119Make a Green-Screen Effect Project . . . . . . . . . . . . . . . . . . . . . . 120Shoot against a green or blue screen . . . . . . . . . . . . . . . . . . . .121Add a green-screen clip to your movie . . . . . . . . . . . . . . . . . .121Improve the green-screen effect . . . . . . . . . . . . . . . . . . . . . . . 123Create a Score in GarageBand Project. . . . . . . . . . . . . . . . . . . . . 124Get your movie into GarageBand . . . . . . . . . . . . . . . . . . . . . . 125Start creating your first song . . . . . . . . . . . . . . . . . . . . . . . . . . 128Add more instruments. . . . . . . . . . . . . . . . . . . . . . . . . . . . . . . . 132Create a new section . . . . . . . . . . . . . . . . . . . . . . . . . . . . . . . . . 134Add a new instrument . . . . . . . . . . . . . . . . . . . . . . . . . . . . . . . . 138Finish your song. . . . . . . . . . . . . . . . . . . . . . . . . . . . . . . . . . . . . . 140CHAPTE R 6Share Your Movies145Make a DVD Project . . . . . . . . . . . . . . . . . . . . . . . . . . . . . . . . . . . . 146Prepare your project for iDVD . . . . . . . . . . . . . . . . . . . . . . . . . 146Choose a theme in iDVD. . . . . . . . . . . . . . . . . . . . . . . . . . . . . . 148Edit theme elements. . . . . . . . . . . . . . . . . . . . . . . . . . . . . . . . . . 149Burn your project to disc . . . . . . . . . . . . . . . . . . . . . . . . . . . . . . 152Share a Movie on the Web. . . . . . . . . . . . . . . . . . . . . . . . . . . . . . . 154Share to MobileMe Gallery. . . . . . . . . . . . . . . . . . . . . . . . . . . . 154Share to YouTube, Facebook, Vimeo, or CNN iReport . . . . 156Export and share to Flickr . . . . . . . . . . . . . . . . . . . . . . . . . . . . . 158Share to iWeb. . . . . . . . . . . . . . . . . . . . . . . . . . . . . . . . . . . . . . . . 160Share a Movie on iTunes, iOS Devices, and the Apple TV . . . 165Share your movie to iTunes. . . . . . . . . . . . . . . . . . . . . . . . . . . . 165Synchronize with iOS devices . . . . . . . . . . . . . . . . . . . . . . . . . 166Watch a movie on the Apple TV . . . . . . . . . . . . . . . . . . . . . . . 167ix
xContentsCHAPTER 7Edit Video on theiPad, iPhone, or iPod touch169Work with Projects in iMovie for iOS. . . . . . . . . . . . . . . . . . . . . . 170Create a new project . . . . . . . . . . . . . . . . . . . . . . . . . . . . . . . . . 170Choose the theme. . . . . . . . . . . . . . . . . . . . . . . . . . . . . . . . . . . . 172Apply a fade in or fade out to the movie . . . . . . . . . . . . . . . . 173Open an existing project . . . . . . . . . . . . . . . . . . . . . . . . . . . . . . 174Add Video to a project . . . . . . . . . . . . . . . . . . . . . . . . . . . . . . . . . . 174Capture video directly . . . . . . . . . . . . . . . . . . . . . . . . . . . . . . . . 174Import from a camera, iPhone, or iPod touch. . . . . . . . . . . . 175Add clips from the Media Library . . . . . . . . . . . . . . . . . . . . . . 176Edit Video . . . . . . . . . . . . . . . . . . . . . . . . . . . . . . . . . . . . . . . . . . . . . . 177Play and skim video . . . . . . . . . . . . . . . . . . . . . . . . . . . . . . . . . . 177Edit clips . . . . . . . . . . . . . . . . . . . . . . . . . . . . . . . . . . . . . . . . . . . . 178Edit transitions . . . . . . . . . . . . . . . . . . . . . . . . . . . . . . . . . . . . . . . 180Add a title . . . . . . . . . . . . . . . . . . . . . . . . . . . . . . . . . . . . . . . . . . . .181Specify a location . . . . . . . . . . . . . . . . . . . . . . . . . . . . . . . . . . . . 182Add and Edit Photos . . . . . . . . . . . . . . . . . . . . . . . . . . . . . . . . . . . . 184Import photos from the Photos app . . . . . . . . . . . . . . . . . . . . 184Edit the Ken Burns Effect . . . . . . . . . . . . . . . . . . . . . . . . . . . . . . 185Edit Audio. . . . . . . . . . . . . . . . . . . . . . . . . . . . . . . . . . . . . . . . . . . . . . 187Change a clip’s volume level. . . . . . . . . . . . . . . . . . . . . . . . . . . 187Add background music . . . . . . . . . . . . . . . . . . . . . . . . . . . . . . . 187Add a sound effect . . . . . . . . . . . . . . . . . . . . . . . . . . . . . . . . . . . 190Add a voiceover . . . . . . . . . . . . . . . . . . . . . . . . . . . . . . . . . . . . . . .191Share Projects . . . . . . . . . . . . . . . . . . . . . . . . . . . . . . . . . . . . . . . . . . 192Share to the Camera Roll. . . . . . . . . . . . . . . . . . . . . . . . . . . . . . 192Share to YouTube, Facebook, Vimeo, or CNN iReport . . . . 193Send the project to another device via iTunes . . . . . . . . . . . 194Index197
IntroductionI love that I’ve been able to write a book about projects in iMovie.Editing video, after all, is a project in many ways. It often requires agood deal of time and attention to detail. It’s something you elect todo, probably in your spare time, because you want to documentwhat happened at an event, or preserve memories, or communicatesomething in a way that text or photos alone are incapable of doing.And I also love that I’ve been able to write a book about projectsin iMovie. If you plucked a much younger me from the days when Ifirst began editing video and showed me today’s iMovie, my brainwould have had trouble processing what I was seeing (not tomention dealing with the fact that somehow I had been pulledthrough time). For as little as 15, or free when you buy a new Mac,you have the capability to edit high-definition video in real time,using a friendly interface that genuinely makes editing fun.And let’s not even speculate how my brain would have reacted toediting HD video on the iPad, using iMovie for iOS.Most of all, I love living in a time where these capabilities areavailable to millions of people who are willing to set aside sometime and creativity. The future really is the best project.
xiiIntroductionAbout the iMovie ProjectsI call it The iMovie ’11 Project Book because I present the information inthe form of projects: simple tasks you can do quickly that highlight animportant concept or technique, and which you can build upon for yourown video editing projects.I’ve divided the book into the following seven chapters: A Primer on Shooting Video. It doesn’t matter the equipment, theexperience, or the budget—shooting poor footage leads to mediocremovies. Here are some tips for improving the experience in the field. iMovie Fundamentals. Learn the building blocks of importing,editing, and working with features such as iMovie’s movie trailers. Organize Your Video Library. Video projects start with lots of clips,which can easily get lost or overlooked when it’s time to start cuttingthem together. Learn how to store, move, and mark footage, and howto use keywords to find clips quickly. iMovie Beyond the Basics. Replace clips, build a photo slideshow,correct color, adjust audio find out how much more iMovie can doto make your video projects more interesting and enjoyable. Creative iMovie Projects. Using the skills you’ve learned, stretchiMovie’s creativity by making a travel highlights movie, a sportshighlights movie, a music video, green-screen special effects, and asoundtrack using GarageBand. Share Your Movies. Don’t let your videos sit inert on a hard drive.Burn them to DVDs, share them on the Web, or transfer them to aniOS device, including the Apple TV. Edit Video on the iPad, iPhone, or iPod touch. You no longer have towait until you get back to your Mac to edit video. Learn all aboutworking with the iMovie for iOS app.Although I’ve included a lot of great information, this book isn’t an encyclopedic look at iMovie. Jump in, enjoy yourself, and create something.
IntroductionxiiiA Note About ConventionsWhen describing a command, I often need to direct you to a menu item.Since your eyes would glaze over if every mention was like, “Choose theLarge item under the Viewer submenu of the Window menu,” I use ahierarchical shortcut that follows how you’d click the menu items:“Choose Window Viewer Large”.I also frequently mention settings in iMovie’s preferences window.Rather than direct you to the command each time (choose iMovie Preferences), I’m more likely to just write “In iMovie’s preferences ”In terms of interacting with the software, the convention for describingthe arrow you manipulate around the screen is a “mouse pointer,” eventhough in many cases you may be using a laptop trackpad or Apple’sMagic Trackpad instead of a mouse. Similarly, I talk about “clicking themouse button,” which translates to single-clicking the button on themouse or trackpad.Lastly, I often refer to the “contextual menu,” which is a pop-up menucontaining commands that apply to the element you’re working with. Toaccess the contextual menu, either hold the Control key and click themouse button or right-click the mouse.Getting iMovie ’11Unless you haven’t purchased a Mac in over a decade, you currentlyown a version of iMovie. Apple has shipped iLife (which also includesiPhoto, GarageBand, iDVD, and iWeb) free with every new Mac since2003, and has included iMovie on new Macs since iMovie 1.0 appearedin 1999. Look for iMovie in your Applications folder; it may also alreadybe in your Dock. However, I can’t automatically assume you haveiMovie ’11, the latest version, introduced in 2010. Most of the material inthis book still applies if you’re running iMovie ’08 or iMovie ’09.However, if your latest version is iMovie HD 6 or earlier, nothing will befamiliar. Apple completely rewrote iMovie for the ’08 version, settingaside the old program in favor of a new approach. iMovie HD still workson modern Macs, although it’s no longer actively supported by Apple.
xivIntroductionThere are three ways to get iMovie ’11: Buy a new Mac. This can be an awfully expensive way to buy a pieceof software, but you get some very nice hardware thrown in with thedeal. Seriously, if you’re contemplating a new Mac purchase anyway,the most recent Macs offer powerful processors, fast graphicsprocessing (which can improve performance in iMovie), and thelatest version of the iLife suite. Buy iLife at retail. For 49 from Apple, or from Amazon.com andother resellers, you get a boxed version of the suite on a DVD. Buy iMovie from the Mac App Store. Introduced in late 2010, theMac App Store is an application on your Mac that lets you purchasesoftware as direct downloads from Apple. (If you don’t have the AppStore application, make sure you’re running Mac OS X 10.6.6 orlater; from the Apple menu (Ö), choose Software Update and installthe latest version.) What’s great about the Mac App Store is thatyou can buy iMovie ’11 by itself for just 15. iPhoto ’11 and GarageBand ’11 are also available for the same price, but iWeb and iDVD—which haven’t been updated since iLife ’09—are not. If you’re lookingto upgrade from iLife ‘08 or earlier, go for the boxed set.
4iMovie Beyondthe BasicsUsing the techniques covered so far, you can make all kinds ofgreat videos in iMovie. Having a firm grasp of the basics helps youedit projects faster, so you’re spending more time enjoying yourcontent and less time feeling your way through the software. Butyou’re bound to run into special situations: What to do when youwant to fine-tune the way a transition works between two clips?What if your footage suffers from unexpected camera shake, or ifthe audio is muddled?iMovie includes many tools for dealing with special situations, aswell as for improving what you’ve already shot. For example, thecolor correction controls can boost saturation, adjust white balance,and apply eye-catching video effects. In this chapter, I also dig intoadvanced editing techniques and building photo slideshows.
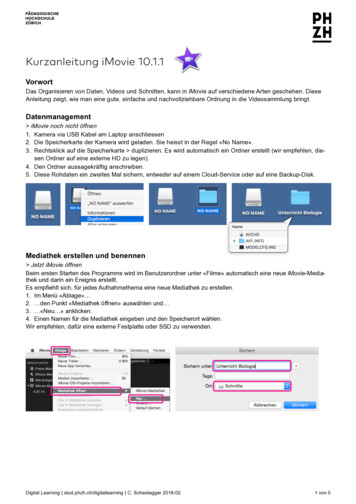
74The iMovie ’11 Project BookLearn AdvancedEditing Techniques ProjectDifficulty level: IntermediateEditing video is a process of repeating a few movements—placing,trimming, adjusting—hundreds or thousands of times. So, you won’t besurprised that iMovie offers shortcuts to make the work easier. The techniques described here are ones you can use in any movie project, andthey focus on inserting clips and replacing existing clips with new ones.I also go into detail about the Precision Editor, a great way of making fineadjustments to the edit points of your clips, and about extracting audiofrom video clips, a valuable but often overlooked capability.Insert a clip into the middle of another clipIn Chapter 2, I explained how to split a clip, a technique often used todrop a new clip into the space between the two segments. An easiermethod is to use iMovie’s Insert function.Inserting a clip1. In the Event browser, select a section of video you want to add toyour project.2. Drag the clip to the Project browser and drop it onto an existing clip(Figure 4.1).Figure 4.1Drag a clip tobe inserted.
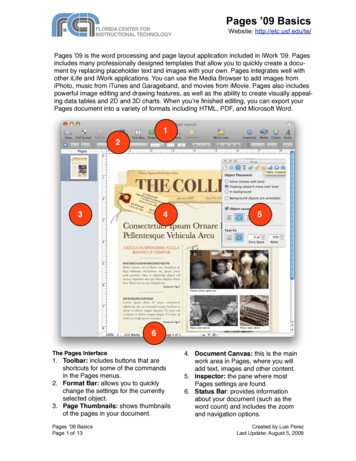
Chapter 4: iMovie Beyond the Basics753. From the pop-up menu that appears, choose Insert (Figure 4.2).Figure 4.2Choose an action.The clip in the Project browser is split, and the new clip appearswhere you dropped it (Figure 4.3).Figure 4.3The inserted cliptipWhen you insert a clip, the next portion of the clip that got splitcontinues where the first portion left off. If you’re looking to insert aclip but not interrupt the scene (for example, you want the audio fromthe first clip to continue while the inserted clip is visible), use acutaway. See “Create a Cutaway Project,” later in this chapter.Replace clipsI recommend assembling a movie fairly quickly, and then spending timelater fine-tuning it. Often, you find that a clip you added isn’t as good asanother one that would fit in the same place. Instead of deleting the clipand adding the new one, use the Replace commands. This option isparticularly helpful when the incoming clip must remain the same duration as the one it’s replacing.Replacing clips1. Drag a clip from the Event browser onto the top of the clip you wantto replace in the Project browser.
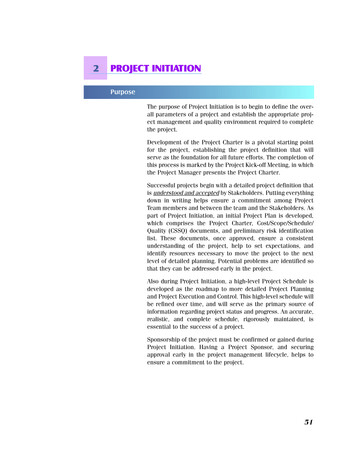
76The iMovie ’11 Project Book2. From the pop-up menu that appears, choose one of the following(Figure 4.4): Replace. The incoming clip completely replaces the clip ontowhich it was dropped. Replace from Start. The first frame of your selection becomesthe start of the replaced clip (just as the regular Replace functionworks). However, the duration of the clip remains the same asthe clip you’re replacing.So, for example, if you want to replace a 10-second clip in yourproject with a 5-second clip from an Event, choosing Replacefrom Start results in a 10-second clip. iMovie grabs 5 secondsoutside your selection to fill the gap.tipnote Replace from End. Similar to the previous option, Replace fromEnd uses the last frame of your selection as the anchor pointwhen replacing a clip. In the example above, 5 seconds of additional footage are pulled from before the selection to maintainthe original clip’s 10-second duration. Replace at Playhead. The first frame of your selection appearswherever you position the playhead and release the mousebutton. In this case, using the example above, iMovie may grabfootage from before or after the selection to fit within the10-second gap.Remember, you can always open the replaced clip in the Clip Trimmerand adjust the visible portion of the footage without changing theduration: Click and drag in the middle of the selection to “slip” the clip.If there isn’t enough available footage to perform a replace action,iMovie warns you that the edit will shorten the duration of the movie.In my example, if I were to select the first 4 seconds of the clip anddrop it into the project using the Replace from End option, iMoviewouldn’t have enough source footage to fill the 10-second gap fromthe end.
Chapter 4: iMovie Beyond the BasicsFigure 4.4I’m replacing a10-second clip in theproject (top) with a5-second selectionfrom the Event browser.Original clip in project (10 seconds)To make it easier to seewhich footage is usedwith each Replacecommand, I’ve madethe replacement andthen opened the newproject clip in the ClipTrimmer (below, withvisible footage selectedin yellow). In each case,the same 5-secondselection was draggedto the original clip inthe movie.Active portion of clip using Replace (5 seconds)77Active portion of clip using Replace from StartActive portion of clip using Replace from EndActive portion of clip using Replace at PlayheadEdit with the Precision EditorMoving selection handles in the Project browser is a quick way to edit aclip, but it’s not always as precise as you’d like. The Precision Editor, likethe Clip Trimmer, is another interface for editing clips, but in this caseyou get to manipulate the point where two clips meet (including a
78The iMovie ’11 Project Booktransition if present), which is referred to as the cut point. Having thiscontrol is great for fine-tuning not just how a clip ends, but how it interacts with the next clip in the movie.The Precision Editor looks simple, but there are several ways to edit theelements surrounding a cut point. You can see exactly where two clipsoverlap, adjust the duration of a transition, and even offset a video clip’saudio without extracting it as a separate clip (a technique I discuss afew pages ahead).To open the Precision Editor, do one of the following: Click the Action button on any
The iMovie '11 Project Book Jeff Carlson Peachpit Press 1249 Eighth Street Berkeley, CA 94710 510/524-2178 510/524-2221 (fax) Find us on the Web at: www.peachpit.com