Transcription
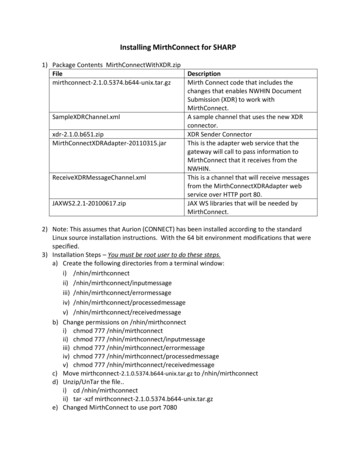
Installing MirthConnect for SHARP1) Package Contents -2.1.0.5374.b644-unix.tar.gzMirth Connect code that includes thechanges that enables NWHIN DocumentSubmission (XDR) to work withMirthConnect.SampleXDRChannel.xmlA sample channel that uses the new XDRconnector.xdr-2.1.0.b651.zipXDR Sender ConnectorMirthConnectXDRAdapter-20110315.jarThis is the adapter web service that thegateway will call to pass information toMirthConnect that it receives from theNWHIN.ReceiveXDRMessageChannel.xmlThis is a channel that will receive messagesfrom the MirthConnectXDRAdapter webservice over HTTP port 80.JAXWS2.2.1-20100617.zipJAX WS libraries that will be needed byMirthConnect.2) Note: This assumes that Aurion (CONNECT) has been installed according to the standardLinux source installation instructions. With the 64 bit environment modifications that werespecified.3) Installation Steps – You must be root user to do these steps.a) Create the following directories from a terminal window:i) /nhin/mirthconnectii) /nhin/mirthconnect/inputmessageiii) /nhin/mirthconnect/errormessageiv) /nhin/mirthconnect/processedmessagev) /nhin/mirthconnect/receivedmessageb) Change permissions on /nhin/mirthconnecti) chmod 777 /nhin/mirthconnectii) chmod 777 /nhin/mirthconnect/inputmessageiii) chmod 777 /nhin/mirthconnect/errormessageiv) chmod 777 /nhin/mirthconnect/processedmessagev) chmod 777 /nhin/mirthconnect/receivedmessagec) Move mirthconnect-2.1.0.5374.b644-unix.tar.gz to /nhin/mirthconnectd) Unzip/UnTar the file.i) cd /nhin/mirthconnectii) tar -xzf mirthconnect-2.1.0.5374.b644-unix.tar.gze) Changed MirthConnect to use port 7080
f)g)h)i)j)i) edit /nhin/mirthconnect/Mirth\ Connect/conf/mirth.properties (Note the space inthe name "Mirth Connect" where the "\" escapes the space character.)ii) change field http.port to be 7080Install JAXWS libraries so that MirthConnect can use them.i) URL to retrieve the JAXWS libraries: http://jax-ws.java.net/ - Version 2.2.1(1) Note that this file has already been included in the zip: JAXWS2.2.120100617.zip.(2) Unzip this file and copy all of its contents to /nhin/mirthconnect/Mirth\Connect/custom-libStart MirthConnecti) Navigate to /nhin/mirthconnect/Mirth\ Connectii) Run mcserver(1) ./mcserveriii) Note: This will run MirthConnect.In order for the MirthConnect administrator to run, FireFox must be configured to usethe JDK from the Aurion installation. Within FireFox, associate the file type of jnlp tojaxws from the jdk.i) Run FireFoxii) Select "Edit" followed by "Preferences" from the menu.iii) Select "Applications" tab.iv) Look for JNLP under content type. (Note: If this does not show up – then you willneed to attempt to launch the MirthConnect administrator console as specified inthe next step and then come back to this step to configure it. This will attempt touse a JNLP file and should cause FireFox to add this to the list.) When it attempts toadd to the list it will prompt you to either Open or Save the JNLP file. Choose Openand then follow the next steps.v) Click the drop down for the action and select "Use other "vi) In the browser navigate to /nhin/jdk/jdk1.6.0 16/bin and select "javaws"vii) If it prompts you to install, select OK.Run MirthConnect Administratori) Run FireFoxii) Go to URL: http://localhost:7080iii) Click on "Launch MirthConnect Administrator"iv) Login(1) User: admin(2) Password: admin(3) On the first time it may give you a Welcome to Mirth Connect screen. If so:(a) Keep the user name and password as: admin(b) Uncheck the Register and Submit usage statistics checkboxes(c) All other fields are optional and can be left blank(d) Select FinishInstall the XDR Sender connector.i) Click on the "Extensions" link.
ii) At the bottom of the screen is a field called File. Enter the path and name of the"xdr-2.1.0.b651.zip" file or browse to the file.iii) Click on the "Install" button.iv) Restart Mirth Connect (stop the server from the cmd line and then reissue the./mcserver command)v) Log back into Mirth Connectk) Import the sample channel: (Sample XDR Channel.xml)i) From within the MirthConnect Administrator, click on "Channels".ii) Click on the "Import Channel" link under "Channel Tasks".iii) Select the "Sample XDR Channel.xml" file. Followed by "OK"iv) You should now see a channel called "Sample XDR Channel" in the list of Channelswithin the MirthConnect Administrator.l) Configure the "Sample XDR Channel".i) These settings should already be set correctly in the example, but the values areincluded here for verification purposes ii) Click on the "Channels" link.iii) Right click on the "Sample XDR Channel" and select "Edit Channel" from the menu.iv) Set up the Source(1) Click on the "Source" tab.(2) Set the following fields:(a) Connector Type: File Reader(b) Method: File(c) Directory: /nhin/mirthconnect/inputmessage(d) Filename Filter Pattern: *.txt(e) Polling Frequency: 1000(f) Delete File after Read: No(g) Move-to Directory: /nhin/mirthconnect/processedmessage(h) Move-to File Name: {ORIGINALNAME} {DATE} {SYSTIME}(i) Error Move-to Directory: /nhin/mirthconnect/errormessage(j) Check File Age: Yes(k) File Age: 1000(l) Sort Files By: Date(m) File Type: ASCII(n) Encoding: Default(o) Process Batch Files: Nov) Set up the Destinations(1) Select the "Destinations" tab(2) If there is already a destination then select it. Otherwise click on "NewDestination" and give it a name.(3) Set the following fields(a) Connector Type: XDR Sender(b) Home Gateway URL: http://localhost:8080(c) Home Gateway OID: 1.1(d) Remote Gateway OIDs: 2.2
(e)(f)(g)(h)(i)Patient ID: P-1Document ID: ad41b9a0-4e54-11e0-b8af-0800200c9a66Document Title: Sample Document TitleDocument MIME/Type: text/plainDocument Parameters:(i) document.author.person: John Doe(ii) document.author.institution: Mirth General Hospital(iii) document.author.role: Physician(iv) document.author.specialty: Medicine(v) document.language.code: en-us(j) Document Content: This is a sample document.(k) Assertion Parameters: (If the parameter is not listed below then leave itblank)(i) assertion.userInfo.name.familyName: Doe(ii) assertion.userInfo.name.givenName: John(iii) assertion.userInfo.userName: jdoe(iv) assertion.userInfo.organization.name: Sample Community(v) assertion.userInfo.roleCoded.code: F1(vi) assertion.userInfo.roleCoded.codeSystem: e: Foo Code System(l) Send Response to: Nonevi) Save the changes by selecting the "Save Changes" link under "Channel Tasks". Notethis link only shows up if you have actually made a change to the channel.m) Deploy the "Sample XDR Channel"i) Click on the "Channels" link to show the channels.ii) Right-click on the "Sample XDR Channel" and select "Deploy Channel".n) Import the Receive XDR Message channel: (ReceiveXDRMessageChannel.xml)i) From the MirthConnectAdministrator, click on "Channels".ii) Click on the "Import Channel" link under "Channel Tasks".iii) Select the " ReceiveXDRMessageChannel.xml " file. Followed by "OK"iv) You should now see a channel called "ReceiveXDRChannel" in the list of Channelswithin the MirthConnect Administrator.o) Configure the " ReceiveXDRChannel "i) These settings should already be set correctly in the example, but the values areincluded here for verification purposes ii) Click on the "Channels" link.iii) Right click on the "ReceiveXDRChannel" and select "Edit Channel" from the menu.iv) Set up the Source(1) Click on the "Source" tab.(2) Set the following fields:(a) Connector Type: HTTP Listener(b) Listener Address: Listen on all interfaces(c) Port: 80
(d) Message Content: Body Only(e) Respond From: None(f) Charset Encoding: UTF-8v) Set up the Destinations(1) Select the "Destinations" tab(2) If there is already a destination then select it. Otherwise click on "NewDestination" and give it a name.(3) Set the following fields(a) Connector Type: File Writer(b) Method: File(c) Directory: /nhin/mirthconnect/receivedmessage(d) File Name: received msg {SYSTIME}.xml(e) Append to file: Yes(f) File Type: ASCII(g) Encoding: Default(h) Template: {message.rawData}vi) Save the changes by selecting the "Save Changes" link under "Channel Tasks". Notethis link only shows up if you have actually made a change to the channel.p) Deploy the " RetrieveXDRMessage "i) Click on the "Channels" link to show the channels.ii) Right-click on the "RetrieveXDRMessage" and select "Deploy Channel".q) Configure the CONNECT environment to talk to MirthConnecti) Deploy the Mirth Adapter Web service into GlassFish(1) Make sure GlassFish is running If you need to start it, you can issue thefollowing command :(a) /nhin/SUNWappserver/bin/asadmin start-domain domain1(b) You can test to make sure these are loaded by looking at the log files locatedin nhin/SUNWappserver/domains/domain1/logs directory. The most recentlog will be named server.log.(2) Deploy the adapter – using the same script. Here is the command (Note: Thisassumes you are in the same directory as the jar file – otherwise you will needthe path to the file.):(a) /nhin/SUNWappserver/bin/asadmin deploy MirthConnectXDRAdapter20110315.jar(b) You should receive “Command deploy executed successfully”ii) Stop GlassFish(1) Enter the following command to stop GlassFish(a) /nhin/SUNWappserver/bin/asadmin stop-domain domain1iii) Modify the internalConnectionInfo.xml file to use the new web service.(1) Open the following file in a text nhin/internalConnectionInfo.xml(a) This file is used to configure Endpoint URLs for the various services used byAurion/CONNECT.
(2) Locate the configuration for the service named: "adapterxdrsecured". There willbe exactly two entries for this that need to be changed – One under homecommunity 1.1 and one under home community 2.2. Make sure you match thename exactly. There will be other entries that start with this text, but containadditional text. Do not change those. Just change the settings for the ones thatmatch the name exactly.(3) Change the value of the endpointURL tag to be (this should be done in bothplaces):(a) ComponentXDRSecured Service(b) The service setting will look as follows when the change is made: service name adapterxdrsecured /name description Adapter Component XDR Secured /description endpointURL ComponentXDRSecured Service /endpointURL /service (c) Save the file with the new changes.iv) Modify the adapter.properties file:(1) Open the following file in the a text nhin/adapter.properties(2) Add a new property:(a) adapterXdrUrl http://localhost:80(3) Save the file.v) Start GlassFish(1) Use the following command:(a) /nhin/SUNWappserver/bin/asadmin start-domain domain1(b) Note: Make sure you have loaded the nhin-profile.sh environment variablesprior to starting Glassfish. These are located in the /etc/profile.d directory.You can test to make sure these are loaded by giving the cd LOGS commandwhich should take you to the ) Testing the installationa) Using a text editor create an HL7 message with the following text:i) MSH b) Save the file – The name of the file must end in ".txt". When the channel wasconfigured, it was configured to look for any file that ends in ".txt".c) Copy the file to: /nhin/mirthconnect/inputmessaged) Notesi) On the next read cycle, MirthConnect will read this message and send it toCONNECT. CONNECT will receive the message, pass the message to the receivingAurion/CONNECT gateway (which is itself since we are in loopback mode), and thenpass the message to the adapter. The adapter will send a response message to theMirthConnect ReceiveXDRMessage channel which will store that response message
as a new file in the /nhin/mirthconnect/receivedmessage folder. The name of thefile will be "Received msg {SYSTIME}.xml" where {SYSTIME} will be replaced bythe system time. In addition, the message that you placed in the inputmessage willbe moved to the /nhin/mirthconnect/processedmessage folder. In this folder thefile will be set to msg.txt {DATE} {SYSTIME} where {DATE} is replaced with thecurrent date and {SYSTIME} is replaced with the current system time. If an erroroccurs the file will be moved to the /nhin/mirthconnect/errormessage folder.ii) The first time a message is sent to CONNECT can take as much as a minute toprocess – they are faster after the first message.iii) Debugging (1) There are a couple of different log files you can look at if things do not appear tobe working(2) MirthConnect Log files(a) /nhin/mirthconnect/Mirth\ Connect/logs(3) CONNECT Log Files(a) /nhin/SUNWappserver/domains/domain1/logsiv) Using MirthConnect Administrator to look at statistics (1) You can use the Dashboard within the MirthConnect administrator to review thestatistics for each channel. It will show the number of messages received, sent,errors, etc. You can also look at details of the messages there as well.
iv) Restart Mirth Connect (stop the server from the cmd line and then reissue the ./mcserver command) v) Log back into Mirth Connect k) Import the sample channel: (Sample XDR Channel.xml) i) From within the MirthConnect Administrator, click on "Channels". ii) Click on the "Import Channel" link under "Channel Tasks".
