Transcription
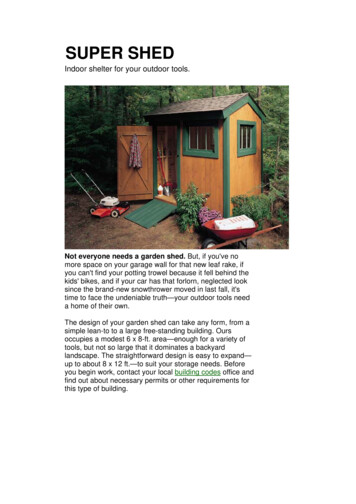
SUPER SHEDIndoor shelter for your outdoor tools.Not everyone needs a garden shed. But, if you've nomore space on your garage wall for that new leaf rake, ifyou can't find your potting trowel because it fell behind thekids' bikes, and if your car has that forlorn, neglected looksince the brand-new snowthrower moved in last fall, it'stime to face the undeniable truth—your outdoor tools needa home of their own.The design of your garden shed can take any form, from asimple lean-to to a large free-standing building. Oursoccupies a modest 6 x 8-ft. area—enough for a variety oftools, but not so large that it dominates a backyardlandscape. The straightforward design is easy to expand—up to about 8 x 12 ft.—to suit your storage needs. Beforeyou begin work, contact your local building codes office andfind out about necessary permits or other requirements forthis type of building.
Solid framing, plywood sheathing andcedar siding makethis a shed to stand the test of time. Our 6x 8-ft. design isexpandable to 8 x 12 ft.Our shed uses standard framing techniques and materials.It's sheathed with 1/2-in. C/D plywood and sided with 1 x 6tongue-and-groove cedar boards. The exterior trim isrough-sawn cedar.In most cases, a shed of this size will not require anelaborate foundation—it's fine to simply rest the structureon four corner blocks that sit on the ground. Someexcavation is inevitable to provide a level and firm base, butthere's really no need to dig below the frost line. If thebuilding settles unevenly, simply jack up a low corner andplace cedar shims between the corner block and floorframing. We used 7-1/2 x 12 x 16-in. solid concrete blocksat the corners.To bring light into our shed, we installed 24 x 32-in. barnsash windows. If you can't find these stocked by a localsupplier, something similar can usually be ordered.Site WorkBegin by marking out the building’s location inyour yard. For a structure of this size, it’s simplestto build a lightweight frame that’s the exact size ofthe shed, then use the frame to mark the site.Use 3/4-in.-thick pine to build your frame. Cut thesides to the exact dimensions of the floor, anduse one screw in each corner to fasten the sidesinto a rectangle. Screw a diagonal brace betweentwo sides of the frame to hold it square.Clear the building site and level any obvious highspots. Place the frame in the site and adjust itsposition until you’re happy with the location of theUse a wooden frame to find the best spotfor your shed. Drive a stake at eachcorner and use string to delineate the site.
shed. Drive stakes into the ground to mark eachcorner, stretch string between them (Photo 1) andthen remove the frame.Find the highest corner of the site and excavatefor the first foundation corner block. Plan onhaving 3 to 4 in. of block exposed above grade.Dig out an area several inches wider than theblock. Spread 2 or 3 in. of crushed stone in thehole to form a stable base for the block.Now you’re ready to position the first block,aligning its edges with the layout string. Checkthat the block is level across its length and width(Photo 2), and adjust the crushed stone asrequired.Use a long, straight 2 x 4 and level to check therelative height of the second corner, thenexcavate the site for the block. Check that thesecond block is level with the first (Photo 3), andadd the remaining corner blocks in the same way.After marking joist locations on long frontand rear rim joists, install metal hangerswith 1-1/2-in. joist hanger nails.Dig a hole for the first block at the highestpoint in the grade. Add gravel, install theblock, align it with the string, and level it.Use a straight 2 x 4 and a 4-ft. level tocheck that the corner blocks are installedat the same height.Building The FloorIt’s a good idea to use pressure-treated lumber forthe floor joists. Cut 2 x 6 stock to length for thefront and back rim joists, and then lay out thelocations of the floor joists on 16-in. centers. Nailjoist hangers to the inside surface of each innerjoist using 1-1/2-in. joist hanger nails (Photo 4).Next, place the inner front and back joistsbetween the corner blocks, and then cut andposition the floor joists (Photo 5). Nail the floorjoists in place, then attach the outer rim joists tothe front and back of the floor frame.Compare opposite diagonal measurements of thefloor assembly to check that it’s square. Nail 3/4in.-thick plywood to the joists for the shed floor(Photo 6).Lay the front and rear joists on the cornerblocks. Then, cut the joists, position them
in the joist hangers and secure with nails.After doubling the front and rear joists,add the 3/4-in. plywood floor. Nail it inplace with 8d nails spaced about 6 in.apart.Wall ConstructionCut 2 x 6 stock to size for the door and windowheaders. Use pieces of 1/2-in. plywood asspacers between the 2 x 6s to bring the headerassemblies to 3-1/2 in. thick. Nail together theheader pieces with 16d common nails.Cut 2 x 4 stock to length for the wall studs andwindow and door jack studs. Nail each jack studto a wall stud with 8d common nails. Build the fourcorner posts by nailing three 2 x 4 spacersbetween two studs as shown on the diagrambelowWith the back wall framing members cutto length and headers assembled, lay outthe pieces on the shed floor and join withnails.Begin framing the back wall by laying out the studlocations on the top and bottom plates. Then, layout the framing members on the deck (Photo 7).Nail through the top plate and into the wallmembers, then secure the bottom plate. Framethe window opening, and nail the second top plateto the wall, keeping its ends back 3-1/2 in. fromeach end of the wall.Now compare the opposite diagonalmeasurements of the wall and adjust theassembly until it’s square. Then, apply 1/2-in.plywood sheathing, using 6d common nailsspaced about 6 in. apart.Stand the rear wall, bracing it with 2 x 4s nailedbetween the wall and the outside floor joists(Photo 8). Nail the bottom plate to the deck so theplywood sheathing is flush with the edge of thedeck.Install 1/2-in. plywood wall sheathing onthe framed back wall. Then, raise theassembly and secure it with diagonalbraces.
Frame the front wall, but don’t apply the sheathingyet. Instead, stand the framed wall and brace it.Position the wall 1/2 in. from the deck edges toallow for the thickness of the sheathing. Thenframe the side walls, one at a time, and standthem. Leave the second top plate off the sidewalls until they are raised. Nail the walls togetherat the corners, and then cut and install the sidewall top plates (Photo 9). Use a level to check thatthe corners of the building are plumb, and nailtemporary diagonal braces to the inside surface ofeach wall.Frame and raise the remaining wallswithout sheathing. After nailing togetherthe corner studs, add the top plates.Apply the remaining plywood sheathing (Photo10). At the side walls, keep the plywood 1-1/2 in.down from the top to provide room to nail thegable-end sheathing.When the framing is in place and theassembly is square and plumb, add theremaining plywood sheathing.Framing The RoofUse a framing square to lay out the 5-in. pitch onthe first roof rafter (Photo 11). Cut out the rafterand use it as a pattern to make the second rafter.Test the first two for proper fit, then trace and cutthe remaining rafters.To find the rafter cutting angle, align the5- and 12-in. marks on the framingsquare’s legs with the edge of the rafterstock.Cut a gusset for each truss from 1/2-in.-thickplywood as shown in the plans. Use a sheet of3/4-in. plywood as an assembly table, and drawthe outline of the roof truss directly on theplywood surface. Align two rafters over thepattern and nail the gusset to the rafters with 11/2-in. roofing nails (Photo 12).Toenail the trusses to the front and rear walls with8d common nails (Photo 13). At the gable endskeep the gussets on the inside faces of thetrusses.Set up a worktable with the outline of theCut 2 x 6 stock to length for the subfascia, andnail the boards to the rafter ends with 16dcommon nails. Cut and install the gable-end
rafter assembly marked. Then, join eachpair of rafters with a plywood gusset.sheathing, and then nail 1 x 6 pine furring overthe gable rafters.Rip cedar stock to width for the front and backsoffits and cut it to length. Use 6d galvanizedfinishing nails to fasten the soffit boards to therafters and subfascia. Then, install the cedarfascia and rake trim.With all the rafters assembled in pairs,position each pair on the wall top platesand secure by toenailing.Install the plywood roof deck, allowing it tooverhang the fascia by 1/2 in. along the eaves.Nail aluminum drip edge to the eaves, and applyroofing felt. Then, install the drip edge along therake edges.Roofing And SidingFollow the manufacturer’s directions for installingthe roof shingles (Photo 14).Since the tongue-and-groove siding is installedvertically, add 2 x 4 nailing blocks between thestuds, about halfway up the wall. Cut and installthese nailers by toenailing them between adjacentstuds.If you plan to stain or paint the trim a differentcolor than the shed siding, it’s a good idea tofinish the roof trim before applying the siding. Cutsiding boards to length and begin installing themat a corner of the building. Use galvanizedfinishing nails to fasten the boards—8d nails forfastening to the 2 x 4 framing and 6d nails for theplywood sheathing (Photo 15). Face nail the firstboard, but fasten succeeding boards with nailsdriven diagonally through the tongue so the headswill be hidden. Set the nailheads slightly belowthe wood surface.Use 1/2-in. plywood for the roof deck andcover it with roofing felt. Install shinglesfollowing the manufacturer’s instructions.Nail 1 x 6 tongue-and-groove cedar sidingin place. Use 8d nails over wall framingand 6d nails when nailing into plywoodalone.
Windows And DoorsAfter staining or painting the siding, install thedoor and window jambs (Photo 16). Nail thejambs directly to the framing, with the outsideedge of each jamb flush to the face of the siding.At the windows, slope the sill pieces about 5 toward the outside of the building, add the topjambs, and then cut the side jambs to fit.Cut stock for doorjambs and nail in place.At a window, install the angled sill piecefirst, then the top jamb, then side jambs.Cut stops for the windows from 1 x cedar stock,and install the outer stops with 6d galvanizedfinishing nails. Then, place a window in eachopening and add the inner stops.Rip door and window trim and shed corner boardsfrom rough-sawn cedar. Cut each piece to lengthand nail in place.Position the door in its opening with a 1/4in. space at the top and sides. Bore pilotholes for the hinge screws and secure thehinges.Cut siding boards to length for the shed door. Useclamps to pull the boards together, but don’t useglue on the joints. Cut the battens for the door,and screw them to the inside surface of theboards.Hold the door hinges in place and mark themounting-hole locations. Bore pilot holes andfasten the hinges to the shed. Position the doorwith a 1/4-in. space on the sides and top, andmark the hinge holes. Bore pilot holes and mountthe hinges (Photo 17). Install the door pull andhasp. Cut the doorstops and nail them in place onthe top and open-side jamb. Then, stain or paintthe windows, door and remaining trim.We built a ramp from pressure-treated stock tomake it easier to wheel a mower or snowthrowerinto the shed. To build a ramp, use 2 x 6 materialspaced about 1/2 in. apart for the ramp deck, and2 x 4 stock for battens underneath.
in the joist hangers and secure with nails. After doubling the front and rear joists, add the 3/4-in. plywood floor. Nail it in place with 8d nails spaced about 6 in.