Transcription
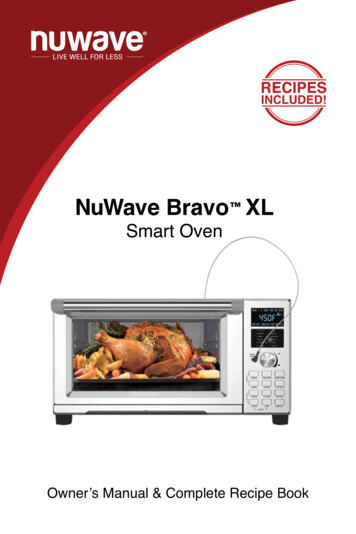
NuWave Bravo XLSmart OvenOwner’s Manual & Complete Recipe Book
NuWave Brio 6Qt Digital Air FryerSuper-heated air cooksyour food to crispy,tender perfection.The digital touch screengives you precisetemperature control.NuWaveNutri-Pot 6QDigital Pressure CookerEasily cook rice, poultry,vegetables and more allwith the press of a button!The Nutri-Pot’s safetyrelease valve and hingedlid make for convenientand safe operation.For more about our innovative products, visit:NuWave Primo Combo GrillWith the NuWave Primo ComboGrill, there’s no need to worry abouthot spots or dried-out leftovers. Theintuitive controls of this countertopsmart oven make it incredibly easyto cook like a professional chef.Everything from large family meals tofrozen foods cook with ease, withoutpreheating or defrosting.NuWave PIC (Precision InductionCooktop)Cook faster, safer,and more efficientlythan you ever couldon your gas orelectric stovetop.www.nuwavenow.com1-877-689-2838
NuWave BruHub Coffee MakerQuality and convenience at yourfingertips. The NuWave BruHubaccommodates virtually all of yourfavorite single-serve pods, butwith more flavor. Makes an 8- or12-ounce cup and full carafe.The thermal stainless steel carafekeeps coffee hot for hours.NuWave Moxie High-PerformanceVacuum BlenderWith the simple press of a button, theNuWave Moxie can remove all theexcess air from the blender.By vacuuming the air out of theblender, you can ensure no air isbeing mixed with your ingredientsduring the blending process,maximizing the nutritional value andensuring your blender creations willremain fresher longer.For more about our innovative products, visit:NuWave Duralon HealthyCeramicNon-Stick CookwareCoated with Duralon Healthy CeramicNon-Stick coating for easy cleanup, thisversatile cookware is perfect for usein ovens or on gas, electric, and eveninduction cooktops.NuWave Bravo XLThe NuWave Bravo XL SmartOven is an air fryer, toaster, andconvection oven all in one! TheBravo features an extra-large,1-cubic-foot capacity. Includes12 convenient, one-touch preprogrammed presets. Set precisetemperatures from 100 F to 450 F.www.nuwavenow.com1-877-689-2838
12 Pre-Programmed MenusTABLE OF CONTENTSOWNER’S MANUALImportant Safeguards. 9-10Additional Safeguards.11-12Parts Description. 13Assembly Guide. 14Operating Instructions. 15-24Care & Maintenance. 25-26Troubleshooting. 26-28Limited Warranty. 28-29BreakfastBaked Eggs in Hell . 31Homemade Granola . 32Sweet Potato Fries. 56Goat CheeseStuffed Mushrooms. 57Baked Sweet Potatoes. 58Cajun-Roasted Potatoes. 59Oven Baked Mac and Cheese. 60PizzaMargarita Pizza . 62Meat Lover's Pizza . 63Triple-Cheese Pizza. 64SeafoodBaked Shrimp. 34Lemon Sesame Salmon. 35Crab Cakeswith Red Pepper Sauce. 36Fish and Chips. 37DehydrateBeef Jerky. 66Banana Chips. 67Candied Bacon . 68Croutons. 69Sun-Dried Tomatoes. 70Dried Apricots. 71PoultryRoasted Chicken. 39Roasted Turkey Drumsticks. 40Roasted Cornish Hen. 41BakingButtery Dinner Rolls . 73Italian Loaf. 74Frutti di Bosco. 75Turkey Sliders. 42Baked Chicken Parmesan . 43BeefNY Strip. 45Ribeye withRoasted Mushrooms. 46Flank Steak. 47Open-Faced Reuben Sandwich. 48PorkPork Shoulder Roastwith Potatoes. 50Baked BBQ Ribs . 51VegetarianRoasted Root Vegetables. 53Roasted Brussels Sprouts. 54Turmeric Roasted Cauliflower . . 55DessertBread Pudding . 77Homestyle Peach Cobbler. 78Chocolate Chunk Cookies. 79SpanishManual . 80-103Air Fry Default Temp: 360 F Default Time: 15 minutes Heat Source: High Fan (level 3) Rack Position: Position #1, 2, or 3Reheat Default Temp: 350 F Default Time: 10 minutes Heat Source: Top/Bottom(100/100 percent) Rack Position: Any PositionWaffle Default Temp: 400 F Default Time: 4 minutes Heat Source: Top/Bottom(100/100 percent) Rack Position: Position #2 or 3Bake Default Temp: 350 F Default Time: 25 minutes Heat Source: Top/Bottom(100/100 percent) Will have a preheat Rack Position: Position #2 or 3Roast Default Temp: 310 F Default Time: 25 minutes Heat Source: Top/Bottom(100/100 percent) Will have a preheat Rack Position: Position #1Pizza Default Temp: 450 F Default Time: 15 minutes Heat Source: Top/Bottom(100/100 percent) Will have a preheat Rack Position: Position #2 or 3 NOTE: Times & Temps will vary onthe size of the pizza.Broil Default Temp: 500 F Default Time: 10 minutes Heat Source: Top (100 percent) Rack Position: Position #1 or 2Frozen Default Temp: 325 F Default Time: 20 minutes Heat Source: Top/Bottom(100/100 percent) Rack Position: Position depends ondesired result.Grill Default Temp: 400 F Default Time: 15 minutes Heat Source: Bottom (100 percent) Will have a preheat Rack Position: Position #1Dehydrate Default Temp: 100 F Default Time: 2 hours Heat Source: Low Fan (level 1) Rack Position: Position depends ondesired result.Toast Default Temp: 310 F Default Time: 3 minutes Heat Source: Top/Bottom(100/100 percent) Rack Position: Position #2, 3 or 4Bagel Default Temp: 310 F Default Time: 3 minutes Heat Source: Top/Bottom(100/100 percent) Rack Position: Position #2, 3 or 4NOTE: NEVER Allow any food to touch the heating elements directly. Default temperatures, times, and rack positions are a guide. Adjustmentsmay need to be made to reach desired result. Fan speed is High (level 3) unless speed is adjusted. Dehydrate should bethe lowest fan setting (level 1).
IMPORTANT SAFEGUARDSProbe Preset Temperature GuideBeefTempRare125 Medium-Rare135 Medium145 Medium-Well150 Well160 READ ALL INSTRUCTIONSWARNING: When using the Bravo Smart Oven, basic safety precautionsshould always be followed:1. Do not touch hot surfaces. Use handles and oven gloves when removingitems from the Bravo.2.3.Minimum Cook TemperaturesPoultry165 Pork145 Seafood145 4.5.6.7.Measurement ChartTeaspoon tFahrenheit FMinute minTablespoon TCelsius CSecond secCup CFluid Ounces fl ozInch in.Ounce ozLiter LDozen dozPound lb(s)Milliliter mlHour hrQuart qtPackage pkg.Gram gPint ptGallon gal8.9.Do not use the Bravo together with other electric appliance with high-power,in case of overload.To protect against risk of electrical shock, do not immerse the cord, plug,or any part of the Bravo’s main unit in water or any other liquids, or touchplug when hands are wet.Always wear protective, insulated oven gloves when inserting or removingitems from the hot oven.Do not place any cookware or dishes in the Bravo that are not oven safe.Do not clean with metal pads.Do not operate the Bravo with a damaged cord or plug, if the appliancemalfunctions, is dropped, or damaged in any manner. Contact CustomerService at 1-877-689-2838 or email help@nuwavenow.com for informationon examination, repair, or adjustment.Close supervision is necessary when any appliance is used near children.The Bravo is not intended for use by children, persons with reducedphysical, sensory, or mental capabilities, or those with lack of expertise orknowledge of this unit.Do not let the cord hang over the edge of table or counter.10. Do not let cord contact hot surfaces, including stovetop.11. Place the Bravo on a surface that is horizontal, even, and stable.12. Do not place on or near a hot gas or electric burner or on a heated oven.13. Do not place the unit close to flammable materials, heating units,or wet environments.14. Do not place airtight containers in the Bravo.15. Do not place plastic or rubber containers in the unit. Avoid using containersmade of any other material other than ceramic, glass, or metal in the unit.16. Do not place paper, cardboard, plastic, or any other flammable materials onthe Bravo during use.17. Use tinfoil to enwrap foods that produce oil or juice when operating and puton the bake tray, to prevent fire.18. Make sure tinfoil does not touch heating elements, to prevent fire.19. Do not cover crumb tray or any part of the oven with metal foil. This willcause overheating of the oven and may cause fire.20. Do not alter or modify any part of the Bravo or use attachments or8accessories not recommended by the manufacturer.Owner’s ManualOwner’s Manual9
ADDITIONAL SAFEGUARDSIMPORTANT SAFEGUARDS (Continued)21. Do not cover any part of the oven with metal foil.22. If excess smoke is escaping from the air vent during operation, unplug theSEE CARE AND MAINTENANCE BEFORE USEElectrical InformationThe Bravo Smart Oven is supplied with a short power cord to reducethe risk of entanglement or tripping. Extension cords may be used ifcare is exercised in their use. If an extension cord is used:1. The marked electrical rating of the extension cord should be at least asgreat as the electrical rating of the Bravo.unit immediately and contact Customer Service at 1-877-689-2838 or emailhelp@nuwavenow.com.23. Do not overfill the Bravo such that contents are touching heating elementsor blocking the fan.24. During use, steam may be released from the air outlet vents.Keep hands and face away from the air outlet openings. Be careful of hotsteam escaping when opening the Bravo.2.25. Avoid placing face and eyes near the glass door during use.26. Never touch the insides of the Bravo while it is operating.27. Never leave the Bravo unattended during use.28. The Bravo is intended for normal, household use. It is not intended to beused in environments such as staff kitchens, shops, offices, or other workenvironments. It is not intended for outdoor use.29. Do not use the Bravo for anything other than its intended use.30. Never put the Bravo against the wall or other appliances. There should be atleast 5 inches of free space behind, to the sides of, and on top of the Bravo.31. Do not disassemble the unit.32. Unplug the Bravo from the outlet when not in use or before cleaning.33. Allow the Bravo to cool before putting on, taking off parts, or before cleaning.WARNINGIn case of other problems, unplug unit and contactCustomer Service:1-877-689-2838 or email help@nuwavenow.com.SAVE THESE INSTRUCTIONSRead and understand the entire manual before using this appliance.1. Amount of ingredients placed in the Bravo should comply with directionslisted under "Operating Instructions."2.3.4.5.6.7.8.10Owner’s ManualThe longer cord should be arranged so that it will not drape over thecountertop or tabletop where it could be pulled on by children or trippedover unintentionally. The Bravo should be operated on a separateelectrical outlet from other operating appliances due to wattagelimitations. Certain models of the appliances may have a polarized plug(one blade is wider than the other). To reduce the risk of an electricshock, this plug is intended to fit into a polarized outlet one way. If theplug does not fit fully into the outlet, reverse the plug. If the plug still doesnot fit properly, contact a qualified electrician. Do not attempt to modifythe plug in any way.Do not move the unit while in operation.Only after the Bravo has completely cooled down should you attempt tomove or handle it.DO NOT attempt to use the Bravo to deep-fry any food as this is NOT itsintended use and may create a fire hazard.Do not cover the Intake Air Vents or Exhaust Vents while the Bravois operating.Always put the ingredients to be cooked on the appropriate baking sheet(do not overfill) and do not allow food to come into direct contact with theheating components.Make sure the Bravo is always clean prior to cooking.It is normal for some smoke to escape the unit when heating for the first time.Owner’s Manual11
ADDITIONAL SAFEGUARDS (Continued)9.PARTS DESCRIPTIONBefore removing the plug from the outlet, always turn the unit "OFF".10. Always unplug power cord by pulling on plug, NOT the cord.NOTICE: FAILURE TO FOLLOW ANY OF THE IMPORTANT SAFEGUARDS,ADDITIONAL SAFEGUARDS, OR THE INSTRUCTIONS FOR SAFE USE IS AMISUSE OF THE BRAVO SMART OVEN THAT CAN VOID THE WARRANTYAND CREATE THE RISK OF SERIOUS INJURY.123WARNING45a5b6Never use the Bravo with loose, damaged, or missing parts.7891012Owner’s Manual1Base2Handle3Digital Display Menu4Menu5aProbe Input5bTemperature ProbePart #: 268086Dial7Functions1189101112Pull-Out Crumb TrayPart #: 268012 Heavy-DutyCooking RacksPart #: 26802Enamel Baking Panand Enamel Broiler RackPart #: 26804Air Fry BasketPart #: 26806Oven LightPart#: 26807(inside oven)Owner’s Manual13
BRAVO CONVECTIONOPERATINGINSTRUCTIONSOVEN DISPLAY2018 LockASSEMBLY GUIDE1.Place the Bravo on a level, even, and stableheat-resistant surface.2.Slide the Cooking Rack(s) into either Position 1,2, 3, or 4 of the Bravo.Air Fry Basket3.Place Baking Pan with Broiler Rack on CookingRack in Position 1.4.Place the Air Fry Basket on top of Baking Pan.It is recommended to use Air Fry Basket withBaking Pan to optimize cooking results.Cooking Rack5.6.Place Crumb Tray into position by sliding it intoslot at bottom of Oven. To remove, push downslightly and pull out.Plug the appliance into a standard wall socket.The power plug is located in the rear of the unit.NOTE:Do not cover or block the intake air vents locatedin the back and sides of the Bravo, as doing so canprevent proper ventilation.PartsPRE RDY WRM DLY PROG PM STGBaking Pan/Broiler RackPosition 4Position 3Position 2Position 1NOTE: Preset temperatures and times may need minor adjustments tobest suit your desired results.14SEAR 1 2 TMP TME TOP BTM PRBAir LIGHTCLOCKON/OFF & START/PAUSE:1. Press "ON/OFF" once to turn the Bravo on. The unit will beep, the LEDdisplay will show "350F" (default), TEMP, TOP, BTM, and the fan icon will bedisplay solid.2. Press "START/PAUSE" to begin cooking. The unit will cook at 350 F for 10minutes. This is the default setting. The LED display will show "00:10" and begin a countdown. TIME, TOP,BTM, and fan icon will be backlit and ":" will flash. To adjust cooking temperature, turn the "START/PAUSE" knobtoward " " (clockwise) to increase, or toward "-" (counterclockwise)to decrease temperature in 5 F increments. Quickly turn the dial toadjust in larger increments. To adjust cooking time, press "TEMP/TIME". The LED screen will display"00:10" and TIME, TOP, BTM and fan icon will be solid. Turn the "START/PAUSE" knob toward the " " (clockwise) to increase, or toward "-"(counterclockwise) to decrease time in 1-minute increments. Quickly turnthe dial to adjust in larger increments. Press "TEMP/TIME" to switch LED screen display between currentcooking temperature and time.Owner’s ManualOwner’s Manual15
OPERATING INSTRUCTIONS (Continued)OPERATING INSTRUCTIONS (Continued)Press "START/PAUSE" once during cooking to pause. If the LED display is on cooking time when paused, it will show remainingcooking time and TIME and ":" will be solid. If the LED display is showing cooking temperature, it will show TEMP andthe current temperature. During pause, only "START/PAUSE", "ON/OFF", and "LIGHT" buttonswill function.4. Press "START/PAUSE" a second time to resume cooking. All symbolsin the LED display will be solid. The LED display will show remaining cooking time and continuethe countdown. TIME, TOP, BTM and the fan icon will be backlit and ":"will flash. Both the cooking temperature and time can be adjusted during cooking bypressing "TEMP/TIME" then turning the "START/PAUSE" knob to adjust.CLOCK:1. Setting the Clock: Press "LIGHT" and "FAN" at the same time. The LED display will show"00:00" and ":" will flash. Turn the "START/PAUSE" knob to set the clock. When the LED displayreaches "12:00", PM will be backlit.2. Displaying Clock During Cooking: Press "LIGHT" and "FAN" at the same time. The LED display will showthe current time. Time can be adjusted at this time. The clock time will remain on the LED display until the "START/PAUSE"knob or any other button is pressed.LIGHT:Default – Light Off1. Press "LIGHT" once to turn light on.2. Press "LIGHT" a second time to turn light off.FAN:Default – Level 3, Full Speed1. Press "FAN". The LED display will show "3" above STG and the FAN iconwill be solid. Press "FAN" to change fan speed. Fan speed can be adjusted during cooking by pressing "FAN".2. To turn the fan off, press "FAN" until the FAN icon is no longer backlit.This indicates the fan is no longer running.3.16Owner’s ManualLevel of fan speed: Level 1 – 33.33% speed Level 2 – 66.67% speed Level 3 – 100% speedTOP/BTM:Default – Top 100%, Bottom 100%. This refers to the amount of heatcoming from the top and bottom heating elements.1. Press "ON/OFF".2. Press "TOP/BTM". LED display will show "100" and TOP will be solid.Adjust the amount of heat coming from Top heating elements by turning the"START/PAUSE" knob. Percentage will change in 10% increments.3. Press "TOP/BTM" again. The LED display will show "100" and BTM will besolid. Again, adjust heat with "START/PAUSE".4. When Top and Bottom heat are chosen, press "START/PAUSE". The Bravowill cook at programmed power.NOTE: While using the Menu feature "Broil", the BTM power is not adjustable, as theBroil function only uses the top heating elements.TEMP/TIME:Default – 350 F, 10 minutes1. Press "TEMP/TIME" once, LED display will show "00:10" and TIME. Turn the "START/PAUSE" knob toward " " (clockwise) to increase time in1-minute increments. Quickly turn the dial to adjust in larger increments. Turn the "START/PAUSE" knob toward "-" (counterclockwise)to decrease time in 1-minute increments. Quickly turn the dial to adjust in larger increments.2. Press "TEMP/TIME" once. LED display will show "350F" and TEMP. Turn the "START/PAUSE" knob toward " " (clockwise)to increase temperature in 5 F increments. Quickly turn the dialto adjust in larger increments. Turn the "START/PAUSE" knob toward "-" (counterclockwise)to decrease temperature in 5 F increments. Quickly turn the dial to adjust in larger increments.3. Press "START/PAUSE" to begin cooking.4. The Bravo will beep 3 times and the LED display will show "End" whencooking is finished.NOTE: "TEMP/TIME" can be pressed to see the current cooking temperature andcurrent remaining cooking time. "START/PAUSE" knob can be turned in conjunction with pressing "TEMP/TIME" to change cooking temperature and time during cooking.3.Owner’s Manual17
OPERATING INSTRUCTIONS (Continued)OPERATING INSTRUCTIONS (Continued) Cooking Time range for 100F 160F is 00:00 to 24:00, 165F 395F is 00:00 toUsing DELAY with cooking functionExample #1 Delay cooking 40 minutes, Cook at 360 F for 20 minutes : Press "PROG" and "LIGHT". Adjust time to 40 minutes (00:40). Press "TEMP/TIME". Adjust cooking temperature. Adjust temperature to360 F ("360F"). Press "TEMP/TIME" a second time to adjust time to 20 minutes (00:20). Press "START/PAUSE". The Bravo will delay for 40 minutes, then beginto cook at 360 F for 20 minutes.Example #2 Delay cooking 60 minutes, cook at 400 F for 10 minutes : Press "PROG" and "LIGHT". Adjust time to 1 hour (01:00). Press "TEMP/TIME". Adjust cooking temperature to 400 F ("400F"). Press "TEMP/TIME" a second time to adjust time to 10 minutes (00:10). Press "START/PAUSE". The Bravo will delay for 60 minutes, then begin tocook at 400 F for 10 minutes.NOTE: Delay will always be the first function executed by the Bravo. The Bravo will beep 3 times and the LED display will show "End" whencooking is finished.PRE-PROGRAMMED MENU FUNCTIONS1. Press "ON/OFF".2. Press "MENU". The LED display will show "360F" (default), the LED light nextto "Air Fry" will be lit, and TEMP, TOP, BTM and the fan icon will be solid.3. Press "MENU" to choose desired menu. The LED display will changedepending on menu selected.4. To change menu selection, press "MENU" until desired menu is selected.5. Once desired menu is chosen, press "START/PAUSE" to begin cooking.The cooking time will be displayed on the LED screen.6. The Bravo will beep 3 times and the LED display will show "End" whencooking is finished.NOTE: Some menu functions require preheating. This step is pre-programmed intoeach menu function that requires it. Preheat functions are "Bake", “Grill”,“Pizza”, and “Roast”. Once preheat temperature is reached, the Bravo will beep, and the LEDdisplay will show "5", and a 5-minute countdown will begin.03:00 and 400F 450F is 00:00 to 01:00.PREHEAT:1. Press "ON/OFF". Adjust cooking temperature and cooking time. Turn the "START/PAUSE" knob toward " " (clockwise) to increasetemperature in 5 F increments. Quickly turn the dial to adjustin larger increments. Turn the "START/PAUSE" knob toward "-" (counter clockwise) todecrease temperature in 5 F increments. Quickly turn the dial to adjustin larger increments.2. Press "PREHEAT". The LED display will show the set cooking temperatureand TEMP will be solid.3. Press "START/PAUSE" to begin preheating. During preheating, the LED display will show the selected temperatureflashing along with the FAN icon, TEMP, TOP, BTM and PRE. When the preheat temperature is reached, the LED display will show "5"TOP and BTM will be solid, and a 5-minute countdown will begin. RDY willbe backlit. The Bravo will beep to indicate oven has reached preheat temperature andfood is ready to be placed into oven. Carefully place food into the Bravo and press "START/PAUSE" tobegin cooking. If "START/PAUSE" is not pressed within the 5-minute countdown, theBravo will automatically turn off and display Clock Time.NOTE: Cook Time and Cook Temperature cannot be adjusted during the 5-minuteholding time after preheat temperature is reached.DELAY:Default 1 hour.1. Press "PROG" and "LIGHT". "01:00", TIME, and DLY will be displayed. Adjust delay time by turning the START/PAUSE knob toward the " "(clockwise) to increase time in 1-minute increments, or turningthe "START/PAUSE" knob toward the "-" (counterclockwise) to decreasetime in 1-minute increments. Quickly turn the dial to adjust in larger increments. Maximum delay time is 99 hours, 59 minutes (99:59).2. Press "START/PAUSE" to begin delay time countdown. The set delay time will be displayed with countdown. TIME will be displayed solid in LED screen during the delay timecountdown. DLY and ":" will flash during the delay time countdown.3. Once delay countdown is complete, the Bravo will begin cooking at setcooking temperature and time (default is 350 F for 10 minutes).18Owner’s ManualOwner’s Manual19
OPERATING INSTRUCTIONS (Continued)OPERATING INSTRUCTIONS (Continued)SEAR:Default — 450 F, 5 minutes.Sear 1: Sear 1 will ALWAYS be the stage BEFORE the regular cooking stage.1. Press "ON/OFF".2. Press "SEAR" once. The LED display will show "450F", TEMP and SEARwill be backlit, and "1" will flash.3. Press "START/PAUSE". The LED display will show SEAR 1, ":" will flash,and TIME, TOP, and BTM will be backlit.4. The unit will "SEAR" at 450 F for 5 minutes (SEAR 1), cook at 350 F for 10minutes (default) the unit will beep 3 times and "End" will be displayed onthe LED screen, indicating cooking is complete.NOTE:Regular cooking stage temperature and time can be adjusted by turning the"START/PAUSE" knob after Step #1.Default — 450 F, 5 minutes.Sear 1 2:1. Press "ON/OFF".2. Press "SEAR" twice. The LED display will show "450F", TEMP and SEAR 1will be backlit, and "2" will flash.3. Press "START/PAUSE". The LED display will show SEAR 1 and ":" willflash. TIME, TOP and BTM will be backlit.4. The unit will "SEAR" at 450 F for 5 minutes (SEAR 1), cook at 350 F for10 minutes (default), and “SEAR" again at 450 F for 5 minutes (SEAR2). SEAR 2 and “:” will flash. Then unit will beep 3 times and "End" will bedisplayed on the LED screen indicating cooking is complete.Sear 2: Default — 450 F, 5 minutes.1. Press "ON/OFF".2. Press "SEAR" three times. The LED display will show "450F", TEMP andSEAR will be backlit, and "2" will flash.3. Press "START/PAUSE".4. The unit will cook at 350 F for 10 minutes (default) and then unit will "SEAR"at 450 F for 5 minutes (SEAR 2). Unit will then beep 3 times and "End" willbe displayed on the LED screen, indicating cooking is complete.NOTE: Press "SEAR" four times to clear out the sear function. Maximum time for all sear functions is 5 minutes. Maximum temperature for all sear functions is 450 F.STAGE: Maximum of 5 stages can be programmed.1. Press "ON/OFF". LED display will show "350F".2. Press "STAGE". The LED display will show TEMP and STG 2. Press "TEMP/TIME". Turn "START/PAUSE" to adjust this stage's cookingtemperature and time.3. Press "STAGE" again to program another stage of cooking. The LED display will show TEMP and STG and "3" will be displayedabove STG. Press "TEMP/TIME". Turn "START/PAUSE" to adjust this stage's cookingtemperature and time.4. Press "START/PAUSE" to begin cooking following the stages programmed.20Owner’s ManualWARM, SEAR 1, SEAR 2, AND DELAY WITH STAGE COOKINGEXAMPLE: DELAY for 1 hour » SEAR 1 350 F for 4 minutes » Cook stage 1at 325 F for 20 minutes » cook stage 2 at 300 F for 40 minutes » cook stage3 at 350 F for 10 minutes » SEAR 2 at 400 F for 5 minutes » WARM at 125 Ffor 30 minutes.1. Press "ON/OFF". Adjust temperature to 325 F by turning "START/PAUSE".LED display will show "325F" and TEMP. Press "TEMP/TIME". Adjust timeto 20 minutes by turning "START/PAUSE". LED display will show "00:20"and TIME.2. Press "PROG" and "LIGHT". Adjust time to 1 hour by turning "START/PAUSE" knob. LED display will show "01:00", DLY, and TIME.3. Press "SEAR" one time. Adjust temperature to 350 F by turning "START/PAUSE". Press "TEMP/TIME". Adjust time to 4 minutes by turning "START/PAUSE". LED display will show "01:00", DLY, TIME, and SEAR and "1"will flash.4. Press "STAGE". Adjust temperature to 300 F by turning "START/PAUSE" knob.Press "TEMP/TIME". Adjust time to 40 minutes by turning "START/PAUSE".LED display will show STG 2, "00:40", TIME, TOP, BTM, and the fan icon.5. Press "STAGE" again. Adjust temperature to 350 F by turning "START/PAUSE". Press "TEMP/TIME" and adjust time to 10 minutes by turning"START/PAUSE". LED display will show STG 3, "00:40", TIME, TOP, BTM,and the fan icon.6. Press "SEAR" again. Adjust temperature to 400 F by turning "START/PAUSE". Press "TEMP/TIME". Adjust time to 5 minutes by turning "START/PAUSE". LED display will show SEAR 1, "00:05", and TIME, and "2"will flash.Owner’s Manual21
OPERATING INSTRUCTIONS (Continued)Press "WARM". Adjust temperature to 125 F by turning "START/PAUSE".Press "TEMP/TIME". Adjust time to 30 minutes by turning "START/PAUSE". LED display will show WRM, "00:30", and TIME.8. Press "START/PAUSE" to begin cooking process.NOTE: During cooking, the Bravo will show all functions programmed for thatcooking cycle. The function that the Bravo is currently cooking in will flash. The remaining time for that function or stage will countdown and ":" will flash.The remaining functions for that cycle will remain backlit. As each function ends its cooking the icons will stop being lit.[LOCK]: [MENU] [SEAR]Lock is used to lock the function of the unit. While in lock mode, the unit’sbuttons will not respond to any action until the unit is unlocked.1. Press "ON/OFF". The LED display will show “350F”, “TEMP”, “TOP”, “BTM”and Fan Icon. Set Cooking Temperature (see TEMP/TIME section of manual).2. To lock unit functions, press "MENU" "SEAR" buttons together. The LEDdisplay will show remaining cooking time, “TIME”, “TOP”, “BTM, Fan Iconand Lock Icon.3. NO BUTTONS WILL FUNCTION DURING LOCK EXCEPT "LIGHT" and"ON/OFF".4. To unlock unit functions, press "MENU" "SEAR" buttons together againand the Lock Icon will go out on LED display.5. "ON/OFF" button will work during lock function for quick easy turn off.7.Example: If user has set sear 1 - stage 1,2,3 - Sear 2 - Warm for thecooking stage, also set target probe temperature as 200F.If probe temperature achieved 200F at stage 2, the unit shall stop cooking for alloutstanding stages but still cook Sear 2 and Warm.To avoid unsafe status (probe is shunted outside of the cavity, but oven startedworking with probe activated), the unit will be shut off when:1. Probe sensed temperature is lower than 120F (49C), and2. Probe sensed temperature increase less than 5F in 3 min.WARM:Default 140 F, 1 hour.1. Press "ON/OFF". LED display will show "350F".2. Press "WARM". "140F" (default) will appear on the LED display along withTEMP and WRM. Adjust warm temperature by turning "START/PAUSE" toward " "(clockwise) to increase, or toward "-" (counterclockwise) to decreasetemperature in 5 F increments. Quickly turn the dial to adjust in largerincrements. Temperature range is 100 F 200 F.22Owner’s ManualOPERATING INSTRUCTIONS (Continued) Adjust warm time by turning "START/PAUSE" toward " " (clockwise) toincrease, or toward "-" (counter clockwise) to decrease time in 1-minuteincrements. Quickly turn the dial to adjust in larger increments.Selectable time is 00:00 to 03:00. WRM will appear on the LED display whenever the warm function is used.3. Press "START/PAUSE" to begin cooking.NOTE:Warm will always be the last cooking fun
on examination, repair, or adjustment. 8. Close supervision is necessary when any appliance is used near children. The Bravo is not intended for use by children, persons with reduced physical, sensory, or mental capabilities, or those with lack of expertise or knowledge of this unit. 9. Do not let the cord hang over the edge of table or counter .