Transcription
User GuideBuilt-In Electric Single and Double OvensTHANK YOU for purchasing this high-quality product. Register your built-in oven at www.jennair.com. In Canada,register your built-in oven at www.jennair.ca.For future reference, please make a note of your product model and serial numbers. These can be found on the labellocated on the oven frame behind the top right side of the oven door.Model NumberSerial NumberTable of ContentsBUILT-IN OVEN SAFETY.2PARTS AND FEATURES.3FEATURE GUIDE.4Touch Panel.5Display.5Display Navigation.5Menu Demonstrations.5Kitchen Timer.7Tones/Sounds.7Tools.7Button Lock.7Oven Temperature Control.8Sabbath Mode.8OVEN USE.9Wi-Fi Connectivity.9Aluminum Foil.9Position Racks and Bakeware.9Roll-Out Extension Rack.10Bakeware.11Oven Vents.11Preheating and Oven Temperature.11Baking and Roasting.12Broiling.12Convection.12Convection Bake.12Convection Roast.13Convection Broil.13Convert Recipe.13Proofing Bread.13Temperature Probe.13My Creations.14Timed Cooking.15Culinary Center.16OVEN CARE.17Self-Cleaning Cycle.17General Cleaning.17Oven Lights.18Oven W10754337D
Built-In Oven SafetyIMPORTANT SAFETY INSTRUCTIONSSAVE THESE INSTRUCTIONSState of California Proposition 65 Warnings:WARNING: This product contains one or more chemicals known to the State of California to cause cancer.WARNING: This product contains one or more chemicals known to the State of California to cause birth defects or otherreproductive harm.2
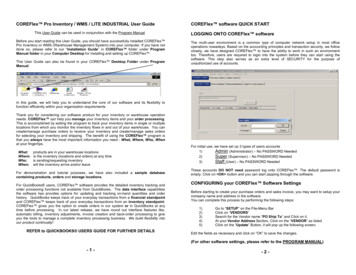
Parts and FeaturesThis manual covers several models. Your model may have some or all of the items listed. Refer to this manual or the Frequently AskedQuestions (FAQs) section of our website at www.jennair.com for more detailed instructions. In Canada, refer to the Customer ServiceSection at www.jennair.ca.ABLCKJDIEHGFA. Electronic oven controlB. Oven ventC. Model and serial number plate(on center vent under control panel)D. Broil elementsE. GasketF. Bottom ventG.H.I.J.K.L.Lower oven (on double-oven models)Hidden bake elementTwin convection elements and fansOven lights (left side, not shown)Oven door lock latchOven light switch3Parts and Features not shownTemperature probe jackTemperature probeRacks
Feature GuideThis manual covers several models. Your model may have some or all of the items listed. Refer to this manual or the Frequently AskedQuestions (FAQs) section of our website at www.jennair.com for more detailed instructions. In Canada, refer to the Customer ServiceSection at www.jennair.ca.Single Oven:BACDA.B.C.D.EE.F.G.H.PowerKitchen timerToolsDisplayFHGSelf cleanOven lightOven cancelStartDouble Oven:ABCDA.B.C.D.E.EFF.G.H.I.PowerUpper cancelUpper lightUpper ovenDisplayGHILower ovenLower lightLower h the Power keypad to turn the oven display on and off.OVEN LIGHTUPPER LIGHTLOWER LIGHTOven cavity lightThe desired oven light is controlled by a touch keypad on the oven control panel. Whilethe oven door is closed, touch the desired Oven Light keypad to turn the oven lights onand off. When the oven door is opened, the oven lights will automatically come on for thecorresponding oven.KITCHEN TIMER(on some models)TimerThe Kitchen Timer can be set in hours, minutes, or seconds up to 23 hours, 59 minutes,and 59 seconds.The Kitchen Timer does not start or stop the oven(s).OVEN CANCELUPPER CANCELLOWER CANCEL(on some models)Oven functionThe Lower Cancel, Upper Cancel, and Cancel keypads stop their respective ovenfunctions, except for the Clock, Kitchen Timer, and Button Lock. The oven cooling fan(s)may continue to operate even after an oven function has been canceled or completed,depending on the oven temperature.START(on some models)Mode StartThe Start keypad begins some oven functions. If Start is not touched within 2 minutesafter touching a keypad, the function is canceled and the time of day is displayed.CLEANSELF CLEAN(on some models)Self-CleaningcycleSee the “Self-Cleaning Cycle” section.TOOLS(on some models)Oven use functionThe Tools keypad enables you to personalize the oven operation to suit your needs.See the “Tools” section.UPPER OVENLOWER OVEN(on some models)Oven selectionThe Upper and Lower Oven keypads enable you to select which oven you want to use.4
Touch PanelMenu DemonstrationsThe touch panel houses the control menu and function controls.The touch keypads are very sensitive and require only a light touchto activate.For more information about the individual controls, see theirrespective sections in this manual.Welcome GuideThis appears on your display the first time the oven is powered up.The Welcome Guide allows you to set up your new oven.After every selection, a tone will sound. Touch BACK at any timeto return to the previous screen.1. Select your language.2. A new welcome screen will appear. Read it and touch NEXT.3. Set the clock and AM, PM, or 24-hour clock (military time).Touch NEXT.4. Select AUTO SYNC (turn on) or DO NOT ADJUST (turn off)to set the daylight savings time. Touch NEXT.5. Set the current date. Touch NEXT.6. Select FAHRENHEIT or CELSIUS to set the units oftemperature. Touch NEXT.7. Set the clock theme by selecting the desired theme. TouchNEXT, and then select the desired background. Touch SAVE.NOTE: This is the background for the center touch display.8. Select CONNECT to connect your appliance to Wi-Fi. Referto the Wi-Fi connectivity manual for further information.ORTouch SKIP to skip this step and complete setup.WARNINGFood Poisoning HazardDo not let food sit in oven more than one hour beforeor after cooking.Doing so can result in food poisoning or sickness.In double-oven models, touch the corresponding oven keypad toshow the cooking modes and temperatures for the desired oven.NOTE: A line will appear above the corresponding oven keypad.In single-oven models, the display will show cooking modes andtemperatures when the oven is turned on.Bake DemonstrationAConvConvConvecectt BaecBakekeConvectBake4004000ConverConvertt o eheatRapRappid PrePPrehreheaheatheatDelayDDelDeelalaylayFor Convection F1 rack1-rk CoCookiokingkingg1-rackCookingDisplayThe display is for both the menu and oven function controls. Thetouch panel allows you to scroll through the oven menus. Thedisplay is very sensitive and requires only a light touch to activateand control.When an oven is in use, the display will show the clock, mode,oven temperature, kitchen timer, and oven timer, if set. If the oventimer is not set, you can set it from this screen.After approximately 2 minutes of inactivity, the display will gointo Sleep mode and the display will dim. When the oven is inoperation, the display will remain bright.During use, the display will show menus and the appropriateselections for the options being chosen.BSTARTSTSTARARTTA. Modes columnB. Temperature column1. In the Modes column, select BAKE.2. In the Temperature column, select the desired temperature.The temperature must be between 170 F and 550 F (77 Cand 288 C).3. Touch START to begin preheating.Drop-Down Message DemonstrationDisplay NavigationThe next steps will convert your standard recipe for use withconvection cooking.If the oven is off, touch the Power keypad to activate the menu.From the home screen, all automatic cooking programs can beactivated, all manual cooking programs can be set, options can beadjusted, and instructions, preparation, and tips can be accessed.Convert BakeRapid PreheatConvert RecipeFor ConvectionBakeRoastMeats, VeggiesBakeCookies, CakesNEXTBroilSteaks, FriesTipsThere are some menus that prompt a drop-down message toappear. Once the message is read, you can dismiss the menuby touching the directional arrow and swiping up.5
Cook Time Demonstration (Optional)3. Select the desired cooking end time in the End Time column.The cook time cannot be longer than 12 hours.4. Touch SET when done, or touch BACK to return to themain menu.The oven will start preheating when the start time is reached.Once the end time is reached, the oven will go into Keep Warmmode by default.ORTouch START NOW to start the oven from the Delay screen.This will set the Oven Timer but will not delay the start time.NOTE: Do not use Delay Start for items that require apreheated oven, such as cakes, cookies, and breads. If foodis in the oven during preheat, it may become overcooked.5. To change a cooking mode or temperature while the ovenis preheating or in a Delay Start, touch the Cooking Modekeypad, make the new selection, and then touch SET.6. At any time, touch CANCEL for the selected oven to cancelthe current cycle and return to the main menu.Cooking ModesThe previous steps can be used for the following cooking modes:NOTE: In some cooking modes, the user can set the cooking timewhile other modes have fixed times.To set a cooking time, follow these instructions.At any time, touch BACK to return to the previous screen. TouchCANCEL for the selected oven to cancel the current cycle andreturn to the main menu.1. To set a cook time, first start a cooking cycle.NOTE: The Oven Timer is only visible once a cooking cyclehas been activated.2. Touch OVEN TIMER. Set the cooking length.3. Touch START to begin the Oven Timer.ORSelect the desired “When Timer Ends” oven action, and thentouch START. The default action is Hold Temp. Keep Warm will reduce the oven temperature to 170 F(77 C) after the cook time ends. Hold Temp will keep the set oven temperature after thecook time ends. Oven Off will turn the oven off when the cook time ends.Delay Start Demonstration (Optional)1. To set a delayed start and end time, select the desired cookingmode and temperature, and then touch DELAY.NOTE: The cooking start time always begins on the nearestquarter hour (0:00, 0:15, 0:30, and 0:45). The cooking timeincludes the oven preheating time. Adjust the start and endtimes accordingly.AB1 30 pm1:30p2:302 30 pmp1:15 pm2:155 pmp1:00 pmCooking starts at:12:4512:45ppmBack2:00 pmCooking ends at:1:45 pmpTemp. RangeDefault Temp.Convect FrozenPizza300 F–500 F(149 C–260 C)375 F (191 C)Convect Pastry170 F–550 F(77 C-288 C)325 F (163 C)Convect SlowRoast 12 hrs190 F–225 F(88 C–107 C)200 F (93 C)Convect SlowRoast 8 hrs200 F–250 F(93 C–121 C)225 F (107 C)Convect SlowRoast 4 hrs250 F–300 F(121 C–149 C)275 F (135 C)True Convect170 F–550 F(77 C–288 C)325 F (163 C)Convect Roast170 F–550 F(77 C–288 C)350 F (177 C)Convect Broil450 F–550 F(232 C–288 C)550 F (288 C)Convect Bake170 F–550 F(77 C–288 C)325 F (163 C)Convect Bake –Rapid Preheat170 F–550 F(77 C–288 C)325 F (163 C)Bake170 F–550 F(77 C–288 C)350 F (177 C)No Preheat1‑Rack Cooking170 F–550 F(77 C–288 C)350 F (177 C)Broil450 F–550 F(232 C–288 C)550 F (288 C)Keep Warm150 F–200 F(66 C–93 C)170 F (77 C)Rapid Proof110 F (43 C)110 F (43 C)Proof100 F (38 C)100 F (38 C)SeSet1:301 30 pmp1:151 151 pmp1:001 00 pmpModeStart NowA. Start time columnB. End time columnNOTE: To use Delay Start for Convert Recipe, Probe Cook, or MyCreations, follow the on-screen prompts until the Delay keypadappears. The previous steps can then be used.2. Select the desired cooking start time in the Start Timecolumn. The oven cannot be delayed more than 11 hoursand 45 minutes.6
Kitchen TimerThe Kitchen Timer can be set in hours, minutes, and secondsand counts down the set time.NOTE: The Kitchen Timer does not start or stop the oven.ModeAvailable SelectionsClock Theme Textures* Celebration* Culinary* Clock Only* Animation*Tones/SoundsTones are audible signals, indicating the following: Valid keypad touch. Spring* Function has been entered. Summer* Oven is preheated. Fall* Invalid keypad touch. Winter* Daylight Saving (Do not adjust/Auto Sync)* Clock Style (Digital/Analog(default) Set Clock Set DateWireless Features Enable Wi-FiSelf Clean Heavy 5 hr Medium 4 hr (default) Light 3 hrButton Lock LockNumber Entry Number pad Scroll (default) Convect RoastTime & Date End of a cooking cycle. When timer reaches zero.Includes using the Kitchen Timer for functions otherthan cooking. First oven element activation in a cooking mode.ToolsThe Tools keypad allows you access to functions andcustomization options within the Electronic Oven Control. Thesetools allow you to set the clock, change the oven temperaturebetween Fahrenheit and Celsius, turn the audible signals andprompts on and off, adjust the oven calibration, change thelanguage, and more. For more information on a setting, selectit and touch the Tips keypad.The Sabbath mode is also set using Tools.ModeAvailable SelectionsSabbath On Convect Bake Off (default) Food Guide (default) On Bake Off (default) 35 F to -35 FCelsius* 20 C to -20 C Fahrenheit*Temp CalibrationNOTE: For double-ovenmodels, upper and lowercalibration are available. Français*English*Touch Calibration Use to calibrate touch screen. Display OffService Info. Model Number, Serial Number,and contact information Display Dimmed (default)Legal Info. License Information Clock OffRestore Defaults Restores Factory Defaults. Clock On (default)*The default for these settings is set at the Welcome screen. Max HighButton Lock Med (default) Low Dim Key Press (Max/High/Med (default)/Low/Off) Timer & Alert (Max/High (default)/Med/Low/Off) Power On & Off (Off/On (default)Demo ModeTemp UnitsLanguageDisplay On/OffClock On/OffBrightnessSoundProbeThe Button Lock shuts down the control panel keypads to avoidunintended use of the oven(s). The Button Lock will remain setafter a power failure if it was set before the power failure occurs.When the control is locked, only the Power keypad will function.The Button Lock is preset unlocked but can be locked.To Activate the Button Lock:1. Touch TOOLS, and then select BUTTON LOCK.2. Touch LOCK to activate the Button Lock mode.NOTE: The touch screen will return to Idle mode and a controllocked message will be displayed.To Deactivate the Button Lock:1. Touch the Power keypad, and then follow the on-screendirections.NOTE: The oven will generate a random sequence of shapesthat must be touched in the order prompted on the screen.7
Oven Temperature Control6. Select the desired oven temperature and touch NEXT.(Optional) Set Bake Time (00:00) and touch SET.ORTouch SKIP TIMER.7. For single ovens, touch START. For double ovens, touchSTART to begin Sabbath mode or touch CHANGE to editthe current programming or to program the other oven.IMPORTANT: Do not use a thermometer to measure the oventemperature. Elements will cycle on and off as needed to maintaina consistent temperature but may run slightly hot or cool at anypoint in time due to this cycling. Opening the oven door will affectcycling of the elements and impact the temperature.The oven provides accurate temperatures and has beenthoroughly tested at the factory. However, it may cook fasteror slower than your previous oven, causing baking or browningdifferences. If necessary, the temperature calibration can beadjusted in either Fahrenheit or Celsius.On double ovens, the upper oven and the lower oven can eachbe calibrated independently.A minus sign means the oven will be cooler by the displayedamount. The absence of a minus sign means the oven will bewarmer by the displayed amount. Use the following chart asa guide.NOTE: The oven display will continue to show the original settemperature and will not reflect the calibration offset. For example,if set to 350 (177 C) and calibrated to -20 , the display willcontinue to show 350 (177 C).Adjustment F(Automatic C Change)Cooks Food10 F (6 C)a little more20 F (12 C)moderately more30 F (18 C)much more0 F (0 C)default setting-10 F (-6 C)a little less-20 F (-12 C)moderately less-30 F (-18 C)much lessTo Disable:Once activated, Sabbath mode can be deactivated on all cavitiesby touching the Power keypad.For single ovens, Sabbath mode can also be deactivated bytouching OVEN CANCEL.For double ovens, if both ovens are running, touching CANCELfor one oven will turn off Sabbath mode for both ovens and willturn off the selected oven. The other oven will return to a regularBake mode.Delayed Sabbath Bake:WARNINGFood Poisoning HazardDo not let food sit in oven more than one hour beforeor after cooking.Doing so can result in food poisoning or sickness.For double ovens, the upper and lower oven temperatures andcook timers can be set independently.If a cook timer is set, the countdown will not appear. The timerwill appear frozen at the set time.To Enable:Sabbath ModeThe Sabbath mode sets the oven(s) to remain on in a bake settinguntil turned off. A timed Sabbath mode can also be set to keep theoven on for only part of the Sabbath.When the Sabbath mode is set, the allowed keypads are thePower keypad and the Cancel keypads.When the oven door is opened or closed, the oven light will notturn on or off and the heating elements will not turn on or offimmediately.If a power failure less than 1 second occurs when the Sabbathmode is set, the oven(s) will remain in Sabbath mode and continuecooking.For a power failure that lasts longer than a second, the oven(s) willreturn to an idle state and Sabbath mode will no longer be active.For double ovens, the upper and lower oven temperatures andcook timers can be set independently. If a cook timer is set, thecountdown will not appear. The timer will appear frozen at the settime.NOTE: Be sure to turn off your smart phone before the Sabbathor holidays. If the phone is on and the oven control app installed,oven changes will be displayed on your phone.1. Touch the Power keypad, and then touch TOOLS.2. Select SABBATH, and then touch NEXT.3. Touch ON, and then touch SETUP.NOTE: The programmed status of the oven(s) will bedisplayed.4. Touch CHANGE.5. For single ovens, go to Step 6. For double ovens, select thedesired oven, and then touch NEXT.6. Select the desired oven temperature, and then touch NEXT.Optional: Set Bake Time (00:00) and touch SET.ORTouch SKIP TIMER.7. Touch DELAY and set the “Cooking Starts at” and “CookingEnds at” times.NOTE: If a bake time is set in the previous steps, the “CookingEnds at” will be calculated based on the bake time. If the timeris not set, the Sabbath mode will continue until canceled.8. Touch SET.Once activated, Sabbath mode can be deactivated on all cavitiesby touching the Power keypad.To Enable:Change Temperature1. Touch the Power keypad, and then touch TOOLS.2. Select SABBATH, and then touch NEXT.3. Touch ON, and then touch SETUP.NOTE: The programmed status of the oven(s) will bedisplayed.4. Touch CHANGE.5. For single ovens, go to Step 6. For double ovens, selectthe desired oven and then touch NEXT.The oven temperatures can be changed while running Sabbathmode by touching the -25 F (-5 C) or 25 F ( 5 C). Touchingthese buttons will not result in any changes to the screen andno sound will play.As an example, touching the 25 F ( 5 C) button 3 times willresult in an oven cavity temperature increase of 75 F ( 15 C);however, the initial oven cavity set temperature will remain onthe screen.NOTE: On double-oven models, the oven cavity temperature maybe set independently.8
Oven UseOdors and smoke are normal when the oven is used the first fewtimes or when it is heavily soiled.During oven use, the heating elements will not remain on but willcycle on and off throughout oven operation.IMPORTANT: The health of some birds is extremely sensitiveto the fumes given off. Exposure to the fumes may result indeath to certain birds. Always move birds to another closedand well‑ventilated room.If the oven door is opened during a cooking mode and left openfor approximately 60 seconds, the cooling fan will switch to ahigher speed. You may experience higher noise during this time.When the oven door is closed, the fan will switch back to its lowerspeed after approximately 60 seconds.Remote NotificationsWi-Fi ConnectivityOnce the Wi-Fi connectivity has been established, you havethe ability to receive status notifications via email and SMS/text.The notifications that can be received are: Oven Cycle Interruptions Preheat Complete Cook Timer Completion Cooking Temperature Change Pre-Heat Cooking Temperature Progress Meat Probe Temperature Change Meat Probe Temperature Reached Cooking Mode Change Control Lock Status Change Kitchen Timer Complete Kitchen Timer ChangeDo not let food sit in oven more than one hour beforeor after cooking. Self-Clean Complete Culinary Center InterruptionsDoing so can result in food poisoning or sickness.Aluminum FoilWARNINGFood Poisoning HazardYour oven has built-in Wi-Fi connectivity. For it to work, you willhave to help it join your home wireless network. For informationabout setting up the connectivity, turning it on and off, receivingimportant notifications, and taking advantage of available features,refer to the Oven Wi-Fi Connected Quick Start Guide that camewith your appliance.Once the setup process has been completed for the Wi-Fi, you willhave access to features that will give you new freedom in cooking.Your available features may vary depending on firmware updates.IMPORTANT: To avoid permanent damage to the oven bottomfinish, do not line the oven bottom with any type of foil or liner.ViewingIMPORTANT: To avoid permanent damage to the porcelainfinish, do not place food or bakeware directly on the oven dooror bottom. For best cooking results, do not cover entire rack with foilbecause air must be able to move freely. To catch spills, place foil on rack below dish. Make sure foilis at least 1/2" (13 mm) larger than the dish and that it is turnedup at the edges.Position Racks and Bakeware Cooking Timers Control Lock Kitchen TimersRacks Meat Probe Status Position racks before turning on the oven.Remote Start Status Do not position racks with bakeware on them. Make sure racks are level.To move a rack, pull it out to the stop position, raise the frontedge, and lift out. Use the following illustration and chartsas guides. Control Turn Oven Off Adjust Kitchen Timer Adjust Oven Light Oven Control Lock Start Oven Controls Adjust Cooking Settings Culinary Center My Creations6543219
Rack And Bakeware PositionsBakewareTo cook food evenly, hot air must be able to circulate. For bestresults, allow 2" (5 cm) of space around bakeware and oven walls.Use the following chart as a guide.Rack Positions – Upper and Lower OvenNOTE: Unless indicated with a “ro” (roll-out rack), all suggestedrack positions are for flat racks.BroilingNumber of Pan(s)Position on RackCenter of rackFoodRack Position1Most broiling62Side by side or slightly staggered3 or 4See the rack position graphicsin this section for pan placementrecommendations.For hamburger patties to have a well-seared exterior and a rareinterior, use a flat rack in position 6. Side one should cook forapproximately 3 minutes. Side two should cook for approximately3 to 4 minutes. Expect a moderate degree of smoke when broiling.Traditional CookingFoodRack PositionLarge roasts, turkeys,angel food cakes, bundtcakes, quick breads, pies1 or 2Yeast breads, casseroles,meat, poultry2Cookies, biscuits,muffins, cakes2 or 3 when single-rack baking;2 and 5 when multi-rack bakingRoll-Out Extension RackThe roll-out extension rack allows easy access to position food inthe oven and remove food from the oven. It can be used in rackpositions 1 through 6.Open PositionABConvection CookingOven SettingNumber ofRacks UsedRackPosition(s)Rapid Preheat Bake13Rapid PreheatConvection Bake13Convection Bake11, 2, or 3Convection Bake22 and 5Convection Bake31, 3, and 5Convection Roast11 or 2Convection Broil14, 5, or 6A. Roll-out extension rackB. Sliding shelfClosed and Engaged PositionABaking Cakes on Two RacksFor best results when baking cakes on two racks, use the Bakefunction and flat racks in positions 2 and 5. Place the cakes onthe racks as shown. Keep at least 2" (5 cm) of space between thefront of the racks and the front of the cakes.BA. Roll-out extension rackB. Sliding shelfTo Remove Roll-Out Extension Rack:1. Slide the rack in completely so that it is closed and engagedwith the sliding shelf.2. Using two hands, lift up on the front edge of the rack and pushthe sliding shelf to the back wall of the oven so that the frontedge of the sliding shelf sits on the rack guides. The frontedge of the rack and the sliding shelf should be higher thanthe back edge.ABaking Cookies on Two RacksFor best results when baking cookies on two racks, use theConvect Bake function and place flat racks in positions 2 and 5.BCA. Sliding shelfB. Rack guideC. Roll-out extension rack3. Pull the rack and the sliding shelf out.10
Oven VentsTo Replace Roll-Out Extension Rack:1. Using two hands, grasp the front of the closed rack and thesliding shelf. Place the closed rack and the sliding shelf onthe rack guide.2. Using two hands, lift up on the front edge of the rack and thesliding shelf together.3. Slowly push the rack and the sliding shelf to the back of theoven until the back edge of the rack pulls over the end of therack guide.To avoid damage to the sliding shelves, do not place more than25 lbs (11.4 kg) on the rack.Do not clean the roll-out extension rack in a dishwasher. It mayremove the rack’s lubricant and affect its ability to slide.See the “General Cleaning” section for more information.ABCDEFBakewareThe bakeware material affects cooking results. Followmanufacturer’s recommendations and use the bakeware sizerecommended in the recipe. Use the following chart as a d aluminum Use temperature and timerecommended in recipe. May need to reduce bakingtemperatures slightly. Use suggested baking time. For pies, breads, andcasseroles, use temperaturerecommended in recipe.The oven vents should not be blocked or covered since they allowthe inlet of fresh air into the cooling system. Also, the bottomvent should not be blocked or covered since it allows the inlet offresh air into the cooling system and the outlet of hot air from thecooling system. Blocking or covering vents will cause poor aircirculation, affecting cooking, cleaning, and cooling results. Place rack in center of oven.Preheating and Oven Temperature Follow rack recommendationsin the “Position Racks andBakeware” section.Preheating Light golden crusts Even browningDark aluminum and otherbakeware with dark, dull,and/or nonstick finish Brown, crisp crustsInsulated cookie sheetsor baking pans Little or no bottombrowningStainless steel Light, golden crusts Uneven browningStoneware/Baking stone May need to increase bakingtime. May need to increase bakingtime. Follow manufacturer’sinstructions. May need to reduce bakingtemperatures slightly.Crisp crustsOvenproof glassware,ceramic glass, or ceramic Single and Double OvenA. Control panelB. Oven ventC. Single oven or upperdouble ovenG. Bottom ventDouble OvenD. Upper ovenE. Oven ventF. Lower ovenG. Bottom ventWhen beginning a Bake or Convect Bake cycle, the oven be
The Kitchen Timer can be set in hours, minutes, or seconds up to 23 hours, 59 minutes, and 59 seconds. The Kitchen Timer does not start or stop the oven(s). OVEN CANCEL UPPER CANCEL LOWER CANCEL (on some models) Oven function. The Lower Cancel, Up