Transcription
Single Sign On (SSO)Integration withAmazon BusinessVersion 1
Self-service integration instructions - SSOTable of contents318Overview FAQ318SSO BenefitsAppendix4Process Flow 5Self Service Setup on Amazon Business 10Testing 13User Experience17Provisioning Users to multiple groups2
Self-service integration instructions - SSOOverviewThis document provides guidance and reference material to IT professionals to establish a single sign-on (SSO) integration withAmazon Business. SSO with Amazon Business is no different from any other SSO integration that you may have done with otherapplications such as Concur, Tableau, Salesforce, ADP etc.SSO BenefitsSingle Sign-On integration allows you to set up SSO with a variety of identity providers such as Okta, OneLogin, Microsoft Azure AD,Microsoft ADFS, AWS SSO, OpenAM, and Shibboleth using SAML 2.0.The key benefits of this feature are:Streamlined onboarding Organizations with hundreds or thousands of employees can get started easily on Amazon Business without Admins having tomanually invite users. New employees can start purchasing immediately because user accounts are automatically created (Just-In-Time provisioning)on first access.Increased security Buyers do not have to provide or manage passwords to access Amazon Business, reducing the risk of credential leakage.Reduced Risk Block access to Amazon Business if employees leave the organization to reduce risks associated with not terminating buyers’access to Amazon BusinessOne-Click Access Users have a seamless and simple authentication experience, whether direct buying or punch-out (from buyer to supplier),similar to other corporate apps you use daily.3
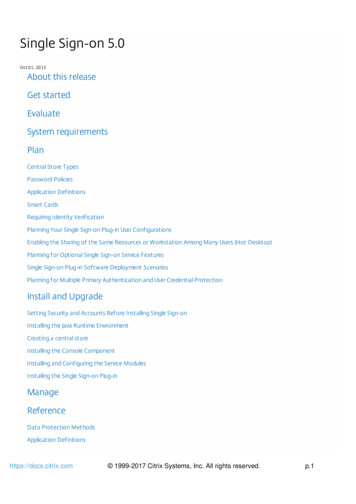
Self-service integration instructions - SSOProcess FlowBelow is the SSO connectivity flow. Identity Provider is customer’s IDP. Service Provider is Amazon Business.Below is the Punchout flow with SSO.4
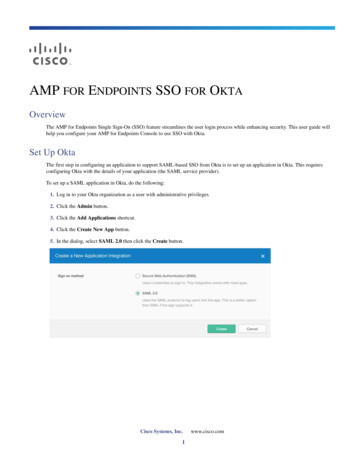
Self-service integration instructions - SSOSelf-Service Setup on Amazon BusinessSSO with Amazon Business is similar to any other SSO integration that customer may have done with other applications such asConcur, Tableau, Salesforce, ADP etc.To get started, please click on self-serviceSelect your IDP provider name from the drop down. If you do not see your IDP in the list, please search using the search bar. Onceit is selected click ‘Next’. If you still do not see your IDP in the list, please provide your IDP name in the “Request help from Amazon”form. While we currently only support the IDPs identified on our list, Amazon Business regularly adds support for new IDPs based oncustomer feedback. Your feedback is very important, and will help inform that process.5
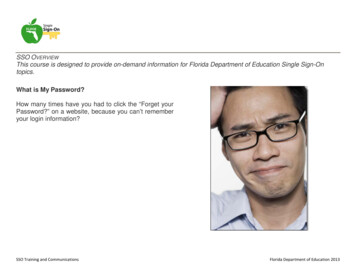
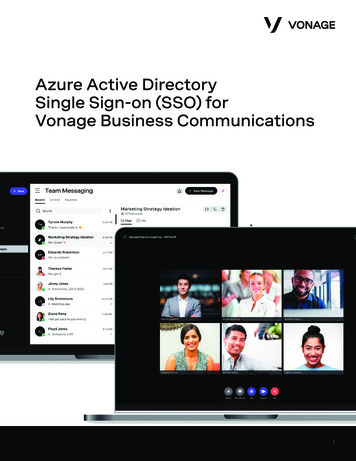
Self-service integration instructions - SSOSelect “Default Group” and “Default Buying Role”. Click on next Default Group: Choose the group where new provisioned users (Just-In-Time) should be added via SSO.New employees canstart purchasing immediately because user accounts are automatically created (Just-In-Time provisioning) on first access. Default Buying Role: set the default role for new users: Punchout (PPI) or Requisitioner (Direct Buy). If you’re using aprocurement system and want your users to follow the procurement workflow by default, choose “Punchout User”. Otherwise,select “Requisitioner” to allow employees to buy directly through Amazon Business website.P.S: You must ensure PPI setup is complete before setting up SSO if selecting “Punchout User”.Provide Amazon Business with your IDP metadata. If your IDP provides SAML metadata for export, download it from your IDP.Then upload the file in the Amazon Business SSO setup page. We will automatically parse the file for the necessary information.Alternatively, you can manually enter on the next page by clicking on “Skip”.Enter following information. Please reach out to your SSO administrator if any questions. EntityID: A globally unique URL provided by your IDP. IssuerURL: A URL that uniquely identifies your SAML identity provider. HTTP-Redirect URL: This determines how a browser redirects a user to your IDP for authentication. Signing certificate: This allows you to verify signatures and establish trust in the messages that have been exchanged. Ensurethat you correctly provide the complete certificate without any missing characters.6
Self-service integration instructions - SSOProvide Amazon Business with your attribute statement mapping. You’ll need to provide the user attributes that will be providedas part of the SAML response. If you have a sample claim or attribute statement, you can upload it and we’ll parse the information.Otherwise, you can enter the following values manually on the next page by clicking on “Skip”.Enter following information. Mandatory attributes: Email address, unique identifier, and name. Name can be separated by first name and last name, or itcan be a full name attribute. Unique identifier: Provide a unique identifier for each user for the SAML response. This can be email address, employeenumber etc. Note that these attributes must exactly match what is the attribute statement in your SAML assertion.7
Self-service integration instructions - SSOConfigure your IDP with Amazon Business metadata Search for Amazon Business in your IDP’s application catalog. If you do not find it, create a new custom application, and enter“Amazon Business” within your IDP. Do one of the following, depending on whether the Amazon Business application you created supports SAML metadata import: If your application supports SAML metadata import, you can download the SAML metadata file from the Amazonconnection data section and import it into your application. If your application does not support SAML metadata import, you need to enter the SSO configuration information using thesteps given below: Download the Amazon metadata XML file from the application configuration page. Open the file and copy the entityID,HTTP POST URL and configure these in your application as required. Download the Amazon certificate. Upload the certificate in your application. With the information provided in the SSO Connection page, configure the application with the URL and Amazon metadata. Ensure that the SAML responses are signed with any algorithm such as SHA56. If your IDP supports SAML assertion encryption, we recommend encrypting using the x509 certificate provided in the Amazonmetadata. If your IDP does not support SAML assertion encryption or encryption using third-party certificates, then you do notneed encrypt the assertion. Provide the attribute mappings for the application to match the attributes you provided on Amazon Business.8
Self-service integration instructions - SSOClick on “Completed” once you verify Connection Data and Attribute mapping.9
Self-service integration instructions - SSOYou should be ready to test the connection now. Click on “Start Testing”TestingBefore you start testing, please make sure the administrator who is clicking on “Start Testing”, is added to your IDP server.Click on “Start Testing”. A new window will open with “Test” button. Please click on “Test”. A new browser tab will open that will redirectyou to your IDP for authentication. In the IDP portal, sign in as a user who has been granted access to the Amazon Business application.If you are already authenticated with your IDP, then we will attempt to federate you using SSO into Amazon Business. Once you aresuccessfully authenticated, you will be able to land on Amazon.comOn the SSO testing page, you will see whether the test was successful or not. If your test was successful, you will be federated intoAmazon Business. If you want other users to test, you can share the SSO SP-login link on the Test page with those users. Please ensure that thoseusers can actually authenticate using your IDP. If you are ready to enable SSO for all users, you can click on “Activate”.10
Self-service integration instructions - SSOSelect the checkbox confirming all testing has been completed and click on Switch to active. The first time someone signs in toAmazon Business using SSO, they will automatically be given an Amazon Business account.P.S: To turn off SSO for your account, please choose Request help from Amazon and tell us to turn off SSO for your account.11
Self-service integration instructions - SSOOnce SSO is active, please follow below process depending on your use case. Ensure that only the right users or groups have access toAmazon Business through your IDP. Users accessing Amazon Business through your eProcurement system through SSO will have toauthenticate with your IDP. Ensure that the users have access to Amazon Business through your IDP.Instructions for your End Users – Punchout The way users access Punchout will still remain same even with SSO. They have to start Punchout from your eProcurementsystem. Users accessing Amazon Business through your eProcurement system through SSO will have to authenticate with your IDP.Ensure that the users have access to Amazon Business through your IDP.Instructions for your End Users - Direct Buy SP Initiated URL: You can host the SSO SP-link provided on the connection page anywhere within your systems so that yourusers can access the URL and federate to Amazon Business. If you use an IDP such as Okta, you can also set up a Bookmarkapplication and embed the SP-login URL. You can also share the URL directly with user so that they can bookmark in their browser. IDP initiated URL: If your IDP supports it, you will be given an IDP initiated URL which can be used to enable IDP initiated SSO. Touse IDP initiated SSO, the URL must be used to replace the Assertion Consumer Service (ACS) URL in your IDP. Direct Access: If your users try to access Amazon.com, they will be routed to your SSO server immediately once they enter theiremail address. This currently works only for existing users.The ACS can be labelled differently in different IDPs. If you are having trouble finding the field to replace, check your IDP’sdocumentation. This field should have a URL ending in 3p redirect or 3p callback if you have access to the IDP initiated URL.Enabling IDP initiated SSO will not impact the usage of Service Provider (SP) initiated SSO through the link provided.12
Self-service integration instructions - SSOUser ExperienceUser Experience without SSO: If the user doesn’t have an existing Amazon account tied to the work email address, user will be provided step-by-stepinstructions to create a new account log-in in your organization’s Amazon Business account. Details like Name, Password needs tobe entered by the user. User logs in to eProc System andclick on Amazon Business Tile. Click on “Get Started” to create anaccount. Enter your name and set a password.Please do not change the emailaddress.13
Self-service integration instructions - SSO You will be logged in to AmazonBusiness.User Experience with SSO:Use Case 1: If the user doesn’t have an existing Amazon account tied to the work email address, Amazon Business SSO will leveragecustomer identity provider and fetch the required details to create a new account log-in automatically in the organization’sAmazon Business account. The user will be automatically routed to Amazon Business homepage.Use Case 2: If the user have an existing Amazon personal account tied to the work email address, Amazon Business SSO will present optionto split/merge the personal account from your business account.14
Self-service integration instructions - SSO User logs in to eProc System andclick on Amazon Business Tile. Enter the password of your personalAmazon account. Once you are able tologin, below options will be presented. Convert my existing Amazonaccount: This option converts yourpersonal account to be part of thisbusiness account. All your orderhistory, addresses and payments willbe moved to business account.Business account admin will haveaccess to your order history.15
Self-service integration instructions - SSO Create a separate business useraccount: This option separates yourpersonal account with your businessaccount. Enter your personal emailaddress and continue. You can login toyour personal account with new emailid and same old password. You will be added to businessaccount with your work email address. You will be logged in to AmazonBusiness.Use Case 3: If the user have an existing Amazon Business account tied to the same work email address, you will have to change the emailaddress on existing business account or reach out to your administrator of previous business account.16
Self-service integration instructions - SSOProvisioning Users to multiple groupsCustomers can now provision new users in different groups.Pre-requisites Customer should be able to create and send a new attribute in the SAML assertion. Customer should have some mapping between their existing system and AB. i.e. their AB structure reflects departments,business units, cost centers etc. Punchout customers will still need to send User Business Unit (UBU) value in Punchout cXML as an extrinsic.There are two ways this can be set up:Option 1: Send full group path in SAML assertion Used in scenarios where AB group structure exactly mirrors customers’ directory structure Customer creates a new “Group” attribute in SAML assertion Pass the full group path for a user e.g. \Company\Finance\New YorkOption 2: Send a Group tag Used in scenarios where AB group structure differs from customers’ directory structure. e.g. group on customer side is “FinanceCost Center - 0010”, while group on AB is simply “Finance”. Customer creates a new “GroupTag” attribute in SAML assertion Customer adds a tag to each group on AB. AB contact can help with this. Customer simply passes tag in SAML assertion. AB checks if tag in SAML assertion matches tag on any group, and if match,creates user in that group. Group Tag can be setup at the time of group creation as shown below.Setting up a group tag attribute mapping, is not available through self-service as of now. Please contact your Amazon Businessrepresentative or our customer service to setup this mapping.17
Self-service integration instructions - SSOFAQWhich Identity providers are supported?Amazon Business uses the industry standard Security Assertion Markup Language (SAML) 2.0, which means our implementation ofSSO integrates easily with any large identity provider that supports SAML. We support service provider initiated SAML with identityproviders such as Okta, OneLogin, AWS SSO, TrustLogin, and Azure AD.Is there any impact to existing users?There is no impact to existing users when the account switches to SSO.Do you support SP initiated or IDp-initiated SSO?We support both.How can I update the SSO configuration once it is switched to Active?Please click on “Get Help” on SSO configuration page and submit a request. Alternatively, you can reach out to our dedicated customersupport team at corporate-punchout@amazon.com or 1 (888) 281-3847.Can I bypass SSO and directly access AB by logging in?An SSO user will be able to access AB directly without a password by navigating to amazon.com/business and still be redirected intoan SSO authenticated session.Does SSO manage users?No. SSO helps with first time user provisioning and subsequent authentication. SSO will not manage user movement across groups.Once the user is manually moved, SSO will honor the new group.Appendix Amazon Business Customer Service/Post-Production SupportPhone, email, or live chat. Contact the Business Customer Service team for any transactional questions related to an order,including: ordering, quantity availability, shipment speed, delivery tracking, returns and refunds. This team can also provideAdministrator support, including feature configuration and system integration support.i. Phone: 1 (888) 281-3847ii. Email: corporate-punchout@amazon.com Please note that we keep adding new features to Amazon Business and the website. You may see slight differences in terminologyand/or layout compared to this document. If you have any questions, please call Amazon Business Customer Support. Learn about Amazon Business SSO at Amazon Business SSO SAML 2.0: The industry-standard SSO communication protocol Identity Provider (IdP): A solution that provides SSO capabilities such as authentication, identity of users, groups etc. Common IdPsinclude Okta, OneLogin, Microsoft ADFS, Azure AD, and recently AWS SSO (all are supported by AB SSO). Service Provider (SP): The application that a user accesses through SSO e.g. Concur, ADP, Salesforce, AWS, or Amazon Business SAML Assertion/Attribute/Claim: A SAML Assertion is the request/response passed between user’s browser and Amazon Business.It contains Attributes are specific pieces of data that provide information about the user e.g. Email Address, Name, Group, groupTag.Assertions essentially contain information that verifies who the IDP is, who the user is, and whether the user should have access toAmazon Business. Claim is a common term used in Microsoft products (ADFS, Azure) and are interchangeable with assertion/attributes.18
eervie ieri iri O 6 Select "Default Group" and "Default Buying Role". Click on next Default Group: Choose the group where new provisioned users (Just-In-Time) should be added via SSO.New employees can start purchasing immediately because user accounts are automatically created (Just-In-Time provisioning) on first access.