Transcription
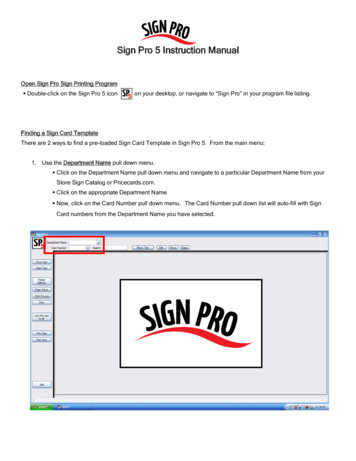
Sign Pro 5 Instruction ManualOpen Sign Pro Sign Printing Program Double-click on the Sign Pro 5 iconon your desktop, or navigate to “Sign Pro” in your program file listing.Finding a Sign Card TemplateThere are 2 ways to find a pre-loaded Sign Card Template in Sign Pro 5. From the main menu:1. Use the Department Name pull down menu. Click on the Department Name pull down menu and navigate to a particular Department Name from yourStore Sign Catalog or Pricecards.com. Click on the appropriate Department Name Now, click on the Card Number pull down menu. The Card Number pull down list will auto-fill with SignCard numbers from the Department Name you have selected.
2. Use the Search function. If you know the Sign Card number of the Sign Card you would like to print, simply type that number in thesearch box and hit “enter”.Placing information on the Sign Card Template Locate the Place Text icon on the top section of the main menu. Click the Place Text icon and the “Text Editor”box will open.
Enter your text by typing the appropriate message in the space. You can edit the font, style and size of the text by highlighting the text and clicking the “Font” icon in the upperright of the “Text Editor” box. Click the “OK” icon in the open “Font” box. Then, click the “OK” icon in the “Text Editor” box.
Your text will appear in a blue box that you can move around the template to position where you would like.Once you click your mouse, the box will “drop” where you have placed it and your text will appear on thetemplate.Editing information on the Sign Card TemplateYou can move or edit any of the information you have created on the Sign Card Template by locating and clicking the Edit,Move or Erase icon located on the top section of the main menu. If you would like to edit the information, click the Edit icon and hover your mouse near the information you would like toedit – there will be a “blinking” box around the available text.oClick the mouse and the “Text Editor” box will appear with your original information.oModify the information by changing the font or the message and click “OK” to exit the “Text Editor” box.This WILL NOT change the location of the message. If needed, follow the “move” instructions after youhave edited your information. If you simply need to move the information to a different location on the Template, click the Move icon and hover yourmouse near the information you would like to move – there will be a “blinking” box around the available text.oClick the mouse and you will have control of that information.oMove the information to the desired location and click the mouse button to “drop” the information in thenew location. To erase, simply click the Erase icon and confirm the text you would like to erase.
Working with Signs that contain multiple “ups”If your Sign Card Template contains more than a single sign on the page, you will see an image under the Next Sign iconon the left of the main menu. This image will contain numbers (1, 2, etc.) for the number of images (“ups”) that will print onthe full sheet. The sign you are currently working on will be highlighted in grey, the others will be shown in black.
If you want a different message on each “up”, click the Next Sign icon and create a new sign for that “up”. To review (or edit) previously created “ups”, use the Prev Sign icon to move within the sign card framework. Again, the“up” you are working on will be highlighted in grey. If you want the same message and layout to be used on each of the “ups”, you can click the copy this sign to all iconand your image will be duplicated on each “up”.Time Saver! When working with “multiple up” signs use the copy this sign to all feature. This will copy the format of the first sign card or labelto all of the other sign cards or labels on the page. Then, you only need to edit the information on subsequent cards/labels – no need to re-format eachcard or label! You will have a more consistent look among your sign cards or labels.
Setting up your printer to printYou can set the paper size, orientation and margins by using the Page Setup icon.Using the Print Preview functionYou can see how the image will print on your printer by using the “Print Preview” mode. Click on the Print Preview icon and you will see an image of the full Sign Card. NOTE: This preview WILL NOT include the Template Art. This preview will only show what your printer will be addingto the existing pre-printed Sign Card stock you will use in your printer.
Printing your Sign CardWhen you are satisfied with the layout of your Sign Card on the Sign Card Template, you can print directly fromSign Pro 5. Load the pre-printed Sign Card stock you purchased from your distributor into your printer. If you are in the Print Preview mode, you can print directly to your printer by clicking on the printer icon in the upper lefthand corner. If you are on the main menu page, you can print directly to your printer by clicking on the Print icon.
Saving your workYou can save a Sign Card Template to your computer hard drive. Click the Save Sign icon on the left of the main menu. Sign Pro 5 has existing folders for some of the more popular departments within retail. You can save your Sign Card inone of those folders, or create your own. Open the folder where you would like to save your Sign Card. Name the Sign Card. Click “save”.
Open an existing Sign CardYou can open a previously created Sign Card to re-print or edit. Click the Open Sign icon on the left of the main menu. Navigate to the folder that contains the saved Sign Card. Click the Sign Card name and the Sign Card will appear on the screen to re-print or edit.
Sign Pro 5 Instruction Manual Open Sign Pro Sign Printing Program Double-click on the Sign Pro 5 icon on your desktop, or navigate to “Sign Pro” in your program file listing. Finding a Sign Card Template There are 2 ways to find a pre-loaded Sign Card Template in Sign Pro 5. From the main menu: 1.