Transcription
Operation Manual
Cristina Bachmann, Heiko Bischoff, Marion Bröer, Sabine Pfeifer, Heike SchillingThanks to: Matthias Klag, Michael RufThe information in this document is subject to change without notice and does not represent a commitment on the partof Steinberg Media Technologies GmbH. The software described by this document is subject to a License Agreementand may not be copied to other media except as specifically allowed in the License Agreement. No part of this publication may be copied, reproduced or otherwise transmitted or recorded, for any purpose, without prior written permissionby Steinberg Media Technologies GmbH.Steinberg, The Grand, VST and ASIO are registered trademarks of Steinberg Media Technologies GmbH. Windows,Windows Vista and DirectX are registered trademarks of Microsoft Corporation in the United States and other countries.Macintosh, Mac and Mac OS are trademarks of Apple Inc., registered in the U.S. and other countries. Pentium and IntelCore are trademarks or registered trademarks of Intel Corporation in the U.S. and other countries. All other product andcompany names are and of their respective holders.Release Date: June 29, 2009 Steinberg Media Technologies GmbH, 2009.All rights reserved.
Table of Contents5Welcome5Key command conventions6How you can reach us6Installation6778The USB-eLicenserSystem requirementsInstalling The GrandRegister your software!8Getting ready to play88910Setting up The Grand as a VST instrument inCubaseUsing The Grand in an AU compatible applicationThe Grand standalone and ReWireMissing content11The content1111The recording of The GrandThe models12Parameters1215161718192124262627General plug-in controlsThe Model pageThe Equalizer pageThe Ambience pageThe Control pageThe Options pageAdditional controls when using The Grand as astandalone instrumentPerformance issuesUsing MIDI controllersMIDI controllersAutomation parameters28Index4The Grand 3
WelcomeThe standalone version allows you to use The Grand 3without a host application – a great choice for performinglive. It has two additional features: the quick-idea scratchpad, which lets you instantly store spontaneous ideas, andthe metronome.Congratulations and thank you for purchasing The Grand 3by Steinberg.Both its previous versions have established The Grand asone of the leading virtual piano instruments worldwide.Now in 2009, The Grand is returning with a third versionto claim its rightful place at the forefront of virtual pianosoftware on the market today.Please don’t forget to register on MySteinberg in order togain access to online support offers and additional exclusive services. And check out the The Grand 3 communityat Cubase.net, our online forum, for tips and other usefulinformation.With the purchase of The Grand 3 you have chosen a premium virtual piano suite which comes with five virtual pianos perfectly recorded to meet your demands, providingstunning sound quality unrivaled by current standards. TheYamaha C7, Bösendorfer 290 Imperial, and Steinway Dgrand pianos plus the classic Yamaha CP80 ElectricGrand, as well as the charismatic upright piano by NordiskaPianofabriken have been recorded to offer you an entirepalette of virtual piano greatness.We wish you a lot of musical inspiration!Your Steinberg The Grand TeamKey command conventionsMany of the default key commands in The Grand usemodifier keys, some of which are different depending onthe operating system. For example, the default key command for Undo is [Ctrl]-[Z] under Windows and [Command]-[Z] under Mac OS X.Thanks to the incorporated intelligent sample architectureand latest recording technology, The Grand 3 does notsimply play back samples, but responds to your individualplaying behavior as well as adding natural full-length sustain and decay, distinctive pedal and hammer noises, andkey thumps in order to recreate the sound of acoustic pianos so perfectly. And it doesn’t stop here. To further enhance the effectiveness of your system, both ECO Modeand RAM Save technology featured in The Grand 3 helpyou to reduce the RAM consumption and improve CPUperformance.When key commands with modifier keys are described inthis manual, they are shown with the Windows modifierkey first, in the following way:[Win modifier key]/[Mac modifier key]-[key]For example, [Ctrl]/[Command]-[Z] means “press [Ctrl]under Windows or [Command] under Mac OS X, thenpress [Z]”.Similarly, [Alt]/[Option]-[X] means “press [Alt] under Windows or [Option] under Mac OS X, then press [X]”.Whether you are a musician, arranger or composer, TheGrand 3 is certainly your first choice when it comes tobreathtaking authenticity, extraordinary dynamic responseand the breadth and depth of tones only made available inthis virtual piano software conceived and designed bySteinberg.Please note that this manual often refers to right-clicking,e.g. to open context menus. If you are using a Mac with asingle-button mouse, hold down [Ctrl] and click.Based on the same technology used by REVerence, theworld’s first VST3-based convolution reverb processor already featured in Cubase 5, The Grand 3 enables you tomake your piano sound as if you were playing in an ancientcathedral or in a live music venue – simply at the flick of aswitch. You also get an algorithmic reverb with more than60 reverb presets to round out your options, giving youabsolute freedom to explore your acoustic environment.5The Grand 3
How you can reach usThe USB-eLicenser is a USB device on which your Steinberg software licenses are stored. All hardware-protectedSteinberg products use the same type of device, and youcan store more than one license on one device. Also, licenses can (within certain limits) be transferred betweenUSB-eLicensers – which is helpful, e.g. if you want to sella piece of software.Clicking the Steinberg logo in the top right corner of TheGrand opens a pop-up menu where you will find items forgetting additional information and help: On this menu, you can find links to various Steinbergweb sites. Selecting one automatically launches yourbrowser application and open the page.The product package of The Grand contains an activationcode, which is found on the Essential Product License Information card within the product package. To make unlimited use of your version of The Grand, you must manuallydownload a license to an USB-eLicenser connected toyour computer, and activate your permanent license usingthe activation code.On the web sites you can find support and compatibility information, answers to frequently asked questions, links for downloading new drivers,etc. This requires that you have a browser application installed on yourcomputer, and a working Internet connection. When you choose the Help item, an online version ofthe documentation opens.The License Control Center (which can be found on theStart menu on Windows systems or in the Applicationsfolder on a Mac after installation of The Grand) is the placewhere you can check the licenses installed on your USBeLicenser, and activate new licenses. You will also find a menu item for the registration of yourproduct.For further information see “Register your software!” on page 8.Installation!To do so, launch the License Download wizard of theLicense Control Center and follow the instructions.Please read the following section before installingThe Grand. If you are using other copy-protected Steinberg products, you may want to transfer all licenses for your applications to one USB-eLicenser, thus using up only oneUSB port of your computer.The USB-eLicenserMany Steinberg products, including The Grand, use theUSB-eLicenser, a hardware copy protection device. TheGrand will not run without an eLicenser containing an activated license.!To transfer licenses between USB-eLicensers, launch the License Transfer wizard of the License Control Center and follow the instructions.The USB-eLicenser is a separate product, and is notincluded in the product package of The Grand.The USB-eLicenser6The Grand 3
System requirementsInstalling The GrandTo use The Grand, your computer must meet the followingrequirements:The product package of The Grand contains severalDVDs for installation. Since The Grand provides a largeamount of content, more than one DVD is needed for theinstallation process. Please have all DVDs ready, becauseyou will be asked to remove one DVD and insert the nextone during the installation.Windows Windows XP (SP2) or Windows Vista Pentium/Athlon 2.0GHz dual core mobile (2.5GHz recommended) or dual core 2.0GHz processor (3GHz recommended) 2 GB RAM (3 GB recommended) Up to 32 GB of free hard disk space Display resolution 1024 x 768 pixels (1280 x 800 pixelsrecommended) Windows DirectX compatible audio hardware (ASIO compatible audio hardware recommended for low-latency performance) DVD-ROM drive with dual-layer support USB port for USB-eLicenser (license management) USB-eLicenser Internet connection for license activation VST2, VST3, AU (tested in Cubase SX3, Cubase 4, Cubase 5,Nuendo 4, Ableton Live 8 and SONAR 8), or ReWire compatible host for use as plug-in or ReWire slave-device!The installation process may take some time. To keepit short you might want to start by installing only onemodel. During the installation process you also havethe possibility to select the content you wish to install.You can add more models or content later by restarting the installation process.!The installer of The Grand allows you to save thecontent files on a different hard drive than the program files.Proceed as follows:1. Insert the first DVD into your DVD drive.An interactive start screen appears. If the interactive start screen is notopened automatically or if you have a Macintosh computer, you can manually open the interactive start screen by double-clicking the file“The Grand 3 Start Center.exe” under Windows or “The Grand 3Start Center.app” on a Macintosh computer.Macintosh Mac OS X 10.5 Power Mac G5 dual 2.0 GHz or Intel Core Duo 2.0 GHz processor (Intel Core Duo 2.66 GHz recommended) 2 GB RAM (3 GB recommended) Up to 32 GB of free hard disk space Display resolution 1024 x 768 pixels (1280 x 800 pixelsrecommended) CoreAudio compatible audio hardware DVD-ROM drive with dual-layer support USB port for USB-eLicenser (license management) USB-eLicenser Internet connection for license activation VST2, VST3, AU (tested in Cubase SX3, Cubase 4, Cubase 5,Nuendo 4, Ableton Live 8 and Logic 8), or ReWire compatiblehost for use as plug-in or ReWire slave-device2. Follow the instructions on screen to start the installation of The Grand and browse through the additional options and information presented.If you don’t want to install The Grand via the interactivestart screen, follow the instructions below:Windows1. Double-click the file called “Setup.exe”.2. Follow the instructions on screen.Macintosh1. Double-click the file called “The Grand 3.mpkg”.2. Follow the instructions on screen.7The Grand 3
Register your software!To access The Grand via an instrument track, proceed asfollows:We encourage you to register your software! By doing soyou are entitled to technical support and kept aware of updates and other news regarding The Grand.1. Open the Project menu, and on the Add Track submenu select “Instrument”.Proceed as follows:2. The Add Instrument Track dialog is opened.Select The Grand from the instrument pop-up menu. Click the Steinberg logo in the top right corner of thecontrol panel and select “Register The Grand 3” from themenu that appears.3. Click OK to create the instrument track.Click the Edit Instrument button in the Cubase Inspector to open thecontrol panel of The Grand.This option is an Internet link that opens the Registration page of theSteinberg web site. To register, simply follow the instructions on screen.The Grand has now been set up as a VST instrument inCubase. For more details about the handling of VST instruments, see the Cubase Operation Manual.Getting ready to playThe following sections describe how to use The Grand asa plug-in in different host applications, or as a standaloneinstrument.Using The Grand in an AU compatibleapplicationYou can use The Grand in an AU host application (e.g.Logic).Setting up The Grand as a VST instrument inCubaseThe AU version of The Grand is installed in your AU plugins folder and lets The Grand work in an AU environment –without any performance loss or incompatibilities.Ö The following information refers to the use of The Grandin Cubase. We assume that you have correctly set up Cubase as well as your MIDI and audio hardware, and that Cubase receives MIDI data from your external MIDI keyboard.If you want to use The Grand in another VST host application, please refer to the documentation of this application.For Logic Pro 8, proceed as follows:1. Open the Track Mixer and select the desired Instrument channel.2. [Command]-click the I/O field, and in the pop-upmenu that opens select either Multi-Channel or Stereo.Cubase provides two ways of working with VST instruments: the VST Instruments window, or instrument tracks.3. In the submenu that appears, select All Instrumentsand then The Grand.To access The Grand via the VST Instruments window,proceed as follows:The Grand is now loaded as AU instrument.1. In Cubase, open the Devices menu and select the VSTInstruments option.The VST Instruments window opens.2. Click in one of the empty slots to open the instrumentpop-up menu and select The Grand.3. You will be asked if you want to create an associatedMIDI track connected to the VST instrument. Click Create.The Grand is loaded and activated, and its control panel is opened. AMIDI track called The Grand is added to the Track list. The output of thistrack is routed to The Grand.8The Grand 3
The Grand standalone and ReWire To retain your The Grand settings, you have to savethem as a preset (click the disk symbol to the right of theThe Grand logo).The Grand can be used as a standalone application, independently of any host application. This also makes it possible to use The Grand with sequencer applications thatdo not support one of the provided plug-in formats of TheGrand (i.e. VST and AU), but allow for data exchange using ReWire.You may want to use a file name that indicates that the file contains settings created for a particular sequencer project. This way, you can easilyreload your settings when reopening a particular sequencer project. Formore information, see “Preset handling” on page 12.The Preferences dialog!Note that to use the ReWire functionality, the corresponding ReWire files must be installed. If you don’thave these files already, you can download themfrom www.propellerheads.se.When running The Grand as a standalone application, youcan configure the application in the Preferences dialog. Toopen the Preferences dialog, proceed as follows:ReWire2 is a special protocol for streaming audio andMIDI data between two computer applications. When using ReWire, the order in which you launch and quit thetwo programs is very important, as the first audio application launched will capture the audio card resources. Click the Open Preferences button (the cogwheel symbol) to the right of the audio output field.Proceed as follows: Right-click in the topmost section of the control paneland select “Preferences” on the context menu.Click here to open thePreferences dialog.1. Launch the sequencer application you wish to use(e.g. Ableton Live, ProTools).The Preferences dialog has several pages on which youcan make the following settings:If your sequencer supports ReWire, it will provide a way to assign audioand MIDI channels for the exchange of data. See the documentation ofyour sequencer application for details. On the MIDI Routing page, use the MIDI Input Port popup menu to specify a MIDI input.2. Launch The Grand as a standalone application.You can launch the program like any other application on your computervia the Start menu or desktop icon (Win) or by double-clicking the application symbol in the Applications folder (Mac). You can also double-clickthe file “The Grand 3.exe” in the program folder (Win).! On the Audio Routing page, use the Audio Output Portpop-up menus to assign different audio outputs.The Grand supports four channels: two front channels (left and right)and two rear channels (left and right). You can assign different audio outputs for each channel. Selecting an audio output on the pop-up menumaps that output to the corresponding channel.If you press [Shift] and select an audio output, the front and rear channelsare set to incrementing audio output ports – e.g. 1, 2, 3, 4 or 5, 6, 7, 8.If you press [Alt]/[Option]-[Shift] and select an audio output, the audio outputs are assigned in pairs to the front and rear channels – e.g. 1, 2, 1, 2 or5, 6, 5, 6.When you are using a Mac, you have to launch theprogram in standalone mode once after the installation to activate the ReWire functionality.When you now play a sample with The Grand, the soundis streamed via ReWire to the assigned mixer channels inyour host application. On the Metronome page you can make a number of settings regarding the use of a metronome:Ö Note that you are now running two completely separate applications. When you save your sequencer project,this will include the overall channel and bus configuration,but none of the settings in The Grand!OptionDescriptionModeHere you can turn the metronome on and off or set it toCount In mode.AccentActivate this to accentuate the first beat of each bar.LevelUse this fader to adjust the volume level of the metronome.ConnectionsHere you can select a separate stereo output for the metronome.9The Grand 3
Missing content On the General page, activate “Don’t prompt for confirmation when quitting The Grand 3” if you want The Grandto close without prompting when quitting the program.There might be situations where a model or a content filebecomes unavailable. The reason can be a closed encrypted partition or a detached removable hard drive, forexample. In these cases you will be prompted that a specific VST Sound Library cannot be found. To access thecontent again, proceed as follows: On the ASIO Driver page, select your audio hardwaredriver from the ASIO Driver menu.If you plan to use several audio applications simultaneously, you maywant to activate the option “Release Driver when Application is in Background”. This will allow another application to play back via your audiohardware even though The Grand is running.The input and output latency values for your audio hardware are displayed. “Latency” is the amount of time it takes for your system to respond to whatever messages are sent to it. High latency results in anoticeable delay between when you press a key and when you hear thesound. Below the latency values, the sample rate that is set for the connected audio hardware is displayed.When you run The Grand, there are several processes fighting for access to processor time in your computer. The parameter “Audio Priority”allows you to determine which processes have priority:OptionDescriptionNormalIn this mode non-audio processes and audio playbackget roughly equal priorities (default setting).BoostIn this mode, audio precedes MIDI in priority. Try thismode if audio playback problems occur when playingback MIDI and audio material.1. Click Ignore.The Grand is loaded, containing the content that could be found.2. Quit The Grand.3. Reattach the removable hard drive or reopen the encrypted partition.4. Launch The Grand.If content files or models are missing for another reason(e.g. if you moved them onto another hard drive after installation or if you have added a hard drive, thereby “shifting” the partitions), proceed as follows:1. In the window with the message about the missingVST Sound Library, click Locate if you want to choose adifferent file location.A file dialog opens.!!Under Windows, we strongly recommend that youaccess your hardware via an ASIO driver writtenspecifically for the hardware, if available. If no ASIOdriver is installed, we recommend that you checkwith your audio hardware manufacturer if they havean ASIO driver available, for example for downloadvia the Internet.2. Browse to the directory where the content is located.3. Select the file and click Open.All content files that are found in this location become available.Ö If you have installed the content files on multiple drives,the dialog might open again asking for further content files. Click Remove if you don’t want The Grand to search fora particular file in the future.On Windows Vista systems, you can also use theGeneric Low Latency ASIO driver if no specificASIO driver is available.This way, you can avoid that The Grand searches for missing content after having uninstalled a specific model.Ö You can activate the “Do not ask again” option if youwant to ignore or remove all missing files at once. Once you have selected the driver, open the Advancedpage to specify which inputs and outputs should be usedand name these. Click the Control Panel button to bringup the control panel for the audio hardware and adjust thesettings as recommended by the audio hardware manufacturer.10The Grand 3
The contentsustain, and response with super realistic playing behaviordelivers the musical equivalent of perfection. This virtualpiano is truly in a class of its own and conveys the expressiveness of the player. If you prefer a brilliant, crisp pianosound, you should use the Yamaha C7.The recording of The GrandModel DA Steinway D Grand was recorded to obtain the Model Dsamples. The enchanting depth of tone and ultra-responsive touch of the Steinway D grand piano is reflected inthe Model D. Its warm and vibrantly rich sound and itsoverall performance simply make playing this virtual pianoa pure joy.Bösendorfer 290The four acoustic piano models were recorded in Swedenby highly experienced recording specialists, in a large studio with a high ceiling well suited for the recording ofacoustic instruments. The piano models were recordedusing top-of-the-line recording equipment, and no filtersor effects were applied during mixing to preserve the natural piano sound. For all keys of each of the 4 acoustic piano models, up to 20 velocities were recorded.The wider register of the Bösendorfer 290 Imperial Grandadds to the piano’s timbre which has intricately been sampled to give you the required control when playing the softest pianissimo through crescendos to the reserves ofpower needed for the loudest fortissimo. This virtual pianomodel shines in every musical aspect, providing the exuberant sound quality and assertiveness of its correspondingreal piano pendant. The recording for The Grand includesthe full extended key range of eight full octaves (97 keys)provided by the 290 Imperial Grand.The modelsUpright PianoThe Grand 3 includes five different piano models, eachcharacterized by individual attributes. You can choose between 3 grand pianos, one upright model and an electricgrand piano. The virtual acoustic pianos are available inthe two recording perspectives “Close” and “Player”:The upright by Nordiska Pianofabriken definitely has personality of the right sort! And its characteristic tone hasbeen captured in the virtual upright piano model, designedto get the job done when looking for that little extra edgeto your song. It might be rock, blues, jazz, gospel or anyother style that simply needs some attitude — when yourtrack requires a less “grand” sound this model is definitelyyour first choice.OptionDescriptionCloseIn this recording perspective the focus is nearer to thekeyboard, delivering a very bright and shiny sound with aminimum of ambience. It is ideal for adding a reverb effect(see “The Ambience page” on page 17).PlayerThe focus of this recording perspective is closer to thestrings and hammers and offers a mellower, pleasingsound with natural ambience.Yamaha CP80The Yamaha CP80 Electric Grand is one of the most favorable classic electric grand pianos around and comeswith the built-in effects tremolo, phaser, flanger and chorus. Here, the samples come directly from the source: thecontent experts at Yamaha.The following section gives you an overview of the characteristics of the different piano models.Yamaha C7The unparalleled tone of a Yamaha C7 Grand was recorded in its whole beauty and musical range. Its incredible sound, resulting from the tonal projection and long11The Grand 3
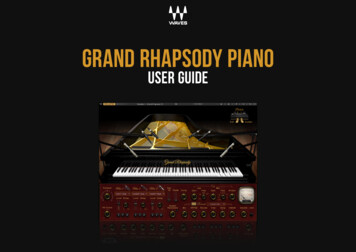
ParametersThe controls for thestandalone player (see“Additional controlswhen using The Grandas a standalone instrument” on page 21).General plug-incontrolsPerformancemeters (see “Performance meters”on page 25)Editor view (see“Switching views”on page 13)Keyboard displayand pedals (see“Preview keyboard and pedals”on page 14)General plug-in controlsPreset handlingIn the upper section of the plug-in window, you will find anumber of general controls. Here you can load and savepresets and adjust the main volume. In addition, there arebuttons to activate the ECO Mode (see “ECO Mode (general controls)” on page 24) and the RAM Save functions(see “RAM Save (general controls)” on page 24). The Reset MIDI function (the “lightning” icon) allows you to resetthe plug-in. Use this function when you lose the MIDI connection, for example, while performing on stage. On theupper left, you will find a button for switching between theEditor and the Player view. Finally, you can click the plug-inand company logos to open the about box or to get in contact with Steinberg. The general plug-in controls are described in detail on the following pages.To the right of the plug-in logo, you will find the presetpop-up menu of The Grand. The presets you load andsave here include any sound settings of The Grand, i.e.the settings on the Model page, the Equalizer page, theAmbience page, etc. You will find the factory presets foreach piano model on separate submenus. The factory presets are separated from your user presets by a line.Ö The presets do not include the setting of the Disk versus RAM usage on the Options page.To load a preset, proceed as follows:1. Click the arrow button to the right of the preset field toopen the preset pop-up menu.2. Open the submenu for the desired piano model.Ö All controls in The Grand can be set to their defaultvalue by holding down [Ctrl]/[Command] and clicking onthe control.3. Select the preset you wish to load.12The Grand 3
Ö When you select a preset from a different model thanthe one that is loaded, the respective samples have to bereplaced. Therefore, the loading process will take longer.Switching viewsThe Grand includes two views: the Editor and the Playerview.To save a preset, proceed as follows:1. Click the disk icon to the left of the preset pop-upmenu.2. Specify a location and file name in the file dialog.3. Click Save to store the preset and close the dialog.Click Cancel to close the dialog without saving the preset.To delete a preset, proceed as follows:1. Select the preset you wish to delete from the presetpop-up menu.If necessary, wait until it has been loaded.2. Click the trash icon to the left of the preset menu.A dialog opens.3. Click Yes to delete the preset and close the dialog.Click No to close the dialog without deleting the preset.The Editor viewÖ Factory presets cannot be deleted.The Editor view shows the piano viewed from above. Instead of a lid there is a display with controls for accessingthe sound parameters and plug-in settings. Below the display there are buttons for switching between the Model,Equalizer, Ambience, Control and Options pages. Thekeyboard and the three pedals in the lower section can beused to preview the pianos.Adjusting the main volumeUse the Main Volume knob to adjust the overall volume ofThe Grand. The maximum value is 12dB (the defaultvalue is 0dB). Turn the control clockwise by clicking on it and dragging upwards to raise the volume. Turn the control clockwise by clicking on it and dragging downwards to lower the volume.The Player viewThe Player view focuses on the piano display. It shows ahigh-quality 3D model of the selected piano model. Abovethe piano display, there are the general plug-in controls,which give access to the presets and the main volume.Apart from that, there are no distracting controls in thePlayer view. Just load a preset from the pop-up menuabove and start playing.13The Grand 3
Ö When you load the plug-in, it always opens in the Editor view.If you click on the plug-in logo in the upper left of the control panel, the about box opens. It contains informationabout the version and build number of the plug-in. Withthe plug-in version and build number you can verify if yoursoftware is up-to-date. Please visit www.steinberg.netregularly to check for updates. To close the about box,click on it or press [Esc] on your computer keyboard.Before you can switch to the Player view, you must load apiano in the Editor view.To switch to the Player view, proceed as follows:1. From the Editor view, load a piano model or a preset.Preview keyboard and pedals2. In the upper left section of the control panel, click the“p” button to the left of the plug-in logo.Typically, you will play the pianos with your MIDI controllerkeyboard and MIDI pedals. However, you can also previewthe pianos by clicking on the keys of the keyboard and thethree pedals below it in the Editor view.The Player view opens, showing the selected piano model.To switch back to the Editor view, click the “e” button inthe upper left of the Player view. To play the piano with your mouse, click the desirednote on the keyboard.Reset MIDISometimes, notes can get stuck, e.g. because the plug-inlost the MIDI connection, or the plug-in receives the wrongMIDI controller data. In such a case, you can “emergencyreset” the plug-in:In the Editor view, the closer you click to the tip of the key, the higher thevelocity and vice versa.In the Player view, the keyboard always plays with full velocity. To play the pedals with your mouse,
Nuendo 4, Ableton Live 8 and Logic 8), or ReWire compatible host for use as plug-in or ReWire slave-device Installing The Grand The product package of The Grand contains several DVDs for installation. Since The Grand provides a large amount of content, more than one DVD is needed for the installation process. Please have all DVDs ready, because

