Transcription
Basic Guitar Setup 101 AbridgedCharles TauberCopyright 1996Revised May 2015charlestauber.com“Things should be as simple as possible, but no simpler.”- Albert Einstein
Preface to the 2015 RevisionThe original version of this article, Basic Guitar Setup 101, was written in 1996 at a time when relatively littleinformation was publicly available to the aspiring luthier, repair person or do-it-yourselfer. It was a time beforeGoogle, Youtube, Photobucket, Twitter and Facebook and the widespread use of multi-media on the internet: it wasa time when internet discussion groups were text-only usenet newsgroups. Consequently, when this article wasoriginally “published” to the usenet group rec.music.guitar.acoustic, it contained no pictures or illustrations sincethey were unsupported in the text-only format of usenet groups.This article was written in response to the many repetitive questions that were posted to the usenet discussionforums. After repeatedly answering many of the same questions on the subject of guitar setup, I though it expedientto put the answers down in a single article, rather than repeatedly address them one at a time. Once published,readers could then be pointed to the article, saving everyone time and effort. The article was well received and sincethen has been freely copied, posted elsewhere and referenced in other articles on the subject.Since that time, many people have added to the available information on the subject. There are now many articles,some of which bear a remarkable resemblance to this one, as well as many how-to videos, photos, webpages andother on-line resources, all found via a simple search of the internet. Some of that information is wonderful and isinformation I wish I had had available when I was first learning. However, regardless of the amount of informationnow available, and the ease with which it can be found, the same questions are still being repeatedly asked in today’sdiscussion forums, making this article as relevant today as it was when it was first written.This article, then as now, is intended as instruction for both those wanting to perform the work themselves as well asfor those who do not want to do the work themselves but want to educate themselves to be able to speakknowledgeably with the luthier or technician who will do the work. As with previous revisions, you are welcome toshare this article with any who are interested or quote portions of the article. In return I ask only that you provide mewith credit as the author.Over the years, this article had grown to near book-sized proportions to include information of relevance to aspiringluthiers and guitar design. In this revision, I have returned the article to its intended purpose of being a no-nonsensehow-to guide dedicated to the basics of guitar setup. In so doing, I have removed most of the theoretical discussion,particularly of intonation and temperament, and eliminated discussion of the more “esoteric” subjects ofcompensated nuts and elements relevant to those who are designing guitars.I hope you find the article useful. Should questions arise while reading the article, feel free to contact me atcharlestauber@yahoo.ca.Charles Tauber, May 2015Basic Guitar Setup 101 Abridged,Charles Tauber, 20152
1. IntroductionThis article is intended to provide an introduction to those wanting to understand the basics of adjusting a guitarto play well. These adjustments are called basic guitar setup. Once the basics of guitar setup are understood,one can use that knowledge to perform the work oneself or one can use that knowledge to better communicatewith a professional who has been commissioned to do the work.Those commissioning a professional luthier or repairperson to perform the setup work can expect to payanywhere from about 50 to 150 for a professional setup. The variation in cost is due to the level of experienceof the person doing the work, their geographic location and, sometimes, the level of demand for their work.Many of the techniques and much of the theory that I have outlined within this article is based upon what I havelearned from those generous enough to share with me what they knew. The techniques I have described are onlyone way of doing things; there is no one right method, though some methods are quicker and easier than others.What is more important than rigidly adhering to a set of techniques is to understand the theory behind thetechniques. Understanding the theory provides you with a basis for separating the facts in guitar setup from theabundant mythology. Once you understand what you are trying to accomplish (the theory) you can adopt, oradapt, specific techniques for accomplishing each task.While the following discussion strictly applies to steel string acoustic guitars, the basic theory is the same forclassical and electric guitars, as well as a wide variety of other fretted string instruments. Also, be aware that, asthe title of this article implies, the information contained in this article is an introduction to, rather than "thefinal word" on, guitar setup.2. The Four AdjustmentsThere are four basic, universal adjustments that affect the playability of every guitar. These are as follows:1. Adjusting the amount of relief (or "bow") in the neck2. Adjusting the string height at the saddle3. Adjusting the string height at the nut and4. Adjusting the intonation.These four adjustments are what I refer to as "basic guitar setup".In contrast with "repair" work, which is work that may need to be uniquely performed on a specific instrumentto maximize the playability of that particular instrument, setup work is a series of adjustments that need to beperformed at least once on every guitar. Very few manufactures take adequate time to properly perform theseadjustments. Even when manufacturers do, the setup is very general and aimed at the "average" player, ratherthan the specific preferences of an individual player. Thus, it is nearly always worthwhile for a guitar owner tohave his or her guitar setup to suit his or her specific preferences.Before discussing each of these four adjustments, along with the minimum of theory necessary to support the"how" and "why" these adjustments are made, lets look briefly at the tools required to make these adjustments.3. ToolsThose intending to undertake the work themselves will need to acquire at least a minimum set of tools to assistthem in conducting the work, as well as a minimum level of skill in using those tools, something that takes timeto acquire. Whether or not one should undertake the work oneself depends upon one’s desire to do so and one’saptitude for doing the work. For many guitar players, it is a much easier - and less frustrating - to pay aprofessional luthier or repairperson to do the work. That said, the individual might choose to perform only someof the simpler aspects of the setup - such as truss rod adjustment - and leave other aspects to a professional.Basic Guitar Setup 101 Abridged,Charles Tauber, 20153
Despite what some luthier-supply houses would have you believe, basic setup work can be accomplished quitesuccessfully using only a small number of simple, inexpensive tools. What tools one needs depends, in part,upon how much of the setup work one wants to do. A minimal set of tools sufficient to perform full setup workcan be assembled from as little as 100 or so. However, if one intends to do a lot of setup work, the cost ofpurchasing a few specialized tools will more than pay for itself in the increased efficiency of using those tools.A minimal set of tools sufficient for guitar setup work is shown below and consists of the following:J Vice of your choosing to hold nuts and saddlesJ X-Acto knife handle and saw bladeJ Teardrop-shaped needle fileJ Standard single-cut bastard mill fileJ Standard woodworking fileJ Short 6” metal ruler and a 36” long metal ruler, preferably calibrated in both inches and millimeters,J Standard set of feeler gaugesJ 0000 grade steel woolJ Various grits of sandpaper - 80 to 600 are usefulJ Home-made sanding blockJ Allen keys (metric and inch) and hexagonal socket wrenches for adjusting truss rodsIn the 1990’s specialized, gauged files were introduced for filing nut slots. These files are available in a varietyof widths intended to match the various diameters of guitar strings. More recently still, saws have beenintroduced that produce a kerf (cut width) that is equal to some common diameters of guitar strings. (The sawscut slots much faster than files do and is my preference.) Individual nut files sell for about 13 each, whileindividual saws sell for about 9 each. Buying a variety of sizes to match specific diameters of strings canquickly become an expensive investment for someone wanting to do only one or two setups. While these cansave time for the professional performing many setups, an equally good job can be accomplished using the ageold methods of instrument makers prior to these specialized files and saws: a simple 10 set of needle files willwork quite adequately. As with needle files, gauged files can be used with a stroke that widens the slot beyondthe actual thickness of the file, allowing one file to produce a variety of slot widths, thereby reducing thenumber – and cost - of files necessary.These days, there are many makes and models of electronic tuners from which to choose. Most tuners that arecalibrated in cents – 1/100th of a semitone – are adequate for setting-up intonation. For those interested in“perfection”, and more detailed investigations into intonation, an expensive strobe tuner is required.Basic Guitar Setup 101 Abridged,Charles Tauber, 20154
4. Neck ReliefWhen reduced to its simplest, the mechanics of the guitar is essentially a set of vibrating strings that arestretched across a (semi) rigid structure. To understand guitar setup, it is helpful to know a little about both thevibrating strings and the structure across which they are stretched.The tension imposed on a guitar’s strings is maintained by fixing each end of the strings: one end at the headand the other at the bridge. While at rest, due to the tension imposed upon each string, each string forms anearly perfect straight line between its end-supports - the nut at the head and the saddle at the bridge. For aguitar, the vibration of a string is initiated by displacing a string from its rest position - the straight-line positionit assumes while it is at rest and under tension - and then releasing it. The elasticity of the string, and the tensionimposed upon the string, causes the string to overshoot its natural rest position until it reaches nearly the samedisplacement in the opposite direction. Due to a "loss" of energy with each overshoot, the amplitude of thestring diminishes (decays) until it eventually returns to its rest position.The general shape assumed by the vibrating string is that of a shallow curve that begins at one end of the string,is a maximum at the string's mid span, and ends at the other end of the string. Thus, (theoretically) there is nodisplacement of the string at the nut or saddle, and there is a maximum displacement near the 12th fret, thestring's theoretical midpoint.The amplitude of a vibrating string depends upon several factors including string tension, string material and theinitial displacement of the string (i.e. how heavily the string is plucked or struck). For example, the same set ofstrings when tuned below concert pitch will have a greater amplitude than when at pitch. Similarly, a lowertension string (such as "silk and steel", or light gauge), when tuned to pitch, will have a greater vibratingamplitude than a higher tension string (such as phosphor bronze, or medium gauge) tuned to the same pitch.Any string type will have a greater amplitude if struck harder (i.e. given a greater initial displacement). Thus,the amplitude of the vibrating strings will vary depending upon the type and gauge of strings used and theplayer's "style" of playing.To accommodate the amplitude of the vibrating string, there are two options: either raise the height of thestrings (the "action") sufficiently that the bottom of the vibrating strings do not touch the tops of the frets, ormake the top of successive frets assume the shape of the vibrating string. The string height can be minimized bydoing the latter, which reduces the distance that the strings must be depressed for fretting. This, in turn, makesthe guitar easier to play.Practically, the way in which the tops of successive frets are made to conform to the amplitude of the vibratingstrings is to introduce a slight curvature to the neck. This curvature, which is a slight upward concavity, isusually referred to as neck "relief". The amount of neck relief required depends upon several factors, includingstring height, and, of course, string amplitude. If the string height is sufficiently great, no neck relief is required;the vibrating strings will clear the tops of the frets regardless. This, however, increases the distance that thestrings must be depressed, which makes the guitar harder to play.Since the amplitude of the vibrating string depends upon the type and tension of strings used and the "attack"used to displace the strings, the amount of neck relief must also depend upon these same factors as well as theindividual preferences of the player. While there is no one universally correct setting for neck relief thataccommodates all the variations of these factors, as a general guideline, approximately .010" of relief is typical.This is generally measured at a fret that is at the mid span of the neck (typically the 7th fret) and is the distancefrom the top of the fret to the bottom of a string when the string is fretted at the first fret and at a fret where theneck joins the guitar body, typically the 14th fret.Basic Guitar Setup 101 Abridged,Charles Tauber, 20155
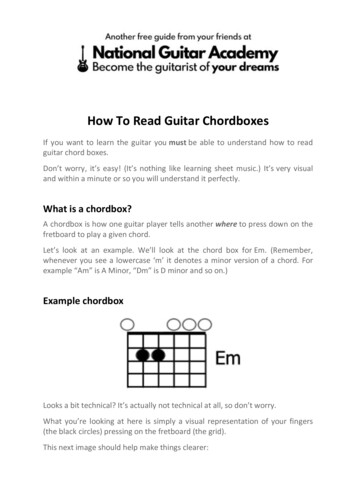
By simultaneously depressing a fully-tensioned string against the 1st and 14th fret, the string forms astraightedge spanning the 1st and 14th frets. Alternatively, a metal straightedge can be laid along the fingerboard(on top of the frets) and the distance measured from the top of the 7th fret to the bottom of the straight edge.I rarely measure the amount of relief. Instead, I prefer to usethe index finger of my fretting (left) hand to hold down astring at the first fret and use my small finger of my right handto hold down the same string at the fret where the neck meetsthe body. I then use the index finger of my right hand to presson the string directly above the 7th fret. By pressing the stringagainst the top of the 7th fret I can visually gauge how muchrelief there is. With experience, it is unnecessary to measurethat small distance with comparative devices, such as feelergauges, calipers, or a dial indicator. Instead, it can bemeasured visually and by feel with sufficient accuracy andrepeatability.For a guitar equipped with an adjustable truss rod, adjusting the amountof neck bow is quite simple. While there are a number of designs ofadjustable truss rods, each shares the same basic principles ofoperation. Specifically, when a threaded nut is tightened on a threadedmetal rod, the resulting tension in the rod alters the curvature of theneck in which the rod is embedded. Adjustment of the rodinvolves tightening or loosening the nut on the rod.Tightening the nut increases the tension in the rod, and consequentlyincreases the amount that the rod counteracts the pull of the strings,thereby reducing the bow in the neck. In recent years, a “doubleacting” rod has become popular in which tightening or loosening the nut will enable the rod to curve in eitherdirection, rather than the single direction achievable with other designs.The truss rod nut may be located at either end of the rod, at either the guitar's head or from inside the soundhole. At the guitar's head, the nut is often concealed under a small plastic or wooden plate, fastened with smallscrews. From the sound hole, the truss rod nut may be directly accessible through ahole in the cross brace, or may be located at the heel block, often accessible onlyby completely loosening the strings. To tighten or loosed the nut, you will requireeither an Allen key or specialized socket wrench. StandardAllen keys are available at most hardware stores andspecialized socket wrenches for this purpose areavailable for several dollars from luthier supplyhouses. (Some manufacturers will include anappropriate wrench or key, particularly if theyuse a nonstandard arrangement.)Since the amount of string tension imposedupon the neck changes the curvature (bow) of the neck, whenever possible, the adjustment should be done whilethe guitar strings are at full tension. Where this is not possible (e.g. some Fender electric guitars) it is aniterative process in which an adjustment is made with no string tension and then the measurement is taken afterthe strings are returned to full tension. This is repeated until the adjustment is correct.The required number of turns of the nut depends upon the amount of bow in the neck, the truss rod design andits installation. Regardless, the adjustment required rarely exceeds one or two full turns of the nut, and is usuallyBasic Guitar Setup 101 Abridged,Charles Tauber, 20156
less than one. Usually, when viewing the nut from the end at which it is adjusted, turning the truss rod nutclockwise tightens the nut and turning it counterclockwise loosens the nut. However, in some truss rod designsthis may be reversed. Consequently, if in doubt, simply turn the nut half a turn in one direction to observe whichdirection tightens the nut.Despite popular mythology, there is no need to turn the nut a quarter of a turn and then wait over night to seethe result before making any further adjustment and waiting again over night, iteratively. Instead, simply turnthe nut as necessary to provide the required relief.Ensure that you are using the correct size of key or wrench for the nut, else you run the risk of damaging the nutand making further adjustment difficult. In some cases, some amount of force is required to turn the nut. Usecommon sense on the amount of force to apply. If in doubt, take the instrument to an experienced repair personwho can instruct you on how to adjust the nut.In addition to this adjustment, it is often helpful to sight down the neck - from nut to sound hole - to observe the"trueness" of the fingerboard and to identify any frets that may not be fully seated. A true fingerboard is one thathas no bumps or hollows along its length (i.e. is "flat"). For guitars with a joint between the neck and the body,it is a common fault to have a hump in the fingerboard just beyond the joint, typically beyond the 14th fret. Thetruer the fingerboard, the lower the string height can be set before the strings buzz against the frets. For guitarswith either no adjustable truss rod, or that have sufficiently untrue fingerboards, the remedy is the same; removethe frets and dress (true) the fingerboard, followed by refretting. This procedure is "involved" and takes a skilledrepair person several hours to complete. Hence, truing of the fingerboard will not be discussed in this article. Bycontrast, adjusting the truss rod is a trivial adjustment that can be performed by the layperson in minutes.It is very important to understandhow changing the amount ofbow in the neck affects theheight of the strings relative tothe tops of the frets. Ideally,from the point of view of ease ofplaying, the guitarist desires thefingerboard surface to be straight("true") along its length and parallel (or nearly parallel) to the bottom of the guitar's strings. This would result inthe strings maintaining a constant distance above the fingerboard along the fingerboard's entire length. This, inturn, would require a uniform effort to depress the strings and would provide the greatest ease of playing.If a curvature (bow) is introduced into the fingerboard (and neck), the strings will no longer be a uniformdistance from the tops of the frets; some places along the string will be closer to the frets, while others will befarther away.If the curvature is concave upwards ("bowed"), the strings will be at their maximum height above the tops of thefrets at the mid span of the curve, as shown in the lower of the two models shown in the figure above.Conversely, if the curvature is concave downwards ("back bowed"), the strings will be at their minimum heightabove the tops of the frets at the mid span of the curve, as shown in the upper model in the figure above. Thecharacteristic symptom of an excessively bowed neck is a high action at the nut that becomes higher around the7th fret. The characteristic symptom of a back-bowed neck is fret buzz in the middle frets, around the 7th fret,and buzzing of the open strings against the first fret. Often, action exhibiting either of these characteristics is aresult of an incorrect neck bow, and is "fixed" by adjusting the bow in the neck.It is important to note that the curvature of the neck affects the string height at both the nut and at the middlefrets. It is, therefore, essential that the correct amount of neck bow be set before any adjustment of the stringheight at the nut or saddle. While the amount of bow affects the string height, it should not be used toBasic Guitar Setup 101 Abridged,Charles Tauber, 20157
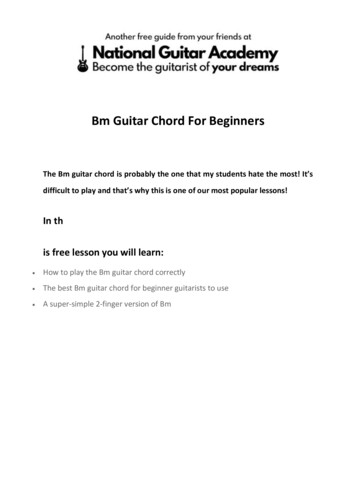
specifically attempt to adjust the string height at either the nut or saddle. Adjusting the amount of neck bow is aseparate adjustment that must be made before and independent of adjusting the string height at the nut andsaddle. This cannot be over emphasized. First set the correct amount of bow in the neck, then, once it has beenset, leave it at that setting and then adjust the string height at the nut or saddle, if necessary.4. Adjusting the String Height at the SaddleThe saddle height can be adjusted either before or after adjusting the string height at the nut. My preference is toadjust the string height at the saddle before adjusting the nut.Most steel string acoustic guitars, as well as most electric and some classical guitars, have the top surface of thefingerboard domed (radiused) or arched across its width. (Many players find a domed fingerboard easier andmore comfortable to play.) To achieve the correct height of each string, the contour of the top (bearing) surfaceof the saddle will generally follow the same curvature as the surface of the fingerboard. However, toaccommodate the slight increase in string height towards the bass strings, the saddle contour deviates somewhatfrom the contour of the fingerboard. Regardless of whether or not the fingerboard has a radius, “compoundradius” or is flat, no special gauges are required to measure or transfer this curvature to the saddleheight/contour. The reason for this will become apparent.Begin by measuring the distance from the top of thetwelfth fret to the bottom of the sixth string while all ofthe guitar's strings are at full tension. One can use astandard ruler, feeler gauges, specialized string heightgauge or other means to measure this distance. I findthat measurements to the nearest 32nd of an inch aresufficiently accurate, though others prefer 64ths oreven decimal measurements. Any method thatmeasures with sufficient accuracy the distance fromthe top of the twelfth fret to the bottom of the stringcan be used. (No, despite “urban legend”, the thicknessof a quarter or dime is not sufficiently accurate.) Repeat for each remaining string. Record each string height.Although the ideal string height depends upon the preferences of the player and the type and construction of theguitar, a typical "good" playing string height ("action") for a steel string acoustic guitar is about 3/32" at thesixth (bass E) string and about 5/64" (2-1/2 32nds at the first (treble E) string, as measured from the top of thetwelfth fret to the bottom of the strings. The intermediate strings increase in string height gradually from thefirst to sixth strings. The increase in string height from one string to the next accommodates the increase invibrating amplitude that accompanies the increase in string diameter. Due to the type of music played, thematerials from which the strings are manufactured, the string tensions used and the type of guitar construction,classical guitars have a higher action, while many electric guitars have a lower action.There are only three possibilities for the measured string height:1. The strings are at the desired height,2. The strings are higher than desired or3. The strings are lower than desired.In the first case, no adjustment is required. Each of the other two possibilities is discussed below.Strings Too HighUsing elementary geometry, it can be shown that a change in the string height at the twelfth fret requires abouttwice the amount of change at the saddle. For example, if a string height measured at the twelfth fret is 4/32",and the desired measurement is 3/32", the change in height at the saddle necessary to lower the string by 1/32"Basic Guitar Setup 101 Abridged,Charles Tauber, 20158
at the twelfth fret is about 2/32". Using the measurements taken, calculate the amount that each string needs tobe lowered at the saddle. Record that amount for each string.Measure the amount of saddle height that is projecting above the top surface of the bridge. The saddle shouldproject at least 1/16" from the top of the bridge, even after reducing the saddle height by the amount you havecalculated necessary to achieve the desired string height at the 12th fret. This ensures that the strings exert asufficient downward force on the saddle to prevent the strings from vibrating side-to-side on the top surface ofthe saddle. The side-to-side vibration often causes a string to rattle or be muted. If the 1/16" projection cannotbe maintained, a neck reset, bridge pin hole ramping or shaving of the bridge may be necessary, which are“repair work” - rather than basic setup work - for either the professional repair person or the skilled amateur.If a uniform reduction in string height is required for all strings, the amount that needs to be removed can bemeasured from the bottom surface of the saddle, and marked with a sharp pencil. The excess can then beremoved, to the pencil line, using a file or sandpaper. If using a file, the saddle can be held upside-down in avice.If using sandpaper, it is considerably easier to keep thesaddle bottom flat and square if a simple aid is used. Asimple aid can be made from a reasonably flat surface,a sheet of 120 grit sandpaper and a block of wood ormetal that has a flat face and an edge that is 90º to itsface. The flat surface can be plate glass, marble, graniteor even a piece of plywood. The sheet of sandpaper canbe affixed to the flat surface with double-sided tape,masking tape, rubber cement, spray adhesive or similaradhesive. The block of wood or metal, about ½” x 3” x6” or so, is placed with its face on the sandpaper andone side of the saddle is pressed against the edge of the block. While maintaining the saddle against the edge ofthe block, repeatedly pull the saddle towards you. Sliding the saddle back and forth across the sandpaper willhave the tendency to round the bottom of the saddle. Flatness of the bottom of the saddle is more a function ofsanding technique than it is of the absolute flatness of the sanding surface. If the guitar is fitted with an underthe-saddle piezoelectric transducer, it is essential for even response of the transducer that the bottom of thesaddle be flat.When you have sanded to the pencil line, the saddle can be reinstalled in the bridge, the guitar re-tuned and thestring height checked. If the measurements and layout were performed accurately, it should be a once-throughprocess, rather than an iterative trial-and-error - there should be no need to sand a bit, check string height, sanda bit more, check string height.If the amount of reduction in string height is not uniform (i.e. from one string to the next), the reduction insaddle height is achieved by removing material from the top surface of the saddle, rather than the bottom.Before removing the saddle from the bridge, mark, using a sharp pencil, the location along the saddle at whicheach string crosses the saddle. Completely loosen all of the strings and remove the saddle from the bridge.Although the saddle should only fit snugly, but not tightly, its removal can often be facilitated with a pair ofpliers. (Saddles should never be glued to the bridge. Should you encounter a saddle that is glued into the bridgeslot, if it cannot easily be removed, the reduction in saddle height will need to be performed from the top of thesaddle and while the saddle is still in the bridge.) Mark on the bottom of the saddle which end of the saddle isfor the 1st string and which is for the 6th string.From the top surface of the saddle, measure, and mark with a pencil, the calculated reduction in saddle heightrequired for each string. A smooth curve can be drawn through the pencil marks on the face of the saddle - orthe height of the saddle can be stepped, as you prefer. Measured this way, determining the curvature of theBasic Guitar Setup 101 Abridged,Charles Tauber, 20159
fingerboard, and any attempt to match that curvature, are irrelevant. Instead, the saddle height where each stringcrosses the saddle is what it needs to be to produce the desired height for each string at the 12th fret.Clamp the saddle in a vise and remove the excess saddle height with a file, filing to the drawn line. When thisstep is correctly completed, the top (string-bearing) surface of the saddle will be flat across its width and curvedalong its length.A string supported by a relatively large, flat bearing surface will tend to vibrate from side to side over the widthof the supporting surface. This causes the string to vibrate against the supporting surface, resulting in either abuzzing sound or
Basic Guitar Setup 101 Abridged, Charles Tauber, 2015 2 Preface to the 2015 Revision The original version of this article, Basic Guitar Setup 101, was written in 1996 at a time when relatively little information was publicly available to the aspiring luthier