Transcription
pU sg ain is s ieak s a DM ng sy aSo Ea lingolRGuitar .On the Spot!Free E-BookMake Up Songs On the Guitar.On the Spot!Jesse HuntCopyright 1997-2005 On the Spot PublishingAll Rights Reserved
Guitar .On the Spot!Free E-BookMake Up Songs On the Guitar.On the Spot!Jesse HuntCopyright 1997-2005 On the Spot PublishingAll Rights Reserved
Guitar On the Spot - The SystemOverviewThis e-book is a free introduction to the guitar. If you’ld like to know more anddiscover how easy it is to jam all over the guitar using one simple code you cancheck out Guitar On the Spot - The System at www.guitar-on-the-spot.com.Click here to learn more about Guitar On the Spot - The System.Guitar On the SpotUsing the CodeGuitar On the Spot IIExpanding the CodeGuitar On the Spot IIICommanding the CodeINTRODUCTION3
Introduction - Part IDear Friend,Congratulations! You’ve taken your first step towards making your guitar playingcareer a reality! Get ready to make up songs right now. Even if you’re a completebeginner.It’s as easy as rolling dice! The secret is knowing the Key Concept.You just follow three simple steps:MAKE UP SONGS BY ROLLING A DIE1 PICKa Keyfor YourSong!2 ROLLa Dieto SelectChords fromthat Key!3 PLAYSong!YourYou can play guitar and make up songs right away without having to read a ton of stufffirst. Just roll the die! It’s an Endless Song Making Machine! edneedto take years of lessonsto read musical notesa “good ear”any guitar experienceIn Guitar On the Spot you’ll discover how to: 4Play guitar right awayMake up songs right away by rolling a dieMake up solos off the top of your headCreate emotions in your songsCreate melodies that you can singGUITAR ON THE SPOT - FREE E-BOOK - MAKE UP SONGS
You’ll also find out how to make up your own: Reggae SongsRock SongsSpanish SongsJazz SongsBlues SongsIf you’ve got the ambition to play guitar, but you’re having a hard time making sense ofit, I feel your PAIN!I struggled for years until I FINALLY discovered the Key Concept. Then it all madesense and I could make up my own songs, solos and riffs on the spot.That’s when I knew I had to share this with you! Because there’s no reason you shouldhave to go through what I went through.When you know the Key Concept practicing the guitar is no longer a chore. Itbecomes fun because you’re always making stuff up off the top of your head!After you start making up your own songs you’ll realize that“The song you’ve been dying to hear isthe one created by YOU!”**********************************Hi my name is Jesse Hunt and I could never make sense of the guitar. I alwayswanted to make up my own songs, but I found the process really frustrating.When I finally figured it out, I realized it’s really simple. The secret is the Key Concept.Once you know it, you can make up your own songs on the guitar on the spot.It’s really easy.Note: If you’re a complete beginner, check out the Guitar Basics section first.If you can already strum some chords continue on to Step 1.But before you do anything make sure your guitar is in tune, or else your songswon’t sound very good. I suggest you buy a guitar tuner at first. Then learnhow to tune a guitar without a tuner. You can learn how to tune a guitar with orwithout a tuner in the Appendix.INTRODUCTION5
Here’s an overview of the 5 steps that you can follow to get started right away:Step 1 - Discover the Secret to Making Up SongsFirst discover the secret to playing the guitar and making up your own songscalled the Key Concept.Step 2 - Make Up Songs Right Away by Rolling a DieMake up your own songs right away by rolling a die.Step 3 - Song Making TipsThen learn some song tips that you can use to spice up your songs. This stepcontains these chapters: Tips to Create Emotions in Your Songs, Make Up aSong With a Verse and a Chorus, The Secret Is in the Numbers, Song MakingTips and Make Up a Melody.Step 4 - Make Up Different Types of SongsDiscover how to make up different types of songs including reggae, rock,spanish, jazz and blues songs.Step 5 - Make Up Solos On Lead GuitarThen you’re ready to make up solos on lead guitar. You’ll discover one simplepattern that you can use to solo over any song. And then learn how to move upthe guitar neck using 4 other patterns.Step 6 - Make Up Riffs On GuitarMake up your own riffs on guitar by playing parts of chords and mixing in notesfrom the simple solo pattern.I created this course because it’s exactly what I wish I had in my hands when I firststarted playing. Unfortunately, I learned the hard way, but you don’t have to.I wish you the best and look forward to hearing your songs!Have Fun!Jesse HuntIf you have any questions or comments please e-mail me at guitaronthespot@hotmail.com. I’d love to hear from you.6GUITAR ON THE SPOT - FREE E-BOOK - MAKE UP SONGS
Guitar On the Spot - Free E-BookMake Up Songs On the Guitar .On the Spot!CONTENTS34Guitar On the Spot - The System - OverviewIntroduction - Note from JesseStart Here If You’re A Complete BeginnerGUITAR BASICSBasicsBasicsBasicsBasicsBasics12345- Parts of the Guitar- How to Hold and Strum a Guitar- How to Play Chords in Three Steps- You Can Make Up Songs Using Chord Progressions- All You Need To Know About the Notes On the Guitar1012141819Start Here If You Can Already Strum Some ChordsSTEP 1DISCOVER THE SECRET TO MAKING UP SONGSChapter 1 - The Secret to Making Up Songs - The Key Concept26STEP 2MAKE UP SONGS RIGHT AWAYBY ROLLING A DIEChapter 2 - Make Up Songs Right Away in Three Steps by Rolling a Die32TABLE OF CONTENTS7
STEP 3SONG MAKING TIPSChapterChapterChapterChapterChapter34567-Tips to Create Emotions in Your SongsMake Up a Song With a Verse and a ChorusThe Secret Is in the NumbersSong Making TipsMake Up a Melody3841434647STEP 4MAKE UP DIFFERENT TYPES OF SONGSChapter 8 - Make Up a Reggae SongChapter 9 - Make Up a Rock SongChapter 10 - Make Up a Spanish SongChapter 11 - Make Up a Jazz SongChapter 12 - Make Up a Blues Song5253545558STEP 5MAKE UP SOLOS ON LEAD GUITARChapter 13 - How to Jam With Other PeopleChapter 14 - Make Up Solos on Lead GuitarChapter 15 - Make Up Solos Up And Down the Guitar Neck646773STEP 6MAKE UP RIFFS ON GUITAR76Chapter 16 - Make Up Riffs On GuitarAPPENDIXAppendix A - How to Tune Your Guitar8GUITAR ON THE SPOT - FREE E-BOOK - MAKE UP SONGS80
Guitar Basics
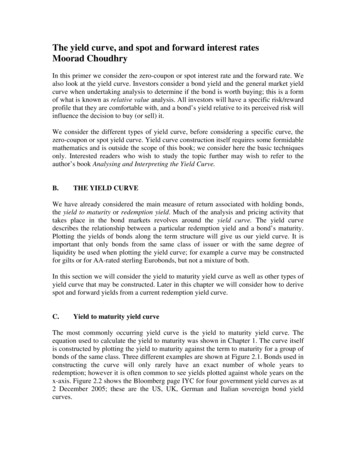
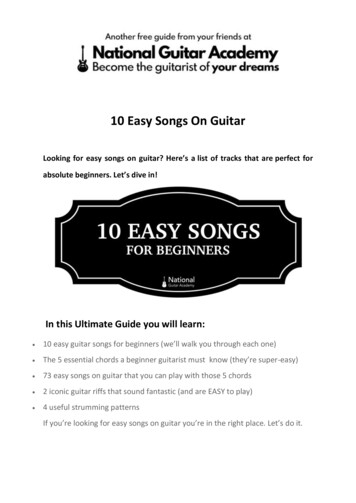
BASICS1Parts of the GuitarSTEEL STRING ACOUSTIC GUITARHeadstockBodyNutSound HoleFretboardFretsFretNeck MarkersTuningPegsBridgePick Guard The bridge holds the ends of the strings in place. The guitar body amplifies the sound and sends it out through the sound hole. The pick guard protects the guitar body from getting scratched by a pick. The frets are the metal ridges embedded in the guitar neck. There are anywherefrom 19 to 24 frets on a guitar neck. The fretboard is the front of the neck where you place your fingers on the strings. The small dots on the fretboard are fret markers for reference so you knowwhere you are. The nut is the top edge of the guitar neck and guides the strings. The headstock holds the six tuning pegs in place.10GUITAR ON THE SPOT - FREE E-BOOK - MAKE UP SONGS
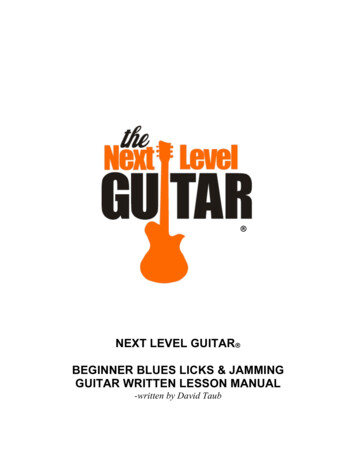
ELECTRIC GUITARNut Tuning me & ToneControls An electric guitar is plugged into an amplifier in order to make the sound louder. The electronic pick-ups “pick up” the vibrations of the strings and convert them intoan electronic signal, which is then sent to the output socket. Each pick-up sounds different because of its location on the guitar body. You use the pick-up selector to choose which pick-ups to turn on. The back pick-up sounds twangy and vibrant (good for lead guitar), while thefront pick-up sounds full and rich (good for rhythm guitar). The body holds the pick-ups in place. The volume control knobs control the volume for each pick-up and the tonecontrol knob controls the brightness of the sound. Some electric guitars have a whammy bar connected to a floating bridge to changethe tension in the strings while playing so you can make cool sounds. The neck and headstock on the electric guitar are basically the same as theacoustic guitar, however the tuning pegs on this electric guitar are all on one side.PARTS OF THE GUITAR11
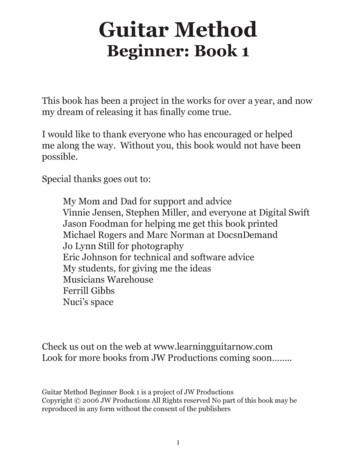
BASICS2How to Hold and Struma GuitarSITTING There are right-handedand left-handed guitars.These pictures show righthanded playing. Rest your inner rightelbow on the edge of theguitar body as a stabilizerfor your arm. Use your right hand to strum the strings of the guitar. Use the fingers of your left hand to push down the strings on the fretboard. Be sure that your left elbow is not resting on your left thigh so that your lefthand is free to move up and down the neck.STANDING Playing the guitar whilestanding is more fun, butmore difficult. Adjust the strap to acomfortable length. If your left wrist hurts, makethe strap shorter or tilt theneck upwards.12GUITAR ON THE SPOT - FREE E-BOOK - MAKE UP SONGS
STRUMMING THE GUITARUse your right hand to pluck or strum the strings Strum downwards with your index fingernail, and upwards with your thumbnail. Practice strumming downwards and upwards four times each.Strum downwards withyour index fingernailStrum upwards withyour thumbnailUSING A PICKYou can use a guitar pick instead of your fingernails Hold the pick between your thumb and indexfinger. Thin picks are good for strumming. Thick picks are good for plucking strings one ata time and for soloing. I personally use Fendermedium picks for everything. Alternate picking strokes between downstrokesand upstrokes to keep your picking consistent.This is called alternate picking.Hold the pick betweenyour thumb andindex fingerHOW TO HOLD AND STRUM A GUITAR13
BASICS3How to Play Chords inThree StepsNOTESEach fret on the guitar is one noteTo play a single note: Push down one stringright above any fret withone finger. Then pluckthat string with a finger ofyour other hand. Pluck the string overthe sound hole on anacoustic guitar or over thepick-ups in the body ofan electric guitar.The Note GNutFretsSingle Note GCHORDSThree or more different notes played at onceis a chord You play chords by readingchord diagrams. See theG Major chord diagram onthe right.The Chord G Major210003Nut There are two main typesof chords: Major chordsand minor chords.The next page shows youhow to play chords in threesteps.14G Majorchord diagramGUITAR ON THE SPOT - FREE E-BOOK - MAKE UP SONGSNut
HOW TO PLAY CHORDS1LOOK AT the numbers on the top ofG Major Chord210003NutNutthe chord diagram You play chords by reading chorddiagrams (see left). The black dots represent your fingers. The numbers on the top of each chorddiagram tell you which fingers to use oneach string according to the FingeringKey in step 2.G Majorchord diagram Chord diagrams with a double line on the top are played near the end of the guitarneck. The double line is the nut.2 LOOK ATthe Fingering KeyFingering Key12340 Strum Without FingersX Do Not Strum3 PUT Each finger is represented by a number in theFingering Key. You use the correspondingfinger on each string. A string that doesn’t have a black dot on ithas either a 0 (zero) or a X on the top. If it hasa 0, you strum that string without putting anyfingers down. If it has a X, you don’t strumthat string.your fingers in the right spots and strum the chordG MajorFingering Key210003123G Major 40 Strum Without FingersX Do Not StrumG Major HOW TO PLAY CHORDS IN THREE STEPS15
TIPS TO PLAY CHORDS Place your thumb on the back of the neck. Arch your fingersand bend the first knuckle of each finger to press down onlyone string per finger. Place your fingers as close as possible to the frets, but noton top of them. This will make the strings sound best andkeep them from buzzing. To learn chords quickly, practice fingering them 20 timeswithout strumming.OPEN CHORDSChords can be played in many different places. The versions of G Major andD Major below are called open chords because you strum at least one string“open” (the strings with the 0s).G Major and D Major Open Chords210003XX0 1 3 2OpenStringsG MajorDon'tstrumD Major Notice that in the G Major chord diagram (above left) there are three 0s andno Xs. This means that you strum all six strings even though you’re onlypushing down three strings. The D Major chord (above right) has two Xs and one 0. Remember, don’tstrum the strings with the Xs, but do strum the string with a 0. When you playD Major, you only strum four strings.16GUITAR ON THE SPOT - FREE E-BOOK - MAKE UP SONGS
HOW TO PLAY BAR CHORDSChords can be played in many different places onthe guitar neck as bar chordsG Major Bar Chord134211Bar ChordSymbolIndex finger pushesdown all strings( When you play a bar chord,you use one finger as a“bar” to push down morethan one string at a time.This is represented by thebar chord symbol in thediagram on the right. Lookat the index finger in thephoto.3 frG MajorFretNumber The 3 fr on the right side of the G Major diagram above, tells you which fretnumber the chord is played on. At first, playing bar chords can be tiring for yourhand, but after some practice you’ll get used to it.ALTERNATE FINGERINGSSome chords have an ALTERNATE FINGERING togive you an option to use different fingersAn Alternate FingeringAlternateFingeringX12341(X 1 3 3 3 X )AlternateFingering( The alternate fingeringis noted in parenthesison the top of the B Majorchord diagram on theright. The photo showsthis alternate fingering.B MajorHOW TO PLAY CHORDS IN THREE STEPS17
BASICS4You Can Make Up SongsUsing Chord ProgressionsCHORD PROGRESSIONSYou can make up songs using chord progressions A sequence of chords is called a chord progression. Chord progressions are the building blocks of songs.Sample Chord ProgressionStaffStrummingStrokesBeat Count210003XX 0 1 3 2023000X3 2 0 1 0G MajorD MajorE minorC Major\1\2\3\4\1One Mea
10 GUITAR ON THE SPOT - FREE E-BOOK - MAKE UP SONGS BASICS 1 Parts of the Guitar STEEL STRING ACOUSTIC GUITAR The bridge holds the ends of the strings in place. The guitar body amplifies the sound and sends it out through the sound hole. The pick guard protects the guitar body from getting scratched by a pick. The frets are the metal ridges embedded in the guitar neck. There