Transcription
1
How To Read Guitar TabThis "How To Read Guitar Tablature" booklet is brought to you by:http://www.12WeekGuitarCourse.comThe 12 Week Guitar Course is an absolutely free-of-charge, 12-week, online guitar coursetaught at beginner, intermediate, and advanced levels by guitar expert, author, and long-timeguitar magazine editor Adam St. James.Adam is the author of best-selling guitar and music instructional books and DVD courses,includingLogical Lead GuitarShut Up 'n' Play Yer Guitar101 Guitar Tips: Stuff All The Pros Know And Use101 Recording Tips: Stuff All The Pros Know And Use101 Singing Tips: Stuff All The Pros Know And UseThe Incredible Scale FinderThe Picture Chord Encyclopedia, and more.Adam's books can be found online or at music retailers around the globe, including GuitarCenter, MusiciansFriend, Barnes & Noble, Amazon.com, and thousands of mom and pop musicand book stores worldwide.For more info on Adam and his books and courses visit http://www.LogicalLeadGuitar.comThe contents of this book are Copyright 2009 Adam St. James2
Table of Contents:What Is Guitar Tab?.4The Bottom Line: Sheet Music vs. Tablature.4Guitar Tab Basics.5How To Read Guitar Tab Chords.6So Is There Any Rhythmic Info in Tab?.7Special Markings And Guitar Techniques.8Guitar Notation Legend.9The Most Useful Techniques Shown As Tab.11A Hammer-On.11A Pull-Off.12A Trill .13A Few Types of Bend.14Half-Step Bend.14Whole-Step Bend.15Grace-Note Bend.15Slight or Microtone Bend.16Pre-Bend.16Bend and Release.17Slides .18Legato Slide.18Shift Slide.19Vibrato .20Pick Hand Tapping .21Harmonics.22Natural Harmonics.22Pinch Harmonics.23Palm Muting.24Tremolo Picking.25Whammy Bar Fun!.26Dive Bomb or Dive and Return.26Scoop.27Dip.28Additional Resources and Links to Free Video Lessons.293
What Is Guitar Tab?Guitar Tablature (usually called "tab") is an alternative to traditional sheet music. Manyguitarists find tab easier to master than traditional sheet music. It certainly is easier to read inthe beginning, but you should know that tablature has a fundamental flaw: While tab may showyou what fret to put your fingers on, most tablature does not indicate the timing of the notes tobe played.Because of this, and unlike sheet music, if you haven't heard the song and don't know therhythm to be played, the tab won't help you much. With traditional sheet music, you can playsongs correctly even if you've never heard them before.Of course most people don't search for tab for songs they've never heard – you're usuallylooking for the tab for a song you love and are eager to play, right?The Bottom Line: Sheet Music vs. TablatureTablature is very popular, and somewhat easier to read than sheet music – up to a point. But inthe long run, you would be better off learning to read traditional sheet music.Once you become a fairly advanced guitarist, and you're looking at the tablature for someshreddin' guitar solo – say by the likes of Joe Satriani, or Jimmy Page, or Zakk Wylde – thetablature can be every bit as complicated as the actual sheet music.Believe me, I've had to transcribe some intense guitar licks in both sheet music and tablature inbooks I've written or edited for music publisher Hal Leonard – and the tab in those was reallycomplicated and full of all kinds of special markings that only a pro tab reader would have beenable to understand – yet without any indication of the rhythmic value of the notes you'resupposed to play.What I'm saying is, that to become an expert tab reader at a high level of guitar ability, you'dhave to put in almost as much time practicing reading tab as reading sheet music – only you'dhave been better off learning to read sheet music to get the rhythmic info necessary to play thesong correctly.Tab is OK, but sheet music is better."Yeah, right," I hear you saying. "Now let's get on with the tablature."OK. Let's do it.4
Guitar Tab BasicsGuitar tablature represents the six guitar strings and the fret numbers you are to play in an easyto read graphic. Each number you see on tablature tells you on which string and at which fret toplace your fingers. Additional markings you'll learn about below will indicate if a note is to betreated in some special way, such as a bend, or vibrato. I'll cover all those special markings inthis booklet.Guitar tab is written with six lines, each representing a guitar string.The top most line represents the thinnest string on your guitar, the bottom line is the thickeststring on your guitar.E-------------------------------- Thinnest ----------------- Thickest StringNumbers placed on these lines indicate which fret to play on each string. Also, you must treatthe tablature as a timeline, with the numbers played in order (in time) as you read from left toright, just like you're reading this sentence.The following tab indicates that you are to play the open first string (thinnest string) – a zero onthe line means to play the string open (not fretted) – followed by the first fret, then the third fret,then the first fret, and then the open string ----------------E--------------------------------5
How to Read Guitar Tab ChordsWhen you see numbers stacked up on top of each other in tablature, this indicates that you areto play them as a chord. Here is the tab for a C -----------E-------------------------------The following example shows that you are to play the C chord four -----------E------------------------------In the above example, you would strum the C chord four times. If, instead, you were supposedto pick the chord one note at a time (an arpeggio), as in a finger-picking song or maybe a slowballad section, you would see the numbers of the chord spread out this ---------Notice that the above example is the same C chord played in the previous example, but thistime played as an arpeggio.Expert Tip: I would highly suggest that whenever you are looking at tab, you keep an eye out forgroupings of numbers that actually make up a chord shape. I routinely see students struggling to play aseries of notes one at a time, and to finger them one at a time – and having the song not sound like it'ssupposed to sound.Then I take a look at the tab they're working from and point out to them that that spread out group ofnumbers is really just a C chord, or a D chord – or whatever – played one note at a time, as an arpeggio.And then as soon as they actually hold the chord down and pick the notes, the song starts to sound like itis supposed to sound.They were seeing it all as just some random notes, not the chord that I saw it to be. Once they saw it andplayed it as a chord, the song came together real quick.So keep your eye out for chords played as arpeggios, and then hold the entire chord down as if you weregoing to strum the chord, even if it is going to be played as an arpeggio.That's yet another example of why you need to be fluent with all your basic chords. If you need helpsmoothing out your chord changes, be sure to check out all the exercises and video lessons in myhttp://www.12WeekGuitarCourse.com6
So Is There Any Rhythmic Info in Tab?The best you're going to get with most tab, in regards to any hints at the rhythm of the notes, isthe spacing of the numbers on the tab timeline. If a pause is needed between notes – or if anote is to be held longer – there will usually be some space between it and the next note. Andwhen notes are to be played in rapid succession, they will be closer together.Take a look at the tablature below. This tab represents the intro and repeating riff in the Beatles"Day Tripper." Notice the space between the first note (the open sixth string) and the 3-4 thatfollows on the same string. On the Beatles' recording, that first note – the open E string – rings abit before they continue with the rest of the riff. The spacing of the notes in this tablatureexample indicates that you are to sustain that note (or at least pause) before playing the notesat the 3rd and 4th E-0---3-4---------------------Watch for the spacing of notes in tablature and treat longer spaces as longer pauses or longersustained notes (you'll have to figure that out by listening to the song). You would know for surewhether the note was to be sustained or simply followed by a rest if you were reading the samenotation in real sheet music.7
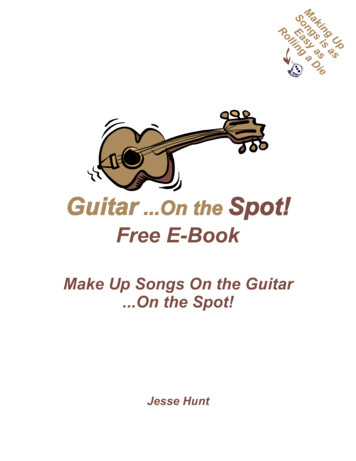
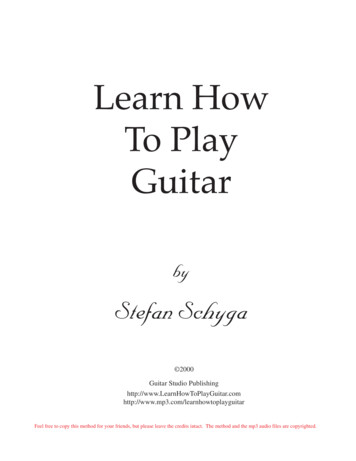
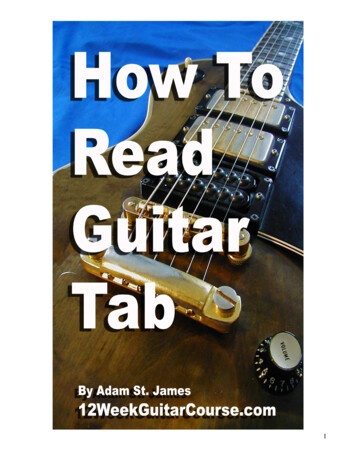
Special Markings and Guitar TechniquesOnce you know which fret to place your fingers on, how do you know whether you're supposedto bend that note, put a little vibrato on it, hammer-on to another note, or apply any other specialtechnique?That's where all the additional markings come in. If you're already familiar with and competent athammer-ons and pull-offs, vibrato, slides, harmonics, and the like, congrats. If not, you'll learnall about them with my 12 Week Free Guitar Course: http://www.12WeekGuitarCourse.comThese techniques are explored in detail in the intermediate level of the course. Get your basicbeginner level skills down first if you haven't already, then dig in to the intermediate level coursepath I've created.Here is a whole list of basic tab markings as they are found in most Internet tablature: h - hammer onp - pull offb - bend string upr - release bend/ - slide up\ - slide downv - vibrato (sometimes written as )t - right hand taps - legato slideS - shift slide- natural harmonic[n] - artificial harmonicn(n) - tapped harmonictr - trillT - tap TP - trem. pickingPM - palm muting\n/ - tremolo bar dip; n amount to dip\n - tremolo bar downn/ - tremolo bar up/n\ - tremolo bar inverted dip - hold bend; also acts as connecting devicefor hammers/pulls - volume swell (louder/softer)x - on rhythm slash represents muted slasho - on rhythm slash represents single noteslashExpert Tip: The tablature you'll see in most professional songbooks, and in most of the onlineand printed lessons I create, is a little different, primarily because we use sheet music/tablaturegraphics programs such as Finale or Sibelius, which allow us to create arrows and other suchsymbols to represent various guitar techniques, rather than having to rely on whatever letters orsymbols a computer keyboard allows.Here is a chart of guitar techniques described in sheet music and tablature, as you may find inmy lessons or in a regular song book you purchase at your local music store:8
9
Expert Tip: The list of techniques shown on the diagram above, and explained in further detailbelow, should not just be considered important in regards to "How To Read Tab." It's way morethan that. This is truly a list of THE MOST IMPORTANT GUITAR TECHNIQUES YOU SHOULDKNOW.Use this list as a check list and make sure you are competent at all or most of these techniques,and your playing will soar!10
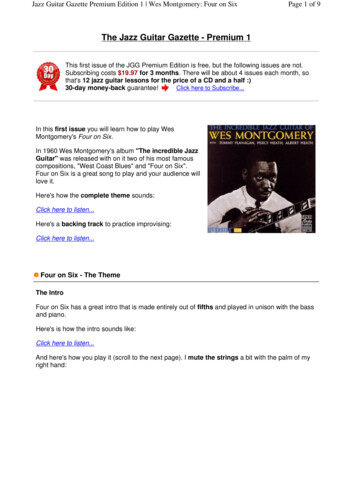
The Most Useful Techniques Shown As TabThere are a handful of guitar techniques you'll come across more often than others – both inyour reading of tablature or sheet music, and in your actual playing.Here are some of the Must-Know tab markings:A Hammer-OnTo play a hammer-on, you'll pick a note, then slam a finger down a fret or more higher on thatsame string. This is a technique you should practice over and over until you can do it routinely.Here it is shown in basic internet -----------The above example indicates that you are to play the note at the 5th fret on the third string, then(without picking again), slam your finger down on the 7th fret of the third string. The "h" betweenthe numbers tells you that this is a hammer-on.Here is the same technique shown as you might find it in a songbook, or one of my courses:11
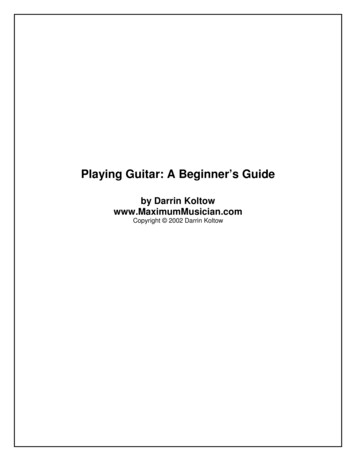
A Pull-OffA Pull-off is basically the opposite of a hammer-on. To play a pull-off, you'll pick a note, then pullthat finger off the string to make a lower note on the same string sound. This technique is a littlemore difficult to master than a hammer-on.You'll place both fingers on the string at the same time. Then pick the first note. To achieve agood pull-off, you'll then need to pull the finger off the string in a sort of plucking motion. If youjust simply lift the finger off the string (lifting straight up), the second note won't be very loud. Toincrease the volume of the second note, apply a slight downward pressure on the string with thefinger you are pulling off. You'll literally need to slightly pluck the string with that finger as itcomes off the fretboard.This is another technique you should practice over and over until you can do it routinely.Here it is shown in basic internet -----------The above example indicates that you are to play the note at the 7th fret on the third string, then(without picking again), pull that finger off and allow the note on the 5th fret of the third stringsound. The "p" between the numbers tells you that this is a pull-off.Here is the same technique shown as you might find it in a songbook, or one of my courses:12
A TrillA trill is a very rapid hammer-on and pull-off combination between two notes. You'll play a note,then hammer-on a note above it on the fretboard, then pull-off that note back to the originalnote. You'll then repeat this move quickly over and over for as long as indicated.Here is a trill shown in typical internet -----------Here is the same technique shown as you might find it in a songbook, or one of my courses:13
A Few Types of BendA Bend may be the most essential skill of all. And you may have to work on it a bunch beforeyou get it right. And bends come in various "sizes," so to speak.We have whole-step bends, half-step bends, quarter-tone bends, and more. If you're not surewhat whole steps and half steps are (and you should know these things) check out my 12 WeekFree Guitar Course: http://www.12WeekGuitarCourse.comAnyway, a bend means that you play a note, then push (or pull) on the string to bend the string,raising the pitch of the note.Half-Step BendHere is a bend shown in basic internet -----------------------------The above example indicates that you are to play the note at the 7th fret on the third string, thenbend that note (it doesn't tell us how much to bend, unfortunately). The "b" after the fret numbertells you that this is a bend.Here is the same technique shown as you might find it in a songbook, or one of my courses:In the above example, you are to bend the note ½ step, which means bend the note until itsounds exactly the same pitch as the note one fret higher, in this case, the 10th fret. A half stepis equal to one fret on the guitar, so a half-step bend indicates bending a note to raise the pitchone fret.14
Whole Step BendHere is a whole step (two fret bend), which is the most common bend you'll come across:Grace Note BendSometimes you actually bend a note before we hear the original (unbent) note. This is called agrace note bend. Here is how that looks in tablature. Notice in the sheet music the "grace" notehas no stem.15
Slight or Microtone BendAnd occasionally we see instructions for a very slight bend, not even a ½ step. This is usuallycalled a ¼ step bend, "slight" or "micro-tone" bend. You'll actually see this a lot on the G note atthe 3rd fret of the sixth string, particularly in songs in the key of A or E.Here is what a "slight" bend looks like:Pre-BendAnd one more type of bend: A pre-bend means that you will actually bend the note all the waybefore you even pick it.Here is what a pre-bend looks like:16
A Bend and ReleaseIf you're going to bend a note, you're going to have to release it too, right? Sometimes we don’tcare whether or not we hear the bend released, but in some instances, the release of the note isessential.In this case you pick and bend the note, let it ring for a bit as a bent note, then slowly release itback to its unbent position, letting it ring the whole time. So you'll hear the unbent note first, thenthe bend, then you'll hear the bend being released, and finally you'll hear the original unbentnote – and you'll only have picked the guitar string one time throughout all of that. You've got togrip the strings and fretboard firmly to keep the note sounding that whole time.Here is what a Bend and Release looks like in basic internet E-----------------------------Or sometimes you'll see it written this -E-----------------------------The "r" between the fret numbers in the first example indicates a release of a bend (though theydidn't tell us to bend the note in the first place – you need to know that ) In the secondexample the "br" between the numbers does indicate that we are to bend the 9th fret, thenrelease back to the 9th fret, though it doesn't indicate how far to bend. The wrong bend (bendinga whole step when you should have bent only a ½ step, or vice versa), is the same thing asplaying the wrong note. But that's a limitation of internet tab not found in songbook tab (which isfar more accurate and informational.)Here is what a Bend and Release looks like in a songbook:Notice the songbook tab indicates only a half-step bend. The internet tab above didn't tell usmuch about how far to bend.17
A SlideSometimes we slide from one fret to another. The slide might go up the fretboard or down thefretboard. Keep in mind, this type of "slide" has nothing to do with playing "slide guitar," which isaccomplished by wearing a glass, ceramic, or metal "slide" on your fretting hand.This may be the easiest common technique of all. To accomplish a slide you simply place yourfinger on a note, pick the string, then slide that finger to a higher or lower fret on that samestring. Done.A slide is indicated by a slash.The slash symbol "/" indicates a slide going up the fretboard (toward the body of your guitar).The slash symbol "\" indicates that you are to slide down the fretboard (away from the body ofyour ---E-----------------------------Here is the same technique shown as you might find it in a songbook, or one of my courses:Again internet tab proves to be not quite as informational as pro tab. There are actually twotypes of slide, the "Legato Slide" and the "Shift Slide." In the Legato slide you only pick thestring once, at the beginning of the slide. In the Shift slide you pick the string both at thebeginning and end of the slide.18
Here is how the Shift Slide looks:Notice the shift slide is missing the curved line above the numbers. The curved line indicatessomething called a "slur," where two or more notes are played without any rhythmic or accentseparation between them. This type of playing is called Legato, and hence the Legato Slide.The opposite of Legato – in general music terms – is staccato. When we have a distinctseparation between notes, as opposed to a smoothly flowing legato melody line, we call thatstaccato. The Shift Slide, because we do pick both the first and second notes, is slightly morestaccato – hence the missing "slur" line.Of course, if you're learning a song you already have heard a zillion times, you'll probably knowby ear whether or not the second note is to be picked.19
VibratoVibrato will probably end up being your favorite technique. Most lead guitarists add a touch ofvibrato to the note at the end of every melodic phrase. Some players add more, some less, butit's almost always in there – unless you listen to really early rock, when, it seems, players justdidn't use much vibrato. I've had students who played lead guitar without ever adding vibratoand it sounded like they had just come in from the early '60s via Time Machine.Vibrato is simply the slight bending of the guitar sting – almost a wiggle, if you will. This is notnearly as much bending as discussed above in the section on Bends. We're talking very slightbending here, usually less than a "micro-tone" bend.Perfecting vibrato takes time, as do all these guitar techniques (well, perhaps with the exceptionof the slide). Start out slow and steady and gradually build up speed. Use a metronome topractice vibrato and try to match your bends to the click of your metronome, gradually increasingthe tempo.You might also want to practice a narrow vibrato and a wide vibrato (where you do bend thenotes a little more). If you listen closely to your favorite guitarists, you'll notice that some use awider vibrato than others.Here is what vibrato looks like in basic internet ------------9 -------------Notice the "v" after the 9 above, and also, in the second example, the " " symbols,indicating vibrato.Here is the same technique shown as you might find it in a songbook, or one of my courses:20
Pick Hand TappingTapping, made very popular by Eddie Van Halen when his 90-second guitar solo "Eruption" firstpinned back our ears in 1978, is a lot of fun, and not too difficult to accomplish.Basically, tapping, or finger-tapping, involves using your pick hand to fret notes, just like youusually do with your fret hand. Most players use the finger tip of their pointer or index finger totap on the guitar fretboard, sounding the note tapped as if it were being played normally by thefret hand.Usually, a tapped note is then pulled off to a lower note on the same string, and often this isdone in a rapid, repetitive pattern, typically involving three separate notes (two played by the frethand, and the other, highest note, tapped by the pick hand).Here is a tap shown in typical internet -----------------------------The "t" indicates you are to tap the 7th fret on the third string with one of your pick handfingertips.A more typical "tapping" riff, shown in typical internet ---E-----------------------------The above riff indicates that you would tap the 12th fret on the second string, then pull off to the8th fret (played by the fret hand), then pull off that note to the 5th fret (also played by the frethand). The phrase is then repeated. In tapping, your tapping finger has to be adept not only attapping the note, but at completing the "pull off," with a slight pluck of the string, much the sameas a traditional pull off (see above).Here is the same technique shown as you might find it in a songbook, or one of my courses:21
HarmonicsHarmonics are those beautiful, chime-like sounds we sometimes play on guitar.They take a bit of practice on their own, of course. Don't apply too much pressure (certainlydon't press down on the string when trying to create a natural harmonic) or your harmonic won'tchime.Natural HarmonicsNotice I said "Natural Harmonic." There are other types, I'll describe below. Natural harmonicschime naturally at the 5th, 7th, and 12th frets (those are the most widely used, anyway.)Natural harmonics do chime elsewhere, but that is a matter for another lesson. (There's a wholelist with a diagram of all the natural harmonics in my Hal Leonard
The 12 Week Guitar Course is an absolutely free-of-charge, 12-week, online guitar course taught at beginner, intermediate, and advanced levels by guitar expert, author, and long-time guitar magazine editor Adam St. James. Adam is the author of best-selling guitar and music instructional books and DV