Transcription
QUICK START GUIDE
ContentsOverview 4Getting Started With Your Dell Desktop 5Getting Started With YourClassic Desktop 8To add a bookmark . . . . . . . . . . . . . . . . . . 12Creating a New Folder . . . . . . . . . . . . . . . 12Using the Firefox Web Browser 14Using Tabbed Browsing . . . . . . . . . . . . . . 14Starting an Application 8Using Bookmarks . . . . . . . . . . . . . . . . . . . 14Customizing Your Desktop 8Adding Bookmarks to the Launcher . . . . 14Personalizing the panel . . . . . . . . . . . . . . . 8Instant Messaging with Pidgin 16Adding and Removing an ApplicationIcon on Your Desktop 8Importing Digital Photographs 16Applications in Ubuntu 17Getting Started with Ubuntu 9Adding and Removing Applications . . . . 17Quickly Viewing a Window Full Screen 9Adding a Printer 18System Preferences and Administration 10Connecting to the Internet 18Setting Screensaver Preferences . . . . . . 10Restoring Your Ubuntu System 19Browsing Files and Folders UsingNautilus 12Ubuntu Reinstallation 19 Using Bookmarks . . . . . . . . . . . . . . . . . . . 12Starting System Restore 193
OverviewOverviewYour Dell computer is preconfigured with Ubuntu if you opted for it during purchase.This document describes how to perform basic functions with your computer running Ubuntuoperating system and also includes reinstallation steps for Ubuntu operating system.You have two modes of operating your computer running Ubuntu. Dell customized mode with a Launcher Classic Ubuntu modeThe two modes have been described in the following chapters.To learn more about Ubuntu operating system, see Help and Support (Clickand Support).4 System Help
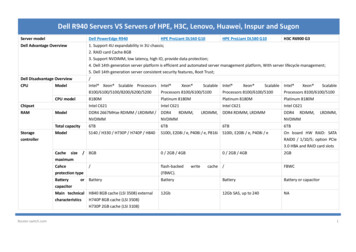
Getting Started With Your Dell DesktopGetting Started With Your Dell DesktopThe Dell Desktop launches when you turn on your computer with Ubuntu operating system.To turn off the Dell Desktop Launcher, click theand select Switch Desktop Mode ClassicDesktop. See “Getting Started with Your Classic Desktop” on page 8 for instructions about gettingstarted with Classic Desktop.56789 10 11124321315
Getting Started With Your Dell Desktop12346LauncherThe Launcher organizes applications andwebsite bookmarks into categories. Toaccess an application using the Launcher,click on a Category, and then click on theapplication, or click on a bookmark to viewthe website in a new tab. You can customizethe Launcher to contain the applicationsand website bookmarks you use mostfrequently by using the Plus Icons.DesktopRight-click on the background for amenu that will allow you to change thebackground image.CategoriesClick on a category to view a list ofapplications and bookmarks.Home IconClick on this icon to minimize all windowsand to display the Launcher.5Ubuntu IconClick on this icon menu to accessPreferences, Places (useful file locations),and Help and Support.6 Running TasksClick the required tab to view the associatedwindow.7 PanelThe panel provides quick access to openrunning tasks on desktop, or to frequentlyused programs, files, or utilities on yourcomputer.8 Search IconClick on this icon to search for files andfolders.9 Battery/Charging Status IndicatorClick on this icon to know the status of thebattery.10 Network Status IndicatorClick on this icon to know the networksignal strength.
Getting Started With Your Dell Desktop11 Volume Control IconClick on this icon to adjust the volume of thecomputer.12 Notification areaIncludes a clock and icons associated withprograms.13 Plus IconsClick the upper Plus Icon to add or remove acategory from the Launcher. Click the lowerPlus Icon to add applications or websitebookmarks.7
Getting Started With Your Classic DesktopGetting Started With Your Classic DesktopStarting an Application1. Click the Applications menu.2. Select the appropriate category and application.Customizing Your DesktopPersonalizing the panelYou can add frequently used utilities and applications to the panel by performing the followingprocedures:1. Right-click on the panel and select Add to Panel.2. Select an application in the Add to Panel dialog box and click Add.Adding and Removing an Application Icon on Your DesktopYou can add an icon on your Desktop to launch a frequently-used application.1. Select an application in the Applications menu.2. Drag and drop the application on to the Desktop.To remove an application icon from your Desktop, drag it into the trash bin.8
Getting Started With UbuntuGetting Started With UbuntuQuickly Viewing a Window Full ScreenPress the key combination Ctrl Alt F to toggle between standard view and full screen view.9
Getting Started With UbuntuSystem Preferences andAdministrationFrom the System menu you can control theappearance and operation of your computerand get help. Select Preferences for settings of themes,keyboard shortcuts, and power management. Select Administration to manage computermonitors and configuration tools functionssuch as network, printing, and users andgroups.Setting Screensaver Preferences1. Click System Preferences Screensaver.The Screensaver Preferences windowappears.2. In the Screensaver Theme list, select Blankfor a blank screen, select Random for arandom screensaver, or select a screensaverof your choice.3. Adjust the slider for the length of time thatyou want your computer to idle before thescreensaver turns on.4. Ensure that the Activate screensaver whencomputer is idle checkbox is selected.5. If you want the screensaver to lock thescreen, select the Lock screen whenscreensaver is active checkbox.6. Click Close.10
Getting Started With Ubuntu11
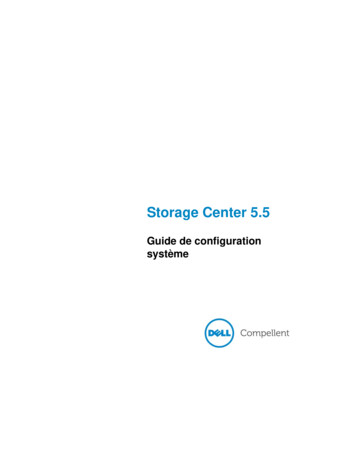
Getting Started With UbuntuBrowsing Files and Folders UsingNautilusThe Nautilus File Manager allows you toview, create, organize, and search for yourfiles and folders using an interface similar toa web browser. To open Nautilus, click Places Home Folder.Using BookmarksBookmarks in Nautilus are similar to bookmarksin a web browser. Use the bookmarks feature tohelp you quickly open frequently-used folders.To add a bookmark1. Browse to the folder that you want tobookmark, and open it.2. Click Bookmarks Add Bookmark or press Ctrl D .The bookmark will appear in the Bookmarksmenu and in the lower portion of the side pane.12Creating a New Folder1. Browse to the location where you want tocreate the new folder.2. Click File Create Folder, or rightclick and select Create Folder, or press Shift Ctrl N .3. Name the folder and press Enter.
Getting Started With Ubuntu13
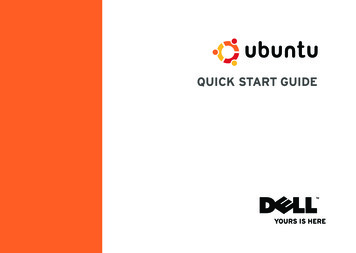
Getting Started With UbuntuUsing the Firefox Web BrowserYou can browse the web using the Firefox webbrowser. The Google search box allows you tosearch the web using Google search enginedirectly from the toolbar. Tabbed browsingmeans you can have multiple pages open, butcontained within the same browser window.Using Tabbed BrowsingTo open a new tab, go to File New Tab orpress Crtl T .To close a tab, click the close button on the tabor press Ctrl W .Using Bookmarks1. To bookmark a page, click Bookmarks Bookmark This Page or press Ctrl D or to bookmark a group of tabs, selectBookmarks Bookmark All Tabs.142. Select a folder for the bookmark andclick Add.Bookmarks saved to the Bookmarks ToolbarFolder appear on the Bookmarks Toolbar.3. To organize and edit your bookmarks, clickBookmarks Organize Bookmarks.Adding Bookmarks to the LauncherIf you have Dell Desktop enabled, you can addweb site bookmarks to the Launcher from withinFirefox.1. To add a bookmark to the Launcher, clickBookmarks Bookmark in Launcher orpress Ctrl Shift D .2. Select a category and click Apply.
Getting Started With Ubuntu15
Getting Started With UbuntuInstant Messaging With PidginImporting Digital PhotographsThe Pidgin messaging client allows you to usemultiple types of instant messaging accountsand protocols all at once.To import photos from your camera:1. Click Applications Internet Pidgin Internet Messenger.2. If you are opening Pidgin for the first time,in addition to your Buddy List, an Accountsdialogue box will prompt you to addaccounts.3. Click Add.4. Select the Protocol of the account that youwant to add, enter the required information,and click Save.5. Close the Accounts dialogue box and,optionally, the Buddy List.You can access the Pidgin menu optionsby right-clicking on the Pidgin icon on thetop panel.161. Plug-in and switch on the camera by placingit in review mode.2. Click on Import Photos.A preview of the photos appear.3. Choose a location on your hard drive to saveyour photos and click Import.
Getting Started With UbuntuApplications in Ubuntu Adding and Removing ApplicationsUbuntu comes with a wide variety ofpre-installed applications.1. Click Applications Add/Remove.Some of the most frequently-used applicationsinclude the following:2. To add an application, select the requiredapplication checkbox. To remove anapplication, deselect the requiredapplication checkbox.3. Some applications may require additionalsupporting applications or will be a part of abundle. If you still want to install/remove theapplication, click Install All/Remove All inthe confirmation window.4. When you have finished making changes,click OK.5. Check the list of changes you have made inthe confirmation window and click Apply.6. Progress windows appear whiledownloading, installing, and removingapplications. Once the processes finish, theChanges Applied window appears.7. Click Close.17
Getting Started With UbuntuAdding a Printer1. Click System Administration Printing.The Printers window appears.2. Double-click on the New Printer icon. TheAdd a Printer wizard will start and yourprinter is automatically detected.3. Click Forward.4. The Printer Driver settings are automaticallyset.5. Click Forward.6. If required, enter a Description and Location7. Click Apply.Your printer appears in the Printers window.If your printer was not automaticallydetected, you can set the Printer Port andDriver manually.Connecting to the Internet1. Click System Administration Network.2. Select the connection that you plan to useand click Properties.3. If you are using a wireless or wiredconnection then set Configuration toAutomatic configuration (Dynamic HostConfiguration Protocol). Otherwise, if yourISP or network administrator has givenyou an IP address, set Configuration toStatic IP address, enter the address in theIP address field and click OK.4. To activate or deactivate networkconnections, select or deselect the checkbox next to the required connection in theConnections tab of the Network Settingswindow.5. Click Close.18
Restoring Your Ubuntu SystemRestoring Your Ubuntu SystemUbuntu ReinstallationIf you received an Operating System media withyour computer, you can use it to restore youroperating system.NOTICE: However, using the OperatingSystem media also deletes all data on thehard drive.NOTE: Your computer may or may not havean optical drive. Use an external opticaldrive or any external storage device for theprocedures that involve media.To reinstall Ubuntu, you need a Ubuntu OSRecovery media.Starting System Restore1. Turn Off the computer.2. Plug in an external USB optical disc driveinto your computer.3. Insert the Ubuntu OS Recovery media in theexternal USB optical disc drive.NOTE: Using the Ubuntu OS Recoverymedia deletes all data on the hard disk.4. Turn On the computer.5. When the DELL logo appears, press 0 immediately.NOTE: The next steps change the bootsequence for one time only. On the nextstart-up, the computer boots according tothe devices specified in the system setupprogram.6. When the boot device list appears, highlightCD/DVD/CD-RW and press Enter .7. Press any key to Boot from CD-ROM. Followthe instructions on the screen to completethe installation.19
Information in this document is subject to change without notice. 2008–2009 Dell Inc. All rights reserved.Reproduction of these materials in any manner whatsoever without the written permission of DellInc. is strictly forbidden.Trademarks used in this text: Dell, the DELL logo, and YOURS IS HERE are trademarks of Dell Inc;Windows is either trademark or registered trademark of Microsoft Corporation in the United Statesand/or other countries.Other trademarks and trade names may be used in this document to refer to either the entitiesclaiming the marks and names or their products. Dell Inc. disclaims any proprietary interest intrademarks and trade names other than its own.January 2009 P/N H840J Rev. A01
Printed in China.Printed on recycled paper.www.dell.com support.dell.com0H840JA01
5 Getting Started With Your Dell Desktop The Dell Desktop launches when you turn on your computer with Ubuntu operating system To turn off the Dell Desktop Launcher, click the and select Switch Desktop Mode Classic Desktop See “Getting Started with Your Classic Desktop” on page 8 for instructions ab