Transcription
7/16/13INTRODUCTION TOARDUINO AND LEDSActivity one: Make sure everybody is up and runningArduino1
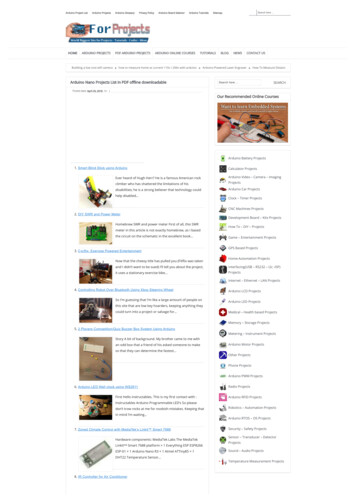
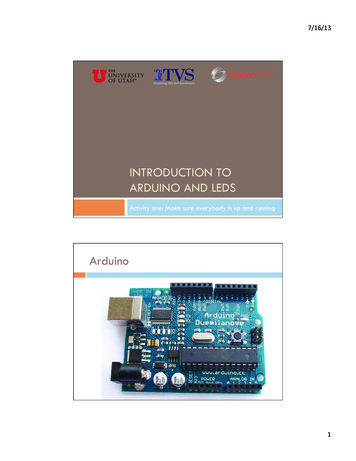
7/16/13ArduinoTest LEDon pin 13Digital I/O pinspowerLEDUSB InterfaceResettx/rx LEDsATmega328External PowerAnalog InputsPhysical Computing Essentials pinMode(pinNumber, mode); // declare a pin INPUT or OUTPUT digitalRead(pinNumber); digitalWrite(pinNumber, value); // force HIGH/LOW voltage analogWrite(pinNumber, value); // PWM for intermediate vals analogRead(pinNumber);// read the HIGH/LOW status of pin// read analog pin through ADC2
7/16/13Physical Computing Helpers delay(ms);// delay for ms millisecondsmillis();// return total milliseconds since program startSerial.begin(baud); // set up serial communication to hostSerial.print(val); // print on monitor (number, char, or string)Serial.println(val); // print with line feedrandom(min, max); // return random between min, max-1map(val, fromLo, fromHi, toLo, toHi); // interpolate to rangeconstrain(val, lo, hi); // constrain value to a rangeDigital Pins Each of the digital pins can be set to one of two values Highand Low (logic 1 ( 5v) and logic 0 (0v)) digitalWrite( pin-number , value ); digitalWrite(13,HIGH);digitalWrite(13, 1); digitalWrite(13,LOW);digitalWrite(13, 0);3
7/16/13Arduino ProgrammingLoad Examples - Basics - BlinkArduino SW system Two required functions voidsetup(){ }// runs once at init time voidloop(){ }// loops forever after init4
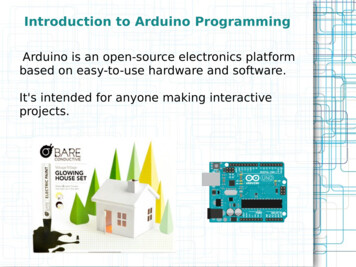
7/16/13Arduino ProgrammingVerify, Upload, New, Open, SaveProgramming areaNotification areaBlink Exampleint led 13;void setup() {pinMode(led, OUTPUT);}void loop() {digitalWrite(led, HIGH);delay(1000);digitalWrite(led, LOW);delay(1000);}5
7/16/13Arduino LED already connected to pin 13Upload Blink to your Arduino Load Basics - Blink into IDEMake sure you select the correct board Tools Make sure you select the correct serial port Not - Board - (Uno or Duemilanove)the bluetooth ports Click on the upload button Watchfor blinky lights during upload6
7/16/13www.todbot.comLEDs and Resistorslong leadAnode short leadCathode -Current flows from Anode to CathodeLights up when current flowswww.todbot.comLEDs and Resistorslong leadAnode short leadCathode -ArduinoCurrent flows from Anode to CathodeLights up when current flowsGround7
7/16/13www.todbot.comLEDs and Resistorslong leadAnode short leadCathode -ArduinoCurrent flows from Anode to CathodeLights up when current flowsGroundCurrent Limiting Resistor Diodes have a “forward voltage” or “diode drop” TypicallyVf is around 0.7v for a diode,and 1.5v to 3.0v for an LED Diodes also have a currentlimit Typically20mA for an LED If you don’t limit the current,they’ll burn out8
7/16/13Current-Limiting Resistor Assume Pin10 can supply 5vAssume LED Vf is 2.0v(5v - 2v) 3v remaining for R1We want 20mAR V/I 3v / .020AR 150ΩOhm’s Law: V IRIn practice,220Ω - 470Ω will workWiring an external LED9
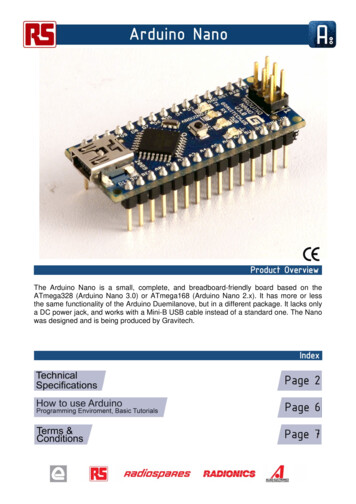
7/16/13Solderless BreadboadDuemilanoveSolderless BreadboardDuemilanove10
7/16/13Wiring up an External LEDWiring up an External LED11
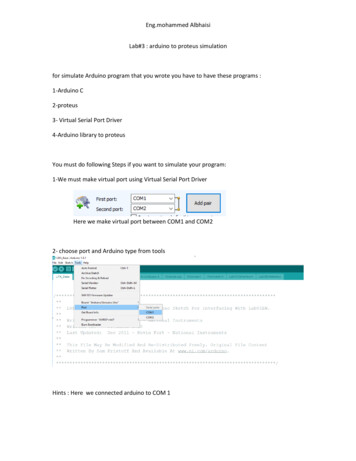
7/16/13Blink Modifications Change numbers in the code Then “upload” to Arduino – watch for blinky lightsChange so that blink is on for 500msec and offfor 100msec What Change so that blink is on for 50msec and offfor 50msec What happens?happens?Change so that blink is on for 10ms and off for10ms Whathappens?Aside: Multiple LEDsEach LED needs its own resistor! You can’t share 12
7/16/13Multiple LED ExampleMultiple LED Example13
7/16/13We just made LEDs blink Big Deal? Most actuators are switched on and off with adigital output ThedigitalWrite(pin,value); function is the softwarecommand that lets you control almost anything LEDs are easy! Motors,servos, etc. are a little trickier, but not much More on that later Arduino has 14 digital pins (inputs or outputs) caneasily add more with external helper chips More on that later www.todbot.comMoving on 14
www.todbot.com7/16/13load Examples – Analog - FadingPulse Width ModulationanalogWrite(pin, value); value can be 0 to 255Must be one of the “PWM pins” : pins 3, 5, 6, 9, 10, 11 Don’t need to set pinMode to OUTPUT (but won’t hurt) www.todbot.com 15
7/16/13Fading Programload Examples – Analog - Fadingint ledPin 9; // LED connected to digital pin 9void setup() {// nothing happens in setup (Why not?)// Answer: Pins default to being OUTPUT. You must define any that you want to use// as INPUT, but if you are using them as OUTPUT you can just assume the default.// Typically, though, it’s good practice to define the OUTPUT pins anyway }void loop() {// fade in from min to max in increments of 5 points:for (int fadeValue 0 ; fadeValue 255; fadeValue 5) {analogWrite(ledPin, fadeValue); // sets the value (range from 0 to 255):delay(30);// wait for 30 milliseconds between brightness steps}// fade out from max to min in increments of 5 points:for (int fadeValue 255 ; fadeValue 0; fadeValue - 5) {analogWrite(ledPin, fadeValue); // sets the value (range from 0 to 255):delay(30);// wait for 30 milliseconds between dimming steps}}Fading Example16
7/16/13End of Activity One There are some additional slides that you can lookat laterThere’s a summary at the end of the handoutAdd a diffuser17
7/16/13Add a diffuservideo . ladyada.net 8
7/16/13Source vs. Sink for currentSink means pull to groundLED is on when Pin 10 is LOW Source means pull to VddLED is on when Pin 10 is HIGHArduino pins: source/sink a max of 40mA/pinAlso 250mA total for ALL pinsRandom Brightness Write a program to make the LED flicker like a flame Choosea random intensity For a random amount of time Use analogWrite(ledPin, val) to change brightnessMain loop repeats itself forever Setthe value of the brightness to a random value Wait for a random amount of time repeat The effect looks like flickering 19
7/16/13Flickering Pseudocode1.2.3.Set the LED to a random brightnessWait for a random amount of timerepeatFlickering Pseudocode1.2.3.4.5.Pick a random number between 100-255Set LED to that brightness (use analogWrite)Pick another random number between 10-150Wait for that amount of time (in ms)Repeatint brightness;brightness random(100, 256);20
7/16/13Candle Program random(min,max); will return a random number between min and(max-1)randomSeed(int); will initialize the random functionNot really needed foo random(10, 200); // assign foo to random number between 10-199 Remember delay(val); // waits for “val” millisecondshints int bright;// make a new variable called brightbright random(100, 256); // set “bright” to a random value// between 100 and 255Remember: analogWrite(pin,value); // sets a brightness on a pin// “pin” is the pin number, “value” is between 0 – 255Candle Programint ledPin 9;int bright 0;int time 0;Load Sketchbook - DM - Candle// select pin for LED output// Variable to hold LED brightness// variable to hold delay timevoid setup () {randomSeed(0);// initialize the random functionpinMode(ledPin, OUTPUT); // ledPin should be an output}void loop () {bright random(100, 256);analogWrite(ledPin, bright);time random(10,150);delay(time);// random brightness value// set the LED brightness// random time in ms// delay for that time}21
7/16/13Load Sketchbook - CandleSmallCandle Program (smaller)int ledPin 9;// select pin for LED outputvoid setup () {pinMode(ledPin, OUTPUT); // ledPin should be output}void loop () {analogWrite(ledPin, random(100, 256)); // LED brightnessdelay(random(10,150)); // delay for random time}Silly LED Tricks22
7/16/13Summary – Whew! Digital Pins usepinMode( pin , INPUT/OUTPUT ) for settingdirection Putthese in the setup() function pinMode(13, OUTPUT); // set pin 13 as an output usedigitalWrite( pin , HIGH/LOW ) for on/off digitalWrite(LEDpin, useHIGH); // turn on pin “LEDpin”analogWrite( pin , val ) for PWM dimming valuesfrom 0 – 255 PWM pins are 3, 5, 6, 9, 10, 11 analogWrite(9, 235); // set LED on pin 9 to somewhat brightMore Summary delay(val) delays for val-number of milliseconds millisecondsare thousandths of a sec(1000msec 1sec) delay(500); // delay for half a second random(min,max) returns a random number between minand max Youget a new random number each time you call the function foo random(10, 255); // assign foo a random # from// 10 to 25523
7/16/13More Summary Two required Arduino functions voidsetup() { } // executes once at start for setup void loop() { } // loops forever statementsexecute one after the other inside loop, then repeatafter you run out int i 10; // define an int variable, initial value 10Other types of variables: char– 8 bits long - 32 bits unsigned float – 32 bit floating point numberStill More Summary for ( start ; stop ; change ) { } for(int i 0; i 8; i ) { } // loop 8 times// the value of i in each iteration is 0, 1, 2, 3, 4, 5, 6, 7 if ( condition ) { } if (foo 10) {digitalWrite(ledPin, HIGH);}if ( condition ) { } else { } if(num 10) { do something }else { do something else }24
7/16/13Last Summary (for now) LEDs – turn on when current flows from anode to cathode Alwaysuse a current-limiting resistor! Remember your resistor color codes 220-470 ohm are good, general-purpose values for LEDs Drive from Arduino on digital pins Use PWM pins if you want to use analogWrite for dimmingArduinoPin13long leadAnode short leadCathode -Current flows from Anode to CathodeLights up when current flowsGroundResources .htm25
7/16/13Contact Information Erik BrunvandSchool of ComputingUniversity of UtahSalt Lake City, UT 84112elb@cs.utah.eduhttp://www.cs.utah.edu/ elb26
Arduino LED already connected to pin 13 Upload Blink to your Arduino Load Basics - Blink into IDE Make sure you select the correct board Tools - Board - (Uno or Duemilanove) Make sure you select the correct serial