Transcription
CF091 seriesOWNER’S GUIDEninjakitchen.com1-877-646-5288
IMPORTANT SAFEGUARDSFor Household Use OnlyREAD ALL INSTRUCTIONS BEFORE USINGYOUR NINJA COFFEE BAR SYSTEM.Safety Signal WordsThis Owner’s Guide and the safety labelsattached to this appliance use signal words thatindicate safety hazards with differing levels ofseverity.Below are the words used and their definitions: WARNING indicates a hazardous situationwhich, if not avoided, could result in death orserious injury. CAUTION indicates a hazardous situationwhich, if not avoided, could result in minor ormoderate injury. NOTICE is used to address practices notrelated to physical injury.The words “WARNING” and “CAUTION” arepreceded by a triangle, signifying that these aresafety-related.The terms “IMPORTANT” and “NOTE” are alsoused to describe good ideas for better and moreefficient equipment use.THIS BOOK COVERS MODEL NUMBERS:CF090A CF4CF091 CF4CF091A CF4CF092W CF4TECHNICAL SPECIFICATIONSVoltage:120V , 60Hz.Power:1450 WattsWater ReservoirCapacity:50 Ounces11-877-646-5288WARNING:To reduce the risk of fire, electric shock, serious injury,death or damage when using this appliance, followthese basic safety precautions.General Precautions1 DO NOT allow young children to operate theappliance or use as a toy. Close supervisionis necessary when any appliance is used nearchildren.2 To reduce the risk of electric shock, this appliancehas a polarized plug (one blade is wider than theother). As a safety feature, this plug will fit into apolarized outlet only one way. If the plug does notfit fully into the outlet, reverse the plug. If it stilldoes not fit, contact a qualified electrician. DONOT force into outlet or try to modify to fit.3 To protect against electrical shock, DO NOTsubmerge the appliance or allow the power cordto come into contact with water or any otherliquid.4 Allow the appliance to cool before removing anyparts and before cleaning.5 NEVER carry the appliance by the power cord oryank it to disconnect from electrical outlet; insteadgrasp the plug and pull to disconnect.6 DO NOT operate any appliance with a damagedcord or plug, or after the appliance malfunctions,or has been dropped or damaged in any manner.7 DO NOT let the power cord hang over the edgesof tables or counters or touch hot surfaces suchas the stove.8 DO NOT remove the brew basket or carafe whilethe appliance is brewing. Scalding may occurif any of these parts are removed duringbrewing cycles.9 The use of an accessory not recommended by themanufacturer may create an overflow conditionand scalding hazard, or result in fire, electricshock, or personal injury.
10 DO NOT operate your appliance in an appliancegarage or under a wall cabinet. When storing in anappliance garage always unplug the unit from theelectrical outlet. Not doing so could create a riskof fire, especially if the appliance touches the wallsof the garage or the door touches the unit as itcloses.Operating Notice11 DO NOT use well water; use tap water.12 Clogging and backing up of water and/or coffeein the filter basket can occur under any of thefollowing conditions: The use of coffee that is toofinely ground; using two or more paper filters;using a permanent filter in conjunction with apaper filter; not cleaning coffee grounds from apermanent filter; or allowing coffee grounds to spillover the filter.13 ALWAYS use appliance on a dry, level surface.14 DO NOT place on or near a hot gas or electricburner, or in a heated oven.15 DO NOT use this appliance for anything other thanits intended use. DO NOT use outdoors.16 DO NOT touch hot surfaces. Use handlesor knobs.17 DO NOT touch warming plate while the brewer isin use.18 DO NOT reach across top of brewer to frothduring brewing. Steam is released from vent ontop of brewer and can result in a steam burn.19 DO NOT run the appliance without water.20 ALWAYS place a vessel beneath the brew basketto receive the brewed coffee.21 DO NOT overfill the water reservoir. Fill water onlyto the Max Fill line.Glass Carafe22 The carafe is designed for use with this applianceonly. It must never be used on a stovetop.23 DO NOT set a hot carafe on a wet or cold surface.24 DO NOT use a cracked or scratched carafe or acarafe that has a loose or weakened handle.25 DO NOT clean carafe with abrasive cleansers,steel wool pads, or other abrasive material.26 DO NOT place carafe in microwave.27 DO NOT expose carafe to extreme temperaturechanges.28 DO NOT place carafe on or near a hot gas orelectrical burner, or in a heated oven.29 DO NOT use carafe for carbonated beverages.30 DO NOT drink directly from the carafe. Liquid fromthe carafe may be very hot.31 DO NOT use the carafe to store food when not inuse.32 Ensure the carafe is completely empty beforestarting a cleaning or brewing cycle. Starting acycle with water or coffee in the carafe will causean overflow.Maintenance33 Remove the power cord from the electrical outletand allow unit to cool before removing brewbasket, water reservoir, or filters before surfacecleaning.34 To prevent illness from bacterial growth in theappliance, follow all cleaning instructions in theCare & Maintenance section of this Owner’sGuide.35 If the product is not operating properly, contactSharkNinja Operating LLC at 1-877-646-5288or ninjakitchen.com for examination, repair, oradjustment.36 Clean the system on a weekly basis.Cord Statement37 A short power-supply cord is provided to reducethe risks resulting from becoming entangled in ortripping over a longer cord.38 DO NOT use extension cords with this product.SAVE THESEINSTRUCTIONSninjakitchen.com2
ContentsThank you forpurchasing theNinja Coffee Bar System .3Getting to Know Your Ninja Coffee Bar System 4Control Panel 5Features of the Ninja Coffee Bar System 6Before First Use 7Setting the Clock & Delay Brew 8Priming Your Ninja Coffee Bar System 9Preparing & Using the Ninja Coffee Bar System 11How Much Coffee do You get in Your Cup? 11Would You Like a Hotter Coffee? 11Pre-Heating 11Filling the Brew Basket With Coffee 12Drip Stop 13Intelligent Warming Plate. 13Stay Warm Button. 13Brewing Coffee 14Customs Brews:. 14Classic & Rich 14Over Ice 15Signature Brews: . 15Specialty & Cafe Forte 15Frothing Your Milk 16Care & Maintenance 17Cleaning After a Brew 17Cleaning Your Carafe. 17Cleaning Your Water Reservoir. 17Cleaning & Descaling Your Brewing System 18Troubleshooting Guide 19Ordering Replacement Parts 21Warranty & Registration 221-877-646-5288
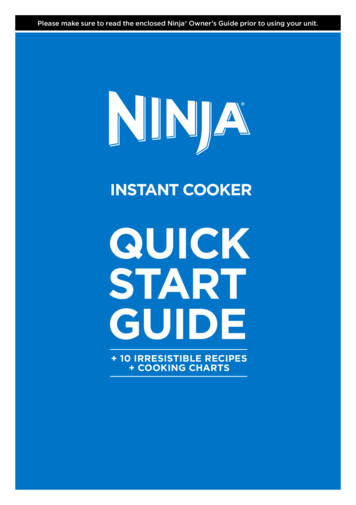
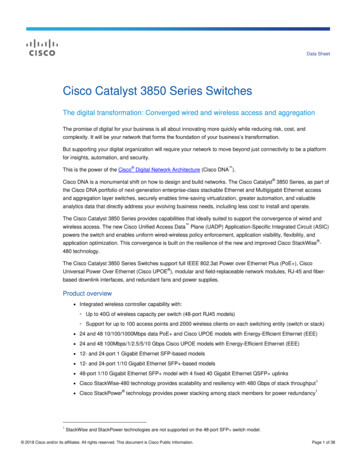
Getting To Know Your Ninja Coffee Bar System CAUTION: DO NOT reach across the top of brewer to frothduring brewing. Steam is released from vent on top of thebrewer and can result in a steam burn.kblcadoimepnqjgfha Brewerb Flip-Top Water Reservoir Lidc Removable Water Reservoird Showerheade Water Tank Shelff Control Panelg Multi-Serve Cup Platformh Intelligent Warming Platei Swinging Brew BasketjklmnopqrDrip Stop TogglePermanent FilterRemovable Filter HolderIntegrated FrotherFrother WhiskBrew-Through Carafe LidGlass CarafeDouble-Sided Scoop: Carafe Side and Single-Serve SidePower Cord & Wrap (not shown)ninjakitchen.com4
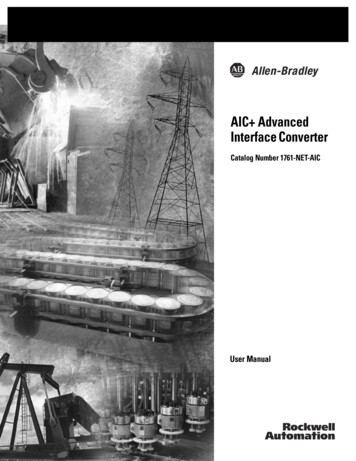
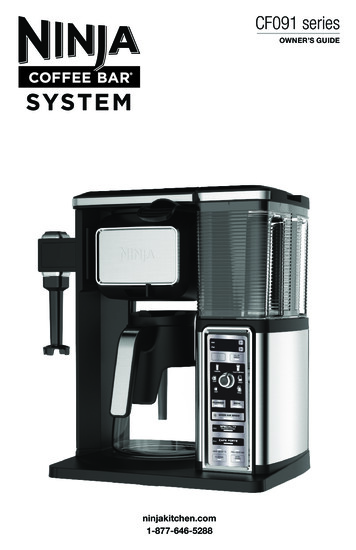
Control Panel121 Programmable Digital Clock2 Clock Hour & Minute Buttons3 Power Button345c5d5b5e5a5f6a6b6c4 Delay Brew Button5 Multi-Serve Diala Cupb XL Cupc Travel Mugd XL Multi-Servee Half Carafef Full Carafe6 Custom Brew Typesa Classic Brew Buttonb Rich Brew Buttonc Over Ice Brew Button7 Ninja Signature Brewsa Specialty Brew Buttonb Cafe Forte Brew Button8 Drip Stop Indicator9 Pre-Heat Indicator10 Intelligent Clean Cycle Indicator/Button11 Stay Warm Button7a7b89101151-877-646-5288
Features of the Ninja Coffee Bar System Thermal Flavor Extraction Technology - Blends precision water delivery with automated controls for calibratedtemperature, pre-infusion, coffee saturation, and flavor richness to unlock the full flavor potential of your coffee.Custom Brews – Brew directly into your favorite cup, travel mug, or carafe.Brew Types – Control the strength and style of your coffee:a. Classic Brew for smooth, balanced flavor from your favorite coffee.b. Rich Brew for a richer, never-bitter coffee flavor that stands up to milk, cream, or flavoring.c. Over Ice Brew for a smooth, rich, freshly brewed iced coffee that’s not watered down.d. Specialty Brew for creating a super-rich concentrate to use as a key ingredient in all kinds of hot milk-based,iced, and frozen coffeehouse-style drinks.e. Cafe Forte for deep, full-bodied, and complex flavor that is so rich and drinkable, it tastes great black—no milk orsweeteners needed.Multi-Serve Cup Platform – Pull it down and place your favorite cup on it. Brew directly into your cup.Removable Water Reservoir with Easy-Access Flip-Top Lid – For quick and easy filling.Auto-iQ – The Ninja Coffee Bar System knows how much water to use for each size and brew type.50 oz. Glass CarafeLED Control Panels with Programmable Digital Clock24-Hour Programmable Delay Brew Button – Set it to automatically brew the following morning.Drip Stop – Stops the flow of coffee from the brew basket, allowing you to pour a cup mid-brew. Switch toggle to theclosed position to prevent dripping once the brew cycle is finished.Clean Function – When your Ninja Coffee Bar System senses there is hard-water calcium buildup in your brewer,which can affect the flavor of your coffee, the CLEAN light will illuminate. Follow the cleaning instructions in the Care &Maintenance section.Stay Warm Button – Your warming plate will automatically turn on after brewing a carafe and turn off after 2 hours. TheStay Warm button allows you to manually turn the warming plate off.Intelligent Warming Plate – Automatically adjusts the temperature of the warming plate to keep your coffee at the idealdrinking temperature without burning it.Audible Ready Signal – Alerts you that your coffee is ready.2-Hour Shutoff – Automatically turns off the warming plate two hours after you brew coffee.Permanent Filter – A reusable filter that preserves the natural coffee oils and small coffee particles to provide a robustflavor, similar to what you would experience when using a French press.Pre-Heat - After plugging in and turning on your brewer by pressing the Power button, allow 3 minutes for your brewerto pre-heat. When plugged in, your Ninja Coffee Bar System will stay pre-heated for 72 hours unless you turn the breweroff by pressing the Power button.Go to ninjakitchen.com for moreinformation and how-to videos.Brew into a cup, travel mug, or carafe.Cup or XL CupTravel Mug or XL Multi-ServeHalf Carafe or Full Carafeninjakitchen.com6
Before First UsePLEASE KEEP THESE IMPORTANTSAFEGUARDS IN MIND WHEN USING THEAPPLIANCE:CAUTION: APPLIANCE CREATES HOT LIQUID.HANDLE WITH CARE.CAUTION: DO NOT remove the vessel whilethe appliance is running without the DripStop in the closed position. Return thevessel quickly and open the Drip Stop tocontinue the brew.CAUTION: Never open the brew basket whenthe coffeemaker is in use.CAUTION: Please ensure you are using at leasta 12 oz. cup for the Cup size, 14 oz. cup for theXL Cup size, 16 oz. travel mug for the Travel Mugsize, and 20 oz. travel mug for the XL Multi-Servesize to prevent overflow and a scalding injury.IMPORTANT: DO NOT run the appliancewithout water. IMPORTANT: Always place a vessel beneaththe brew basket to receive the brewedcoffee.IMPORTANT: DO NOT overfill the waterreservoir. Fill water only to the Max Fill line.1Remove all packaging material, stickers, and labelsfrom the brewer.2Wash the water reservoir, permanent filter, glasscarafe, and removable filter holder in warm, soapywater with a soft cloth.NOTE: The glass carafe is dishwasher safe. Place ontop rack only.71-877-646-52883Rinse and dry thoroughly.4Wipe the intelligent warming plate with a damp cloth.5Before first use, prime the system by running two FullCarafe, Classic Brew cycles with water only. After eachcycle is complete, discard the water.NOTE: See the Priming Your Ninja Coffee Bar Systemsection.
Setting the Clock & Delay BrewFig. 1Fig. 2Fig. 4Fig. 3SETTING THE CLOCK1Plug the power cord into an electrical outlet. The clockwill flash on the control panel to indicate that the timehas not been set. (Fig. 1)2Press the H (hour) or M (minute) button until you reachthe current time. The AM or PM indicator will illuminateon the left side of the display as you are setting thetime. (Fig. 2)3After 5 seconds, the clock will stop flashing and theclock will be set.NOTE: If the clock stops flashing and does not displaythe correct time of day, pressing the H (hour) or M(minute) button at any time will cause the clock to flashagain. You can now reprogram the correct time of dayby following the steps above.3While the clock is flashing, press the H (hour) or M(minute) button to set the time that you would likethe Delay Brew to begin. The AM or PM indicator willilluminate on the left side of the display as you aresetting the desired time.4Once the proper time has been set, select the size ofthe vessel that you would like to brew into.5Select the Brew Type that you desire from the 5 flashingbuttons. The selected brew type will be illuminated.(Fig. 4)6Once the time, brew size, and brew type have been set,allow the Delay Brew button to stop flashing, or pressthe Delay Brew button to activate. When the Delay Brewis activated, the Delay Brew button will illuminate andan audible signal will play to verify the Delay Brew isset.NOTE: If you unplug the brewer or in the event of anextended power loss, you will need to reset the clockthe next time the brewer is plugged in.NOTE: To deactivate the Delay Brew cycle, press theDelay Brew button once more and the light will turn off.Any change to the selected brew size or starting anyother brew will cancel the programmed Delay Brew.SETTING THE DELAY BREW TIMENOTE: The Ninja Coffee Bar System must remain onfor the Delay Brew function to work. Do not power offafter setting Delay Brew.1Turn the unit on by pressing the Power button locatedunder the clock.NOTE: The clock will remain on even if the unit isturned off. Ensure the unit is powered on before settingDelay Brew.27Place the appropriate-sized vessel under brew basket.IMPORTANT: Make sure the Drip Stop is in the openposition.Go to ninjakitchen.com for moreinformation and how-to videos.Press Delay Brew. The Delay Brew button will illuminateand the clock will begin to flash “12:00” or the lastDelay Brew time that was set. (Fig. 3)ninjakitchen.com8
Priming Your Ninja Coffee Bar SystemCAUTION: Fill reservoir with water up to, but not exceeding, the Max Fill line. We recommend fresh, cool,filtered water. Do not fill water reservoir with any other liquids such as brewed coffee, carbonated beverages,etc. as other liquids may damage your brewer.Fig. 5Fig. 6Fig. 7Fig. 9Fig. 81Place the brewer on a dry, clean, and level surface.2To fill the water reservoir, use the hand grips to lift itto the right and up off the brewer. (Fig. 5) The waterreservoir lid flips open for easy filling, and the entirelid is easily removable for quick cleaning. Add fresh,filtered water up to, but not exceeding, the Max Fill line(Fig. 6), then return the water reservoir to the brewerby angling it into the holder and pushing in toward thebrewer to lock into place. (Fig. 7) Do not fill waterreservoir with anything other than water as other liquidsmay damage your brewer.91-877-646-52883Ensure removable filter holder and permanent filter arenested inside the brew basket. (Fig. 8) Once in place,slide the brew basket all the way in until you hear aslight click. (Fig. 9)
Fig. 104Twist the brew-through lid clockwise onto the glasscarafe to lock into place. (Fig. 10)5Center the carafe below the brew basket. (Fig. 11)NOTE: Do not place any ground coffee in the brewbasket for the first two cycles.6Plug the brewer into an electrical outlet.7Once all parts are securely in place, press the Powerbutton.Fig. 11Fig. 128With the unit powered on, make sure the Drip Stoptoggle is set to the open position. Select the Full Carafesize and Classic Brew setting. (Fig. 12)9When the cycle is complete, discard the water in thecarafe. Repeat, beginning with step 2. You are nowready to use your Ninja Coffee Bar System to brewcoffee.ninjakitchen.com10
Preparing & Using the Ninja Coffee Bar SystemHOW MUCH COFFEE DO YOU GET IN YOUR CUP?CAUTION: Please ensure that you are using at least a 12 oz. cup for the Cup size, 14 oz. cup for the XL Cupsize, 16 oz. travel mug for the Travel Mug size, and 20 oz. travel mug for the XL Multi-Serve size to preventoverflow and a scalding injury.Each size and brew type produces a different amount of coffee to optimize strength and taste.NOTE: The coffee grounds will absorb some of the water that is brewed, resulting in slightly less brewed coffee than water used.APPROXIMATE BREW VOLUMESize/BrewClassicOver IceRich(coffee only)Over Ice(filled with ice)Cup9.5 oz.8.7 oz.3.8 oz.9.5 oz.XL Cup11.5 oz.10.3 oz.4.6 oz.11.5 oz.Travel Mug14 oz.13.2 oz.5.9 oz.14 oz.XL Multi-Serve18 oz.16 oz.7.3 oz.18 oz.Our Specialty Brew is always 4 oz. and Cafe Forte is always 8 oz., so you don’t need to adjust the dial for those Signature Brews.WOULD YOU LIKE A HOTTER COFFEE?The type of cup you brew into can drastically influence the drinking temperature of your coffee.CERAMIC CUPCupTemperatureDrinkingTemperatureWhy is there adifference?NINJA CUPPAPER CUPRoomTemperatureHotPre-warmed withhot waterHotterPre-warmed inmicrowave with estA cold ceramicmug will steal heatfrom the coffee asit warms itself up.If the mug isalready warm, itwill not steal asmuch heat fromthe coffee.Just like yourcold mug, coldmilk lowers thetemperature ofyour coffee.The doublewalled Ninja cupis designed toretain initial coffeetemp better thana ceramic cup.Unlike a ceramicmug, a thinnerpaper cupdoes not stealsubstantial heatfrom the coffee.PRE-HEATING1Plug in your brewer, then press the Power button to initiate pre-heating. You will see the Pre-Heating light turn on.2Allow 3 minutes for your brewer to pre-heat.3After 3 minutes, the Pre-Heating light will turn off. Your brewer is now pre-heated.4Your Ninja Coffee Bar System will stay pre-heated for 72 hours unless you turn the brewer off by pressing the Powerbutton.111-877-646-5288
ORFig. 13Fig. 14FILLING THE BREW BASKET WITH COFFEEFor best results, use the measurement chart in the nextcolumn to determine how much ground coffee to use foreach brew size. The amount of ground coffee for each sizewill remain the same for any brew type you select. Forexample, if you select Cup and Classic Brew, you will usethe same amount of coffee grounds as if you select Cup andOver Ice Brew.CAUTION: The maximum capacity for groundcoffee is 12 rounded tablespoons or 6 Ninja Big Scoops. Exceeding this amount or using fineground coffee may cause overflow.12Place the permanent filter or a #4 paper cone filterin the removable filter holder. If using a paper filter,first ensure the permanent filter is removed from theremovable filter holder. Then fold the paper filter alongthe seams, open it fully, and firmly press it into thebrew basket, making sure it is firmly seated. (Fig. 14)3Use the Ninja Scoop and follow the measurementsin the chart to fill the filter. These measurements arebased on level scoops—adjust to your preferred taste.(Fig. 15) We suggest using a medium-sized grind ifgrinding whole beans.Serving SizeNinja ScoopTablespoonsCup / XL Cup2–3 small scoops2–3 Tbsp.Travel Mug /XL Multi-Serve3–5 small scoops3–5 Tbsp.Half Carafe3–4 big scoops6–8 Tbsp.Full Carafe4–6 big scoops8–12 Tbsp.Signature BrewsNinja ScoopTablespoonsSpecialty (4 oz. Brew)2 big scoops4 Tbsp.Cafe Forte (8 oz. Brew)2 big scoops4 Tbsp.NOTE: Exceeding the recommended medium grindsize for whole beans may cause the brew basket tooverflow.Open the brew basket by sliding it out of the brewer.(Fig. 13)NOTE: Check for any loose grounds that may be left inthe brew basket. Remove and rinse the removable filterholder if needed.Fig. 154Slide the brew basket back into the brewer until it clicksinto place.ninjakitchen.com12
Preparing & Using the Ninja Coffee Bar System - cont.CAUTION: HOT WATER. Do not remove the brew basket or vessel while brewing.CAUTION: STEAM. Do not touch steam vents or the top of the brewer while brewing.CAUTION: The brew basket is hot after brewing. Always allow the brewer to cool down before cleaning.Fig. 16Fig. 17DRIP STOPINTELLIGENT WARMING PLATENOTE: If the Drip Stop is closed before you begin abrew, the brewer will notify you with 5 beeps andthe Drip Stop indicator will illuminate. Set the DripStop to the open position and select your brewconcentration level.The Intelligent Warming Plate will automatically turn onafter a Full or Half Carafe size of Classic or Rich Brew. TheIntelligent Warming Plate will adjust the heat it produces toavoid burning the coffee over time.CAN’T WAIT FOR THAT FIRST CUP TO BE READY?When brewing a carafe, close the Drip Stop to pause thebrew cycle and pour a cup. Promptly replace the carafe andopen the Drip Stop to complete the brew. (Fig. 16)NOTE: If you forget to open the Drip Stop, the Ninja CoffeeBar System will pause the brew, and after 20 seconds it willgive you a friendly audible reminder. After 6 minutes, thebrew will be canceled.CAN’T WAIT FOR THE LAST FEW DROPS?When the brew cycle is complete, set the Drip Stop to theclosed position to stop dripping from the brew basket.NOTE: While the Drip Stop is closed, the Drip Stop indicatorwill illuminate.NOTE: Remember to open the Drip Stop when you are readyto brew again. If you forget, your Ninja Coffee Bar Systemwill give you a friendly audible reminder.131-877-646-5288CAUTION: The HOT SURFACE light will illuminatewhen the warming plate is hot. Do not touch thesurface when this light is illuminated.STAY WARM BUTTONPress the Stay Warm button after the brew to turn theIntelligent Warming Plate off. You can turn the IntelligentWarming Plate back on within 2 hours of the brew bypressing the Stay Warm button again. (Fig.17)
Fig. 18Fig. 19BREWING COFFEENOTE: If making a single cup, lower the Multi-ServeCup Platform down and center the cup or mug on thecup platform. Please ensure you are using at least a 12oz. cup for the Cup size, 14 oz. cup for the XL Cup size,16 oz. travel mug for the Travel Mug size, and 20 oz.travel mug for the XL Multi-Serve size.NOTE: Each brew has a pre-infusion cycle withvarying times. The brew will begin, stop, and bequiet for a short period of time before it beginsagain. This process is used to evenly saturate thecoffee grounds.NOTE: For hotter coffee, rinse the coffee cup, mug, or glasscarafe with hot water prior to brewing.3CAUTION: Ensure the coffee cup, mug, or glasscarafe is completely empty before starting a brewingcycle. Starting a brewing cycle with coffee in thevessel could cause an overflow.Press the Classic Brew or Rich Brew button and thebrew will begin. (Fig. 18, Fig. 19) Press the ClassicBrew or Rich Brew button again to cancel the brew.NOTE: The brew will begin, stop, and be quiet fora short period of time before it begins again. Thisprocess is used to evenly saturate the coffeegrounds.CUSTOM BREWS:CLASSIC & RICHClassic Brew - For a smooth, balanced flavor.Rich Brew - For a coffee that is richer than ClassicBrew and still smooth, with more room for milk andcream.NOTE: If brewing a half carafe or a full carafe, theStay Warm indicator and Intelligent Warming Platewill automatically turn on. (Fig. 18, Fig. 19) This canbe turned off by pressing the Stay Warm button onceilluminated. The Intelligent Warming Plate will turn offautomatically after 2 hours.1After filling the water reservoir and adding groundcoffee to the filter, be sure the Drip Stop is open andthe reservoir, basket, and filter are securely in place.NOTE: Do not remove water reservoir, brew basket, orvessel while brewing.2Use the Multi-Serve dial to select the size of coffee youwould like to brew. Place the empty vessel you wouldlike to brew into underneath the brew basket.4The Ninja Coffee Bar System will beep to signal acompleted brew.NOTE: Rich Brew will use slightly less water and yieldslightly less brewed coffee than Classic Brew.ninjakitchen.com14
Preparing & Using the Ninja Coffee Bar System - cont.Fig. 20Fig. 21OVER ICE BREW - Designed to brew hot coffee over iceto lock in the flavor for a rich, freshly brewed, smoothiced coffee that’s not watered down. Be sure your vesselis filled with ice before brewing.C AUTION: DO NOT USE GLASSWARE. However, theprovided glass carafe is safe to use due to thespecialized glass material.1Fig. 22SIGNATURE BREWS:Specialty and Cafe Forte brews deliver a specific amountof concentrated coffee for the perfect brew every time.Specialty delivers approximately 4 oz. and Cafe Fortedelivers approximately 8 oz.Specialty Brew - Delivers a strong coffee concentrateperfect for an iced blended coffee drink or milk-basedspecialty drink.After filling the water reservoir, add ground coffee to thefilter. Be sure the Drip Stop is open and the reservoir,brew basket and filter are in place.2Use the Multi-Serve dial to select the size of coffee thatyou would like to brew.3Before brewing, fill the desired vessel to the top with icecubes and place the vessel below the brew basket. Pressthe Over Ice Brew button and the brew will begin. (Fig. 20)Press the Over Ice Brew button again to cancel the brew.Cafe Forte Brew - Has a deep, full-bodied, andcomplex flavor that is rich and drinkable. It tastes greatblack—no milk or sweeteners needed1Note: If brewing an iced blended drink, fill the desiredvessel with the amount of ice recommended in therecipe before brewing.IMPORTANT: Always fill the desired vessel to thetop with ice before placing it below the brewbasket. Do not add ice to the water reservoir.NOTE: The brew will begin, stop, and be quiet fora short period of time before it begins again. Thispre-infusion process is used to evenly saturatethe coffee grounds.2NOTE: If making a carafe of Over Ice Brew, fill thecarafe with ice and brew without the brew-through lid.4C AUTION: Make sure to use the proper cup size toprevent coffee from overflowing the cup.151-877-646-5288Place the vessel that you would like to brew intounderneath the brew basket. Press the Specialty Brewbutton or Cafe Forte button and the brew will begin.(Fig. 21, Fig. 22) Press the Specialty Brew button orCafe Forte button again to cancel the brew.NOTE: The brew will begin, stop, and be quiet fora short period of time before it begins again. Thispre-infusion process is used to evenly saturatethe coffee grounds.The Ninja Coffee Bar System will beep to signal acompleted brew. Stir to cool coffee completely.Go to ninjakitchen.com for moreinformation and how-to videos.After filling the water reservoir and adding groundcoffee to the filter, be sure the Drip Stop is open andthe reservoir, brew basket and filter are securely inplace.NOTE: No matter which size is selected on theMulti-Serve dial, Specialty will always brew 4 oz.and Cafe Forte will always brew 8 oz.3The Ninja Coffee Bar System will beep to signal a completedbrew.
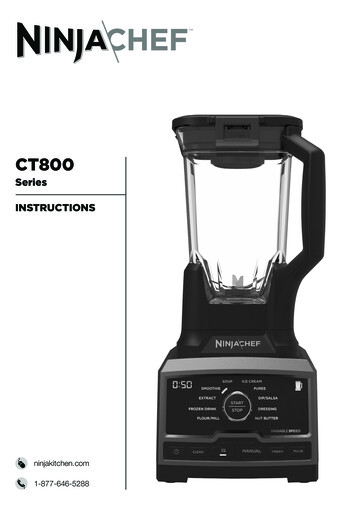
CAUTION: DO NOT reach across the top of the brewer to froth during brewing. Steam is released from vent ontop of brewer and can result in a steam burn.Fig. 23Fig. 24Fig. 25FROTHING YOUR MILK1Pour milk into cu
temperature, pre-infusion, coffee saturation, and flavor richness to unlock the full flavor potential of your coffee. Custom Brews – Brew directly into your favorite cup, travel mug, or carafe. Brew Types – Control the strength and style of your coffee: a. Classic Brew for smooth, balan