Transcription
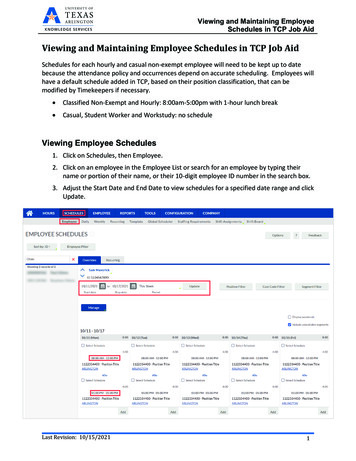
Viewing and Maintaining EmployeeSchedules in TCP Job AidViewing and Maintaining Employee Schedules in TCP Job AidSchedules for each hourly and casual non-exempt employee will need to be kept up to datebecause the attendance policy and occurrences depend on accurate scheduling. Employees willhave a default schedule added in TCP, based on their position classification, that can bemodified by Timekeepers if necessary. Classified Non-Exempt and Hourly: 8:00am-5:00pm with 1-hour lunch break Casual, Student Worker and Workstudy: no scheduleViewing Employee Schedules1. Click on Schedules, then Employee.2. Click on an employee in the Employee List or search for an employee by typing theirname or portion of their name, or their 10-digit employee ID number in the search box.3. Adjust the Start Date and End Date to view schedules for a specified date range and clickUpdate.Last Revision: 10/15/20211
Viewing and Maintaining EmployeeSchedules in TCP Job AidEditing Employee Schedules1. To edit the schedule, right click on a shift and click Edit. Or click the Select Schedulecheckbox for the shift, click the Manage button, and select Edit.Note: You can only edit one schedule shift at a time.2. Adjust the Time In, Time Out, and Position as needed.3. When finished,click Save.Last Revision: 10/15/20212
Viewing and Maintaining EmployeeSchedules in TCP Job AidDeleting Employee Schedules1. To delete a schedule for a shift day, right click on the day and click Delete. Or click theSelect Schedule checkbox for the shift, click the Manage button, and select Delete.2. To delete schedules for multiple days, click the check box for Select Schedule on eachday, right click, and click Delete.3. A pop-up window will display asking if you are sure you want to delete the segment(s).Click OK to continue or Cancel to return without cancelling the segment.Note: When a recurring schedule is edited or deleted, it will be marked as Overridden. Thisis done to indicate that the schedule has been changed from the employee’s regularlyscheduled time.Adding a Schedule1. To add a schedule for a day that does not currentlyhave a schedule or to add an additional scheduledsegment to an existing schedule, click Add.Last Revision: 10/15/20213
Viewing and Maintaining EmployeeSchedules in TCP Job Aid2. Enter the Time In.3. Enter the Time Out.4. Select a Position.5. When finished, clickSave.Note: Adding a schedule on the Overrides tab will not result in the schedule recurring in futureweeks. These additions are one-time only changes.Recurring ScheduleThe recurring tab displays the recurring schedule that is currently assigned to the employee.Note: To apply a schedule from Advanced Scheduler, you must first unassign the employee’srecurring schedule if one has been assigned.1. Click the Recurring tab.2. Click the Override role settings checkbox.3. Click the Unassign icon. This will remove the row for the recurring schedule.Last Revision: 10/15/20214
Viewing and Maintaining EmployeeSchedules in TCP Job Aid4. Click Assign.5. Set the Start Date for the new recurring schedule.6. Click the radio icon for Use recurring schedule.7. Click the drop down and choose the appropriate recurring schedule. See the defaultschedules above for details regarding the recurring schedule8. Click Assign and Save.Last Revision: 10/15/20215
Oct 15, 2021 · 2. Click on an employee in the Employee List or search for an employee by typing their name or portion of their name, or their 10 -digit employee ID number in the search box. 3. Adjust the Start Date and End Date to vi