Transcription
MassHealthProvider PortalA How To Guide for UsingYour Online Resource
TABLE OF CONTENTSSelect a link below to view the instructionsRegister . 4Logging In . 7Resetting Your Password . 8Home . . 9My Account 10Notification Center . 11Provider Administration . . 12Add Users . 12Manage Users . 14Search Users . 14Create Billed Amount List 15Billed Amount Associations 18Assign Billed Amount List 18Dental Information . 19Search Affiliated Providers . 19Patient Management . 21Member Eligibility 21Member Detail 23Search Broken Appointments . 26Submit Broken Appointments . 27Claims/Prior Authorizations . . . 28Search Claims/Prior Authorizations Void Claims .Submit Claims/Prior Authorizations .Claims Confirmation Report .MassHealth Provider PortalUser Guide282931332
TABLE OF CONTENTSSelect a link below to view the instructionsRemittance . . 34Document List . 35Find a Dentist . 36Contact Us . . . 37Submit Inquiry 38Review Inquiry 40Reports . 42Event Calendar 43MassHealth Provider PortalUser Guide3
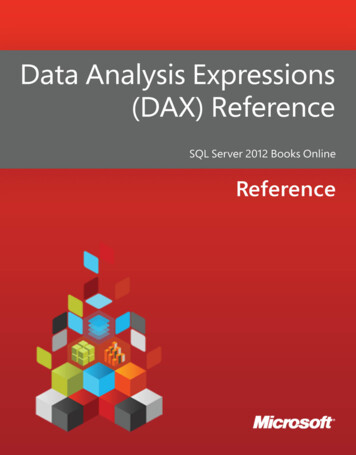
HOW TORegister for the PortalSTEP 1The only way to self-register for the Portal is as a Super User. In order to do this, you will need tohave information about both the business office and specific details on at least one of the Providersat that office. Key information that you will need in order to self-register include the Provider’s firstand last name, NPI and license number, as well as the tax ID for the practice.If you are a designated Super User for the practice and have this information available, go tohttps://provider.masshealth-dental.net/ and click REGISTER.Tip: A Super User is someone in your practicewho has complete administrative privilegesacross your organization, including access toall employee and patient records. It isrecommend that you restrict the number ofSuper Users to a minimum.Tip: If you are unsure whether you are a designated Super User foryour practice and/or not sure if you have all of the necessaryinformation to self-register, please contact your MassHealthrepresentative.MassHealth Provider PortalUser GuideTable of Contents4
HOW TORegister for the PortalSTEP 2Complete all of the requiredinformation on the registrationpage and click REGISTER.Tip: Always use a businessemail address, not apersonal email, whenregistering on the Portal.If all of the information is correct,you will receive a “RegistrationSuccessful” notification. You willthen have Tier 1, or Super User,access, which can be used to addall further users in the system.If your registration is notsuccessful, try the following: Adjust the Provider Name: Ifyour practice name is ‘BobSmith LLC’ try both ‘Bob SmithLLC’ and ‘Bob Smith’ in theProvider Name field IDs must match exactly: TheLicense, NPI and Tax ID entriesmust match what is on file. Tryentering the Tax ID with andwithout the hyphenIf your registration is still unsuccessful, please contact your MassHealth representative.MassHealth Provider PortalUser GuideTable of Contents5
HOW TORegister for the PortalSTEP 3If your registration was successful, you will receive an email with directions for logging into thePortal. Click the link, and verify that your information is correct. You will only need to go through theregistration process once.STEP 4Update your temporary password to a permanent password. You can set your security questions andanswers.Tip: All three security questionsmust have different answers. Youmay want to write down yourpassword and security questionsand answers, and file theinformation in a safe place.STEP 5It is recommended that you add at least one other Super User right away. Note that adding otherSuper Users (or standard users) does not require the self-registration process. They can be addedthrough the simple Manage Users section of the Portal.MassHealth Provider PortalUser GuideTable of Contents6
HOW TOLogin to the PortalSTEP 1In your browser, go to https://provider.masshealth-dental.net/ and click SIGN IN.STEP 2Enter the email address used to register, or that was used by your Administrator to create yourlogin. Enter the password and click Login.MassHealth Provider PortalUser GuideTable of Contents7
HOW TOReset a PasswordSTEP 1If you’ve forgotten your password, go to the Sign Inpage (https://provider.masshealth-dental.net/) andclick SIGN IN.STEP 2Click the “Forgot password?” link right above theLogin button.STEP 3On the next page, in the User ID field, enter the email used to register for the Portal and click OK.STEP 4You will receive an email. Open the email, click the link, and update your password as directed.When done, click Submit. If you don’t see the email, be sure to check your spam folder.MassHealth Provider PortalUser GuideTable of Contents8
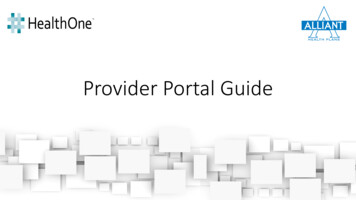
HOW TONavigate the Home PageHome PageClick the Mass.Gov link tovisit the MassGov websiteSee page 12 forinformation onadding andmanaging users ofthis PortalClick Home to return tothis page at any timeSee page 28 forinformation onsearching,submitting andvoiding Claims andPrior AuthorizationsThe navigation menu runsacross the top of the pageSee page 42 forinformation onReportsTip: Not all users will see all icons. Userswill only see those icons for which theyhave permission.MassHealth Provider PortalUser GuideTable of Contents9
HOW TOUpdate My AccountSTEP 1Click My Account on the top navigation menu.STEP 2Type the updated name and/or EOB notification preference, then click UPDATE INFORMATION.Click UPDATE PASSWORD or UPDATE USER PROFILE to update either of those items.MassHealth Provider PortalUser GuideTable of Contents10
HOW TOAccess the Notification CenterSTEP 1Click the bell icon in the top right corner to see a glimpse of any messages. Click VIEWNOTIFICATIONS to see all notifications in their entirety.STEP 2Any notifications will display in the message list. Click View All New to see new notifications or ViewAll Previous to see older notifications.MassHealth Provider PortalUser GuideTable of Contents11
HOW TOAdd a New UserSTEP 1Clicking the Manage Users button on the home pagewill take you to the same page as selecting ProviderAdministration Manage Users on the navigationmenu. Only Tier 1 users (Super Users) will be able tomanage users.STEP 2Before adding a new user, you may want to check to see if they are already registered on youraccount. Enter the person’s Last Name, then click SEARCH.STEP 3The search results will display a list of users matching the search criteria. If the desired user is notfound, click ADD NEW USER.MassHealth Provider PortalUser GuideTable of Contents12
HOW TOAdd a New UserSTEP 4Enter the user’s First and Last Name, and Email address. Follow the instructions to set the user’s Tier,Role and Permissions. When done, click ADD USER.Tip: Tier 1 users (Super Users)default to having all of thepermissions enabled.STEP 5Once the user has been successfully added,you will receive a confirmation message.MassHealth Provider PortalUser GuideTable of Contents13
HOW TOManage / Edit UsersSTEP 1From the Manage Users page, you can update user information. To search for a specific user, entertheir last name or email and click SEARCH. Or, to view a list of all users, leave the fields blank, thenclick SEARCH. Click on the name of the user you wish to edit.STEP 2This will bring up the Edit User page, where you can update the user’s name, tier, role, emailaddress, location and permission levels, as well as lock or disable the account. When complete, clickUPDATE USER.Tip: Once a user has been added, they cannever be permanently deleted, onlydisabled or enabled. If a user no longerneeds access to your account, eithertemporarily or permanently, set theDisabled field to Yes. To re-enable them,set the field to No.MassHealth Provider PortalUser GuideTable of Contents14
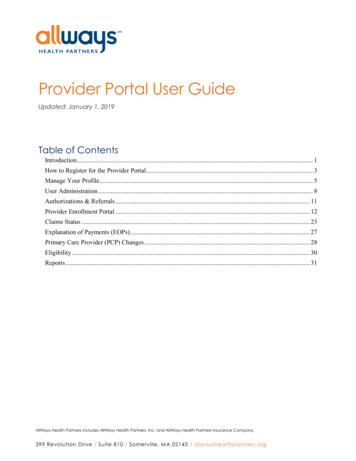
HOW TOCreate a Billed Amount ListSTEP 1Provider offices have the ability to store billed amounts by procedure codes.This will result in faster and easier online claim submission. To get started,select Provider Administration Amount List from the navigation menu.To create a new Billed Amount List, click the ADD button.STEP 2In the popup screen, namethe new Billed Amount List,then click CREATE.STEP 3The Results listing will populate with the new Billed Amount List. Before the list can be used, it isnecessary to associate the list with providers and service offices, and add procedure codes.Click the name to open the Billed Amount Detail page.MassHealth Provider PortalUser GuideTable of Contents15
HOW TOCreate a Billed Amount ListSTEP 4To associate the Billed Amount List to a service office or provider, click ADD BILLED AMOUNTASSOCIATION.STEP 5In the popup screen, select aService Office from the drop downlist, then search for a Providerconnected to that office. Click ADD.STEP 6The Billed Amount List Associations result list will populate with the new Service Office andProvider selections. Continue adding associations by clicking ADD BILLED AMOUNTASSOCIATION and following the same steps.You can remove associations by clicking UNLINK.Tip: Billed Amount List Associations are specific to particularcombinations of Service Offices and Providers. To make a list availableto multiple offices and providers, the list will need to be associatedwith each Service Office / Provider combination separately.MassHealth Provider PortalUser GuideTable of Contents16
HOW TOCreate a Billed Amount ListSTEP 7Next, add procedure codes. Click ADD BILLED AMOUNT DETAIL.STEP 8In the popup screen, enter aProcedure Code and BilledAmount. The ProcedureCode Description will autopopulate. Click ADD.STEP 9The Billed Amount List Detail result list will populate with the new procedure. Continue addingprocedures by clicking ADD BILLED AMOUNT DETAIL and following the same steps.You can edit or delete procedures by clicking EDIT or DELETE as necessary. Click PRINT THIS PAGE toprint a copy for your records.MassHealth Provider PortalUser GuideTable of Contents17
HOW TOAssign Billed Amount ListsSTEP 1You can assign or edit Billed Amount Lists by selecting ProviderAdministration Billed Amount Association from the navigation menu.STEP 2By leaving all fields blank and hitting SEARCH from the Billed Amount Association page, you willbe able to see a list of all Billed Amount List Associations that have been created.STEP 3To disassociate a List from an office or dentist, click UNLINK for that List.MassHealth Provider PortalUser GuideTable of Contents18
HOW TOUse the Dentist ListSTEP 1The Dentist List tool is for checking the credentialing and contactinformation for offices and dentists specific to this login, based onthe Tax ID number. Select Provider Administration Dentist Listfrom the navigation menu.STEP 2To search for a specific office or dentist, enter as much information as possiblein the search fields. To search for all associated offices and dentists, leave thesearch fields blank and click on SEARCH.STEP 3You can print or download the search results. To view additional details, click the links under Nameor Treating Dentist.MassHealth Provider PortalUser GuideTable of Contents19
HOW TOUse the Dentist ListSTEP 4Review additional details about affiliated providers, including License information, NetworkAffiliations and Service Offices.If any information needs to be updated, use the Contact Us form to submit updated details. ClickContact Us on the top navigation bar to open the form.MassHealth Provider PortalUser GuideTable of Contents20
HOW TOCheck Member EligibilitySTEP 1You can quickly check coverage eligibility of members. Click Patient Management MemberEligibility from the navigation menu. In the form, enter a Provider and Location, the Member’sService Date (date on which they received treatment), Date of Birth, and either Member ID orMember Last Name.STEP 2Repeat the above step on this same page to search eligibility for multiple Members at the sametime. If more search lines are needed, click “ ADD ADDITIONAL SEARCH LINES”. When all Membersare entered, click on the SEARCH button. You can search for up to 30 members at a time.MassHealth Provider PortalUser GuideTable of Contents21
HOW TOCheck Member EligibilitySTEP 3Search results will return in three sections: Active, Ineligible, and Not Found.Tip: The Benefit Effective Date for memberswill display in the eligibility Search Results.If a Member is not found based on your search information, this could mean that they are notin the system, incorrect data was entered, or that there is more than one Member with matchinginformation (such as matching Service Date, Date of Birth, and Last Name). You can SEARCHAGAIN and add more information, such as First Name or Member Number.STEP 4It is possible to save the search list for later use, as in the case of searching for all appointmentsscheduled for tomorrow. Simply click on SAVE SEARCH.Saved searches will display at the bottom of the Member Eligibility page. Click LOAD SEARCH tore-populate the search fields with all previously entered data. You will need to re-select theLocation and Provider field manually.MassHealth Provider PortalUser GuideTable of Contents22
HOW TOCheck the Member Detail PageSTEP 1From the Member Eligibility Search Results page, click on the Member Number.STEP 2Clicking on the Member Number will open Member Detail page. This provides informationregarding the member, including contact information, claims and service history.Tip: The Benefit Effective Date for memberswill display in the Member Detail page.MassHealth Provider PortalUser GuideTable of Contents23
HOW TOCheck the Member Detail PageSTEP 3Click VIEW CLAIMS to review claim information for this member. The page will automatically loadthe member’s information. To modify your search, enter the relevant information then clickSEARCH.MassHealth Provider PortalUser GuideTable of Contents24
HOW TOCheck the Member Detail PageSTEP 4From the Member Detail page, you can also review the member’s Service History. Click VIEWSERVICE HISTORY.STEP 5Review the results of the Service History search.MassHealth Provider PortalUser GuideTable of Contents25
HOW TOSearch Broken AppointmentsSTEP 1You can search for broken appointments for your office. Select PatientManagement Broken Appointments from the navigation menu. Enter therelevant information and click Search.STEP 2Search results will display a list of broken appointments.MassHealth Provider PortalUser GuideTable of Contents26
HOW TOSubmit Broken AppointmentsSTEP 1You can submit broken appointments for your office. Select PatientManagement Broken Appointments from the navigation menu.Enter the patient type, category of service, reason for the brokenappointment and language spoken by the patient, as well as anynotes, then click SUBMIT BROKEN APPOINTMENT.STEP 2Once the broken appointment is submitted, you will receive a confirmation.MassHealth Provider PortalUser GuideTable of Contents27
HOW TOSearch Claims/Prior AuthorizationsSTEP 1Clicking on the Claims/Prior Authorizationsbutton from the Home page or the link from thenavigation menu will bring you to the SearchClaims and Prior Authorizations page.Enter the relevant information and click Search.Alternatively, simply choose either Dental Claim orPrior Authorization and click SEARCH to see allresults for either category.STEP 2Search results will display information about the Claim or Prior Authorization, including the datereceived and the amount paid. To view more details, or to Void a Claim, click on the appropriatelisting under Claim/Prior Auth Number.MassHealth Provider PortalUser GuideTable of Contents28
HOW TORequest a Claim be VoidedSTEP 1To void a Claim, first Search for the Claim using the process described previously, and click on theClaim/Prior Auth Number to display Claim details. From the Claim details page, click VOIDCLAIM.MassHealth Provider PortalUser GuideTable of Contents29
HOW TORequest a Claim be VoidedSTEP 2On the Void Request Form, enter the required information, including the amount of the Claim,provider license information, and a reason for the void. If you need to add any supportingdocumentation, you can upload a file and attach it to the void request. Click SUBMIT VOIDCLAIM.STEP 3Once the void is submitted, you will receive a confirmation.MassHealth Provider PortalUser GuideTable of Contents30
HOW TOSubmit Claims/Prior AuthorizationsSTEP 1To submit a Claim or Prior Authorization, select Claims/Prior Authorizations Submit Claims &Prior Authorizations from the navigation menu. Enter the relevant information and click SEARCH.This will confirm the Member’s eligibility.STEP 2The Optional Information section mirrors standard language on the ADA claim form. These fields arenot required, but are present for those providers that want to include the additional detail.Tip: The Initial Deductible fieldsDeductible Anniversary Dateand Deductible Percentage Metare for Health Safety Netproviders only.MassHealth Provider PortalUser GuideTable of Contents31
HOW TOSubmit Claims/Prior AuthorizationsSTEP 3After entering all basic information about the claim and determining Member eligibility, addindividual line items to your claim. This is done by entering Procedure Codes that were created asBilled Amount Lists, as well additional information about the tooth or teeth serviced.You can also attach supporting documents directly to the Claim.STEP 4Once the Claim is submitted, you will receive a confirmation and the Claim Number.MassHealth Provider PortalUser GuideTable of Contents32
HOW TOView a Claims Confirmation ReportSTEP 1As an administrative function, some Providers like to print outcopies of submitted claims to place in patients’ files.To obtain a Dental Claim Confirmation Report, select Claims/PriorAuthorizations Claims Confirmation Report from the navigationmenu. Enter the Service Office, Treating Dentist, and what type ofsubmission was made. The report can be sorted either by MemberID or Member Last Name. Click PRINT THIS PAGE to print thereport.MassHealth Provider PortalUser GuideTable of Contents33
HOW TOSearch RemittanceSTEP 1You are able to look up past payments using thecheck or deposit number, Payer Name, PayeeName, or you can opt to see all payments for agiven date range. The last eighteen months worthof records will be available. Select Remittance onthe navigation menu.STEP 2Enter the data you want to search on. The last eighteen months worth of records will beavailable. Click SEARCH when complete.STEP 3Review payment details. To view additional payments, click VIEW MORE.MassHealth Provider PortalUser GuideTable of Contents34
HOW TOView your Document ListSTEP 1Your Document List contains items that have beenattached for your reference. Select Document List onthe navigation menu.Leave all fields blank and cli
4 HOW TO Register for the Portal STEP 1 MassHealth Provider Portal Table of Contents User Guide The only way to self-register for the Portal is as a Super User.In order to do this, you will need toAuthor: DentaQuestTitle: PowerPoint PresentationCreated Dat