Transcription
Guitar Hero MIDI ControllerCreated by John ntrollerLast updated on 2022-04-12 11:06:24 AM EDT Adafruit IndustriesPage 1 of 21
Table of ContentsOverview3 Parts Wii Guitar Hero Controller Optional367USB MIDI Essentials7 MIDI Messages Wii Guitar Hero Controller MIDI Synthesizers899Hook Up the Controller10 Plug Things In to Other Things Fancy Mode1112Code the Guitar Hero MIDI Controller DownloadInstall the FirmwareBootloader ModeDrag and DropTest MIDI OutputPlay!Customize It Adafruit Industries1516161616181818Page 2 of 21
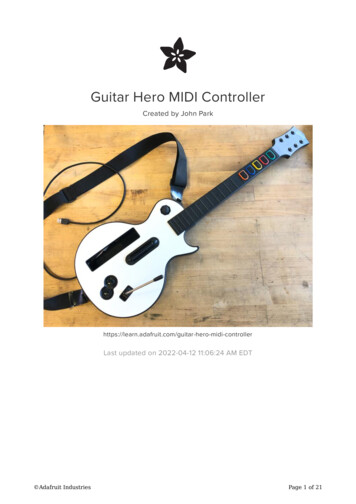
OverviewYou can turn an old Guitar Hero accessory into a USB MIDI controller for yoursynthesizer! Wii accessories use I2C to send all of their data, so we'll couple theGuitar Hero controller with a STEMMA QT Nunchuck Breakout and an Adafruit QT Pyto read all the fret buttons, whammy bar, strum bar, and joystick data.You'll be able to send MIDI notes, chords, octave changes, whammy bar pitch bends,and joystick CC messages to any software synth or a USB MIDI host-capablesynthesizer.PartsYour browser does not support the video tag.Adafruit QT Py - SAMD21 Dev Board with STEMMA QTWhat a cutie pie! Or is it. a QT Py? This diminutive dev board comes with our favoritelil chip, the SAMD21 (as made famous in our GEMMA M0 and Trinket M0 boards).Thistime it. 7.50In StockAdd to CartYour browser does not support the video tag.Adafruit Wii Nunchuck Breakout AdapterDig out that old Wii controller and use it as a sleek controller for your next robot if youlike. The Adafruit Adafruit Wii Nunchuck Breakout Adapter fits snugly into the Wiiconnector. 2.95In StockAdd to Cart Adafruit IndustriesPage 3 of 21
STEMMA QT / Qwiic JST SH 4-pin Cable - 100mm LongThis 4-wire cable is a little over 100mm / 4" long and fitted with JST-SH female 4-pinconnectors on both ends. Compared with the chunkier JST-PH these are 1mm pitchinstead of. 0.95In StockAdd to Cart Adafruit IndustriesPage 4 of 21
USB C to USB C Cable - USB 3.1 Gen 4 with E-Mark - 1 meter longAs technology changes and adapts, so does Adafruit! Rather than the regular USB A,this cable has USB C to USB C plugs!USB C is the latest. 9.95In StockAdd to Cart Adafruit IndustriesPage 5 of 21
USB A to USB C AdapterAs technology changes and adapts, so does Adafruit, and speaking of adapting, thisadapter has a USB A plug and a USB C socket so your older.Out of StockOut of StockWii Guitar Hero ControllerYou have one in your closet. If not, 30on eBay, less at a thrift shop. Adafruit IndustriesPage 6 of 21
OptionaliOS Lightning to USB OTG CableYour iOS phone or tablet may not have a USB port on the bottom but that doesn'tmean you can't use it to connect USB devices. Secretly known as a 'CameraConnector' or. 17.50In StockAdd to CartUSB MIDI EssentialsMIDI is a venerable protocol (dating back to 1983) that is used to communicatebetween synthesizers, controllers, sequencers, sample players, computers, mobiledevices, drum machines, and other electronic music making devices. Adafruit IndustriesPage 7 of 21
MIDI MessagesA simple and very common use case is to have a controller, such as a piano-stylekeyboard, send Note On and Note Off data to a music synthesizer (including softwaresynths on your computer or mobile device).Press a key and a message is sent telling the synth to play a specific musical note.Release the key and a message is sent to the synthesizer telling it to stop playing thatnote.Getting a bit fancier than simple on/off messages, MIDI can also be used to send"continuous controller" CC messages, typically the result of turning a knob or pushinga slider on the keyboard controller. These can be used to sweep through the cuttofffrequency of a low pass filter, or modulate a tremolo, and many, many otherparameters.A similar scheme is also used to send pitch bend info -- often represented by a pitchbend wheel on the left side of a MIDI keyboard.USB MIDI uses the same message protocol as classic MIDI, but does so over a USBhost/device transport. Adafruit IndustriesPage 8 of 21
This makes it very simple to plug MIDI devices/controllers into computers and iOSdevices, which act as the MIDI host. This is great, because it means you can controlsoftware synthesizers using something nicer than a computer keyboard!Wii Guitar Hero Controller MIDIOn its own, the Wii Guitar Hero controller sends analog signals via I2C for all of itsseven buttons, strum bar buttons, x/y joystick, and whammy bar. We'll use the WiiNunchuck breakout adapter with the QT Py microcontroller to convert those I2Cmessages into MIDI notes, CC messages, and pitch bend from the whammy bar.With the QT Py plugged into your computer or iOS device via the USB-Lightningadapter (https://adafru.it/D4n), you'll be able to play any software synth with yourGuitar Hero controller!SynthesizersNearly any software synth (or DAW (digital audio workstation) you find will allow youto use USB MIDI to control the notes, pitch bend, and CC input. Here are some goodones to try:Linux / Windows / mac osfree open source Helm (https://adafru.it/C-a) VCV Rack (https://adafru.it/C-b) Pure Data (https://adafru.it/C-c) Vital (https://adafru.it/P-f) Ardour (https://adafru.it/C-d)Chrome Web Browser Viktor NV-1 https://nicroto.github.io/viktor/ (https://adafru.it/C-4) Juno-106.js http://juno-106.js.org/ (https://adafru.it/C-5) Adafruit IndustriesPage 9 of 21
iOSfree open source AudioKit Synth One (https://adafru.it/C-6) (iPad only)free GarageBand (https://adafru.it/C-7) DRC Polyphonic Synth by Imaginado (https://adafru.it/C-8) (iPhone and iPad)Hook Up the ControllerThanks to the Wii Accessory plug on the controller, we can make all of ourconnections without disassembling the guitar. The plug hooks up with the WiiNunchuck breakout adapter very simply! Adafruit IndustriesPage 10 of 21
Plug Things In to OtherThingsHere's all we need to connect:Nunchuck adapter to QT Py with aSTEMMA QT cableWii controller Accessory Plug to Nunchuckadapter (be sure to follow the "Notch Up"directionsQT Py to computer with USB cable Adafruit IndustriesPage 11 of 21
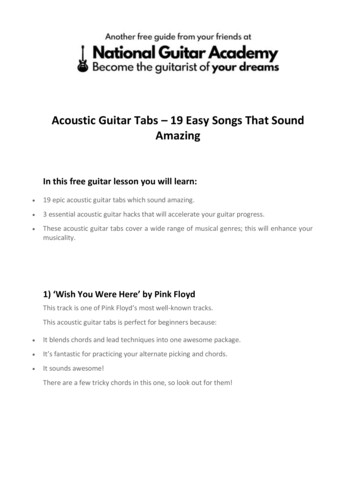
If connecting to an iOS device, you'll also need a Lightning to USB OTG adaptercable, such as adafru.it/3940If you want to keep it super simple, this is all you need to do. Just push the parts intothe empty Wiimote slot and you're done!Fancy ModeIf you want to get a bit fancy with it, you can create a small notch in the access panelon the back of the guitar. Adafruit IndustriesPage 12 of 21
Be careful with cutting instruments and wear eye protection.Open the access panel, then mark thedoor where you want to file out a notch forthe USB cable.Use a round file (or utility knife, small saw,and sandpaper, etc.) to create the notch.Plug the USB cable into the QT Py andthen close the access panel.You're all set! Adafruit IndustriesPage 13 of 21
Adafruit IndustriesPage 14 of 21
Code the Guitar Hero MIDI ControllerIn order to make it simple to get up and running with your Guitar Hero MIDI Controllerwith no programming required, we've created a drag-and-drop firmware you can use.If you're just getting started with your QT Py, there is lots more info here in the mainLearn Guide! (https://adafru.it/P-A) Adafruit IndustriesPage 15 of 21
DownloadFirst, download the firmware file linked in the button below and save it to yourcomputer hard drive somewhere you'll be able to find it, such as your Downloadsfolder.Guitar Hero MIDI QTPy.UF2https://adafru.it/P-BThis program will replace CircuitPython. To get back to your CircuitPythonprojects, reinstall it by following ythonInstall the FirmwarePlug your QT Py into your computer with a good quality, data capable USB cable. Lifeis too short to go through the pain of accidentally using a power-only USB cable, soplease round up any you own, cut them in half, travel to a distant land, bury them, anddance on their grave.Bootloader ModeNow, we'll put the QT Py into "bootloader" mode. In this mode it will appear as a USBdrive on your computer and will be ready to receive a new .uf2 firmware file. Doubleclick the reset button on the top side of the board, next to the STEMMA QT connectorport.Once you have double-clicked the reset button, the indicator LED will turn green.You'll notice a new USB drive appear on your computer named QTPY BOOT, this isthe bootloader USB storage built right into the QT Py. It is now ready to receive thefirmware file.Drag and DropNow, drag the Guitar Hero MIDI QTPy.UF2 file onto the QTPY BOOT drive. The filewill copy over in a few seconds and then the QT Py will automatically restart itself(you'll see the QTPY BOOT drive disappear, don't worry, this is normal!). The statusLED will turn off, indicating regular operation mode. Adafruit IndustriesPage 16 of 21
You've updated the firmware and you're ready to play!If you ever need to manually switch out of bootloader mode, simply press thereset button one time. Adafruit IndustriesPage 17 of 21
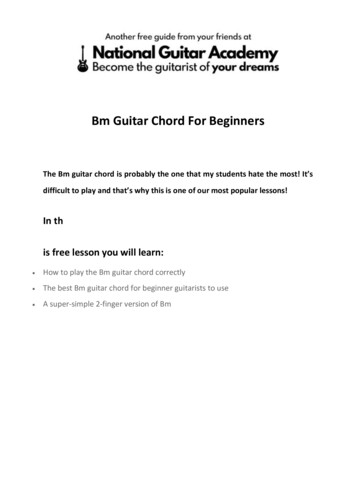
Test MIDI OutputYou can test to see that your QT Py is outputting MIDI signals properly by using a MIDIutility. These will report all activity coming from any MIDI controller plugged into yoursystem. Here are some to try: MIDI Monitor (https://adafru.it/rBH) for mac os MIDI-OX (https://adafru.it/nkF) for Windows MIDI Wrench (https://adafru.it/C-1) for iOS MIDI Scope (https://adafru.it/C-2) for Android KMidimon (https://adafru.it/rBI) for Linux Web MIDI Monitor (https://adafru.it/C-3) for Chrome browserPlay!Here's how the controls are mapped:Customize ItIf you'd like to modify or customize your code, you can download the Arduino codelinked below and use it along with the Arduino IDE. Then, you'll flash your QT Py withthe updated firmware using the Arduino IDE Upload button. Adafruit IndustriesPage 18 of 21
// SPDX-FileCopyrightText: 2021 John Park for Adafruit Industries//// SPDX-License-Identifier: MIT//Wii Guitar Hero MIDI Controller// by John Park for Adafruit Industries#include WiiChuck.h #include Adafruit TinyUSB.h #include MIDI.h Accessory guitar;Adafruit USBD MIDI usb midi;MIDI CREATE INSTANCE(Adafruit USBD MIDI, usb midi, MIDI);int MIDI OUT CH 1; // pick your midi output channel herebool DEBUG 0; // set to 1 to use serial monitor to check out controller whammyBar;joyX;joyY;minusButton; // drop an octave w each pressplusButton; // up and octave w each n 0;plusButtonOn 0;strumDownOn 0;strumUpOn 0;fretButtonOn[] {0, 0, 0, 0, 0};int octave 12;// note offset value, used to change octavesint strumDownChord[] {36, 40, 43, 45};octave valueint strumUpChord[] {36, 41, 43, 45} ;int fretNotes[] {24, 26, 28, 29, 31};//all note values will be offset byint lastWhammy 16; // Use the resting state value of your whammy barint whammyPitchVal 8192; // resting position of pitchwheelintintintintintintlastJoyX 223; // resting value of joyXjoyXCCNum 71; // VCF or whatever you assign in synth softwarejoyXCCVal 0;lastJoyY 224; // resting value of joyYjoyYCCNum 72; // VCAjoyYCCVal 0;void setup() {Serial.begin(115200);MIDI.begin(MIDI CHANNEL OMNI);guitar.begin();guitar.type GuitarHeroController;}void loop() {guitar.readData();// Read inputs and update mapsfretButtons[0] guitar.values[10]; // greenfretButtons[1] guitar.values[11]; // redfretButtons[2] guitar.values[12]; // yellowfretButtons[3] guitar.values[13]; //bluefretButtons[4] guitar.values[14]; // orangeminusButton guitar.values[6];plusButton guitar.values[16];strumDown guitar.values[7];strumUp guitar.values[7];whammyBar guitar.values[0]; Adafruit IndustriesPage 19 of 21
joyX guitar.values[20];joyY guitar.values[21];for(int i 0;i 5;i ){if(fretButtons[i] 255 && fretButtonOn[i] 0){MIDI.sendNoteOn(fretNotes[i] octave, 127, MIDI OUT CH);fretButtonOn[i] 1;}if(fretButtons[i] 0 && fretButtonOn[i] 1){MIDI.sendNoteOff(fretNotes[i] octave, 0, MIDI OUT CH);fretButtonOn[i] 0;}}if(whammyBar! lastWhammy){whammyPitchVal map(whammyBar, 15, 26, 8192, 16383); // remap to pitch valuerange, two semitones hereMIDI.sendPitchBend(whammyPitchVal, MIDI OUT CH);lastWhammy whammyBar;}if(joyX! lastJoyX){joyXCCVal map(joyX, 190, 255, 0, 127); // remap to bigger rangeMIDI.sendControlChange(joyXCCNum, joyXCCVal, MIDI OUT CH);lastJoyX joyX;}if(joyY! lastJoyY){joyYCCVal map(joyY, 190, 255, 0, 127); // remap to bigger rangeMIDI.sendControlChange(joyYCCNum, joyYCCVal, MIDI OUT CH);lastJoyY joyY;}if(minusButton 0 && minusButtonOn 0){octave constrain((octave - 12), 0, 108);minusButtonOn 1;}if(minusButton 128 && minusButtonOn 1){minusButtonOn 0;}if(plusButton 255 && plusButtonOn 0){octave constrain((octave 12), 0, 108);plusButtonOn 1;}if(plusButton 0 && plusButtonOn 1){plusButtonOn 0;}if(strumDown 0 && strumDownOn 0){for(int c 0; c 4; c ){MIDI.sendNoteOn(strumDownChord[c] octave, 127, MIDI OUT CH);}strumDownOn 1;}if(strumDown 128 && strumDownOn 1){for(int c 0; c 4; c ){MIDI.sendNoteOff(strumDownChord[c] octave, 0, MIDI OUT CH);}strumDownOn 0;}if(strumUp 255 && strumUpOn 0){for(int c 0; c 4; c ){MIDI.sendNoteOn(strumUpChord[c] octave, 127, MIDI OUT CH);}strumUpOn 1;}if(strumUp 128 && strumUpOn 1){for(int c 0; c 4; c ){MIDI.sendNoteOff(strumUpChord[c] octave, 0, MIDI OUT CH);}strumUpOn ts();for (int i 0; i WII VALUES ARRAY SIZE 3; i ) {Serial.println("Controller Val " String(i) " " String((uint8 t) guitar.values[i]));} Adafruit IndustriesPage 20 of 21
delay(50);// keeps the terminal from flooding}} Adafruit IndustriesPage 21 of 21
Nov 15, 2021 · Code the Guitar Hero MIDI Controller In order to make it simple to get up and running with your Guitar Hero MIDI Controller with no programming required, we've created a drag-and-drop firmware you can use. If you're just getting started with your QT Py, there is lots more info here in the m