Transcription
SonicWall NSA 2600/3600/4600/5600/6600Getting Started GuideRegulatory Model Numbers:1RK29‐0A9 – NSA 26001RK26‐0A2 – NSA 36001RK26‐0A3 – NSA 46001RK26‐0A4 – NSA 56001RK27‐0A5 – NSA 6600
Copyright 2017 SonicWall Inc. All rights reserved.SonicWall is a trademark or registered trademark of SonicWall Inc. and/or its affiliates in the U.S.A. and/or other countries. All other trademarks and registeredtrademarks are property of their respective ownersThe information in this document is provided in connection with SonicWall Inc. and/or its affiliates’ products. No license, express or implied, by estoppel orotherwise, to any intellectual property right is granted by this document or in connection with the sale of SonicWall products. EXCEPT AS SET FORTH IN THE TERMSAND CONDITIONS AS SPECIFIED IN THE LICENSE AGREEMENT FOR THIS PRODUCT, SONICWALL AND/OR ITS AFFILIATES ASSUME NO LIABILITY WHATSOEVER ANDDISCLAIMS ANY EXPRESS, IMPLIED OR STATUTORY WARRANTY RELATING TO ITS PRODUCTS INCLUDING, BUT NOT LIMITED TO, THE IMPLIED WARRANTY OFMERCHANTABILITY, FITNESS FOR A PARTICULAR PURPOSE, OR NON‐ INFRINGEMENT. IN NO EVENT SHALL SONICWALL AND/OR ITS AFFILIATES BE LIABLE FOR ANYDIRECT, INDIRECT, CONSEQUENTIAL, PUNITIVE, SPECIAL OR INCIDENTAL DAMAGES (INCLUDING, WITHOUT LIMITATION, DAMAGES FOR LOSS OF PROFITS,BUSINESS INTERRUPTION OR LOSS OF INFORMATION) ARISING OUT OF THE USE OR INABILITY TO USE THIS DOCUMENT, EVEN IF SONICWALL AND/OR ITSAFFILIATES HAVE BEEN ADVISED OF THE POSSIBILITY OF SUCH DAMAGES. SonicWall and/or its affiliates make no representations or warranties with respect tothe accuracy or completeness of the contents of this document and reserves the right to make changes to specifications and product descriptions at any timewithout notice. SonicWall Inc. and/or its affiliates do not make any commitment to update the information contained in this document.For more information, visit https://www.sonicwall.com/legal/.LegendWARNING: A WARNING icon indicates a potential for property damage, personal injury, or death.CAUTION: A CAUTION icon indicates potential damage to hardware or loss of data if instructions are not followed.IMPORTANT, NOTE, TIP, MOBILE, or VIDEO: An information icon indicates supporting information.NSA 2600/3600/4600/5600/6600 Getting Started GuideUpdated ‐ March 2017232‐003419‐51 Rev A
1In this GuideThis SonicWall NSA 2600/3600/4600/5600/6600 Getting Started Guide provides instructions for basic installation andconfiguration of SonicWall NSA 2600, NSA 3600, NSA 4600, NSA 5600, and NSA 6600 appliances. Contents on page 4 Getting Started Task Overview on page 7SonicWall NSA appliances provide these key features: The NSA 6600 supports up to 12 Gbps of high‐performance firewall throughput and up to 6000 VPN clients. The NSA 5600 delivers up to 9 Gbps firewall inspection throughput, NSA 4600 delivers 6 Gbps, NSA 3600 delivers 3.4 Gbps,and NSA 2600 delivers 1.9 Gbps. Each of these platforms consolidate intrusion prevention, gateway anti‐virus and anti‐spyware, network‐based malwareprotection, and application intelligence and control. All support high availability deployments when paired with the samemodel. You can add bandwidth management, application blocking, Capture Advanced Threat Protection, deep packet inspectionwith DPI‐SSL and DPI‐SSH, secure connectivity with SSL VPN and IPSec VPN, content filtering, client anti‐virus, anti‐spam,stateful high availability, and, on the NSA 6600, high availability clustering.For more product information, visit https://www.sonicwall.com.SonicWall NSA 2600/3600/4600/5600/6600 Getting Started Guide3
ContentsChapter 1In this Guide on page 3Sections included: Contents on page 4 Getting Started Task Overview on page 7Chapter 2Hardware Overview on page 9Sections included: SonicWall NSA Package Contents on page 10 NSA 2600 Front Panel on page 12 NSA 2600 Back Panel on page 13 NSA 3600/4600/5600 Front Panel on page 14 NSA 3600/4600/5600 Back Panel on page 15 NSA 6600 Front Panel on page 16 NSA 6600 Back Panel on page 174SonicWall NSA 2600/3600/4600/5600/6600 Getting Started Guide
Chapter 3Initial Setup on page 19Sections included: Determining the WAN Type on page 20 System Requirements on page 21 Recording Configuration Information on page 21 Initial Configuration on page 23 Connecting to the Internet on page 26 Troubleshooting Connections on page 30Chapter 4Registering, Licensing, and Upgrading onpage 31Sections included: Using MySonicWall on page 32 Creating a MySonicWall Account on page 32 Registration Overview on page 33 Registering in SonicOS on page 33 Alternative Registration Options on page 33 Licensing Security Services on page 35 Activating Licenses Using a Key on page 37 Upgrading Firmware on page 37SonicWall NSA 2600/3600/4600/5600/6600 Getting Started Guide5
Chapter 5Support and Training Options on page 41Sections included: Customer Support on page 42 Knowledge Base on page 42 User Forums on page 42 Training on page 42 Related Documentation on page 43 Additionally Supported Languages on page 43Chapter 6Rail Assembly and Rack MountingInstructions on page 45Chapter 7Product Safety and RegulatoryInformation on page 51Section included: Rail Assembly and Rack Mounting on page 46Sections included: Safety Instructions on page 52 Sicherheitsanweisungen on page 54 安全說明 on page 56 Declaration of Conformity on page 58 Warranty Information on page 58 ( 台灣 RoHS)/ 限用物質含有情況標示資訊 on page 59For general support information, see SonicWall Support on page 61.6SonicWall NSA 2600/3600/4600/5600/6600 Getting Started Guide
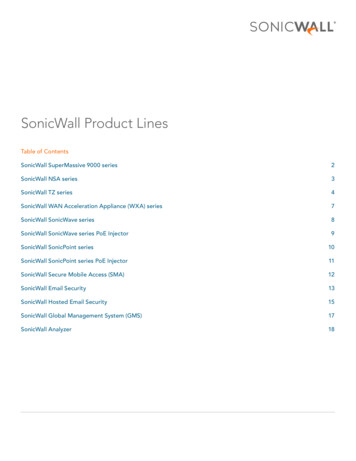
Getting Started Task OverviewThe following flow chart illustrates the necessary steps in the process of getting started with your new SonicWall NSA appliance.Configuration ProcessVerifyPre-ConfigurationRequirementsStart UpManagementComputerPerform InitialSetupRegistration, Licensing, and Deployment ProcessCreate aMySonicWallAccountRegisterAppliance inSonicOSCompleteDeploymentConfigurationSonicWall NSA 2600/3600/4600/5600/6600 Getting Started Guide7
8SonicWall NSA 2600/3600/4600/5600/6600 Getting Started Guide
2Hardware OverviewThis section describes the items shipped with the SonicWall NSA appliance and provides front and rear illustrations of theappliances. SonicWall NSA Package Contents on page 10 NSA 2600 Front Panel on page 12 NSA 2600 Back Panel on page 13 NSA 3600/4600/5600 Front Panel on page 14 NSA 3600/4600/5600 Back Panel on page 15 NSA 6600 Front Panel on page 16 NSA 6600 Back Panel on page 17SonicWall NSA 2600/3600/4600/5600/6600 Getting Started Guide9
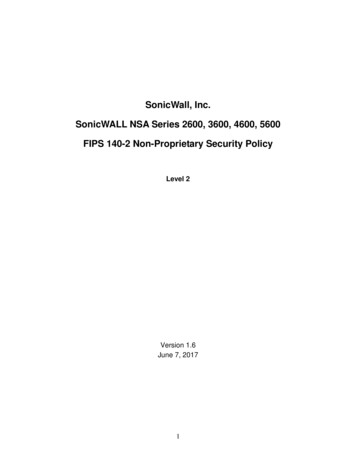
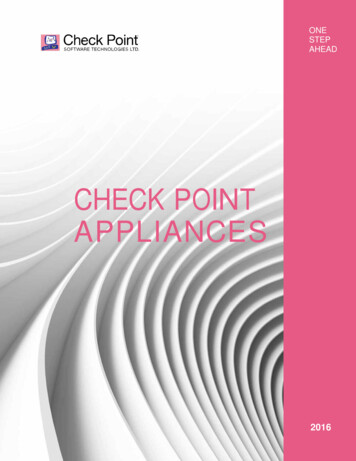
SonicWall NSA Package ContentsBefore you begin the setup process, verify that your package contains the following items:1 One SonicWall NSA 2600, NSA 3600, NSA 4600, NSA 5600, or NSA 6600 appliance2 One rack mounting rail kit (with NSA 3600/4600/5600/6600) or two rack mounting ear kits (with NSA 2600)3 One serial CLI cable4 One Ethernet cable5 One power cord*6 One Safety, Environmental, and Regulatory Information document7 One SonicWall NSA 2600/3600/4600/5600/6600 Getting Started Guide*The included power cord is approved for use only in specific countries or regions. Before using a power cord, verify that it is ratedand approved for use in your location. The power cord is for AC mains installation only. See Installation Requirements on page 52for more information.10SonicWall NSA 2600/3600/4600/5600/6600 Getting Started Guide
SonicWall NSA Package 7X5X2X0SDHCM0ALARMTESTPWRSonicWall NSA 5600MGMTCONSOLEX3X17SonicWall NSA 2600/3600/4600/5600/660034Geƫng Started Guide56SonicWall ProductsSafety, Environmental, and RegulatoryInformaƟŽŶJanuary 2017The following informaƟon comprises the safety, environmental, and regulatory messageapplicable to SonicWall products. These messages ensure proper handling and disposal ofthe equipment.The various messages are grouped by language. In general, the languages of the EuropeanUnion appear Įrst and are grouped alphabeƟcally. Non European Union languages aregrouped together towards the back, aŌer the double line.sonicwall.com support.sonicwall.com232 001007 50 Rev ACopyright 2017 SonicWall Inc. All rights reserved.Regulatory Model Numbers:1RK29-0A9 – NSA 26001RK26-0A2 – NSA 36001RK26-0A3 – NSA 46001RK26-0A4 – NSA 56001RK27-0A5 – NSA 6600SonicWall is a trademark or registered trademark of SonicWall Inc. and/or its Ăĸliates in the U.S.A.and/or other countries. All other trademarks are property of their respecƟve owners.The informaƟon in this document is provided in connecƟon with SonicWall Inc. and/or its aĸliates'products. No license, express or implied, by estoppel or otherwise, to any intellectual property right isgranted by this document. SonicWall Inc. and/or its aĸliates do not make any commitment to updatethe informaƟon contained in this document. For more informaƟon, visit hƩps://www.sonicwall.com/legal/.Missing Items? If any items are missing from your package, contact SonicWall Support SonicWall NSA 2600/3600/4600/5600/6600 Getting Started Guide11
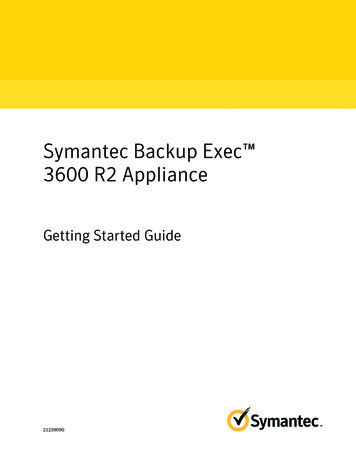
NSA 2600 Front PanelSDHC PortSecure Digital High-Capacity (SDHC)port for future useUSB Ports (2)For 3G/4G/Analog modem adaptor supportConsole PortMGMT Port (1 GE)Access the SonicOS Command LineInterface (CLI) via the enclosed serialCLI cable1 Gigabit Ethernet Management InterfaceX6X41GEX2X0M0SDHCM0Expansion ModuleALARMTESTPWRSonicWall NSA 2600CONSOLEMGMTX7X5X3X1Expansion Module BaySafeMode ButtonFor SonicWall-approvedexpansion modulesPress and hold until Test LED starts blinkingto set the appliance into SafeMode.X0-X7 (1 GE)LED IndicatorsHigh-speed copper Gigabit Ethernet portsPower: Blue: Indicates power supply is operating correctlyYellow: Indicates power supply is disconnectedTest: Quick Blinking Yellow: InitializingSlow Blinking Yellow: Safe ModeSolid Yellow: Test modeAlarm: Indicates alarm activity in Red LEDM0: Indicates Expansion Module 0 activity in Red LED12SonicWall NSA 2600/3600/4600/5600/6600 Getting Started Guide
NSA 2600 Back PanelFans (2)Dual auto-throttling fans for systemtemperature controlIoPower SupplyProvides power to the SonicWall applianceby plugging in the AC cord and switchingthe appliance onSonicWall NSA 2600/3600/4600/5600/6600 Getting Started Guide13
NSA 3600/4600/5600 Front PanelSDHC PortSecure Digital High-Capacity (SDHC)port for future useUSB Ports (2)For 3G/4G/Analog modem adaptor supportConsole PortManagement Port (1 GE)Access the SonicOS Command LineInterface (CLI) via the enclosed serialCLI cable1 Gigabit Ethernet Management X5X2X0SDHCM0ALARMTESTPWRSonicWall NSA 5600CONSOLEMGMTX3X1SafeMode ButtonX0-X11 (1 GE)Press and hold until Test LED starts blinkingto set the appliance into SafeMode.14High-speed copperGigabit Ethernet portsLED IndicatorsX12-X15 (1 GE SFP)Power: Blue: Indicates power supply is operating correctlyYellow: Indicates power supply is disconnectedTest: Quick Blinking Yellow: InitializingSlow Blinking Yellow: SafeModeSolid Yellow: Test modeAlarm: Indicates alarm activity in Red LEDM0: Indicates Expansion Module 0 activity in Red LED1 Gigabit Ethernet hot-pluggable SFPinterfaces for high-speed fiber orcopper Ethernet communicationSonicWall NSA 2600/3600/4600/5600/6600 Getting Started GuideX16-X17 (10 GE SFP )10 Gigabit Ethernet hot-pluggable ports
NSA 3600/4600/5600 Back PanelFans (2)Dual auto-throttling fans for systemtemperature controlIoPower SupplyExpansion BayFor SonicWall-approvedexpansion modulesProvides power to the SonicWall appliance byplugging in the AC adaptor and switching theappliance onSonicWall NSA 2600/3600/4600/5600/6600 Getting Started Guide15
NSA 6600 Front PanelSDHC PortSecure Digital High-Capacity (SDHC) portfor future useBypass StatusTurns on whenfail-to-wire bypassmode is activeConsole PortAccess the SonicOS Command Line Interface(CLI) via the enclosed serial CLI cableMGMT Port (1 GE)1 Gigabit EthernetManagement BYPASSSTATUSALARMTESTPWRSonicWall NSA 6600CONSOLEMGMTX19X17X15X13X11X9X7X5X3X1USB Ports (2)For 3G/4G/Analog modem adaptor supportX0-X7 (1 GE)SafeMode ButtonPress and hold until Test LED starts blinking toset the appliance into SafeMode.LED IndicatorsPower: Blue: Indicates power supplies are operating correctlyYellow: Indicates a disconnected power supplyTest: Quick Blinking Yellow: InitializingSlow Blinking Yellow: SafeModeSolid Yellow: Test modeAlarm: Indicates alarm activity in Red LEDM0: Indicates Expansion Module 0 activity in Red LED16SonicWall NSA 2600/3600/4600/5600/6600 Getting Started GuideHigh-speed copperGigabit Ethernet portsX8-X15 (1 GE SFP)1 Gigabit Ethernet hot-pluggable SFPinterfaces for high-speed fiber orcopper Ethernet communicationX16-X19 (10 GE SFP )10 Gigabit Ethernet hot-pluggable ports*X16, X18, and X19 are designated with a ‘dot’ tosignify ports with a direct uplink to the applianceCPU for maximum throughput ; X17 shares theCPU uplink with X0-X15.
NSA 6600 Back PanelFans (2)Dual auto-throttling fans for systemtemperature controlIoPower SupplyExpansion BayFor SonicWall-approvedexpansion modulesProvides power to the SonicWall appliance byplugging in the AC adaptor and switching theappliance onWARNING: Potential Hazard from FanThis manual contains specific warning and caution statements where they apply. Please read the Safety Instructionsbefore use! See Product Safety and Regulatory Information on page 61.SonicWall NSA 2600/3600/4600/5600/6600 Getting Started Guide17
18SonicWall NSA 2600/3600/4600/5600/6600 Getting Started Guide
3Initial SetupThis section provides an overview of available WAN types, a section to record configuration information, and initial setupinformation and procedures. Determining the WAN Type on page 20 System Requirements on page 21 Recording Configuration Information on page 21 Initial Configuration on page 23 Connecting to the Internet on page 26 Troubleshooting Connections on page 30SonicWall NSA 2600/3600/4600/5600/6600 Getting Started Guide19
Determining the WAN TypeBefore configuring your SonicWall NSA appliance, you need todetermine the type of WAN connection that your setup willuse. SonicWall supports the following types: Static—Configures the appliance for a network that usesstatic IP addresses. DHCP—Configures the appliance to request IP settingsfrom a DHCP server on the Internet. PPPoE—Point‐to‐Point Protocol over Ethernet (PPPoE) istypically used with a DSL modem. If your ISP requiresdesktop software with a username and password, selectNAT with PPPoE mode. PPTP—Point‐to‐Point Tunneling Protocol (PPTP) is used toconnect to a remote server. PPTP typically supports olderMicrosoft Windows implementations that requiretunneling connectivity. L2TP—Layer 2 Tunneling Protocol (L2TP) is used to transmitLayer 2 data over IP or other Layer 3 routed networks.Internet Service Providers (ISPs) often use it to enablevirtual private networks (VPNs) for customers over theInternet. It does not encrypt network traffic itself. If L2TP isnot available in the Setup Wizard, you can configure it laterin the SonicOS management interface.20SonicWall NSA 2600/3600/4600/5600/6600 Getting Started Guide Wire Mode (2‐Port Wire)—Inserts the appliance into thenetwork using two paired interfaces. Available Wire Modetypes include Bypass, Inspect, and Secure. Bypass modeallows for quick and non‐disruptive insertion into the datapath. Inspect mode extends Bypass mode with trafficinspection for classification and flow reporting. Securemode provides full SonicWall ReAssembly‐Free DeepPacket Inspection (RF‐DPI) and control of network traffic.Secure Mode affords the same level of visibility andenforcement as conventional NAT or L2 Bridged Modedeployments, but without any L3/L4 transformations, andwith no alterations of ARP or routing behavior. If WireMode is not available in the Setup Wizard, you canconfigure it later in the SonicOS management interface.NOTE: When operating in Wire Mode, the firewall’sMGMT interface is used for local management. Toenable remote management and dynamic securityservices and application intelligence updates, a WANinterface (separate from the Wire Mode interfaces)must be configured for Internet connectivity. Tap Mode (1‐Port Tap)—Using a single interface, thefirewall connects to and receives mirrored packets from anadjacent switch SPAN port. Similar to Inspect mode in WireMode, but with a single port and not in the physical path oftraffic.
System RequirementsBefore beginning the setup process, verify that you have: An Internet connection A Web browser supporting Java Script and HTTP uploadsSupported BrowsersAccepted BrowserBrowser Version NumberInternet Explorer9.0 and higherChrome18.0 and higherFirefox16.0 and higherSafari5.0 and higher, running onnon‐Windows machinesRecording ConfigurationInformationUse this section to record your configuration information. Besure to keep it for future reference.NOTE: The default MGMT interface IP address is192.168.1.254.Registration InformationSerial Number:Record the serial number foundon the bottom panel of yourSonicWall NSA appliance.Authentication Code:Record the authentication codefound on the bottom panel ofyour SonicWall NSA appliance.SonicWall NSA 2600/3600/4600/5600/6600 Getting Started Guide21
Networking InformationLAN IP Address:Subnet Mask:WAN IP Address:Select a static IP address for yourSonicWall NSA appliance that is withinthe range of your local network. (defaultfor X0 is 192.168.168.168)Record the subnet mask for the localnetwork (default mask is 255.255.255.0).Client devices connecting through theappliance LAN interface are assigned IPaddresses in this network (default clientaddresses assigned by the SonicOS DHCPserver are on the 192.168.168.0/24subnet).Select a static IP address for yourEthernet WAN interface (X1). This settingonly applies if you are using an InternetService Provider (ISP) that assigns a staticIP address.Wire ModeInterface andPaired Interface:If using Wire Mode, enter the two pairedinterfaces. These can be in any non‐wireless zone(s).Tap Interface:If using Tap Mode, enter the interface,and optionally the switch interface, used.Administrator InformationAdmin Name:Select an administrator accountname. (default is admin)Admin Password:Select an administrator password.(default is password)Internet Service Provider (ISP)InformationRecord the following information about your current Internetservice:If you areconnectingwith DHCPIf you areconnectingwith a StaticIP addressNo information is usually required. However,some providers may require a host name.Host Name:IP Address: . . .Subnet Mask: . . .Default Gateway: . . .Primary DNS: . . .DNS 2 (optional): . . .22SonicWall NSA 2600/3600/4600/5600/6600 Getting Started GuideDNS 3 (optional): . . .
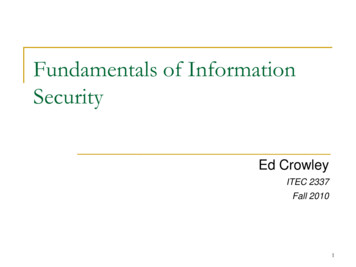
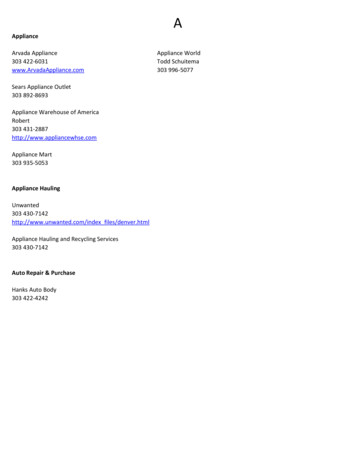
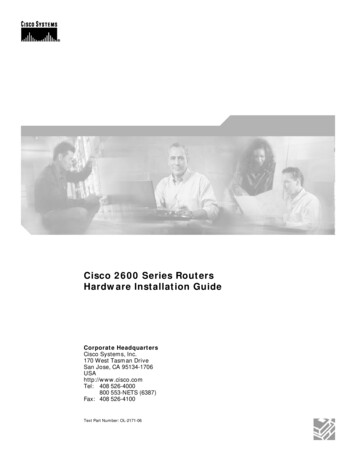
Initial ConfigurationThe diagram below illustrates how to connect your management computer to the SonicWall NSA appliance for initial setup.SonicWall X0X7X5X3X1SDHC120V AC(U.S.)M0ALARMTESTPWRSonicWall NSA 5600MGMTCONSOLEMGMTManagement ComputerEthernetNOTE: Appliance port configuration varies by platform, but the MGMT port location is similar on all SonicWall NSA 2600/3600/4600/5600/6600 appliances.SonicWall NSA 2600/3600/4600/5600/6600 Getting Started Guide23
The following sections provide initial configuration informationand instructions for connecting your SonicWall NSA appliancefor initial setup:For further information regarding power requirements, referto Product Safety and Regulatory Information on page 51 ofthis document. Connecting to the MGMT Port on page 24 Applying Power to the NSA on page 24 SonicWall NSA LED Activity on page 24 Using the Setup Wizard on page 25Connecting to the MGMT PortThe MGMT port is a dedicated 1 gigabit Ethernet interface forappliance management and SafeMode access.1 Using the provided Ethernet cable, connect one end ofthe cable to the computer you are using to manage theSonicWall NSA appliance.2 Connect the other end of the Ethernet cable to theMGMT port on your SonicWall NSA appliance.Applying Power to the NSAConnect the AC power cord from the SonicWall NSA applianceinto an appropriate power outlet.SonicWall NSA LED ActivityThe Power LEDs on the front panel illuminate blue when theappliance is powered on.The Test LED or Alarm LED may illuminate and blink while theappliance performs a series of diagnostic tests. When theseLEDs are no longer illuminated and the Power LEDs remainsteadily lit, the SonicWall NSA appliance is ready forconfiguration. This typically occurs within a few minutes ofturning on the power.If the Test or Alarm LEDs remain lit after the SonicWall NSA hascompleted powering on, restart the appliance bydisconnecting the power, waiting 1 minute, and thenconnecting the power again.For a connected MGMT or copper gigabit Ethernet port, theLink LED for the port illuminates green or amber depending onthe link throughput speed, indicating an active connection: Amber indicates 1 Gbps Green indicates 100 Mbps An unlit left LED with the right LED lit indicates 10 Mbps24SonicWall NSA 2600/3600/4600/5600/6600 Getting Started Guide
Using the Setup WizardWhen you are ready to begin initial setup, configure yourmanagement computer with a static IP address on the192.168.1.0/24 subnet, such as 192.168.1.20. This allows yourcomputer to connect to SonicOS via the MGMT interface.NOTE: Be sure to disable pop‐up blocking software, orset your web browser to allow pop‐ups and cookies.To configure initial settings using the Setup Wizard:1 With your computer connected to the appliance MGMTport, start your web browser and navigate to thedefault MGMT interface IP address:http://192.168.1.2542 Launch the SonicOS Setup Wizard by clicking the firsthere link. This wizard helps you quickly configure theSonicWall appliance to secure your Internetconnection.3 Follow the on‐screen prompts to configure the adminpassword and network settings.If a DHCP server is available on the network, the wizardrequests IP settings from it. You can click Next to acceptthese or click Manual Config to enter a static IP addressand other network settings.In the Manual Configuration screen, click Retry torevert to DHCP, or enter your own settings and thenclick Next.The initial screen displays the options to launch theSetup Wizard or configure the appliance manually.SonicWall NSA 2600/3600/4600/5600/6600 Getting Started Guide25
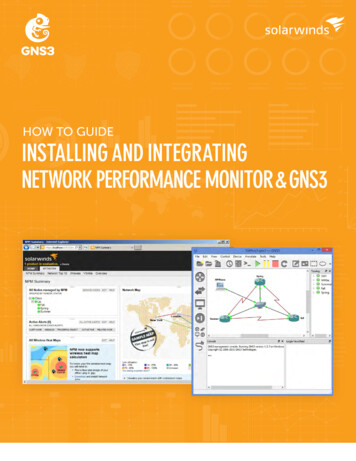
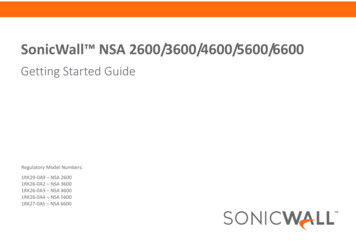
4 Once completed, click Done in the Setup Completescreen.Connecting to the InternetAfter initial setup is complete, physically connect the SonicWallNSA LAN and WAN interfaces to the appropriate networkdevices in your environment to provide access to externalnetworks or the Internet.5 Continue to Connecting to the Internet on page 26 toconnect the appliance for Internet access.Then, refer to Registering, Licensing, and Upgrading onpage 31 to begin the registration process.NOTE: Internet connectivity is needed for therecommended product registration process. For initialInternet access, connect your computer to the NSA X0interface or to the LAN subnet.You cannot reach the Internet or other externaldestinations while connected to the MGMT interfacewithout first configuring a default gateway in itsinterface settings.The Internet Access diagram illustrates how to connect yourcomputer to the SonicWall NSA appliance for Internet access.Topics: Connecting the LAN Port on page 28 Connecting the WAN Port on page 28 Testing Your Internet Connection on page 2926SonicWall NSA 2600/3600/4600/5600/6600 Getting Started Guide
Internet AccessSonicWall X0X7X5X3X1X1120V AC(U.S.)SDHCM0ALARMTESTPWRSonicWall NSA 5600CONSOLEMGMTX0X0 (LAN)X1X1 (WAN)InternetEthernetSonicWall NSA 2600/3600/4600/5600/6600 Getting Started Guide27
Connecting the LAN Port1 Connect one end of an Ethernet cable to your localnetwork switch or other networking device, or to yourcomputer.2 Connect the other end of the Ethernet cable to the X0(LAN) port on your SonicWall NSA appliance.Connecting the WAN Port1 Connect one end of an Ethernet cable to your Internetconnection.If you have a router, DSL modem, or cable modem,connect the Ethernet cable to a LAN port on the routeror modem.2 Connect the other end of the Ethernet cable to the X1(WAN) port on your SonicWall NSA appliance.NOTE: If X1 is configured in Wire Mode, configure adifferent interface with one of the other WAN types foruse in this step.28SonicWall NSA 2600/3600/4600/5600/6600 Getting Started Guide
Testing Your Internet ConnectionTo test your Internet connection:1 After you exit the Setup Wizard, connect yourcomputer to the LAN subnet or directly to the X0 (LAN)port.2 Point your browser to the X0 IP address configuredduring initial setup (default: 192.168.168.168).3 When the login page appears, log into the SonicOSmanagement interface as the administrator (default:admin), using the configured password (default:password).4 Open a command prompt window on your computerand enter the command: ping sonicwall.com5 Open another web browser and navigate to:https://www.sonicwall.comIf you cannot view the SonicWall home page, try one of thesesolutions: Verify that the Local Area Connection settings on yourcomputer are set to use either DHCP or a static IP onthe LAN subnet. Verify that the WAN interface being used for Internetconnectivity is not configured in Wire Mode or TapMode. Renew your computer’s DHCP address or restart yourcomputer to accept new network settings from theDHCP server in the SonicWall appliance. Restart your Internet router to communicate with theDHCP client in the SonicWall appliance. Check Troubleshooting Connections on page 30 formore suggestions.NOTE: WAN connectivity issues are unrelated tocompletion of the MySonicWall registration process.If you can view the SonicWall home page, you have configuredyour SonicWall NSA appliance correctly.SonicWall NSA 2600/3600/4600/5600/6600 Getting Started Guide29
Troubleshooting ConnectionsTroubleshooting Your LAN ConnectionUse the suggestions in this section to troubleshoot your MGMTand LAN connections.If you do not see the SonicOS login prompt when you pointyour browser to the X0 (LAN) IP address, consider thefollowing:Troubleshooting Your MGMTConnection Did you correctly enter the IP address for the SonicWallNSA X0 interface into your web browser, beginning with“http://” or “https://”?If you cannot connect to the SonicWall NSA appliance or theSetup Wizard does not display, consider the following: Did you correctly enter the SonicWall NSA management IPaddress beginning with “http://” or “https://” in your webbrowser? Did you try restarting your management station while it isconnected to the SonicWall appliance? Are the Local Area Connection settings on your computerset to one of the following?: Obtain an IP address automatically using DHCP Did you try restarting your management station while it isconnected to the SonicWall appliance? A static IP address on the default LAN subnet(192.168.168.0/24) Are the Local Area Connection settings on your computerset to a static IP address on the192.168.1.0/24 subnet? A static IP address on the configured LAN subnet, if youchanged it during initial setup Is the Ethernet cable connected to your computer and tothe MGMT port on your appliance? Is the connector clip on your network cable properly seatedin the port of the security appliance?30SonicWall NSA 2600/3600/4600/5600/6600 Getting Started Guide Is the Ethernet cable connected to your computer and tothe X0 (LAN) port on your appliance? Is the connector clip on your network cable properly seatedin the port of the security appliance?
4Registering, Licensing, and UpgradingThis section provides instructions for registering on MySonicWall, licensing security services, and upgrading firmware on yourSonicWall NSA appliance. Using MySonicWall on page 32 Creating a MySonicWall Account on page 32 Registration Overview on page 33 Registering in SonicOS on page 33 Alternative Registration Options on page 33 Licensing Security Services on page 35 Activating Licenses Using a Key on page 37 Upgrading Firmware on page 37Registration is an important part of the setup process and is necessary in order to receive the benefits of SonicWall securityservices, firmware updates, and technical support.SonicWall NSA 2600/3600/4600/5600/6600 Getting Started Guide31
Using MySonicWallSonicWall requires a MySonicWall account prior to configuringyour appliance. If you already have a MySonicWall account,you can continue to Registration Overview on page 33.To create a MySonicWall account:1 In your Web browser, navigate to:https://www.mysonicwall.com2 In the login screen, click the Register Now link.MySonicWall is used during registration of your SonicWallappliance and to activate or purchase licenses for securityservices, support, or software specific to your SonicWalldevice.For a High Availability configuration, MySonicWall provides away to associate a secondary unit that can share securityservice licenses with your primary appliance.NOTE: MySonicWall registration information is not soldor shared with any other company.Creating a MySonicWallAccountA MySonicWall account is required in order to register theSonicWall NSA appliance. You can create a new MySonicWallaccount from any computer by navigating to:https://www.mysonicwall.com32SonicWall NSA 2600/3600/4600/5600/6600 Getting Started Guide3 Complete the Registration form, and then click Register.4 Verify that the information is correct, and then clickSubmit.5 To confirm your account was created, click Continue.
Registration Overview3 The screen displays a message that your SonicWallappliance is not reg
6 SonicWall NSA 2600/3600/4600/5600/6600 Getting Started Guide For general support information, see SonicWall Support on page 61. Chapter 5 Sections included: Support and Training Options on page 41 Customer Support on page 42 Knowledge Base on page 42 User Forums on page 42