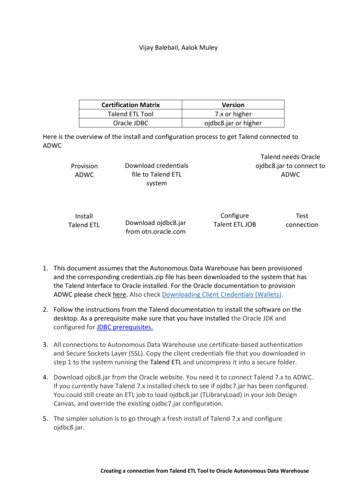
Transcription
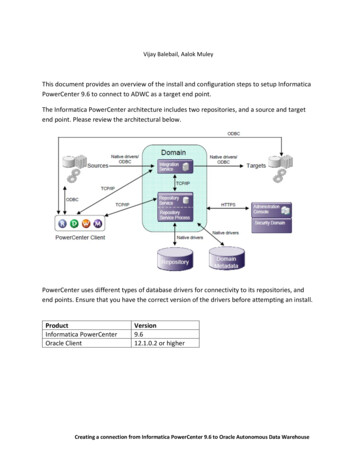
Creating a connection from Informatica PowerCenter 9.6 toOracle Autonomous Data WarehouseVijay Balebail, Aalok MuleyThis document provides an overview of the install and configuration steps to setup InformaticaPowerCenter 9.6 to connect to ADWC as a target end point.The Informatica PowerCenter architecture includes two repositories, and a source and targetend point. Please review the architectural below.PowerCenter uses different types of database drivers for connectivity to its repositories, andend points. Ensure that you have the correct version of the drivers before attempting an install.ProductInformatica PowerCenterOracle ClientVersion9.612.1.0.2 or higherCreating a connection from Informatica PowerCenter 9.6 to Oracle Autonomous Data Warehouse1
Creating a connection from Informatica PowerCenter 9.6 toOracle Autonomous Data WarehouseConfiguration StepsProvisionADWCInstall OracleDatabase Client on thePowerCenter serverInstallInformaticaPowerCenterPowerCenter uses OracleDatabase Client to loaddata to ADWCDownload credentialsfile PowerCenter systemConfigure OracleClient connect toADWCConfigureDomainRepositoryTest OracleDatabase ClientConfigureMetadataRepositoryServiceExtract ADWCMetadata tobuild ETL flowsAdd ADWCas Target(Optional)Configuration Steps:StepDescription0123Provision ADWC, install OracleClientInstall PowerCenter software,Domain and MetadataRepository (Oracle)Configure Target Connection toADWImport Target MetadataRepository LocationOn premises OracleOracle Database CloudDatabase no ASOService (DBCS, DBaaS)--Follow Informatica InstallGuideAppendix A--------Step 0: Provision ADWC, install and configure Oracle Client1. Provision Autonomous Data Warehouse Cloud (ADWC) and download the correspondingcredentials.zip file to the system that will have the Informatica PowerCenter installation. Forthe Oracle documentation to provision ADWC click here. Also check Downloading ClientCredentials (Wallets).2. All connections to Autonomous Data Warehouse Cloud use certificate-based authenticationand Secure Sockets Layer (SSL). Copy the client credentials file that you downloaded in stepCreating a connection from Informatica PowerCenter 9.6 to Oracle Autonomous Data Warehouse2
Creating a connection from Informatica PowerCenter 9.6 toOracle Autonomous Data Warehouse1 to the system where you will be installing Informatica PowerCenter and uncompress itinto a secure folder.3. Download the Oracle Database Client to the system where Informatica PowerCenter will beinstalled. We first validate that the Oracle Database Client can communicate with ADWC,and since it is installed on the same system as Informatica PowerCenter, it ensures thatPowerCenter is also configured correctly.4. Edit the sqlnet.ora file, replacing “?/network/admin” with the name of the foldercontaining the client credentials.For example:WALLET LOCATION (SOURCE (METHOD file) (METHOD DATA (DIRECTORY "/home/adwc credentials")))SSL SERVER DN MATCH yes5. Create the TNS ADMIN environment variable and set it to the location of the secure foldercontaining the credentials file you saved in Step 3. The tnsnames.ora file provided withthe credentials zip file contains three database service names identifiable as high, mediumand low. The predefined service names provide different levels of performance andconcurrency for Autonomous Data Warehouse Cloud. Use one of these service names inyour ConnectString.6. Test the Oracle Client with Oracle SQL*Plussqlplus password/\"Password\"@ConnectStringorsqlplus /nologsql set define offsql connect username/password@connectStringIf the connection is successful you are ready to move to the next step.Step 1. Install Informatica PowerCenter Software and Domain andMetadata Repository ServiceIf you have an existing Informatica PowerCenter install and associated repositories then youcan jump to Step 2 which describes the steps to configure ADWC as a target.Follow the Informatica PowerCenter install documentation to install the software and theDomain and Metadata Repository. If the repository is stored in an Oracle database on-premisesthat does not have the Advanced Security Option (ASO) configured, then follow the installationsteps in the Informatica install guide. However, if the repository is going to be in the OracleCreating a connection from Informatica PowerCenter 9.6 to Oracle Autonomous Data Warehouse3
Creating a connection from Informatica PowerCenter 9.6 toOracle Autonomous Data WarehouseCloud Database Cloud Service (DBCS) or on an on premises Oracle Database with ASOconfigured, then we need additional configuration as detailed in Appendix A.Step 2: Add ADWC as target connection to Load DataBelow are the steps to setup ADWC as a target. As a prerequisite make sure that you haveinstalled the Oracle Database Client 12.1.0.2 or higher on the PowerCenter environment.Ensure PowerCenter server environment is started with ORACLE HOME environment variableset. Next in the PowerCenter Workflow manager, in the menu use Connection - Relational andadd new connection. You can add ADWC as your target. Enter the username, password andconnect string (step 1.6) for ADWC.Step 3: Import Target (ADWC) MetadataDataDirect ODBC drivers distributed with Informatica PowerCenter 9.6 cannot connect toADWC. So, you cannot import ADWC’s metadata into the repository. We are working withInformatica to bundle the latest DataDirect ODBC drivers to resolve this issue.In the meanwhile, please use the following steps to configure the import of the target (ADWC)metadata into the repository.1. Import Metadata into target from source. Create a target definition from a relationalsource by dragging the source definition into the Target Designer workspace. TheDesigner creates a relational target definition that matches the source definition.2. You can edit the definition to change information such as the description, columns, datatypes, and target type. Save as target definition.This is likely a sufficient workaround for most of the cases. Check out this blog for more details.This completes the install and configuration of Informatica PowerCenter software, repositoriesand source and targets.Appendix AHow to install Informatica PowerCenter and configure it to use Oracle Database Cloud Service(DBCS) as its repositoryOverview:When installing PowerCenter to work with the ADWC, the Domain Repository could be storedon the Oracle Database Cloud Service (DBCS).Creating a connection from Informatica PowerCenter 9.6 to Oracle Autonomous Data Warehouse4
Creating a connection from Informatica PowerCenter 9.6 toOracle Autonomous Data WarehouseSQL*Net encryption is enabled by default on DBCS instances. The DataDirect drivers bundledwith PowerCenter lack the necessary JCE files to support SQL*Net encryption. The installationdoesn’t have an option to install “software only” and is hard wired to configure the Domainrepository which fails to install into DBCS.To successfully carry out an install and configuration of PowerCenter it is required to initiallydisable SQL*Net encryption on Oracle DBCS.Then install the repository, update the DataDirect configuration files to support SQL*Netencryption, and then re-enable SQL*Net encryption.Oracle is working with Informatica and Data Direct JDBC to simplify the installation steps. In themeanwhile, here is the sequence of installation steps needed.The high-level steps to install Informatica PowerCenter are as follows:1. Disable SQL*Net encryption on the Oracle Database where Domain ConfigurationRepository is to be installed.2. Install PowerCenter and the Domain Repository as per the installation guide.3. Enable the SQL*Net encryption on Oracle DB server.4. Configure DataDirect drivers to connect over SQL*Net encryption.1. Disable SQL*Net encryption on Oracle Database Cloud Service (DBCS)All Oracle databases in the cloud have SQL*Net encrypted enabled by default. To disable it, youneed to simply comment out certain parameter in sqlnet.ora and restart the listener.Note: If the Database has an ASM cluster, you need to modify the sqlnet.ora fromORACLE HOME and restart the listener from GRID HOME.cp ORACLE HOME/network/admin/sqlnet.ora ORACLE HOME/network/admin/sqlnet.ora.origThen edit sqlnet.ora file.Replace SQLNET.ENCRYPTION SERVER required withSQLNET.ENCRYPTION SERVER rejected.Example sqlnet.oraENCRYPTION WALLET LOCATION (SOURCE (METHOD FILE)(METHOD DATA (DIRECTORY /opt/oracle/dcs/commonstore/wallets/tde/ ORACLE UNQNAME)))#SQLNET.ENCRYPTION SERVER REQUIREDSQLNET.ENCRYPTION SERVER rejectedCreating a connection from Informatica PowerCenter 9.6 to Oracle Autonomous Data Warehouse5
Creating a connection from Informatica PowerCenter 9.6 toOracle Autonomous Data Warehouse#SQLNET.CRYPTO CHECKSUM SERVER REQUIRED#SQLNET.ENCRYPTION TYPES SERVER (AES256,AES192,AES128)#SQLNET.CRYPTO CHECKSUM TYPES SERVER (SHA1)#SQLNET.ENCRYPTION CLIENT REQUIRED#SQLNET.CRYPTO CHECKSUM CLIENT REQUIRED#SQLNET.ENCRYPTION TYPES CLIENT (AES256,AES192,AES128)#SQLNET.CRYPTO CHECKSUM TYPES CLIENT (SHA1)Restart the listener.lsnrctl reload listener name 2. Install PowerCenter and the Domain Repository as per the Installation guide.3. Enable the SQL*Net encryption on Oracle DBCS.Restore the original sqlnet.ora file and ensure that SQLNET.ENCRYPTION SERVER required is set and restart the listener again.mv ORACLE HOME/network/admin/sqlnet.ora.orig ORACLE HOME/network/admin/sqlnet.oralsnrctl reload listener name 4. Configure the DataDirect JDBC drive to connect over SQL*Net encryption.5. Shutdown Informatica Server.6. Download the Java Cryptography Extension (JCE) Policy Files that are compatible with thePowerCenter version.Download the Java Cryptography Extension (JCE) Policy Files. The DataDirect JDBC driver forOracle requires Java Cryptography Extension (JCE) Policy files to support a 256-bit strengthencryption. loads/jce-7-download432124.htmlOpen the JCE policy zip file that you downloaded and replacethe local policy.jar and US export policy.jar files to the folder in directory InformaticaInstallationDir \java\jre\lib\securityThen update the Driver configuration to accept encrypted data.Go to InformaticaInstallationDir /isp/bin directory and run thefollowing updategatewaynode command:Creating a connection from Informatica PowerCenter 9.6 to Oracle Autonomous Data Warehouse6
Creating a connection from Informatica PowerCenter 9.6 toOracle Autonomous Data WarehouseExample./infasetup.sh updategatewaynode -cs"jdbc:informatica:oracle://db hostname:1521;ServiceName informatica.oracle.network.com;EncryptionLevel required;EncryptionTypes (AES256,AES192,AES128);DataIntegrityLevel required;DataIntegrityTypes SHA1" -dt oracle -du infmetadata -dp mypasswordAt this point, you should have a successfully driver configuration to communicate overSQL*Net encryption. Restart the Informatica server.Creating a connection from Informatica PowerCenter 9.6 to Oracle Autonomous Data Warehouse7
Oracle is working with Informatica and Data DirectJDBC to simplify the installation steps. In the meanwhile, here is the sequence of installation steps needed. The high-level steps to install Informatica PowerCenter are as follows: 1. Disable SQL*Net encryption on the Oracle Database where Domain Configuration Repository is to be installed. 2. Install PowerCenter and the Domain Repository as per
