Transcription
Random sample pagesfromPermacultureDesignA step-by-step guidebyAranya
ContentsForeword viiPreface viiiHow to use this guide ixIntroduction xYou’re already a designer xiPART ONE PreparationsObservation Skills 2Patterns 3An Introduction to systems 7Spirals of erosion and degradation 11Principles and directives 14Summary 15Effective Design 16Identifying roles within the process 18Working as part of a team 19Inclusion 19Conflict resolution 22Structuring the process 23The Action learning cycle 25Flowcharts 26Summary 27PART TWO The Design ProcessSurveying the Site 30Maps 32Making base and field maps 34Create a base map from an existing map 34A base map from your own measurements 38Drawing your base map 46Summary 54Base mapping flowchart 55Recording site information 56Record existing site elements 57Map access points and routes through the site 59Identify the different zones on the site 60Map the different sectors of the site 62Estimating heights 69Record water across the site 70Take at least one soil sample 70Identify the site’s remaining limiting factors 72Map any site utilities 73Identify any free or cheap resources available. 73Creating base map overlays 75Keeping an observation diary 76Summary 78Recording site information flowchart 79
The Client Interview 80SMART goals 80The interview 81Working with multiple clients or community groups 85Small community processes 85Small to medium sized group processes 87Wider community planning 88Summary 90Client interview flowchart 91Analysis 92Identifying functions 93The process 93Functions, systems and elements 94Identifying the key functions 95Creating your SMART goals 96Choosing systems and elements 97The process 97Permaculture ethics 98Ecological impact 98Financial costs 102Time limitations 102Appropriate scale 103Interconnectedness 103Intrinsics 106Comparing best options 107Visioning and wild design 108Summary 109Choosing systems and elements flowchart 111Placement 112Around an existing main element 112Design from patterns to details 113Microclimates 113Elevation planning and aspect 115Zoning 116Access and desire lines 116Sectors 117Soil type 119Utilities 119Visualise succession 119Incremental design 120The fine details 121The Blank canvas 121McHarg’s exclusion method 122Placement flowchart 123Integration 124Energy cycling 124Process flows 126Patterns and principles 127Edge effect 128Guilds and companion planting 131Putting it all together 135Summary 136Integration flowchart 137
Design Proposal 138Share your concept design early 138Creating your final proposal 139Mapping your ideas 139Drawing 140Modelling 144Using technology 145Additional maps 146Further information 146Implementation details 149Summary 150Design proposal flowchart 151Implementation 152Breaking down the task 152Start small and work out from well-managed areas 152Factors that influence task prioritisation 153Least change for greatest effect 153Design around the limiting factors 153Resource availability 154Dependencies (a.k.a. precedences) 154Yeoman’s Keyline scale of permanence 154Creating a simple implementation plan 155Creating a project management plan 156Critical Path Analysis 158Overseeing a project implementation 159Summary 161Maintenance and Evaluation 162Creating a maintenance plan 162The need for ongoing evaluation 163Summary 164Implementation and maintenance flowchart 165Presenting to a Client 166Presentation flowchart 169PART THREE Beyond Land Based DesignBeyond Land Design 172Designing processes 172Designing zone 00 176Designing social structures 181Reflecting on the Process 184A Call to Action 185Appendices 186References 186Full design process flowchart 187Resources 188Online materials 188Recommended reading 188Glossary 190
Observation skillsPatternsOne of the first things we notice whenwe observe natural ecosystems is thatcertain patterns keep appearing,in many situations and at varyingscales. These patterns occur in bothtime and space, and while the former determine our routines, thelatter are often only considered fortheir beauty. However, nature’s mostcommon patterns have evolved overmany millennia† as being the most effectivefor survival. While conditions on the surface of the Earth havechanged considerably over time‡, life has always managed toadapt in order to survive and thrive here. So our challenge asdesigners is to identify what each of these patterns excels at doing and to apply them where appropriate in our designs.Patterns in spaceThe study of patterns and their successful application in designis a fascinating and detailed subject much beyond the scope ofthis guide. That said, there are some key principles that, onceunderstood, can help us to use them effectively in our designs.Firstly, patterns occur at the edge between two different mediaor systems. So the branching fractal form of a broccoli head issimply the edge between the plant and the atmosphere, thewaves on the ocean the place at which the air mixes with thewater. Resources are exchanged across these edges; needs aremet and waste products eliminated, so by increasing surfacearea, nature increases the efficiency of this interaction and ultimately the size and health of the organism. Hence we find thatmany of the most common patterns we see around us in nature(branching, waves, spirals, webs and so on), all have extensive‘edge’. Of course the ultimate edge on this beautiful planet isthe one between the earth and the atmosphere where almosteverything lives, and that’s because this is where all the keyrequirements for life occur together.† Nature has done 3,500,000,000 years of Research & Development!‡ Levels of Oxygen in the atmosphere were once much lower and the temperatureof the sun also considerably cooler, requiring higher levels of greenhouse gases.3
Effective DesignSummarySo the key things to remember about the design process are:Defining roles* When working for a client, clarify at the beginning of thedesign process, theirs and your own levels of involvement.* Identify the point at which you hand over the responsibility forthe design implementation to them.* Put all this in writing at the start, in a design proposal.Working as part of a design team* Identify everyone’s skills and make best use of them.* Ensure that everyone feels heard and gets an equal chance tocontribute.* Rotate roles in meetings and discussions.* Use the given meeting techniques to avoid needing to usethose for conflict resolution.Design frameworks* Provide us with a successful pattern to guide our process.* Help us to avoid missing out anything important.* All essentially follow the broad process of:Survey, Analyse, Design, Implement and Maintain.* Different frameworks might be better suited to some designprocesses than others.* While they appear to be linear processes with a beginning andan end, they are effectively cyclical.* A design is never completely finished.The Action learning cycle* Outlines the way in which we learn naturally.* All the design frameworks are based upon this process.* Any mistakes are opportunities for learning.27
The Site Survey - making mapsChoose your baselineNext, plot the key fixed points on the site such as buildings,gateways, fencing corner posts, telegraph poles or big trees.Start by choosing two points, perhaps along one side and agood distance apart, from which you can measure everythingelse. If need be, drive in two posts yourself for this purpose. Formost urban garden designs you might choose two corners of anadjacent building. Such walls are often straight, making it easyto measure between those points and so providing you with auseful baseline for your mapping.Measure distances or take bearingsIn this diagram we see a building being used as a baseline forthe survey, corners A and B being measured as 15m apart. Weknow such a building will be easy to draw using one or morestraight lines, so it will be a good way to start our map. Fromhere, the simplest method of pinpointing the other elements onthe site, such as Trees 1 and 2, is to measure their distances fromeach corner, A and B. You can use a site tape or pacing, see theonline resources for a simple pace conversion table .39
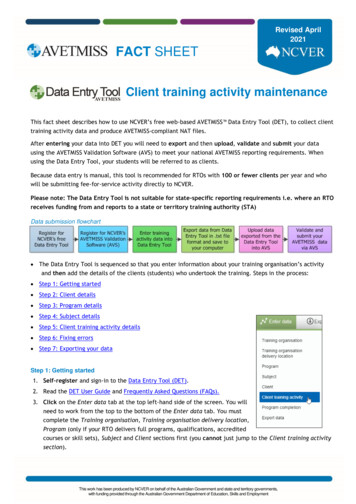
Permaculture Design - a step-by-step guideAre there any significant barriers to such flows, such as wildlifecorridors into the site being interrupted by busy roads or bywaterways? Where do people visit to perform tasks, collectthings or to rest? Where are resources brought onto the site,stored or taken away? How does the current layout affect theperformance of the site? Are any routes longer than they needto be, or passing through areas causing avoidable disruption?Identify the different zones on the siteZoning is all about how energy is being used on the site. We’llstart by mapping current patterns of activity and later redesignfor greater efficiency. Zones are focused upon main areas of usesuch as buildings (often called zone 0) and any well-used desirelines, where people move slowly enough to notice what’s going on around them. To minimise work we’ll later gather thethings needing the most attention around these focuses.Now sketch out the current zoning onto your desire lines andaccess map or overlay. Using a different colour for each zone isa great way of differentiating them, like in my example below.The desire lines around my mobile home shaped my zoning of the space60
Permaculture Design - a step-by-step guideSnow – The thaw after snow showsus more than we can normally see.Snow melts more quickly on theroofs of heated buildings that arepoorly insulated. Capped wells andother underground bodies of waterwill melt snow more quickly thansurrounding ground; a clear circleon a snowy yard is probably an oldwell that has been concreted over.Other favourable microclimates,such as around buildings, will alsothaw snow quickly. Conversely, thechilliest spots will hang onto snowresidues the longest. Desire lines arealso easy to see in the snow. Wheredo people and animals prefer towalk? Now you know!Fire – Hopefully you’ll never experience a wildfire, by allaccounts it’s a pretty terrifying thing. If the site is in a fire riskarea then designing to protect the site against it is a priority(remember designing for disasters?). Instead of waiting for one,find out about the history of wildfires in the area and theirpatterns. Radiant heat is the most destructive aspect of fire andburns from a considerable distance, even a small campfire canforce a retreat. The main things to look for on site are:*****68Inflammable plants and trees; conifers and eucalypts (high resincontent trees) burn particularly fiercely. Do prevailing windsblow on to the site from that direction?Is the site on a slope? Fire travels very quickly uphill and isfiercest on ridges, which are usually the driest areas.Where are access roads to the site routed?Is there an emergency on-site gravity-fed water supply?What are the buildings made of? Are they designed withfire-protection in mind (e.g. white painted, with door andwindow screens, simple roof shapes and screened undershotguttering that doesn’t collect hot ashes, etc.)?
Permaculture Design - a step-by-step guideIf your site has a variety of different microclimates and landuses, it’s worth surveying the soil in a few places and thencomparing your findings. What do these observations tell youabout the underlying geology of this area? The base rock willdetermine the soil type and thus the basic growing conditions.†Identify the site’s remaining limiting factorsOur survey may have already identified some of the site’s keylimiting factors: perhaps excessively shady or boggy areas, veryheavy or light soil, or crops regularly grazed off by insects orwild animals? Some of these factors we may seek to modify,others such as altitude we are going to have to accept and seekto discover the gifts they offer. Our role as designer is to identifykey limiting factors, and then to design strategies to overcomethem. Sometimes, by removingone limitation, the landscapewill change dramatically, likeremoving grazing animalsfrom a landscape to permit there-growth of forest. Returningto our leaky barrel analogy,an effective strategy might beas simple as plugging some ofthose wasteful leaks. A quicklook around many sites willquickly identify the tragic lossChris Dixon in his woodland, whichof energy and resources such as: regenerated after sheep were removed******Heat escaping from buildings.Fertility being washed out of the soil.Water leaving the site before being fully utilised.Crops being left to rot (most commonly under trees).High maintenance, low output systems (e.g. most lawns).Vandalism.You may also identify other opportunities being wasted like:Workers having insufficient to do, or being wasted on lowvalue tasks. Volunteer help not being made use of.* Free or cheap local resources, not being collected, or utilised.*†72The Living Landscape by Patrick Whitefield has an excellent chapter on this.
The Client InterviewWorking with multiple clients orcommunity groupsWhen working with larger clientgroups it is important to ensure thateveryone feels heard. Ultimately,the success of a community projectdepends heavily upon the degree ofownership a group feels over the endproduct. I’ve seen well-meant projects, such as community orchards,created with little or no consultationwith the local residents. Inevitablythose projects suffer vandalism, because those carrying out the damagehave no connection to this thing that‘just landed’ in their neighbourhood.Here’s a small selection of tools that have been developedto help groups successfully make decisions, any of which mayprove useful in particular circumstances. If you plan to workwith groups of more than just a few clients, then I recommendthat you investigate at least one of the following methods inmore detail than I have room for here. I provide just a briefoverview of each below, but each is well documented either inbooks, on the Internet, or both. When working with groups inthis way, you might be offering a set of questions for the groupto go away and consider their answers to, or be stepping intothe role of an outside facilitator in their process. However, ifyou are considering taking on the latter role, I would certainlysuggest that you get some training first.Small community processesAny of the methods previously offered to assist design teams inworking together could also be useful to small groups of clientsin establishing a collective vision and set of priorities. Twoadditional processes follow that take up more time, but offer away to ensure equal participation in any key decision making.These work well for up to 10 or 15 people, maybe more, but asthe group size increases, the time needed for the process mayexpand accordingly.85
The Client InterviewClient interview flowchart91
Permaculture Design - a step-by-step guideFunctions, systems and elementsStill confused about the difference between functions, systemsand elements? Maybe this will help: elements are individualthings that make up a system when connections exist betweenthem. Several systems can also connect up to create biggersystems. Either elements on their own, or complete systems,perform (one or more) functions. A function is what you wantto achieve and the system or element is the means by which youachieve it. Here are some HedgeHazel, elder, ash, bramble etc.FencePosts, concrete, wooden slats etc.RoofwaterharvestingEarthworksGutter, diverter, downpipe, waterbutt or tank, pondDams, sluices, gulleys, trees etc.SlopeTerracing, swales, gabions, net andSoilstabilisationpan, ionVeg garden(plants)Veg garden(structure)OrchardComposting, green manures, liquidfeeds, mycorrhiza, treebogCardboard, bark, compost, straw,wood chip etc.Carrots, potatoes, onions etc.Raised beds, composting system,greenhouse, hand toolsApple, plum, pear trees etc.Note that while Hazel has appeared here as an element in ahedge system to provide wind protection, it could also havebeen listed as an element fulfilling the functions of soil improvement or food production.Remember, ‘adaptable’ (multi-functional), resilient (multipleelements for each important function) and ‘high efficiency’(least work for greatest effect) are always design aims and don’tneed to be considered as separate functions.94
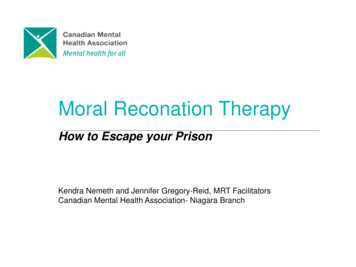
Permaculture Design - a step-by-step guidePlacementNow we’ll experiment with best placements forthe different elements and systems in our design.If there’s a fixed point of focus on the site (suchas a house), then we’ll be placing everything mostefficiently in relation to that. However, when starting with a‘blank canvas’ we get to choose the best place to site our centreof activity. If we’re arranging our design around a proposednew house or other structure, its placement will probably beour most important decision. If we’re designing a site withoutan obvious central element, then we’ll need to identify themost important elements to place first and go from there.Around an existing main elementWhen designing around a fixed point of focus like a building,we’ve a number of methods we can use to plan the layoutof the site. Using our base map and overlays from the survey,we’ll aim to make our mistakes ‘on paper’, instead of in thelandscape itself. One helpful tool for this process is the landscape modelling technique I use to teach zones and sectors.Using landscape modelling to explore placement or systems and elements112
Analysis - integrationSome edges can be significantly deep, though defining theexact distance where an effect becomes negligible is difficult,as it can vary with changing environmental conditions such asthe weather or soil moisture levels. Just think how you mightchoose to cycle into town on a sunny day, yet take the carinstead when it’s wet and windy. Pollinating insects behavein a similar way! Such things are extremely fuzzy23. Beneficialeffects can be short-term or year round, depending upon themeans of interaction.So when increasing edges wecan do so by making them bothlonger and deeper. Nature’spatterns, like crenellation (wavyness) already show us how tomake them longer. Depth can beincreased by wherever possiblehelping the agents of transmission, like planting a windbreakhedge for pollinating insects orby buying a good waterproofjacket for a hesitant cyclist! Bycreating ponds with gently sloping edges we increase the areaof shallow water that warms in the sun: a popular microclimatewhere creatures such as tadpoles thrive. Adding mycorrhizalfungi when planting most plants and trees creates a beneficialrelationship that increases their ability to ‘reach’ soil nutrients.Remember though that while increasing edges in our designs isgenerally a good idea, that we should always optimise ratherthan maximise them. If we produce more of a resource thanwe can make use of, we create more work for ourselves havingto harvest it all and find new uses or outlets for it. If we leaveit we risk creating an imbalance in the system, any unusedresources having the potential to become pollution and attractpests. Don’t be greedy, match your design to your needs. Youcan always increase that edge again later when you have thecapacity to deal with the extra yields. Remember, start smalland work out from well managed areas.but don’t be an obsessive edgetarian.129
Permaculture Design - a step-by-step guideDrawingDraw your design directly onto the base mapPerhaps our simplest option is to draw our design ideas directlyonto our base map. If we made multiple copies of this earlierfor recording site information, we can use one of those. If wewish to separate out some aspects of our design, or distinctimplementation phases, we can avoid clutter by spreadingthese details over a series of maps. Below is the plan I made ofmy mobile home garden, drawn directly onto the base map.Design: AranyaBase map and overlaysAnother way of presenting a design is to instead draw it ontoan overlay. If you chose earlier to record site information inthis way, you can use the same technique to present yourfinal ideas. Use good quality (high transparency) tracing paperif you can; this will also allow you to show multiple overlays atthe same time when useful.140
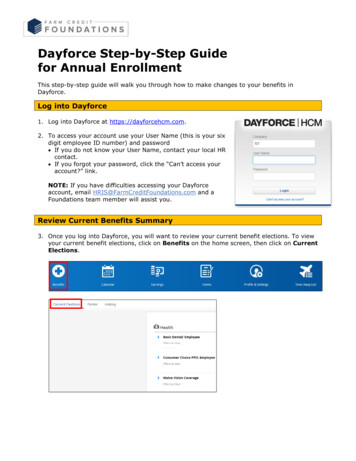
ImplementationThe kind of things that can go wrong include:*****Poor communication, the team don’t know what to doDisagreements, personality conflicts and walk outsFailure to meet standards or regulationsBad management and poorly defined goalsInclement weatherBeing prepared for such eventualities gives you a better chanceof dealing with them effectively should they occur.A good tool for taking a simple Work Breakdown Structureand turning it into something more precise that we can workfrom is a Gantt project planning chart.Gantt chart created using Open Source software, thoughyou could also use paper to lay one out.One advantage of using software is that if a task is delayed,then all dependencies can be easily shifted along the timelinein response. If you are computer-literate, the best way to learnhow to use this useful tool is to download one of the freeGantt programs and play with what it can do. A Gantt chartplaces all the chunked tasks down the left side of a grid, in theorder of implementation. The timeline runs left to right, andfor each task a coloured bar is placed indicating the anticipatedstart and finish times.157
Permaculture Design - a step-by-step guidePresenting to a ClientNow that you’ve finished your design, youmay be faced with presenting your ideas tothe client(s). The first thing to remember isthat however well they know the site, theywon’t have been through the same designprocess as you and won’t be familiar with many of the analysistools. Your job then is to communicate not just your recommendations, but also the reasoning behind the choices you’vemade. Sometimes you’ll disagree with what they initially askedyou for; if so, show good reasons, so that they can see whyyour ideas are a much better choice. Have at least one trialrun presentation, particularly if you’re not a confident publicspeaker. In my experience though, knowing the subject is thebest cure for any pre-presentation nerves.ObservationsDescribe your key site observations.* Explain what you’ve discovered about the overall landscapesurrounding the site (a map can help).* Present your base map with any overlays showing zones,sectors, access points, desire lines etc.* Describe your observations about slope across the site.* What did you notice about microclimates across the site?* What is the soil like? Does it vary in content, depth, pH etc.across the site?* How does water flow and settle across the site?* What significant flora, fungi and fauna are present?* What are your observations about structures on the site?* How is energy being harvested and used?* How are any natural or social events affecting the site?* Use photos where necessary to illustrate these points.The Client interview(s)* What are the key points you took from the interview(s)?* Reflect back on their values and vision.* Reflect back their timescale and budget for the design.166
Permaculture Design - a step-by-step guide Snow – The thaw after snow shows us more than we can normally see. Snow melts more quickly on the roofs of heated buildings that are poorly insulated. Capped wells and other underground bodies of water will melt snow more quickly than surrounding