Transcription
St ep-by-St epPict u r e Gu ideSu t u r e VideoTu t or ials!In t er act iveQu iz!H O W T O SU T U REInteractive e-Book!
Th an k you f or dow n loadin g ou r Su t u r eSt ep-by-St ep e-Book Gu ide!Ou r goal at A M edics is t o assist m edical an d ph ysician assist an tst u den t s in lear n in g h ow t o su t u r e. Th at is w h y w e cr eat ed t h ise-Book gu ide an d Su t u r e Pr act ice Kit . We h ope t h at ou r pr odu ct w illh elp you in r each in g you r car eer goals!If you ar e r eadin g t h is gu ide an d h ave n ot yetbou gh t ou r su t u r e k it , you can get you r ver y ow nA M edics com plet e su t u r e pr act ice k it dir ect lyf r om Am azon by click in g " Or der h er e" bu t t onbelow or by visit in g: h t t ps:/ / am zn .t o/ 2Ij6YOmOu r Su t u r e Pr act ice Kit in clu des ever yt h in gn eeded t o st ar t pr act icin g dif f er en t su t u r in gt ech n iqu es discu ssed in t h is eBook :Or der Her e
In t r odu ct ionWelcom e t o t h e A M edics Su t u r e Pr act ice Gu ide. In t h is m an u al,you w ill lear n t h e basics of su t u r in g an d h ow t o per f or m su r gicalk n ot t ies as w ell as f ive basic su t u r in g t ech n iqu es. Th er e ar em an y dif f er en t su t u r in g t ech n iqu es bu t w e ch ose t o f ocu s on ly ont h e f ive m ost com m on su t u r in g t ech n iqu es. Th e t ech n iqu esin clu ded in t h e e-Book ar e: sim ple in t er r u pt ed, sim ple r u n n in g,ver t ical m at t r ess, h or izon t al m at t r ess, an d su bcu t icu lar r u n n in gsu t u r in g. On ce you lear n an d m ast er t h e f ive su t u r in gt ech n iqu es, you can expan d an d add ot h er su t u r in g t ech n iqu es t oyou r sk illset .On e of t h e m ost cr u cial st eps t o advan ce you r su t u r in g sk ills is t opr act ice as m an y t im es as possible. By r epet it ion , you w ill be w ellpr epar ed an d con f iden t w h en per f or m in g dif f er en t su t u r in gm et h ods. Pr act ice is t h e m ain k ey t o m ast er all t h e com m ont ech n iqu es an d t ak e you r su t u r in g sk ills t o t h e n ext level!In t h is e-Book , w e h ave in clu ded a st ep-by-st ep gu ide m an u alw it h im ages f or each of t h e f ive basic su t u r in g t ech n iqu es. Acor r ect ly placed su t u r e m ay be t h e dif f er en ce bet w een a m in im alscar an d a per m an en t u n sigh t ly scar af t er h ealin g. If you w ou ldlik e t o access st ep-by-st ep su t u r in g videos you can f in d t h em byclick in g below :Videos
Table of Con t en t sA M edics Kit & Tool Han dlin g1. Hegar Needle Holder / Dr iverPage 12. Adson For cepsPage 23. Su r gical Scissor sPage 34. Scalpel Han dle & BladesPage 45. Cu r ved M osqu it o For cepsPage 86. 4/ 0 Nylon Th r ead Su t u r es w it h 3/ 8 NeedlePage 87. Su t u r e Pr act ice Pad w it h Non -slip BasePage 108. Car r y-all Leat h er CasePage 11In st r u m en t Ties & Kn ot s1. Squ ar e Kn otPage 132. Su r geon's Kn otPage 14Su t u r in g BasicsFive Su t u r in g Tech n iqu es1. Sim ple In t er r u pt ed Su t u r ePage 242. Sim ple Ru n n in g/ Con t in u ou s Su t u r ePage 273. Hor izon t al M at t r ess Su t u r ePage 304. Ver t ical M at t r ess Su t u r ePage 335. Ru n n in g Su bcu t icu lar Su t u r ePage 36Qu iz
A M edics Kit&Tool Han dlin g
Hegar Needle Holder / Dr iverTh is is a pr im ar y in st r u m en t r equ ir ed w h enper f or m in g a su t u r e. If you look at t h e jaw s oft h e n eedle h older you w ill n ot ice t h er e ar elacer at ion s w h ich f ir m ly h old or secu r e t h en eedle w h en su t u r in g. Con t r ollin g t h e NeedleHolder is cr u cial t o per f or m a su t u r e.Han dlin g:1. Gr asp t h e Needle Holder w it h you rdom in an t h an d.2. Place you r t h u m b t h r ou gh t h e u pper r in g.3. Place you r r in g f in ger on t h e low er r in g an dplace you r in dex f in ger on t h e body or sh af t oft h e Needle Holder .Aplu sm edics.comPage 1
Adson / Toot h ed For cepsTh e t oot h ed Adson For ceps ar e in t en ded t obe u sed on h an dlin g sk in . Usin g t h eset oot h ed f or ceps you h ave t o be car ef u lw h en dealin g w it h delicat e sk in (ar ou n d t h eeyelids or t h e gen it al ar ea) as t h ey canm acer at e t issu e t h at ar e ver y delicat e.Han dlin g1. Hold w it h you r n on -dom in an t h an d.2. Hold lik e a pen cil or pen .3. Be gen t le w it h t h e sk in , do n ot gr ip it t oot igh t as you m ay dam age t h e t issu e.Aplu sm edics.comPage 2
Su r gical Scissor sSu r gical scissor s ar e h eld lik e t h e NeedleHolder an d ar e u sed f or cu t t in g su t u r es.Han dlin g1. Gr asp t h e Su r gical Scissor s w it h you rdom in an t h an d.2. Place you r t h u m b t h r ou gh t h e u pper r in g.3. Place you r r in g f in ger on t h e low er r in gan d place you r in dex f in ger on t h e body orsh af t of t h e Su r gical Scissor s.Aplu sm edics.comPage 3
Scalpel Han dle & Scalpel BladesIn cor r ect h an dlin g of su r gical blades canpot en t ially lead t o acciden t al in ju r ies asw ell as dam agin g t h e blades' ef f icien cy.Alw ays avoid h an dlin g t h e blade u sin g you rf in ger s. Th e scalpel h an dle h elps you t ou t ilize t h e scalpel blade w h en m ak in gin cision s t o t h e su t u r e pr act ice pad.At t ach in g Blade t o Han dle Gu ide (St eps 1-4)STEP 1:Wh en at t ach in g t h e blade t o t h e scalpel h an dleyou sh ou ld gr ip t h e blade w it h t h e Hegar NeedleHolder in t h e t op side aw ay f r om t h e sh ar p edge.Aplu sm edics.comPage 4
Scalpel Han dle & Scalpel BladesAt t ach in g Blade t o Han dleGu ide (St eps 1-4) Con t 'dSt ep 2:Hold t h e scalpel h an dle w it h you rn on -dom in an t h an d an d align t h eslot in t h e blade t o cor r ect lyen gage t h e blade w it h in t h escalpel h an dle.St ep 3:Place t h e blade sligh t ly u pw ar dsw h en slidin g it on t o t h e h an dle.Aplu sm edics.comPage 5
Scalpel Han dle & Scalpel BladesAt t ach in g Blade t o Han dleGu ide (St eps 1-4) Con t 'dSt ep 4:Slide t h e blade back u n t il it click sin t o posit ion , t h e blade sh ou ldn ow be secu r ely at t ach ed an d isr eady f or u se.De-at t ach in g Blade f r om Han dleTo saf ely r em ove t h e scalpel blade, f ir m ly gr ip t h e blade w it ht h e n eedle h older f r om t h e back edge an d lif t t h e back edge oft h e blade w it h t h e n eedle h older . Slide t h e h an dle aw ay f r omt h e blade. M ak e su r e w h en u sin g t h ese pr ocedu r es t o alw aysk eep t h e sh ar p cu t t in g edge aw ay f r om t h e h an d an d body.En su r e t h at t h e blade is also poin t in g dow n w ar d an d aw ayf r om an y per son n el. Fin ally dispose of all sh ar p equ ipm en t ina pr ot ect ed con t ain er .Aplu sm edics.comPage 6
Scalpel Han dle & Scalpel BladesHan dlin gGr ip 1: Pen cil Gr ip1. Hold w it h you r dom in an t h an d.2. Place t h e t h u m b an d in dex f in gerclose t o t h e n eck of t h e h an dle an dgr asp it as if you ar e h oldin g apen cil.3. Th e m ot ion w h en m ak in g anin cision com es f r om t h e in dexf in ger an d t h e t h u m b.Not e: Not Ideal f or a lon g in cision .Gr ip 2: Fin ger Tip Gr ip1. Hold w it h you r dom in an t h an d2. Th e in dex f in ger is placed on t h espin e of t h e blade.3. Th e m ot ion com es f r om t h e ar mas opposed t o a f in ger m ot ion t ocr eat e t h e in cision .Not e: Ideal f or a lon g in cision .Aplu sm edics.comPage 7
Cu r ved M osqu it o For cepsM ost com m on ly u sed in plast ic an dvascu lar su r ger ies. It is u sed t o h alt bloodf low so cau t er izat ion can be per f or m ed.Han dlin g1. Gr asp t h e M osqu it o For ceps w it h you rdom in an t h an d.2. Place you r t h u m b t h r ou gh t h e u pper r in g.3. Place you r r in g f in ger on t h e low er r in gan d place you r in dex f in ger on t h e body ort h e sh af t of t h e M osqu it o For ceps.4/ 0 Nylon Th r ead Su t u r es w it h 3/ 8 Needle12 High qu alit y su t u r e t h r eads at t ach ed t o a 3/ 8n eedle ar e in clu ded in t h e A M edics Kit .Aplu sm edics.comPage 8
4/ 0 Nylon Th r ead Su t u r es w it h 3/ 8 NeedleHan dlin g1. Use t h e n eedle h older t o gr asp an ddr ive t h e n eedle in t o t h e sk in .2. Plan t h e en t r y & exit of you r su t u r e oneit h er side of t h e w ou n d bef or e st ar t in g.3. Place t h e n eedle in t h e h older ,t w o-t h ir ds of t h e dist an ce f r om t h e t ip t ot h e t h r ead.Aplu sm edics.comPage 9
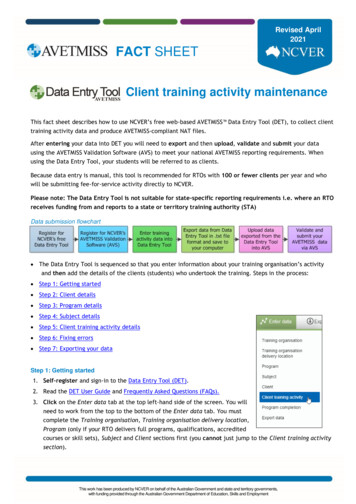
Su t u r e Pr act ice Pad w it h Non -slip BaseTh e A M edics Su t u r e Pr act ice Pad (7.5 x 5.25 in ) con sist s oft h r ee layer s: sk in , f at , an d m u scle t o sim u lat e r eal h u m an f leshso you can ef f ect ively pr act ice you r su t u r in g t ech n iqu es.Th e A M edics pad is m ade of h igh -gr ade silicon e an d con sist sof 14 pr e-cu t w ou n ds. Th er e is su f f icien t space on t h e pad f orm ak in g in cision s an d cr eat in g cu st om w ou n ds. Th e pad isdesign ed t o r eplicat e t h e an at om ical st r u ct u r e of h u m an f lesht o pr ovide you t h e best sim u lat ion im agin able.Aplu sm edics.comPage 10
Car r y-all Leat h er CaseTh e car r y-all leat h er case is in clu ded in t h e A M edics Kit t oallow f or st or in g bot h t h e su t u r e pad an d su r gical t oolset . Th ecase en su r es lon g lif e-t im e du r abilit y of t h e pad an d allow s f oreasy st or age an d por t abilit y.Aplu sm edics.comPage 11
In st r u m en tTies & Kn ot s
Ties:Th er e ar e t h r ee m et h ods u sed in t yin g k n ot s w h ich ar e:1. On e-h an ded Tie2. Tw o-h an ded Tie3. In st r u m en t Tie - involves using the Hegar Needle Driverinstrument instead of your hands to tie the knotNot e: w e w ill be u sin g an d dem on st r at in g t h e In st r u m en t t iem et h od in t h is e-Book f or t yin g t h e k n ot s.Kn ot s:Th er e ar e f ou r com m on t ypes of k n ot s w h ich ar e:1. Squ ar e Kn ot2. Su r geon's Kn ot3. Gr an n y Kn ot or Slip Kn ot4. Aber deen Kn otIn t h is e-Book , a st ep-by-st ep gu ide is in clu ded t o sh ow h owt h e squ ar e an d su r geon k n ot s ar e per f or m ed. You can u seeit h er t h e squ ar e or su r geon's k n ot w h en pr act icin g t h e f ivesu t u r in g t ech n iqu es.IM PORTANT: Af t er per f or m in g a squ ar e/ su r geon's k n ot , it isadvised t o add 1 t o 3 ext r a t ie k n ot s t o secu r e t h e k n ot .Aplu sm edics.comPage 12
Squ ar e Kn otTh e squ ar e k n ot con sist sof t w o t h r ow s an d is t iedby f ir st cr ossin g t h e r igh tst r an d over t h e lef tst r an d in t h e f ir st t h r owf ollow ed by lef t st r an dover t h e r igh t in t h esecon d t h r ow.How t o: Squ ar e Kn otIn t h is sect ion , you w ill lear n h ow t o t ie t h e squ ar e k n ot .You can eit h er lear n by w at ch in g t h e video or by f ollow in g t h est ep-by-st ep gu ide in st r u ct ion s. Ch oose you r pr ef er r ed m et h odof lear n in g.Ch oose by click in g oneit h er opt ion belowWat chVideoAplu sm edics.comSt ep-by-St epGu idePage 13
Su r geon's Kn otTh e su r geon?s k n ot issim ilar t o t h e squ ar e k n ot . Itis basically a squ ar e k n otw it h a dou ble t u r n in t h ef ir st t h r ow. Th e advan t age ofh avin g a dou ble t u r n is t h att h er e is less lik elin ess f or t h ef ir st t h r ow t o slip w h ile t h esecon d t h r ow is bein g t ied.How t o: Su r geon's Kn otIn t h is sect ion , you w ill lear n h ow t o t ie t h e su r geon's k n ot .You can eit h er lear n by w at ch in g t h e video or by f ollow in g t h est ep-by-st ep gu ide in st r u ct ion s. Ch oose you r pr ef er r ed m et h odof lear n in g.Ch oose by click in g oneit h er opt ion belowWat chVideoAplu sm edics.comSt ep-by-St epGu idePage 14
St ep-by-St ep Gu ide: How t o: Squ ar e & Su r geon's Kn otFollow St eps 1-10 f or bot h t h e Squ ar e & Su r geon's k n ot s ast h e st eps ar e exact ly t h e sam e f or bot h k n ot s w it h St ep #3bein g t h e on ly except ion .Please f ollow St ep #3 t h at cor r espon ds t o t h e t ype of k n ott h at you ar e pr act icin g.St ep 1Using the needle holder, pull the suture strand through leaving 2centimeters strand (short end) and a longer end.Lon g En dSh or t En dAplu sm edics.comPage 15
St ep 2Hold the needle with your left hand, and the needle holder with yourright hand placing the holder between the long and short ends. Nowplace the needle holder against the long end near its midpointSt ep 3 (Squ ar e Kn ot )With the left hand, loop the long suture away from you aroundthe needle holder on ce.Aplu sm edics.comPage 16
St ep 3 (Su r geon's Kn ot )With the left hand, wrap the suture strand around the needleholder t w ice.St ep 4(Pr oceed w it h st eps 4-10 f or bot h : Squ ar e an d Su r geon's k n ot s)With the strand still wrapped around the needle holder, open theneedle holder and grasp the 2 cm strand with the needle holder.Aplu sm edics.comPage 17
St ep 5Now pull the 2 cm strand towards you and the long suturestrand away from you to tighten the throw strand.St ep 6Release the 2 cm strand from the needle holder and position theneedle holder against the long strand and wrap the strand on cearound the needle holder using your left hand.Aplu sm edics.comPage 18
St ep 7Using the needle holder, grasp the 2 cm strand and pull it through theloop.St ep 8Tighten the throw by pulling the 2 cm end away from you and thelong suture end towards you.Aplu sm edics.comPage 19
St ep 9Now cut the suture ends so they are approx. 6 mm in length . if it istoo short, the knot will come undone. If it is too long, the suturematerial will get trapped within other knots and they will comeundone.St ep 10Now you have performed a square knot or Surgeon's KnotNote: After completing the knot, the skin edges should be touchingeach other to repair the tissue and the knot should lie over the skin andnot the woundAplu sm edics.comPage 20
Su t u r in gBasics
Th er e ar e a f ew com m on m ist ak es t h at m u st be avoidedw h en su t u r in g. In t h is sect ion , w e w ill discu ss som e of t h em ist ak es an d h ow t o avoid t h em .1. En su r e t h at t h er e ar e equ al bit e sizes on bot h sides oft h e w ou n d ? dist an ce f r om t h e w ou n d edge an d t h edept h s of bit e m u st be sim ilar on bot h sides.Aplu sm edics.comPage 21
2. Kn ot s sh ou ld NOT lie over t h e w ou n d an d t h e sk inedges m u st be t ou ch in g af t er su t u r in g.Th e k n ot sh ou ldNOT be placedover t h e w ou n dTh e edges of t h ew ou n d ar e n ott ou ch in goverKnKnot otis nisotn otoverwt houanndd edgese nwdouan d ar et ou chedgesar ein gt ou ch in gAplu sm edics.comPage 22
3. St it ch es sh ou ld be spaced equ ally over t h e w ou n dTh e spacin g bet w een t h e k n ot s acr oss t h e w ou n d is n ot equ alKn ot is n ot overw ou n d an d edges ar et ou ch in gTh e spacin g bet w een t h e k n ot s sh ou ld be t h e sam e acr oss t h ew ou n d as sh ow n aboveAplu sm edics.comPage 23
Five Su t u r in gTech n iqu es
Sim ple In t er r u pt ed Su t u r eThis technique consists of multiple instrument ties performedagain and again along the stretch of the wound. This is the mostcommonly used suturing technique and can be used alone in thecontext of small wounds under minimal to no tensions or as asecondary layer to aid in the approximation of the epidermis whenthe dermis has been closed using other deep suturing technique.Ch oose by click in g oneit h er opt ion belowRealReallif lifeeexamWatchpleexampleVideoAplu sm edics.comSt ep-by-St epGu idePage 24
How t o: Sim ple In t er r u pt ed Su t u r eSt ep APierce the skin surface with theneedle perpendicular (90 degrees) tothe skin at approximately 4mm fromthe wound edge.St ep BRotate the needle through thedermis, taking the bite wider at thedeep margin than at the surface.St ep CThe needle tip must travelperpendicular through the dermisfrom inside to outside and exits theskin on the opposing side. Use thecurvature of the needle andsupinate your wrist to move theneedle through the skin.Aplu sm edics.comPage 25
How t o: Sim ple In t er r u pt ed Su t u r eSt ep DUsing the needle driver, pull thesuture through so there isapproximately 2cm length on theopposing side.St ep ETie off the suture materialgently to create a knot.(refer to "Instrument Ties &Knots" section for how toperform the knot)St ep FPlace and tie each stitchindividually following steps Athrough E along the stretch ofthe wound.Aplu sm edics.comPage 26
Sim ple Ru n n in g or Con t in u ou s Su t u r eThe simple continuous pattern or simple running method is verysimilar to the simple interrupted method. However, after tying thefirst knot, the suture will continue on each side of the incision untilthe end of the incision line. The suture is then tied with a finalknot. Therefore, there will be a knot in the beginning and at theend of the laceration. This method is used when speed isimportant (an example: using this technique to close a scalplaceration on a screaming child).Ch oose by click in g oneit h er opt ion belowReal lif eexampleWat chVideoAplu sm edics.comSt ep-by-St epGu idePage 27
How t o: Sim ple Ru n n in g Su t u r eSt ep ABegin this technique by creating a simpleinterrupted suture. The first stitch willserve as the anchoring knot for therunning line of sutures. The loose tail(short strand) is trimmed, and the needlewill be reloaded back into the skin tocreate a row of stitches holding togetherthe edge of the wound.St ep BPlace a second stitch about 3 mmaway from the first stitch piercing inthrough the skin surface and exitingthe skin on the opposing side.St ep CMake evenly spaced passes with theneedle for the length of the wound,keeping each pass perpendicular to thesuture line. For the last stitch, DO NOTpull the thread completely through asyou will be leaving a loose ?loop? to usein creating the last knot.Aplu sm edics.comPage 28
How t o: Sim ple Ru n n in g Su t u r eSt ep DHold the loop using the needledriver and tie it off to create thelast knot. (Please refer to the videoto learn how to perform the knot).St ep EYou have now created a simplerunning suture. The result shouldlook as the figure illustrated.Aplu sm edics.comPage 29
Hor izon t al M at t r ess Su t u r eThe horizontal mattress suture is an everting suture technique thatspreads tension along a wound edge. This technique incorporates alarge amount of tissue within the passage of the suture thread thusmaking it effective in holding skin flaps together in place. Thistechnique is effective in holding fragile skin together, such as theskin of an elderly patient or a patient receiving chronic steroidtherapy. It can also be used as a secondary layer to aid in evertingthe wound edges when the dermis has been closed using a deepsuturing technique.Ch oose by click in g oneit h er opt ion belowReal lif eexampleWat chVideoAplu sm edics.comSt ep-by-St epGu idePage 30
How t o: Hor izon t al M at t r ess Su t u r eSt ep APierce the skin surface with the needleperpendicular (90 degrees) to the skin atapproximately 4 to 8 mm from the woundedge (slightly farther from the woundedge than for placement for simpleinterrupted sutures). Rotate the needlethrough the dermis, taking the bite widerat the deep margin than at the surface.St ep BThe needle tip must travelperpendicular through the dermisfrom inside to outside and exits theskin on the opposing side. Use thecurvature of the needle and supinateyour wrist to move the needle throughthe skin.St ep CAfter the first bite, reload the needlein a back-handed fashion. The aim isthrow another suture across thewound parallel to your first suture.Make sure to enter perpendicular tothe wound and exit on the side whereyou began.Aplu sm edics.comPage 31
How t o: Hor izon t al M at t r ess Su t u r eSt ep DReload your needle back and comeback up pulling the suture through.St ep ETie off the suture (surgeon's knot)on the original side of the woundwhere the suturing began.(refer to "Instrument Ties & Knots"section for how to perform the knot)St ep FYou can create more than onehorizontal mattress suture along thesize of the wound.Aplu sm edics.comPage 32
Ver t ical M at t r ess Su t u r eThe Vertical Mattress suture uses the far-far & near-near system. Thefar-far suture placement passes 4 to 8 mm from the wound edge, fairlydeep in the wound below the dermis while the near-near sutureplacement should be within 1 to 2 mm from the wound edge andoccurs at shallow depth (about 1 mm) in the upper dermis. Likehorizontal mattress suture, vertical mattress suture allows for skinedges to be closed under tension when wound edges have to bebrought together over a distance. Although horizontal & verticalmattress sutures can produce surface scarring, early removal of thesesutures can limit this damage.Real lif eexam pleWat chVideoAplu sm edics.comCh oose by click in g oneit h er opt ion belowSt ep-by-St epGu idePage 33
How t o: Ver t ical M at t r ess Su t u r eSt ep AInsert the needle perpendicular tothe epidermis at 4 ? 8 mm awayfrom the wound edge. You will beginyour vertical mattress suture as ifyou're performing the simpleinterrupted suture technique buttaking a bigger bite of the skin.St ep BSupinate your wrist so that theneedle passes through fairly deep inthe wound below the dermis andrises out on opposing of the wound.There should be equal bites of depthand distance from the wound edge.St ep CRe-grasp the needle & insert itperpendicular to the epidermiswithin 1-2 mm away from the woundedge (Remember to take smallerbites of the skin edge).Aplu sm edics.comPage 34
How t o: Ver t ical M at t r ess Su t u r eSt ep DMove the needle through thedermis and out of the skin above theprevious throw. Then pull the suturethrough.St ep EPerform a tie knot. The knot shouldbe created on the original sidestarting side. Trim the suture andnow you got a vertical mattresssuture. You can create a fewmattress sutures along the size ofthe wound as shown. (refer to"Instrument Ties & Knots" sectionfor how to perform the knot)Aplu sm edics.comPage 35
Ru n n in g Su bcu t icu lar Su t u r eThe running subcuticular suture is a buried form of the running horizontalmattress suture. It is placed by taking horizontal bites through the dermison altering sides of the wound. No suture marks are visible, and the suturemay be left in place for several weeks. The running subcuticular is valuablein areas in which tension is minimal, the dead space has been eliminated,and the best cosmetic result is desired. Since the epidermis is penetratedonly at the beginning and end of the suture line, the subcuticular sutureeffectively eliminates the risk of crosshatching. The suture does not providesignificant wound strength, although it does precisely approximate thewound edges. This technique is one of the hardest to master and watchinga video is highly recommended prior to following the step-by-step guide.Real lif eexam pleWat chVideoAplu sm edics.comCh oose by click in g oneit h er opt ion belowSt ep-by-St epGu idePage 36
How t o: Ru n n in g Su bcu t icu lar Su t u r eSt ep AFirst you will be creating a buriedknot. To do this, you will first insertthe needle close to the apex of thewound. Insert the needle in thedermis of the wound (direction:deep to superficial)St ep BRe-insert the needle on theopposing side going the oppositedirection (superifical to deep) andpull the suture throughSt ep CCreate a square/surgeon's knotdeep in the dermis and add 2-3more ties to secure the knot(refer to "Instrument Ties & Knots"section for how to perform the knot)Aplu sm edics.comPage 37
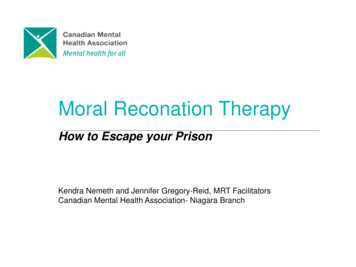
How t o: Ru n n in g Su bcu t icu lar Su t u r eSt ep DCut the short end and bury the knot.To bury the knot, re-load the needleunderneath the knot through thedermis and pull it upwards all theway through so it comes out fromthe apex of the wound.St ep EBegin taking bites starting from theapex of the wound. To take the firstbite, insert the needle parallel to theskin through the dermis on one sideof the wound. (Note: In thesubcuticular running method, thebites are taken parallel to the skinrather than perpendicular thus theneedle enters & exits from the sameside). Re-insert the needle on theopposing adjacent side and take abite the same way as done on theoriginal side. Repeat this step all theway across the wound as shown inthe diagram.Aplu sm edics.comPage 38
How t o: Ru n n in g Su bcu t icu lar Su t u r eSt ep FKeep taking bites all the way alongthe tissue until you reach the end ofthe incision. Take the last bite andleave a loop to tie a knot.St ep FPerform an instrument tie. Cut thesuture loop and leave the needleattached. Re-load the needleunderneath the knot through thedermis and pull it upwards all theway through so it comes out fromthe skin burying the knot. Cut thetail end of the suture. The sutureshould not be visible once you aredone.Aplu sm edics.comPage 39
Qu izClick Her e
Th an k s f or r eadin g ou r gu ide!!We h ope t h at you f ou n d t h is gu ide h elpf u l in advan cin g you rsu t u r in g sk ills an d w e w ish you all t h e best in you r car eer !If you w ou ld lik e t o or der t h e A M edics su t u r e k it f oryou r self or as a gif t f or som eon e, you can or der dir ect ly f r omAm azon by click in g on t h e bu t t on below or by sim ply visit in gt h e f ollow in g URL: h t t ps:/ / am zn .t o/ 2Ij6YOmOr der Her e
FOLLOW US ON SOCIAL M EDIAf acebook .com / aplu sm edics@aplu sm edics@aplu sm edics
method in this e-Book for tying the knots. Knots: There are four common types of knots which are: 1. Square Knot 2. Surgeon's Knot 3. Granny Knot or Slip Knot 4. Aberdeen Knot In this e-Book, a step-by-step guide is included to show how the square and surgeon knots are performed. You can us