Transcription
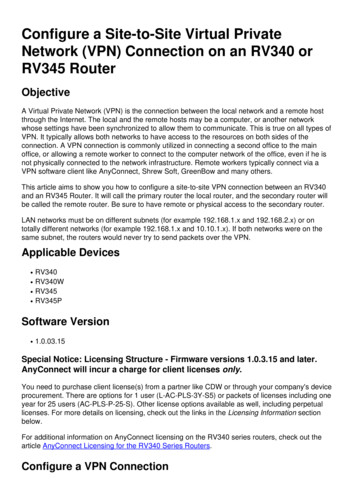
Configure a Site-to-Site Virtual PrivateNetwork (VPN) Connection on an RV340 orRV345 RouterObjectiveA Virtual Private Network (VPN) is the connection between the local network and a remote hostthrough the Internet. The local and the remote hosts may be a computer, or another networkwhose settings have been synchronized to allow them to communicate. This is true on all types ofVPN. It typically allows both networks to have access to the resources on both sides of theconnection. A VPN connection is commonly utilized in connecting a second office to the mainoffice, or allowing a remote worker to connect to the computer network of the office, even if he isnot physically connected to the network infrastructure. Remote workers typically connect via aVPN software client like AnyConnect, Shrew Soft, GreenBow and many others.This article aims to show you how to configure a site-to-site VPN connection between an RV340and an RV345 Router. It will call the primary router the local router, and the secondary router willbe called the remote router. Be sure to have remote or physical access to the secondary router.LAN networks must be on different subnets (for example 192.168.1.x and 192.168.2.x) or ontotally different networks (for example 192.168.1.x and 10.10.1.x). If both networks were on thesame subnet, the routers would never try to send packets over the VPN.Applicable Devices RV340RV340WRV345RV345PSoftware Version 1.0.03.15Special Notice: Licensing Structure - Firmware versions 1.0.3.15 and later.AnyConnect will incur a charge for client licenses only.You need to purchase client license(s) from a partner like CDW or through your company's deviceprocurement. There are options for 1 user (L-AC-PLS-3Y-S5) or packets of licenses including oneyear for 25 users (AC-PLS-P-25-S). Other license options available as well, including perpetuallicenses. For more details on licensing, check out the links in the Licensing Information sectionbelow.For additional information on AnyConnect licensing on the RV340 series routers, check out thearticle AnyConnect Licensing for the RV340 Series Routers.Configure a VPN Connection
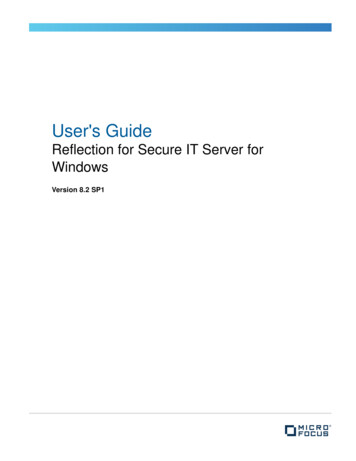
Local RouterStep 1. Log in to the web-based utility of the local router and choose VPN Site-to-Site.Note: In this example, an RV340 is used.Step 2. Click the plus icon.Step 3. Ensure that the Enable check box is checked. It is checked by default.Step 4. Enter the name of the connection in the Connection Name field.Note: In this example, the name is TestVPN1.
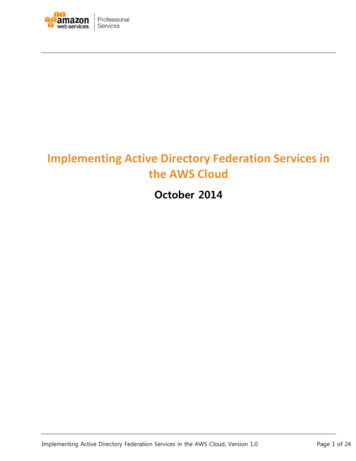
Step 5. Choose the security settings of the connection from the IPSec Profile drop-down list. Theoptions will depend on the IPSec Profiles created. For instructions on how to create an IPSecProfile, click here.Note: In this example, CiscoTestVPN is chosen.Step 6. Choose the interface to be used by the local router. The options are: WAN1 — This option will use the IP address of the Wide Area Network 1 (WAN1) interface ofthe local router for the VPN connection.WAN2 — This option will use the IP address of the WAN2 interface of the local router for theVPN connection. WAN2 is not available in single-WAN routers.USB1 — This option will use the IP address of the Universal Serial Bus 1 (USB1) interface ofthe local router for the VPN connection.USB2 — This option will use the IP address of the USB2 interface of the local router for theVPN connection. USB2 is not available on single-USB routers.Note: In this example, WAN1 is chosen.
Step 7. Choose the identifier of the WAN interface of the remote router. The options are: Static IP — This option will let the local router use the static IP address of the remote routerwhen establishing a VPN connection. If this option is chosen on the local router, the remoterouter should also be configured with the same option.FQDN — This option will use the Fully Qualified Domain Name (FQDN) of the remote routerwhen establishing the VPN connection.Dynamic IP — This option will use the dynamic IP address of the remote router whenestablishing a VPN connection.Note: Interface identifier on the remote router should be the same as the Interface identifier of thelocal router. In this example, Static IP is chosen.Step 8. Enter the IP address of the WAN interface of the remote router.Note: In this example, 124.123.122.123 is used.
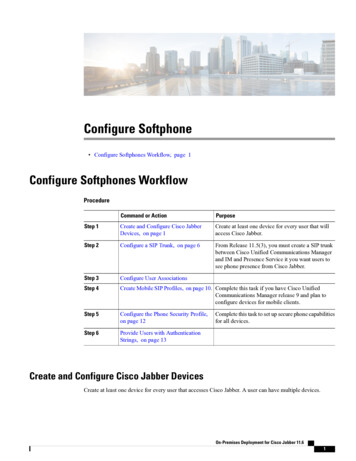
Step 9. Click the radio button for the Internet Key Exchange (IKE) Authentication Method that youneed. The options are: Preshared Key — This option means that the connection will require a password in order tocomplete the connection. The preshared key should be the same on both ends of the VPNconnection.Certificate — This option means that the authentication method is using a certificategenerated by the router instead of a password when connecting.Note: In this example, Preshared Key is chosen.Step 10. Enter the preshared key for the VPN connection in the Preshared Key field.Step 11. (Optional) Uncheck the Minimum Preshared Key Complexity Enable check box if youwant to use a simple password for the VPN connection. This is checked by default.
Step 12. (Optional) Check the Show plain text when edit Enable check box to display thepreshared key in plain text. This is unchecked by default.Step 13. Choose the identifier type of the local network from the Local Identifier Type drop-downlist. The options are: Local WAN IP — This option will identify the local network through the WAN IP of theinterface.IP Address — This option will identify the local network through the local IP address.Local FQDN — This option will identify the local network through the FQDN, if it has one.Local User FQDN — This option will identify the local network through the FQDN of the user,which can be his email address.Note: In this example, IP Address is chosen.Step 14. Enter the identifier of the local network in the Local Identifier field.Note: In this example, 124.123.122.121 is entered.
Step 15. Choose the IP Address type that may be accessed by the VPN Client from the Local IPType drop-down list. The options are: Subnet — This option allows the remote side of the VPN to access the local hosts in thespecified subnet.IP Address — This option allows the remote side of the VPN to access the local host with thespecified IP address.Any — This option allows the remote side of the VPN to access any of the local hosts.Note: In this example, Subnet is chosen.Step 16. Enter the IP address of the network or host to be accessed by the VPN client in the IPAddress field.Note: In this example, the IP address is 10.10.10.1.Step 17. Enter the Subnet Mask of the IP address in the Subnet Mask field.Note: In this example, the subnet mask is 255.255.255.0.
Step 18. Choose the Remote Identifier Type from the drop-down list. The options are: Remote WAN IP — This option will identify the remote network through the WAN IP of theinterface.Remote FQDN — This option will identify the remote network through the FQDN, if it has one.Remote User FQDN — This option will identify the remote network through the FQDN of theuser, which can be his email address.Note: In this example, Remote WAN IP is chosen.Step 19. Enter the WAN IP address of the remote router in the Remote Identifier field.Note: In this example, the remote identifier is 124.123.122.123.Step 20. Choose the network type that the local network needs access to from the Remote IPType drop-down list. The options are: IP Address — This option lets the local hosts access the remote host with the specified IPaddress.
Subnet — This option lets the local hosts access the resources on the remote host with thespecified subnet.Any — This option lets the local hosts access the resources on the remote host with any IPaddress.Step 21. Enter the LAN IP address of the remote network in the IP Address field.Note: In this example, the IP address is 192.168.2.1.Step 22. Enter the subnet mask of the remote network in the Subnet Mask field.Note: In this example, the subnet mask is 255.255.255.0.Step 23. Click Apply.
Step 24. Click Save.You should now have configured the VPN settings on the local router.Remote RouterStep 1. Determine the VPN settings of the local router such as: Interface of the local and remote router to be used for the VPN connection.Wide Area Network (WAN) Internet Protocol (IP) address of the local and remote router.Local Area Network (LAN) address and subnet mask of the local and remote network.Preshared key, password or certificate for the VPN connection.Security settings of the local router.Firewall exemption for the VPN connection.Step 2. Log in to the web-based utility of the router and choose VPN IPSec Profiles.
Step 3. Configure the VPN security settings of the remote router, matching the VPN securitysettings of the local router. For instructions, click here.Step 4. On the web-based utility of the local router, choose VPN Site-to-Site.Step 5. Click the plus icon.
Step 6. Ensure that the Enable check box is checked. It is checked by default.Step 7. Enter the name of the VPN connection in the Connection Name field. The connectionname of the remote router may be different from the connection name specified in the local router.Note: In this example, the Connection Name is TestVPN.Step 8. Choose the IPSec Profile form the drop-down list. The options will depend on the IPSecProfiles created. For instructions on creating an IPSec Profile, click here.Note: In this example, CiscoTestVPN is chosen.
Step 9. Choose the interface that the remote router will use for the VPN connection from the dropdown list. The options are: WAN1 — This option will use the IP address of the Wide Area Network 1 (WAN1) interface ofthe remote router for the VPN connection.WAN2 — This option will use the IP address of the WAN2 interface of the remote router forthe VPN connection. WAN2 is not available in single-WAN routers.USB1 — This option will use the IP address of the Universal Serial Bus 1 (USB1) interface ofthe remote router for the VPN connection.USB2 — This option will use the IP address of the USB2 interface of the remote router for theVPN connection. USB2 is not available on single-USB routers.Note: In this example, WAN1 is chosen.Step 10. Choose the identifier of the WAN interface of the local router from the Remote Endpointdrop-down list. The options are: Static IP — This option will let the remote router use the static IP address of the local routerwhen establishing a VPN connection. If this option is chosen on the local router, the remoterouter should also be configured with the same option.FQDN — This option will use the Fully Qualified Domain Name (FQDN) of the local routewhen establishing the VPN connection.Dynamic IP — This option will use the dynamic IP address of the local router whenestablishing a VPN connection.Note: Interface identifier on the remote router should be the same as the Interface identifier of the
local router. In this example, Static IP is chosen.Step 11. Enter the WAN IP address of the local router.Note: In this example, the IP address is 124.123.122.121.Step 12. Click the radio button for the Internet Key Exchange (IKE) Authentication Method that youneed. The options are: Preshared Key — This option means that the connection will require a password in order tocomplete the connection. The preshared key should be the same on both ends of the VPNconnection.Certificate — This option means that the authentication method is using a certificategenerated by the router instead of a password when connecting.Note: In this example, Preshared Key is chosen.
Step 13. Enter the preshared key for the VPN connection in the Preshared Key field.Step 14. (Optional) Uncheck the Minimum Preshared Key Complexity check Enable box if youwant to use a simple password for the VPN connection. This is checked by default.Step 15. (Optional) Check the Show plain text when edit Enable check box to display thepreshared key in plain text. This is unchecked by default.Step 16. Choose the identifier type of the remote network from the Local Identifier Type drop-downlist of the remote router. The options are: Local WAN IP — This option will identify the remote network through the WAN IP of theinterface.
IP Address — This option will identify the remote network through the local IP address.Local FQDN — This option will identify the remote network through the FQDN, if it has one.Local User FQDN — This option will identify the remote network through the FQDN of theuser, which can be his email address.Note: In this example, IP Address is chosen.Step 17. Enter the identifier of the remote network in the Local Identifier field of the remote router.Note: In this example, 124.123.122.123 is entered.Step 18. Choose the IP Address type that may be accessed by the VPN Client from the Local IPType drop-down list. The options are: Subnet — This option allows the local side of the VPN to access the remote hosts in thespecified subnet.IP Address — This option allows the local side of the VPN to access the remote host with thespecified IP address.Any — This option allows the local side of the VPN to access any of the remote hosts.Note: In this example, Subnet is chosen.Step 19. Enter the IP address of the network or host to be accessed by the VPN client in the IPAddress field.
Note: In this example, the IP address is 192.168.2.1.Step 20. Enter the Subnet Mask of the IP address in the Subnet Mask field.Note: In this example, the subnet mask is 255.255.255.0.Step 21. Choose the Local Identifier Type from the drop-down list. The options are: Remote WAN IP — This option will identify the local network through the WAN IP of theinterface.Remote FQDN — This option will identify the local network through the FQDN, if it has one.Remote User FQDN — This option will identify the local network through the FQDN of theuser, which can be his email address.Note: In this example, Remote WAN IP is chosen.
Step 22. Click Apply.Step 23. Click Save.You should now have configured the VPN settings on the remote router.View a video related to this article.Click here to view other Tech Talks from Cisco
Configure a Site-to-Site Virtual Private Network (VPN) Connection on an RV340 or RV345 Router Objective A Virtual Private Network (VPN) is the connection between the local network and a remote host through the Internet. The local and the remote hosts may be a computer, or another network w