Transcription
North Carolina State Bureau of InvestigationDivision of Criminal Informationin conjunction withpresentsOmnixx Console andTrainer ManualAugust 5, 2003
Omnixx Console and Trainer ManualPortions of this manual were copied with permission from the Omnixx Console Subagency User Administrator Training Manual and Omnixx Trainer User Guide,publications of the Datamaxx Professional Services section of Datamaxx AppliedTechnologies, Inc. This manual is subject to their copyright and as such may not be usedfor any outside purpose without their written permission.Licensed users may make copies of this document for the sole purpose of providing theiremployees with instructions on the operation of this software on a licensed deviceconnected to the DCI computer network. Any use outside of this scope is unauthorized.Copyright 2002 DATAMAXX Applied Technologies, Inc.Printed in the United States of AmericaThis publication is protected by copyright. All rights are reserved and no part of it maybe reproduced or transmitted by any means or in any form, (for any purpose other thanthe purchaser’s personal use), without prior written consent from Datamaxx AppliedTechnologies, Inc. Information in the manual is subject to change without notice anddoes not represent a commitment on the part of Datamaxx Applied Technologies, Inc.The software and/or databases may be used or copied only in accordance with the termsof the license agreement. The purchaser may make one copy of the software for back-uppurposes.All brands mentioned in this book are acknowledged as trademarks of their respectiveholders.2
Omnixx Console and Trainer ManualTable of ContentsChapter 1 – Introduction to Omnixx ConsoleTerms to Know Before Getting StartedInstallation of Omnixx SoftwareLogging In To Omnixx DesktopElements of the Console InterfacePage 5Page 5Page 11Page 15Chapter 2 – Omnixx Console User FunctionsAdd New UserSelect UserModify UserDelete UserUser ReportsPage 17Page 21Page 23Page 26Page 29Chapter 3 – Student EnrollmentsStudent EnrollmentsStudent CancellationsPage 32Page 35Chapter 4 – Using Omnixx TrainerTaking a Certification TestSubmitting a Certification TestReportsExiting TrainerPage 37Page 40Page 43Page 443
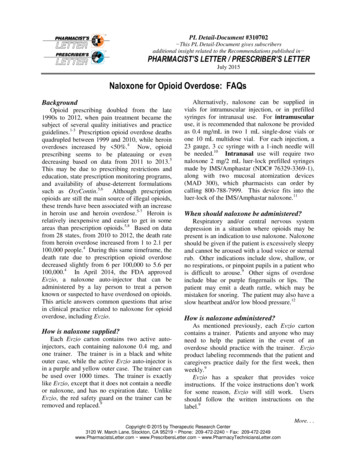
Omnixx Console and Trainer Manual1Introduction to Omnixx ConsoleWelcome to Omnixx Console, the administrative module of the new Omnixx suite ofproducts from Datamaxx Applied Technologies, Inc. Omnixx Console is an HTMLbased application that is designed to manage and administer Omnixx Force andOmnixx Trainer clients. Omnixx Console has been integrated along with OmnixxForce and Omnixx Trainer into one browser application that allows for easy access to allthree of these applications through the Omnixx Desktop.Figure 1-1 – The Omnixx DesktopThrough the Sub-agency User Administrator (TAC) authorization in the OmnixxConsole, it is possible to perform the following functions, which are described in detail inChapter 2: Select UserAdd New UserModify UserDelete User4
Omnixx Console and Trainer ManualTerms to Know Before Getting StartedBefore using the Omnixx Console, there are some terms that you will want to becomefamiliar with. Understanding these terms will aid you in the use of this manual, as wellas provide you with valuable background information that will help make your use of theOmnixx Console as efficient as possible. Omnixx - Stores all of the application programs and data needed by OmnixxForce, Omnixx Trainer, and Omnixx Console. Omnixx Console – Provides the end-user functionality needed to maintain theapplication repository. It allows authorized users to update the repository’sdatabase. It is a browser-based application that allows agency administrators tomaintain database records for users and devices assigned to their own agencies. Omnixx Force – Browser-based desktop application that allows users to sendand receive text-based messages over dedicated law enforcement networks. Omnixx Trainer – A browser-based extension of Omnixx that provides online certification testing. Agency – With regard to this document, “agency” refers to the NC State Bureauof Investigation Division of Criminal Information, which is the NCIC and NLETSControl Terminal Agency (CTA). Sub-agency – With regard to this document, “sub-agency” refers to an authorizedlaw enforcement or criminal justice agency within North Carolina that isconnected to the DCI network. Terminal Agency Coordinator (TAC) – An individual, appointed by the agencyhead of a criminal justice agency with DCI access, to act as the liaison betweenDCI and the criminal justice agency. With regard to this document, this term alsoincludes Assistant Terminal Agency Coordinators.Installation of Omnixx SoftwareTo start the Omnixx Console application, you must first access the Omnixx Login screen.In order to do this, double-click on the browser icon located on your computer’s desktop.The icon should be for either Internet Explorer or Netscape Navigator. If the OmnixxLogin is not configured as your Home Page, you will have to type the URL (web address)into the browser’s address bar. The URL for the Omnixx Login screen t.htm5
Omnixx Console and Trainer ManualAlso, keep in mind that your computer may already be configured with a shortcut icon forthe Omnixx Login screen. If this is the case, simply double-click on the shortcut toproceed.Figure 1-2 – The Omnixx Login ScreenIf this is the first time you are accessing any of the Omnixx applications on a particulardevice, you will have to download and run the correct version of the Java RuntimeEnvironment and the Web Start application. Click on the “Click here to install the JavaRuntime” link located at the bottom of the Omnixx Login screen. You will be promptedwith the following warning:Figure 1-3 – Java Runtime Warning ScreenClick the OK button to proceed. The following dialog box will appear and prompt youwith directions to complete the next step of the installation process. Click OK.6
Omnixx Console and Trainer ManualFigure 1-4 – Java Runtime Instruction Dialog BoxMake sure that you have selected “Run this program from its current location” andclick the OK button to continue.Figure 1-5 – File Download Dialog BoxThe following progress meter will be displayed:Figure 1-6 – Java Progress Meter Dialog BoxYou will then be prompted with a Security Warning. You must click on the Yes buttonto continue. If you click No, the installation process will be terminated.7
Omnixx Console and Trainer ManualFigure 1-7 – Security WarningThe Java Web Start License Agreement will then be displayed. Read the agreement andclick the Accept button to continue the process. If you click Decline, the installationprocess will be terminated.Figure 1-8 – Java Web Start License AgreementNext, you will be prompted to enter the path of the directory where you would like theJava Web Start application installed. You may leave the path at the default, or click theBrowse button to select a different location. Then click the Next button.8
Omnixx Console and Trainer ManualFigure 1-9 – Java Web Start Select Installation Directory ScreenThe Java Web Start files will now be installed to the path specified in the previous step.The following progress dialog box will be shown to indicate the completion level of theinstallation.Figure 1-10 – Java Web Start Installation Progress MeterAfter the Java Web Start files have been installed, the client machine will be searched toensure that the correct version of the Java 2 Runtime Environment has been installed. Ifnot, you will be prompted to select the path where you would like this program installed.9
Omnixx Console and Trainer ManualYou can leave it at the default path, or click the Browse button to select an alternatedirectory. Next, click the OK Button.Figure 1-11 – Java 2 Runtime Environment Installation Directory ScreenYou will be notified when the installation is complete and you can choose whether or notyou would like to read the on-line help manual for Java. Select Yes to view the manual,or select No if you prefer to skip the manual and login to the Omnixx Desktop.Figure 1-12 – View Java On-line Manual Selection10
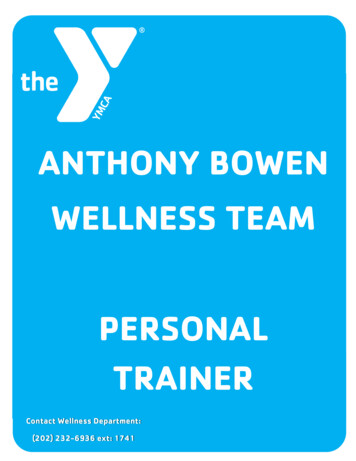
Omnixx Console and Trainer ManualLogging In To Omnixx DesktopNow that both Java Web Start and the correct version of the Java Runtime Environmenthave been installed to the client machine, you are now ready to login to the OmnixxDesktop. If this is the first time that this computer has logged into Omnixx, your loginscreen should look like the screen in Figure 1-13.Figure 1-13 – The Omnixx Login ScreenOn the Omnixx Login screen, you will be prompted to enter the following information.All of the information will be retained by the system, except the Password, so it will nothave to be entered every time you login to the Omnixx Desktop. User ID – Enter your User ID. This field is not case sensitive. Password – Enter your password. This field is not case sensitive. Agency – Enter NCDCI0000 if not already entered.sensitive. Validation Code – Enter the TID of the terminal you are using. If you arelogging in from a computer that is not a DCI terminal, leave this field blank toavoid security login errors.11This field is not case
Omnixx Console and Trainer Manual New Password – Enter a new password if you wish to change your currentpassword. This field is not case sensitive. Confirm – Re-enter your new password. This field is not case sensitive. Omnixx Path – Enter the letter of the drive in which you would like to install theOmnixx directory.If someone has successfully logged into Omnixx on this computer previously, the loginscreen may look slightly different as indicated in Figure 1-14 below.Figure 1-14 – The Omnixx Login Screen (Hidden Attributes)After all the information is entered correctly, click on the “Log In” icon to begin thelogin process. Upon successful login from the Omnixx Login screen, the operator’scurrent certification status record will be displayed, indicating the modules andauthorizations the operator is allowed to use.12
Omnixx Console and Trainer ManualFigure 1-15 – Current Certification StatusClick “Close” to close the Current Certification Status window. The Omnixx Desktopwill now be loaded:Figure 1-15 – The Omnixx Desktop13
Omnixx Console and Trainer ManualOnce you are logged into the Omnixx Desktop, you will be able to access all of theOmnixx applications you are authorized to use, without having to login to each programindividually.Locate the following Omnixx Console icon and click it to access the application:Figure 1-16 – Omnixx Console Icon14
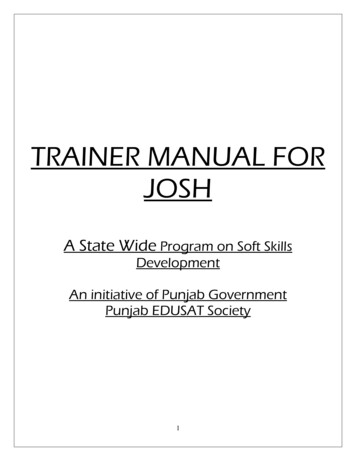
Omnixx Console and Trainer ManualElements of the Console InterfaceBCADFigure 1-17 – The Omnixx Console InterfaceA. Main Menu Area – The Main Menu Area is located on the left-hand side of theOmnixx Console Interface. It contains a tree menu of all available menu items. Themenu will only contain items that the currently logged on administrator is certified toperform.B. Summary Area – The Summary Area, which is located across the top of theinterface, is divided into two parts. The left-hand side always displays the agency,sub-agency, user, and device currently selected. The right-hand side varies dependingon what function has been selected.C. Prompt Area – The Prompt Area, which is located below the Summary Area,displays instructions to the administrator that are related to the currently selectedfunction.D. Functionality Area - The Functionality Area, which comprises the majority of theinterface, displays the currently selected function.15
Omnixx Console and Trainer Manual2Omnixx Console User FunctionsThe functions described in this chapter are used to enter and manage user accounts. TheOmnixx database controls access to all Omnixx applications (Omnixx Force, OmnixxTrainer and Omnixx Console) by several security descriptors, one of which is useraccounts.The functions described in this chapter include the following: Select User, Add NewUser, Modify User, Delete User, and Reports. To access any of these Device functions,click on the Users heading listed in the Main Menu of the Omnixx Console interface. Adrop-down menu of available functions will be displayed.UsersHeadingFigure 2-1 – Omnixx Console InterfaceAs a TAC, you will only be authorized to perform limited functions in the Consoleapplication. Although all Console Menu subjects are listed, you will only be able toaccess the Users section and subsections (such as Reports).16
Omnixx Console and Trainer ManualYou must click on the Users icon (purple symbol to the left of Users) to expand thefunctions into view as demonstrated in Figure 2-2 – Omnixx Console ExpandedFunctions.Figure 2-2 – Omnixx Console Expanded FunctionsAdd New UserThe Add New User function is utilized to add a new User to the selected sub-agency listin the Omnixx database.Note: Before adding a new user, the TAC must have the user’s name, last four digitsof the user’s social security number, desired password, and challenge question andchallenge answer (optional).To Add a User: Click the Add New User option that appears in the Users drop-down menu(demonstrated in Figure 2-3 – Omnixx Console Main Menu – Add New User)17
Omnixx Console and Trainer ManualFigure 2-3 – Omnixx Console Main Menu – Add New User The following Add User dialog box will appear:Figure 2-4 – Add New User Dialog Box Enter the following information into the fields:o User ID – The User ID for this user. Use upper case when entering alluser information. The User ID must follow the standard DCI format (firstletter of first name, last name up to 15 characters, and the last four digitsof the user’s social security number). John Doe (SOC 245351234) wouldbe entered as JDOE1234. Omnixx will not allow two users to have thesame User ID.o Status – Defines whether this user will be considered Active or Disabled.When entering a new user, be sure to choose “Active” as the user status.o Miscellaneous – Leave this section blank. Click the Next button to continue. If the User ID that you entered has already been entered into the Omnixxdatabase, the following error message will be displayed:18
Omnixx Console and Trainer ManualFigure 2-5 – User Successfully Added Confirmation If you received the above error, click the OK button. You should then try usinganother name combination. Enter the user’s middle or nickname initial instead ofthe user’s first name initial when calculating the Operator ID. If the User was successfully entered into the Omnixx database, the followingconfirmation will be displayed:Figure 2-6 – User Successfully Added Confirmation The user’s default password is automatically set as his User ID. You will need tochange this password on the next screen. Click the OK button to continue. TheUser Password screen for the selected user is displayed.Figure 2-7 – Add New User – User Password Dialogue19
Omnixx Console and Trainer Manual Enter the following information into the fields:o New Password – Defines the password associated with the new useraccount. The password may be alpha/numeric and must be at least 6characters and no more than 20 characters. The password MUST beentered using uppercase!Note: CJIN and some CAD systems limit the password to 6 alpha/numericcharacters. If the operator will be using a mobile, it is recommended tocreate a 6-character alpha/numeric password to prevent login problems.o Re-Enter New Password – Verifies the password associated with the newuser account. The password MUST be re-entered using upper case!NOTE:If the data entered New Password and Re-Enter NewPassword fields do not match, the administrator will beprompted with the following error:Figure 2-8 – Password Error Warningo Expiration Date – Defines an expiration date for this user’s password.This field defaults to 90 days from today’s date. Click the box touncheck it, changing the password to non-expiring.o Challenge Question – Allows the user to enter a question that can be usedin the event that his/her password needs to be reset. The ChallengeQuestion can be asked by a TAC to validate the user’s identity. This is anoptional field, but may be beneficial to agencies with a large userpopulation.o Challenge Response – Allows the user to enter the answer to theChallenge Question in the event that his/her password needs to be reset.The Challenge Response will be provided to the TAC to validate theuser’s identity. Click the Next button to continue. The User Point-of-Contact screen for theselected user is displayed.20
Omnixx Console and Trainer ManualFigure 2-9 – Add New User - User Point-of-Contact Information Screen Enter the appropriate information and click the Next button to proceed. If theUser record was successfully entered into the Omnixx database, the followingconfirmation will be displayed:Figure 2-10 – Add New User - ConfirmationSelect UserThe Select User function allows a TAC to select an existing user from the Omnixxdatabase for their sub-agency. After a user has been selected, any configuration changesthat are made will pertain to this particular user, until a different user is selected.To Select a User: Click on the Select User option that appears in the Users drop-down menu.21
Omnixx Console and Trainer ManualFigure 2-11 – Omnixx Console Main Menu – Users Menu A list of all the users belonging to the selected sub-agency that have previouslybeen added to the Omnixx database is displayed in the Functionality Area.Step 1Step 2Figure 2-12 – Users – Available Users List Highlight the appropriate User by clicking on it. Click the OK button to proceed. The identifier of the selected User now appears in the User field in the SummaryArea of the interface. This record can now be modified or deleted by the TAC byclicking on the appropriate function.Figure 2-13 – Omnixx Console Summary Area22
Omnixx Console and Trainer ManualModify UserThe Modify User function allows the TAC to make changes to information that hasalready been added to the Omnixx database for a particular user, such as an incorrectname. It is important to note that Omnixx does not currently allow changing a UserID once it has been assigned.Note: Only DCI can move a user to another agency. If a user leaves your agency, youshould “disable” the operator and notify DCI by sending a text message toterminal PIU or contact your Training Specialist.To Modify a User: Select the Modify User option that appears in the Users drop-down menu.Figure 2-14 – Omnixx Console Main Menu – Users Functions If a user has already been selected (as mentioned in the previous section of thismanual), the User Identification screen is then displayed and populated with thepreviously entered information for the selected user. The User ID is displayed ingray text because it cannot be changed.Note: If a user has not been selected, a list of all available users for the TAC’ssub-agency will appear in the Functionality Area of the interface. Youmust now select the user to be modified by highlighting the user name andclicking the OK button.23
Omnixx Console and Trainer ManualFigure 2-15 – User Identification Screen Make any desired changes (if any) to the current information. Click the Next button to proceed to the next step. The User Password screen forthe user is then displayed and is populated with any previously enteredinformation, except for the password.Figure 2-16 – User Password Screen Make any desired changes (if any) to the current information. To change the user’s password, enter a new password in the New Password fieldand Re-enter New Password field. If disabling an operator (i.e. no longer an employee at your agency), changeSTATUS to Disabled by clicking the drop-down menu and selecting Disabled.24
Omnixx Console and Trainer Manual Click the Next button to proceed. The user’s Point-of-Contact informationscreen is then displayed and populated with any previously entered information.Figure 2-17 – User’s Point-of Contact Screen Make any desired changes (if any) to the current information, and click the Nextbutton to proceed. In the above example, the user’s middle name was changedfrom Henry to Harold.Figure 2-18 – User’s Point-of Contact Screen – Confirmation of Change25
Omnixx Console and Trainer ManualDelete UserThe Delete User function allows the TAC to delete an existing user from the Omnixxdatabase. Use this feature to delete a User ID that was entered incorrectly.Warning: Deleting a user will completely remove the user from the Omnixx database,along with his certification authorizations, test history, etc. The only time a TACshould delete a user is when a User ID was entered incorrectly and the student has notyet attended certification class or tested. Once the incorrect user has been deleted, thecorrect user information may be entered.To Delete a User: The operator to be deleted must first be selected. Follow the instructions in the“Select A User” section of this booklet. Once selected, click on the Delete User function that appears in the Users dropdown menu.Figure 2-19 – Omnixx Console Main Menu After clicking on the delete user function, the following form will appear:26
Omnixx Console and Trainer ManualFigure 2-20 – Delete User Confirmation Type the word DELETE into the empty field, making sure it is in all capitalletters. Click the NEXT button to continue. A second Delete Confirmationscreen is then displayed.Figure 2-21 – Second Delete Confirmation Screen In this box, the word DeLeTe must be typed exactly as shown, with only everyother letter being capitalized. Click on the NEXT button to complete the deletionprocess. Omnixx will generate a response indicating that the user has been deleted.27
Omnixx Console and Trainer ManualFigure 2-22 – Selected User Deleted Confirmation Screen Click OK once again. Omnixx generates a response indicating that the deletionof the user is complete.Figure 2-23 – Delete User Completed28
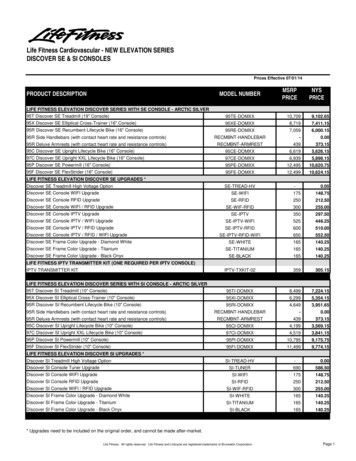
Omnixx Console and Trainer ManualUser ReportsThe User Reports function is utilized to display various customizable reports on users inthe Omnixx database. A TAC can only print reports on the users in the TAC’s subagency. These reports include: User SummaryUse this report to:1) Determine what applications a user is authorized to access (OFB – ForceBrowser, OC – Console, OT – Trainer); all users are authorized to accessForce and Trainer once they successfully complete certification class, whileonly TAC’s have authorization for Console.2) Determine who at your agency is authorized as a TAC. User Certification Status SummaryUse this report to:1) Search for a user by name2) Search for a user by User ID3) Search for users who will be expiring within a given period of time (next 3060-90 days, 6 months, etc.)4) Search by module certification (who is certified at an agency in a certainmodule) User Test History SummaryUse this report to:1) Determine what tests a particular user has taken with results2) Determine what users has taken a particular test (displays users names and/orID’s)As a TAC, the most commonly used report will probably be the User CertificationStatus Summary report.To Build a User Certification Status Summary Report: Click on the Reports option that appears in the Users drop-down menu to displaythe Reports options.29
Omnixx Console and Trainer ManualFigure 2-24 – Users Reports Option Click on the User Certification Status Summary Report option. The followingdialog box will appear:Figure 2-25 – User Certification Status Summary Report Select which fields you want to see on the report by clicking in the Field columncheck boxes. Fields which are checked will appear in the report. The Filter column allows the report to be customized as needed. Make sure youragency ORI is selected in the Sub-agency field. The Order field sets the sorting order. To see a report sorted by users’ lastnames, set the Order field of the Last Name to 1 and choose the Order priorityfor the remaining fields.30
Omnixx Console and Trainer Manual If Expiration Date is set for ALL, the report will list all users and theircertification status. You may use the Expiration Date field to display only records expiring within aspecific period of time (30 days, 60 days, 90 days, 6 months, etc.). Click Show Report to generate the report you selected. The report will bedisplayed in a new window of your Web browser. With the example Summary Report from figure 2-25, the following report wouldbe generated:Figure 2-26 – User Certification Status Summary Report Example Close this Web browser window to go back to the Report page. Click Done to close the Report page and return to the Omnixx Main Menu.31
Omnixx Console and Trainer Manual3Student EnrollmentsThis portion of the Omnixx manual provides instructions on enrolling students forDCI classes. This process involves accessing the SBI’s Web page and completing asimple on-line form for student enrollment. This process is temporary, however. In alater release of Omnixx, Datamaxx will provide a software component that willincorporate class enrollments into the existing Omnixx software. Student Enrollments Note: Before enrolling a student in a class, the student must be entered into Consoleby the agency TAC! The enrollment requires the User ID as part of theenrollment information, which is only available AFTER entry into Console. Donot attempt to guess the User ID, as that ID may already be assigned to anotheruser!To access the DCI class schedules: Go to the DCI’s Web site. The URL, which must be typed exactly as it appears,is sbi.jus.state.nc.us Click on the link for class enrollments. The following page will appear:32
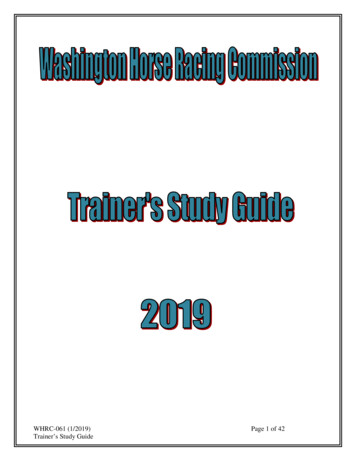
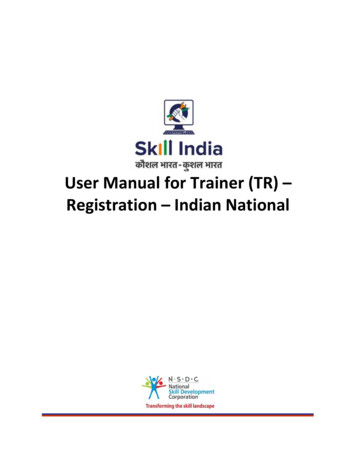
Omnixx Console and Trainer ManualFigure 3-1 – DCI Class Enrollment – State Map When the state map appears, click on the portion of the state (DCI district) forwhich you wish to view the class schedule. This page may be printed in itsentirety if needed.Figure 3-2 – DCI Class Enrollment - Class View33
Omnixx Console and Trainer Manual The class schedule will display show the following:o Class Location – the location where class is being heldo Training Dates – the days class is being heldo Class Dates and Time – the day(s) and beginning time for each modulethat is scheduled for that instructional periodo Class Title – the modules that are scheduled during that instructionalperiodo Status – one of the following status types will be displayed: OPEN - indicating class enrollments are still being accepted FULL – indicating class is closed to further enrollments CANCELED – indicating the module(s) have been canceled forthat instructional period After choosing the class in which to enroll the student(s), click on the Enroll linkbeside the instructor’s name. A form will appear for the student enrollment.Figure 3-3 – DCI Class Enrollment Form This form allows for the entry of up to three individuals’ information to beentered. The form consists of the following fields which must be completed:34
Omnixx Console and Trainer Manualo Email Address of Person Authorizing Enrollment – this is the emailaddress of the TAC or other authorized person who is enrolling thestudent(s) for class. DCI will use this to contact the agency forconfirmation of enrollment or notification that the class is full.o Class Date – this is the beginning date of the class for which thestudent(s) are being enrolled.o Agency – the name of the enrolling agency.o ORI – the ORI of the enrolling agency.o Name – the name of the student being enrolled. The name should beentered using LAST,FIRST MIDDLE format. This field appears threetimes on this form.o User ID – the User ID of the student being enrolled. This field appearsthree times on this form.o Module Indicator fields (M1 through M6) – these check boxes are usedto indicate the module(s) for which each operator is being enrolled. Usinga mouse, check the box(es) that correspond to the modules being enrolled.o Person Authorizing Enrollment – the name of the person authorizing thestudent enrollment. The name should be entered using LAST,FIRSTMIDDLE format. Once all appropriate information has been entered on this form, click the Submitbutton. DCI will generate an email message to the appropriate DCI Trainer withthe enrollment information.Student CancellationsTo cancel a DCI student enrollment: From the DCI class enrollment state map, click on the portion of the state (DCIdistrict) of the DCI Trainer for which the student enrollment had been previouslysubmitted. Click on the Cancel link beside the instructor’s name. A form will appear for thestudent cancellation. This form consists of the following fields which must be completed:o Email Address of Person Authorizing Cancellation – this is the emailaddress of the TAC or other authorized person who is canceling thestudent(s) enrollment. DCI will use this to contact the agency forconfirmation of cancellation.o Class Date – this is the beginning date of the class for which thestudent(s) was originally enrolled.35
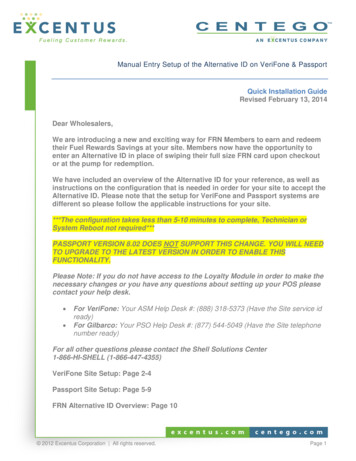
Omnixx Console and Trainer Manualo Agency – the name of the canceling agency.o ORI – the ORI of the canceling agency.o Name – the name of the student being cancelled. The name should beentered using LAST,FIRST MIDDLE format. This field appears threetimes on this form.o User ID – the User ID of the student being cancelled. This field appearsthree times on this form.o Module Indicator fields (M1 through M6) – these check boxes are usedto indicate the module(s) for which each operator is being cancelled.Using a mouse, check the box(es) that correspond to the modules beingcancelled.o Person Authorizing Cancellation – the name of the person authorizingthe student cancellation. The name should be entered using LAST,FIRSTMIDDLE format.Figure 3-4 – DCI Class Cancellation Form Once all appropriate information has been entered on this form, click the Submitbutton. DCI will generate an email message to the appropriate DCI Trainer withthe cancellation information.36
Omnixx Console and Tr
Omnixx Console and Trainer Manual 4 1 Welcome to Omnixx Console, the administrative module of the new Omnixx suite of products from Datamaxx Applied Technologies, Inc. Omnixx Console is an HTML based application that is designed to manage and administer Omnixx Force and Omnixx Trainer cli