Transcription
UCONNECT 3.0OWNER’S MANUALSUPPLEMENT
SECTIONTABLE OF CONTENTSPAGE1SAFETY GUIDELINES . . . . . . . . . . . . . . . . . . . . . . . . . . . . . . . . . . . . . . . . . . . . . . . . . . . . . . . . . 312INTRODUCTION . . . . . . . . . . . . . . . . . . . . . . . . . . . . . . . . . . . . . . . . . . . . . . . . . . . . . . . . . . . . . 723RADIO MODE . . . . . . . . . . . . . . . . . . . . . . . . . . . . . . . . . . . . . . . . . . . . . . . . . . . . . . . . . . . . . . . 2134MEDIA MODE . . . . . . . . . . . . . . . . . . . . . . . . . . . . . . . . . . . . . . . . . . . . . . . . . . . . . . . . . . . . . . 2545UCONNECT PHONE . . . . . . . . . . . . . . . . . . . . . . . . . . . . . . . . . . . . . . . . . . . . . . . . . . . . . . . . . . 2956UCONNECT 3.0 VOICE RECOGNITION QUICK TIPS . . . . . . . . . . . . . . . . . . . . . . . . . . . . . . . . 356
SAFETY GUIDELINESCONTENTS䡵 SAFETY GUIDELINES . . . . . . . . . . . . . . . . . . . . .4䡵 CYBERSECURITY . . . . . . . . . . . . . . . . . . . . . . . .51
4 SAFETY GUIDELINESSAFETY GUIDELINESWARNING!ALWAYS drive safely with your hands on thesteering wheel. You have full responsibility andassume all risks related to the use of the Uconnectfeatures and applications in this vehicle. Only useUconnect when it is safe to do so. Failure to do somay result in an accident involving serious injuryor death. Stop use immediately if a problem occurs. Failure todo so may cause injury or damage to the product.Return it to your authorized dealer to repair. Make certain that the volume level of the system is setto a level that still allows you to hear outside trafficand emergency vehicles.Safe Usage Of The Uconnect System Read all instructions in this manual carefully beforeusing your system to ensure proper usage! Your system is a sophisticated electronic device. DoAll persons should read this manual carefully beforenot let young children use your system.using the radio system. It contains instructions on how to Permanent hearing loss may occur if you play youruse the system in a safe and effective manner.music or the system at loud volumes. Exercise cautionPlease read and follow these safety precautions. Failurewhen setting the volume on your system.to do so may result in injury or property damage. Keep drinks, rain, and other sources of moisture away Glance at the screen only when safe to do so. Iffrom your system. Besides damage to your system,prolonged viewing of the screen is necessary, park in amoisture can cause electric shocks as with any elecsafe location and set the parking brake.tronic device.
SAFETY GUIDELINES 5updates to improve the usability and performance of yoursystems or to reduce the potential risk of unauthorized and Do not insert any damaged, warped, scratched or dirtyunlawful access to your vehicle systems.discs into the disc player.The risk of unauthorized and unlawful access to your Discs that have been modified with an adhesive labelvehicle systems may still exist, even if the most recentshould not be used in the disc player.version of vehicle software (such as Uconnect software) is Do not insert more than one disc at a time into the installed.player slot.Disc Player — If EquippedCYBERSECURITYYour vehicle may be a connected vehicle and may beequipped with both wired and wireless networks. Thesenetworks allow your vehicle to send and receive information. This information allows systems and features inyour vehicle to function properly.Your vehicle may be equipped with certain security features to reduce the risk of unauthorized and unlawfulaccess to vehicle systems and wireless communications.Vehicle software technology continues to evolve over timeand FCA US LLC, working with its suppliers, evaluatesand takes appropriate steps as needed. Similar to a computer or other devices, your vehicle may require softwareWARNING! It is not possible to know or to predict all of thepossible outcomes if your vehicle’s systems arebreached. It may be possible that vehicle systems,including safety related systems, could be impaired or a loss of vehicle control could occur thatmay result in an accident involving serious injuryor death. ONLY insert media (e.g., USB, SD card, or CD) intoyour vehicle if it came from a trusted source. Mediaof unknown origin could possibly contain malicious software, and if installed in your vehicle, itmay increase the possibility for vehicle systems tobe breached.(Continued)1
6 SAFETY GUIDELINESWARNING! (Continued) As always, if you experience unusual vehicle behavior, take your vehicle to your nearest authorizeddealer immediately.NOTE: FCA or your dealer may contact you directly regardingsoftware updates. To help further improve vehicle security and minimizethe potential risk of a security breach, vehicle ownersshould: Routinely checkwww.driveuconnect.com/software-update tolearn about available Uconnect software updates. Only connect and use trusted media devices(e.g. personal mobile phones, USBs, CDs).Privacy of any wireless and wired communications cannotbe assured. Third parties may unlawfully intercept information and private communications without your consent.For further information, refer to “Onboard DiagnosticSystem (OBD II) Cybersecurity” in your Owner’s Manual.
INTRODUCTIONCONTENTS䡵 RADIO 3.0 (FIAT) . . . . . . . . . . . . . . . . . . . . . . . .8 䡵 UCONNECT 3.0 SYSTEM VOICE COMMAND. . .16䡵 RADIO 3.0 (CHRYSLER/DODGE/JEEP/RAM) . . .122
8 INTRODUCTIONRADIO 3.0 (FIAT)WARNING!ALWAYS drive safely with your hands on thesteering wheel. You have full responsibility andassume all risks related to the use of the Uconnectfeatures and applications in this vehicle. Only useUconnect when it is safe to do so. Failure to do somay result in an accident involving serious injuryor death.
INTRODUCTION 92
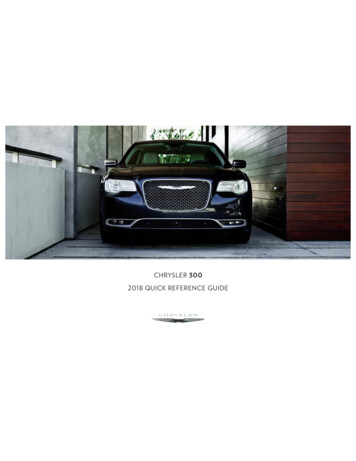
10 INTRODUCTION1 — RADIO5 — ENTER/BROWSE & TUNE/SCROLLPush the RADIO button on the faceplate to enter theRadio Mode. The different tuner modes; AM, FM andSXM (if equipped) can be selected by pushing the RADIObutton on the faceplate until the desired tuner mode isdisplayed.Push the ENTER/BROWSE button to accept a highlightedselection on the screen. Rotate the TUNE/SCROLL knob toscroll through a list or tune a radio station.6 — PRESETS 1–6These buttons on the faceplate tune the radio to thestations that you commit to memory AM (A, B, C), FMPush the INFO button on the faceplate for a RBDS station (A, B, C) and Satellite (A, B, C) — 18 AM, 18 FM and(one with call letters displayed). The radio will return a 18 SAT stations.Radio Text message broadcast from an FM station (FM7 — BACKmode only).Push the BACK button on the faceplate to return to a3 — AUDIOprevious menu or screen.Push the AUDIO button on the faceplate to adjust the8 — SEEK UPBass, Mid Range, Treble, Balance or Fade.Push the SEEK UP button on the faceplate to tune the4 — MENUradio to the next listenable station or channel.Push the MENU button on the faceplate to scroll betweenthe setting sub-menus.2 — INFO
INTRODUCTION 119 — SEEK DOWN12 — A-B-CPush the SEEK DOWN button on the faceplate to tune Push the A-B-C button on the faceplate to select the A, Bthe radio to the previous listenable station or channel.or C preset list.10 — PLAY/PAUSE/MUTE13 — MEDIAPush to Play, Pause or Mute the music.Pushing the MEDIA button on the faceplate will allowyou to switch from AM/FM/SXM modes to Media mode(CD – if equipped, USB/iPod, AUX).11 — ON/VOLUMEPush the ON/VOLUME control knob to turn on theradio. Push the ON/VOLUME control knob a secondtime to turn off the radio.The volume control turns continuously (360 degrees) ineither direction without stopping. Turning the ON/VOLUME control knob to the right increases the volumeand to the left decreases it.2
12 INTRODUCTIONRADIO 3.0 (CHRYSLER/DODGE/JEEP/RAM)WARNING!ALWAYS drive safely with your hands on thesteering wheel. You have full responsibility andassume all risks related to the use of the Uconnectfeatures and applications in this vehicle. Only useUconnect when it is safe to do so. Failure to do somay result in an accident involving serious injuryor death.
INTRODUCTION 132
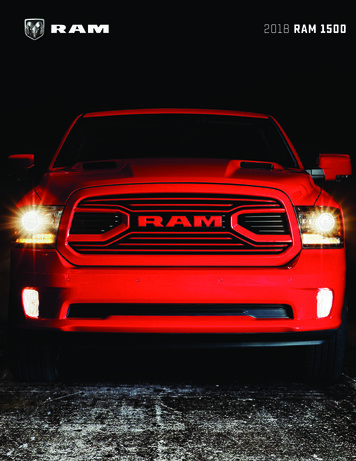
14 INTRODUCTION1 — RADIO5 — SEEK UPPush the RADIO button on the faceplate to enter the Push the SEEK UP button on the faceplate to tune theRadio Mode. The different tuner modes; AM and FM can radio to the next listenable station or channel.be selected by pushing the RADIO button on the face6 — BACKplate until the desired tuner mode is displayed.Push the BACK button on the faceplate to return to a2 — INFOprevious menu or screen.Push the INFO button on the faceplate for a RBDS station7 — MENU(one with call letters displayed). The radio will return aRadio Text message broadcast from an FM station (FM Push the MENU button on the faceplate to scroll betweenmode only).the setting sub-menus.3 — A-B-C8 — PLAY/PAUSE/MUTEPush the A-B-C button on the faceplate to select the A, B Push to Play, Pause or Mute the music.or C preset list.9 — AUDIO4 — ENTER/BROWSE & TUNE/SCROLLPush the AUDIO button on the faceplate to adjust thePush the ENTER/BROWSE button to accept a highlighted Bass, Mid Range, Treble, Balance or Fade.selection on the screen. Rotate the TUNE/SCROLL rotaryknob to scroll through a list or tune a radio station.
INTRODUCTION 1510 — SEEK DOWN12 — PRESETS 1–6Push the SEEK DOWN button on the faceplate to tune These buttons on the faceplate tune the radio to thethe radio to the previous listenable station or channel.stations that you commit to memory AM (A, B, C), FM(A, B, C) — 18 AM and 18 FM stations.11 — ON/VOLUME13 — MEDIAPush the ON/VOLUME control knob to turn on theradio. Push the ON/VOLUME control knob a second Pushing the MEDIA button on the faceplate will allowyou to switch from AM and FM modes to Media modetime to turn off the radio.(CD – if equipped, USB/iPOD, AUX).The electronic volume control turns continuously(360 degrees) in either direction without stopping. Turning the ON/VOLUME control knob to the right increasesthe volume and to the left decreases it.2
16 INTRODUCTIONUCONNECT 3.0 SYSTEM VOICE COMMANDWARNING!ALWAYS drive safely with your hands on thesteering wheel. You have full responsibility andassume all risks related to the use of the Uconnectfeatures and applications in this vehicle. Only useUconnect when it is safe to do so. Failure to do somay result in an accident involving serious injuryor death.
INTRODUCTION 172
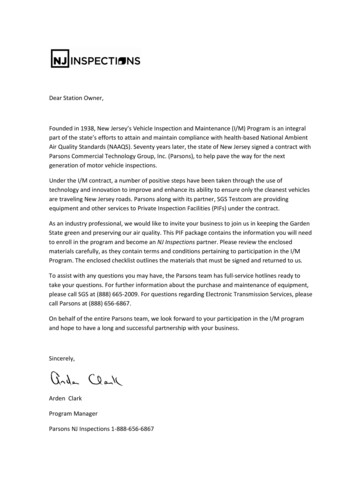
18 INTRODUCTION1 — RADIO5 — PRESETS 1–5Push the RADIO button on the faceplate to enter theRadio Mode. The different tuner modes; AM, FM andSXM (if equipped) can be selected by pushing the RADIObutton on the faceplate until the desired tuner mode isdisplayed.These buttons on the faceplate tune the radio to thestations that you commit to memory AM (A, B, C), FM(A, B, C) and Satellite (A, B, C) — 15 AM, 15 FM and15 SAT stations.6 — ENTER/BROWSE & TUNE/SCROLL2 — PHONE PICK UPPush the ENTER/BROWSE button to accept a highlightedPush the PHONE PICK UP button to initiate or answer a selection on the screen. Rotate the TUNE/SCROLL knob toscroll through a list or tune a radio station.phone call, send or receive a text.3 — PHONE HANG UP7 — SEEK UPPush the PHONE HANG UP button to end a call.Push the SEEK UP button on the faceplate to tune theradio to the next listenable station or channel.4 — A-B-C8 — BACKPush the A-B-C button on the faceplate to select the A, BPush the BACK button on the faceplate to return to aor C preset list.previous menu or screen.
INTRODUCTION 199 — MENU13 — ON/VOLUMEPush the MENU button on the faceplate to scroll between Push the ON/VOLUME control knob to turn on thethe setting sub-menus.radio. Push the ON/VOLUME control knob a secondtime to turn off the radio.10 — INFOThe volume control turns continuously (360 degrees) inPush the INFO button on the faceplate for a RBDS stationeither direction without stopping. Turning the ON/(one with call letters displayed). The radio will return aVOLUME control knob to the right increases the volumeRadio Text message broadcast from an FM station (FMand to the left decreases it.mode only).14 — MEDIA11 — PLAY/PAUSE/MUTEPushing the MEDIA button on the faceplate will allowPush to Play, Pause or Mute music or Mute an activeyou to switch from AM/FM/SXM modes to Media modephone call.(CD – if equipped, USB/iPod, AUX).12 — SEEK DOWNPush the SEEK DOWN button on the faceplate to tunethe radio to the previous listenable station or channel.2
RADIO MODECONTENTS䡵 OPERATING RADIO MODE . . . . . . . . . . . . . . . .22 Setting Presets. . . . . . . . . . . . . . . . . . . . . . . . .23 On/Off Volume Control . . . . . . . . . . . . . . . . . .22 SiriusXM Satellite Radio Mode — If Equipped . . .23 Enter/Browse & Tune/Scroll Control . . . . . . . .22 Audio . . . . . . . . . . . . . . . . . . . . . . . . . . . . . .24 Seek Functions . . . . . . . . . . . . . . . . . . . . . . . .223
22 RADIO MODEOPERATING RADIO MODEThe radio is equipped with the following modes:When scrolling a list, push the ENTER/BROWSE buttonon the faceplate to choose a selection. FMSeek Functions AMSEEK UPPush and release the SEEK UPbutton on the faceplate to tune the radio to the next listenable station orPush the RADIO button on the faceplate to enter the channel.Radio Mode. The different tuner modes; AM, FM, andDuring a SEEK UP function, if the radio reaches theSXM, can then be selected by pushing the RADIO buttonstarting station after passing through the entire band twountil the desired tuner mode is displayed.times, the radio will stop at the station where it began.On/Off Volume ControlSEEK DOWNPush the ON/OFF Volume Control knob to turn on thePush and release the SEEK DOWNbutton on theradio. Push the ON/OFF Volume Control knob a secondfaceplate to tune the radio to the next listenable stationtime to turn off the radio.or channel.When the audio system is turned on, the sound will beDuring a SEEK DOWN function, if the radio reaches theset at the same volume level as last played.starting station after passing through the entire band twoEnter/Browse & Tune/Scroll Controltimes, the radio will stop at the station where it began. SXM SiriusXM Satellite Radio (if equipped)Turn the rotary TUNE/SCROLL control knob clockwiseto increase or counterclockwise to decrease the radiostation frequency.
RADIO MODE 23Setting PresetsThe Presets are available for all Radio Modes, and areactivated by pushing any of the six PRESET buttons onthe faceplate.When you are receiving a station that you wish tocommit into memory, push and hold the desired numbered button on the faceplate for more that two secondsor until you hear a confirmation beep.SiriusXM and all related marks and logos are trademarks ofSiriusXM Radio Inc. and its subsidiaries. SiriusXM SatelliteRadio requires a subscription, sold separately after trialsubscription included with vehicle purchase. Prices andprogramming are provided by SiriusXM and are subjectto change. Subscriptions governed by Terms & Conditionsavailable at www.siriusxm.com/customeragreement.SiriusXM Radio U.S. service only available to those atleast 18 years of age in the 48 contiguous UnitedStates, D.C., and PR. Service available in Canada; seewww.siriusxm.ca.The Radio stores up to 18 presets in each of the Radiomodes. Push the A-B-C button on the faceplate to selectThis functionality is only available for radios equippedthe A, B or C preset list.with a Satellite receiver. In order to receive satellite radio,SiriusXM Satellite Radio Mode — If Equippedthe vehicle needs to be outside with a clear view to theSiriusXM Satellite Radio uses direct satellite-to-receiver sky.broadcasting technology to provide clear digital sound,If the screen shows Acquiring Signal, you may have tocoast to coast. The subscription service provider ischange the vehicle’s position to receive a signal. In mostSiriusXM Satellite Radio. This service offers over 130cases, the satellite radio does not receive a signal inchannels of music, sports, news, entertainment, andunderground parking garages or tunnels.programming for children, directly from its satellites andbroadcasting studios. A one-year SiriusXM Satellite Radio subscription is included.3
24 RADIO MODE Loudness (If Equipped) — Select “Loudness” andpush the ENTER/BROWSE button to mark the checkPush the AUDIO button on the faceplate for the Radiobox on or off. Push the BACK button on the faceplate3.0, and push the MENU button on the Uconnect 3.0 andwhen done.find the AUDIO menu within it, to enter the AudioMenu. Turning the TUNE/SCROLL knob, highlight the AUX Volume Offset (If Equipped) — Select “AUXVolume Offset” and push the ENTER/BROWSE butdesired selection.ton. Turn the TUNE/SCROLL knob to adjust theThe Audio Menu shows the following options for you tosetting or – 3. Push the BACK button on the faceplatecustomize the audio settings:when done. Treble, Mid, Bass, Fade And Balance — Select thedesired setting to adjust, then push the ENTER/BROWSE button. Turn the TUNE/SCROLL knob toadjust the setting or – 9. Push the BACK button onthe faceplate when done.Audio Speed Adjusted Volume (If Equipped) — Select“Speed Adjusted Volume” and push the ENTER/BROWSE button. Turn the TUNE/SCROLL knob toadjust the setting to Off, 1, 2, or 3. Push the BACKbutton on the faceplate when done.
MEDIA MODECONTENTS䡵 OPERATING MEDIA MODE. . . . . . . . . . . . . . . .26 Disc Mode . . . . . . . . . . . . . . . . . . . . . . . . . . .26 Common Media Functions . . . . . . . . . . . . . . . .26 USB/iPod Mode . . . . . . . . . . . . . . . . . . . . . . .27 Source . . . . . . . . . . . . . . . . . . . . . . . . . . . . . .26 AUX Mode . . . . . . . . . . . . . . . . . . . . . . . . . . .27 Info . . . . . . . . . . . . . . . . . . . . . . . . . . . . . . . .26 Bluetooth Mode . . . . . . . . . . . . . . . . . . . . . . .28 Audio . . . . . . . . . . . . . . . . . . . . . . . . . . . . . .264
26 MEDIA MODEOPERATING MEDIA MODEFast SEEK DOWNMedia Mode is entered by pushing the MEDIA button onthe faceplate located to the left of the display. Once inMedia Mode, press the MEDIA button in order to selectthe desired media source.Push and hold the SEEK DOWNbutton on thefaceplate and the desired mode will begin to rewindthrough the current track until the button on thefaceplate is released.Common Media FunctionsSourceSEEK UP/SEEK DOWNPush and release the SEEK UPplate for the next selection.Push the MEDIA button on the faceplate to select thedesired audio source, disc (if equipped), AUX, USB orbutton on the faceBluetooth audio device.InfoPush and release the SEEK DOWNbutton on thefaceplate to return to the beginning of the current Push the INFO button on the faceplate to display theselection, or return to the beginning of the previous current track information.selection if the Media is within the first three secondsAudioof the current selection .Refer to “Radio Mode” for adjusting the audio settings.Fast SEEK UPDisc Modebutton on the faceplatePush and hold the SEEK UPand the desired mode will begin to fast forward If equipped, the vehicle may have a remote disc playerthrough the current track until the button on the located in the lower center console storage bin.faceplate is released.Disc Mode is entered by either inserting a disc or bypushing the MEDIA button on the faceplate located to theleft of the display. Once in Media Mode, select “Disc Mode.”
MEDIA MODE 27Inserting Compact DiscUSB/iPod ModeGently insert one disc into the disc player following theillustration indicated on the player. The disc will automatically be pulled into the disc player and the disc iconwill illuminate on the radio display. If a disc does not gointo the slot more than 1.0 inch (2.5 cm), a disc mayalready be loaded and must be ejected before a new disccan be loaded.USB/iPod Mode is entered by either inserting a USBJump Drive or iPod cable into the USB port, or bypushing the MEDIA button on the faceplate located to theleft of the display. Once in Media Mode, push the MEDIAbutton and select USB/iPod.If you insert a disc with the ignition ON and the radioON, the unit will switch to CD/Disc mode and begin toplay when you insert the disc. The display will show thetrack number and index time in minutes and seconds.Play will begin at the start of track 1.Eject Button — Ejecting A DiscInserting USB/iPod DeviceGently insert the USB/iPod device into the USB port. Ifyou insert a USB/iPod device with the ignition ON andthe radio ON, the unit will switch to USB/iPod mode andbegin to play when you insert the device. The displaywill show the track number, and index time in minutesand seconds. Play will begin at the start of track 1.AUX ModePush the EJECT button on the CD module to eject the disc.AUX Mode is entered by inserting an AUX device usingIf you have ejected a disc and have not removed it withina cable with a 3.5 mm stereo audio jack into the AUX10 seconds, it will be reloaded. If the disc is not removed,port, or by pushing MEDIA button on the faceplatethe radio will reinsert the disc but will not play it.located to the left of the display. Once in Media Mode,A disc can be ejected with the radio and ignition OFF.push the MEDIA button and select “AUX.”4
28 MEDIA MODEInserting Auxiliary DeviceBluetooth ModeGently insert the auxiliary device cable into the AUX Bluetooth Streaming Audio (BTSA) or Bluetooth Mode isport. If you insert an auxiliary device with the ignition entered by pairing a Bluetooth device containing musicON and the radio ON, the unit will switch to AUX mode to the Uconnect system.and begin to play when you insert the device cable.Before proceeding, the Bluetooth device must be pairedwith the Uconnect Phone to communicate with theControlling The Auxiliary DeviceUconnect system.The control of the auxiliary device (e.g., selecting playlists, play, fast forward, etc.) cannot be provided by the See the “Pairing Procedure” in this manual for furtherradio; use the device controls instead. Adjust the volume details.with the ON/OFF VOLUME rotary knob, or with theOnce the Bluetooth device is paired to the Uconnectvolume of the attached device.system, push the MEDIA button located on the faceplate.NOTE: The vehicle radio unit is acting as the amplifier Once in Media Mode, select “Source” screen and thenfor audio output from the auxiliary device. Therefore if select “Bluetooth.”the volume control on the auxiliary device is set too low,NOTE: For mobile phone compatibility and pairingthere will be insufficient audio signal for the radio unit toinstructions, please visit UconnectPhone.com.play the music on the device.
UCONNECT PHONECONTENTS䡵 OPERATING UCONNECT PHONE . . . . . . . . . . .30 Receiving A Call — Accept (And End) . . . . . . .33 Pairing A Phone . . . . . . . . . . . . . . . . . . . . . . .31 Mute (Or Unmute) Microphone During Call . . .33 Phonebook Download — Phonebook TransferFrom Mobile Phone . . . . . . . . . . . . . . . . . . . . .32 Transfer Ongoing Call Between Handset AndVehicle . . . . . . . . . . . . . . . . . . . . . . . . . . . . . .33 Making A Phone Call. . . . . . . . . . . . . . . . . . . .33 Changing The Volume . . . . . . . . . . . . . . . . . . .335
30 UCONNECT PHONEWARNING!ALWAYS drive safely with your hands on thewheel. You have full responsibility and assume allrisks related to the use of the Uconnect featuresand applications in this vehicle. Only useUconnect when it is safe to do so. Failure to do somay result in an accident involving serious injuryor death.OPERATING UCONNECT PHONEThe Uconnect Phone is a voice-activated, hands-free,in-vehicle communications system with Voice CommandCapability (see Voice Command section).The Uconnect Phone allows you to dial a phone numberwith your mobile phone using simple voice commands.NOTE: The Uconnect Phone requires a mobilephone equipped with the Bluetooth Hands-Free Profile. To check mobile phone compatibility please visitUconnectPhone.com.Uconnect System Support: U.S. residents - visit DriveUconnect.com or call1-877-855-8400 (24 hours a day 7 days a week) Canadian residents call 1-800-465-2001 (English) or1-800-387-9983 (French) or visit DriveUconnect.caMon. – Fri., 8:00 am – 8:00 pm, ETSat., 9:00 am – 5:00 pm, ETSun., Closed
UCONNECT PHONE 31WARNING!ALWAYS drive safely with your hands on the wheel.You have full responsibility and assume all risksrelated to the use of the Uconnect features andapplications in this vehicle. Only use Uconnect whenit is safe to do so. Failure to do so may result in anaccident involving serious injury or death.1. Place the ignition in the ACC or ON position.2. Push the “Phone” button on the faceplate.NOTE: If there is no phones currently connected with thesystem, a pop-up will appear asking if you would like topair a mobile phone.3. Select “Yes” to begin the pairing process.4. Search for available devices on your Bluetooth enabledmobile phone.Pairing A Phone Press the Settings button on your mobile phone.To begin using your Uconnect Phone, you must pair your Select Bluetooth and ensure it is enabled. Oncecompatible Bluetooth enabled mobile phone. Mobile phoneenabled, the mobile phone will begin to search forpairing is the process of establishing a wireless connectionBluetooth connections.between a cellular phone and the Uconnect system.To complete the pairing process, you will need to refer- 5. If No is selected, and you still would like to pair amobile phone, press the “Settings” button from theence your mobile phone Owner’s Manual. Please visitUconnect Phone main screen.UconnectPhone.com for complete mobile phone comSelect “Paired Phones,” and then select “Add Device” . patibility information. Search for available devices on your Bluetooth enNOTE:abled mobile phone (see below). When prompted onthe phone, select “Uconnect” and accept the connec You must have Bluetooth enabled on your phone totion request.complete this procedure. The vehicle must be in PARK.6. Uconnect Phone will display an in progress screenwhile the system is connecting.5
32 UCONNECT PHONE7. When your mobile phone finds the Uconnect system, phone’s phonebook. Specific Bluetooth Phones withselect “Uconnect.”Phone Book Access Profile may support this feature.See UconnectPhone.com for supported phones.8. When prompted on the mobile phone, accept theconnection request from Uconnect Phone.NOTE:NOTE: Some mobile phones will require you to enter the Download and update, if supported, begins as soon asPIN number.the Bluetooth wireless phone connection is made to theUconnect Phone, for example, after you start the vehicle.9. When the pairing process has successfully completed,the system will prompt you to choose whether or not You may be asked for permission to initiate the phonethis is your favorite phone. Selecting “Yes” will makebook download.this phone the highest priority. This phone will takeprecedence over other paired phones within range and A maximum of 2,000 contact names with six numbersper contact will be downloaded and updated everywill connect to the Uconnect system automaticallytime a phone is connected to the Uconnect Phone.when entering the vehicle. Only one mobile phoneand/or one Bluetooth audio device can be connected Depending on the maximum number of entries downto the Uconnect system at a time. If “No” is selected,loaded, there may be a short delay before the latestsimply select “Uconnect” from the mobile phone/downloaded names can be used. Until then, if availaudio device Bluetooth screen, and the Uconnectable, the previously downloaded phonebook is availsystem will reconnect to the Bluetooth device.able for use.Phonebook Download — Phonebook TransferFrom Mobile Phone Only the phonebook of the currently connected mobilephone is accessible.If equipped and specifically supported by your phone, Only the mobile phones phonebook is downloaded. SIMUconnect Phone will ask you if you want to downloadcard phonebook is not part of the Mobile phonebook.names (text names) and number entries from your mobile
UCONNECT PHONE 33 This downloaded phonebook cannot be edited or Mute (Or Unmute) Microphone During Calldeleted on the Uconnect Phone. These can only be Push the “Play/Pause/Mute” hard button on the radioedited on the mobile phone. The changes are transor during a call, push the VOICE COMMAND buttonferred and updated to Uconnect Phone on the nexton the steering wheel. After the BEEP, say “mute” (orphone connection.“mute off”).Making A Phone CallTransfer Ongoing Call Between Handset And1. Push the PHONE button on the steering wheel.Vehicle With a call in progress use the browse/enter scrollwheel to select “transfer” then press the enter buttonor push the “Phone Pickup” button on the steeringNOTE: A phone call can also be made with the Uconnectwheel controls during a call, push the VOICE COM3.0 by pushing the phone button on the radio, andMAND button on the steering wheel. After the BEEP,selecting a particular contact in the phone book, or recentsay “transfer call.”calls.Changing The VolumeReceiving A Call — Accept (And End)1. Start a dialogue by pushing the PHONE button on the1. When an incoming call rings or is announced onfaceplate, then adjust the volume during a normal call.Uconnect, push the PHONE button on the faceplate.2. Use the radio ON/VOLUME rotary knob to adjust the2. To end a call, push the PHONE button on steeringvolume to a comfortable level while the Uconnectwheel or the PHONE button on the faceplate.system is speaking. Please note the volume setting forNOTE: A phone call can also be accepted, and ended byUconnect phone is different than the audio systempushing the steering wheel PHONE button.volume setting.2. After the BEEP, say “dial” (or “call” a full name orphone number).5
UCONNECT 3.0 VOICE RECOGNITION QUICK TIPSCONTENTS䡵 UCONNECT VOICE RECOGNITION. . . . . . . . . .36 Radio . . . . . . . . . . . . . . . . . . . . . . . . . . . . . . .38 Introducing Uconnect . . . . . . . . . . . . . . . . .
Push the ON/VOLUME control knob to turn on the radio. Push the ON/VOLUME control knob a second time to turn off the radio. The electronic volume control turns continuously (360 degrees) in either direction without stopping. Turn-ing the ON/VOLUME control knob to the right increases the volume and to the left decreases it. 12 — PRESETS 1-6