Transcription
BIM 360 Design Technical Manual1
ContentsAssigning Access to BIM 360 Design. 7BIM 360 Account Administration. 7Signing into your BIM 360 Account Administration Portal. 8Configuring your BIM 360 Administration Account. 9Setting Up a BIM 360 Project. 9To Create a Project:. 9Activating Services. 10Assigning Project Administrators. 10To add Project Admins to a new project:. 10Project Administration. 11Organize folders for the project. 12To assign a Team to the Folders:. 13To go through the managed folder/subfolder path go to:. 13Invite Project Team Members. 14To invite those users to a Team (and set their permissions within the Team):. 15Working in Document Management. 17Setting Folder Permissions. 17Managing Files. 18Working in Design Collaboration. 20Packages and Package Statuses. 20Setting up and Sharing Packages. 21Setting permissions on who can share a package. 21Consuming a Shared Package. 22To consume a package:. 23Track changes in a package. 24Working in Revit. 25Linking files. 26Managing Cloud Models. 27CADPRO Services. 282
Introduction to BIM 360 ProductsFor all project stake-For teams who needFor teams who needFor teams who needholderswho needForall projectstakecontrolledaccessholders whoneedtotorealForcollaborateteams whoinneed-timeon RevitinmodtocollaboraterealcoordinateFortoteamswho needmultidisciplineto coordinateto teamscollaborateonForwho needworkperformed ondurto collaboratePreviouslyseparatebeenbrought togetherinto a single BIMwork360 Brandthat tto applications-time on hasRevitmodportDesign,Build &pointOperate.BIM 360hasis ourAutodesk’scloudintopla eapplicationsbeenbrought AECtogethera single360 Brandthatstructionmanagement.The BIMis availableAECin fourofferings:Docs,BIM 360port Design,Build & Operate.BIM360360pla ormis our Autodesk’scloudpla ormBIMfor 360projectdeliveryandDeconsign,BIMmanagement.360 Glue and TheBIMBIM360 360Build.structionpla orm is available in four offerings: BIM 360 Docs, BIM 360 Design, BIM 360 Glue and BIM 360 Build.BIM 360 Subscription bscription EntitlementsSingle DataRepositorySingle DataDashboardsRepository &Analyti csDashboards &Analyti csAdministrationCentralized account-, project– and me mber administration. (Project Admin / Account Admin)AdministrationCentralized account-, project– and me mber administration. (Project Admin / Account Admin)This next-generation pla orm removes the need for single point applications and unifies your project data.unified BIM 360solutionaggregatesthe dataand next-generationpla ormremovesthe needfor singlepoint applicationsandtounifiesproject ityinrealtime.ta. The unified BIM 360 solution aggregates the data and provides transparency to project stakeholdersmaking everyone more accountable and improving visibility in real time.3
BIMDocsBIM 360360 DocsBIM 360 DocsThe Document Management module, included in all BIM 360 products, or purchased as a stand-alone asBIM 360 Docs, is the foundation for all work managed in BIM 360. As any AEC project kicks off, this iswhere it should start. It's the place to centralize, control and give access to project information for all teamThe Document Management module, included in all BIM 360 products, or purchased as a stand-alone asmembers.BIM 360 Docs, is the foundation for all work managed in BIM 360. As any AEC project kicks off, this isManagement:accessto allprojectdocuments,plansand models,where itDocumentshould start.It's the placeControlledto centralize,controlandgive accessto projectinformationforservingall teamas the single data repository for BIM 360.members.Document Management: Controlled access to all project documents, plans and models, servingas the single data repository for BIM 360.BIM 360 DesignBIMDesignBIM 360360 DesignDesign teams will start their work in BIM 360 Design. This is our next generation design collaboration solution for controlled cloud worksharing, milestone and deliverable tracking across teams. Customers usingC4R asked us for greater control over shared models and access—and we are delivering it.Design teams will start their work in BIM 360 Design. This is our next generation design collaboration soluWorksharing:Co-authormilestoneRevit modelsreal time andreviewdesigndevelopmentwiththetion for Cloudcontrolledcloud worksharing,and indeliverabletrackingacrossteams.CustomersusingC4R askedus for greaterover shared models and access—and we are delivering it.extendedteam atcontrolany time.CloudCo-authorRevit modelsin realexchangetime andtoreviewdesigndevelopmenttheControl designdeliverablekeep therightinformationwithin theDesignWorksharing:Collaboration:extendedteamat any time.right handsthroughoutthe project.Controldesign accessdeliverableto keep theplansrightandinformationin edto all exchangeproject documents,models, servingrightthe project.as thehandssinglethroughoutdata repositoryfor BIM 360.Document Management: Controlled access to all project documents, plans and models, servingas the single data repository for BIM 360.4
BIM 360 GlueBIM 360 GlueBIM 360 GlueAs the project moves to Preconstruction, contractors and VDC managers will work in next-generation BIM360 Glue, now available and connected to the same common data pla orm in BIM 360, for model coordiBIMAs the projectmoves to Preconstruction,andVDC managerswill workallowingin next-generationnationand constructabilityreviews. Taskscontractorssuch as clashdetectionare automatedinsights to atapla orminBIM360,formodelcoordiprovided in real time to inform the project.nation and constructability reviews. Tasks such as clash detection are automated allowing insights to beprojects, offers simplified model aggregation, viewing and automatprovidedModelin realCoordination:time to informForthe3Dproject.ed clash detectionModel Coordination: For 3D projects, offers simplified model aggregation, viewing and automatDocumentManagement: Controlled access to all project documents, plans and models, servinged clash detectionas the single data repository for BIM 360.Document Management: Controlled access to all project documents, plans and models, servingas the single data repository for BIM 360.BIM 360 BuildBIM360360BuildBuildBIMAs the project moves to the construction site, teams can work in BIM 360 Build, the field management solution. BIM 360 Build also includes RFIs and submittals workflows keeping critical project data centralizedAs theproject movesto the constructioncan workBIM 360 inBuild,the fieldmanagementsoandaccessible.Subcontractorsand tradessite,canteamsnow respondto insubmittalsthe samesystemas they workflowskeepingcriticalprojectdatacentralizedage quality programs. And all work is tracked and auditable.and accessible. Subcontractors and trades can now respond to submittals in the same system as they manFieldprograms.Management:age qualityAnd allIssueworkmanagement,is tracked andchecklistsauditable.and daily reports for on-site execution andcollaboration between the field and the officeField Management: Issue management, checklists and daily reports for on-site execution n Creation,the field andthe officeand approval of RFIs & Submittals with controlledworkflow processes across teams .Project Management: Creation, assignment and approval of RFIs & Submittals with controlledDocumentManagement:workflow processesacrossControlledteams . access to all project documents, plans and models, servingas the single data repository for BIM 360.Document Management: Controlled access to all project documents, plans and models, servingas the single data repository for BIM 360.5
Getting started with BIM 360 Design6
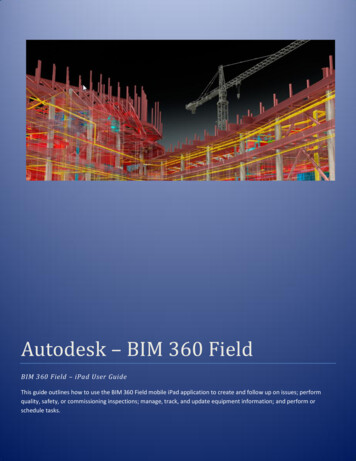
Assigning Access to BIM 360 DesignBIM 360 Design access will need to be assigned to individual users by a ContractManager or Software Coordinator. Please scan this code to see how to set userpermissions for products, services & support (classic view)BIM 360 Account AdministrationThrough the Account Administration portal, you can manage your BIM 360 account, includingprojects, members, and companies. You can link to Account Administration directly by visiting admin.b360.autodesk.com. BIM 360 has two levels of administration to ensure security andcontrol across your projects: Account Administration and Project Administration. Only AccountAdmins have the ability to create new projects, activate BIM 360 services, and assign ProjectAdministrators.After your BIM 360 subscription is activated, the Account Administrator receives an email witha get started link.7
Click the Activate your account button to launch the Account Administration portal. Here youcan sign into Account Administration using your Autodesk ID. If you don’t have an Autodesk ID,click the Create Account button.Note: Each welcome email is meant for only one person - do not forward it to others. The firsttime you access account administration, you do so from the email invitation.Signing into your BIM 360 Account Administration PortalSign into the BIM 360 Account Administration Portal with this link: https://admin.b360.autodesk.com/8
Configuring your BIM 360 Administration AccountWhen you first sign in to BIM 360 Account Administration, use the Account Settings profilepage to customize your account. You can upload your company logo, edit how your accountname appears in BIM 360, invite account administrators, and define your business units.To customize your account:1. In account administration, click Settings2. Click the Profile tab3. Click Add Account Image and upload an image or logo4. For the account name, click the pencil icon and enter a name as you want it to appear inBIM 360 and in notifications. Then click Save5. Under Account Administrators, you can add more administrators. This important stepensures that you are not a single point of failure for account management. Click andenter a name or email address. Then click Save6. New account administrators will receive a welcome email that allows them to access theirBIM 360 account and sign inSetting Up a BIM 360 ProjectAccount administrators can create projects and assign project administrators to BIM 360 services. When you create a project, add information used for company reporting and analytics andensure that all team members have consistent project information across workflows.To Create a Project:1. In account administration, click Projects, then Addtion.2. In the Create Project Profile dialog, specify the project name and enter the project informaRequired fields are marked with an asterisk3. Specify the language. English is the default9
Activating ServicesAfter creating a project profile, choose the services you want to activate. For BIM 360 Design,activate the Document Management and the Design Collaboration services on the Project.Note: The services displayed vary depending on which services were purchased.Assigning Project AdministratorsAccount Administrators can activate services and add project administrators to a project.To add Project Admins to a new project:1. In account administration, click Projects.2. Click a project in the list.3. On the Project Members page, click Services.4. For the BIM 360 service that you want to assign an administrator to, click Activate. Forexample, for BIM 360 Document Management, click Activate to add an administrator andintegrate BIM 360 Document Management with the current project.10
5. Enter the member’s name or email. Click Save to send the welcome email. This emailallows project administrators to sign in to the account with their Autodesk ID.Note: Existing members are notified that they’ve been added to the account as projectadministrators.Note: Account Admin will auto-populate already added team members or you can copy settingsfrom other projects.Once you’ve activated the services, you’ll see the modules in the module picker.Project AdministrationAs a project administrator you can: Organize Project folders Invite Project Members Set Folder Permissions Manage Files11
Organize folders for the projectEvery project starts with pre-configured top-level folders to support a specific process or datatype. These folders are called Plans and Project Files. You can add subfolders to these folders.Use Plans to manage, publish, and review the latest set of construction documents, in both 2Dand 3D formats. Use Project Files for any project document, including design data and all otherdocument types.Note: The Design Collaboration module only supports folders under Project Files.You can manually create subfolders for teams in the Document Management module, orthrough a managed path using the Design Collaboration module. The managed path is recommended as it creates the correct subfolders and its permissions. For more information, see thehelp topic, To Work with Folders.To manually set up folders and subfolders:1. Go to the Document Management Module and create a subfolder for each team.2. Then go to the Design Collaboration Administrator to define them as teams.Warning: While it is possible to rename the “Project Files” folder, doing so will break functionality.12
To assign a Team to the Folders:With the team folders created, you can now assign teams to them.Go to Project Admin Services Add Team and select the Team folder you wish to assign.To go through the managed folder/subfolder path go to:1. Go to Project Admin Services Design Collaboration Add Team.Note: new team folders are created with this approach. You can define the defaultlocation of these team folders at the lower section to this dialog.13
1. Enter the desired Team name.The newly created Teams and their paths display.Invite Project Team Members 14Go to Project Admin Members Add.Note: After entering an email address, press Enter or add a comma.
To invite those users to a Team (and set their permissions within the Team):1. Go to Project Administration Services.2. Select Design Collaboration.3. Select a team.4. Click Manage Team Members.Here you can add individual users, all users of a certain role, or all users from a certain company.15
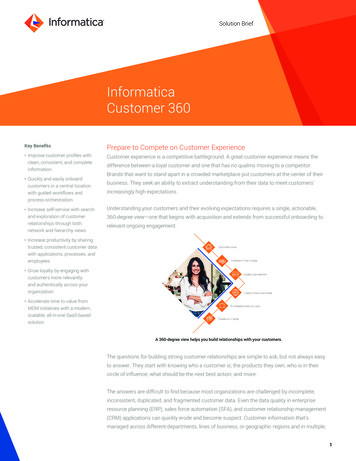
Design Collaboration requires certain permissions on folders and subfolders for the data exchangebetween the various project teams. These are set through the permission levels:16
Working in Document ManagementThe Document Management module allows you to more granular control over permissions on theProject Files data.Setting Folder PermissionsYou can set permissions to restrict user access to certain folders, or limit access according to user roleor company.Sub-folders automatically inherit the permission level of the parent folder, but can be changed later.If changed, sub-folder permissions must match the access level of the parent folder, or else have agreater (less restricted) access level of the parent folder. Permission levels include: Upload – onlyUser/role/company may share their own documents in that folder with other team members. View – onlyUser/role/company may view documents and add mark-ups or issues, but cannot upload documents. View UploadUser/role/company may share their own documents with team members and view any otherdocuments in that folder. View Upload EditUser/role/company may share their own documents with team members and view and edit anyother documents in that folder. View Upload Edit ControlUser/role/company may share their own documents with team members and view and edit anyother documents in that folder. As part of the Controller (control) role they can also carry outtasks within that folder that are usually restricted to the Project Admin. This includes creatingtitle blocks, adding project members and managing permissions. This permission level offers thegreatest access to folders.Note: Permissions can also be set at the folder, Role, Company, file and user levels. To set permissions, select the desired folder and select the Permissions option.17
Here you can set the permissions for the folder and for each user in the folder.Managing FilesIn Document Management you can Download, Move, Copy, Lock, Share, and Delete models.Note: You must check the box next to the file you want to manage for the buttons to display.18
Note: Manage Cloud Models in Revit is now only for rolling the file back, and force relinquishing. You can also recover deleted cloud models.In the Team folder, click Deleted Items.Any deleted items will be displayed.19
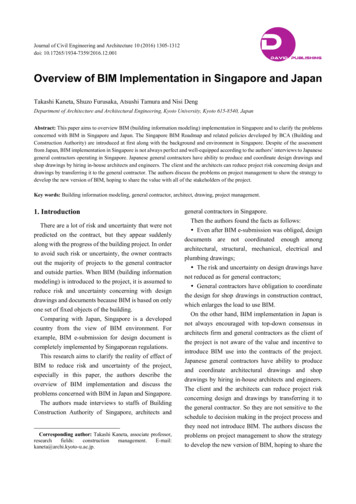
Working in Design CollaborationThe Team Space is your home portal in the Design Collaboration module. It provides an up-todate viewing experience of the current state of the model. Here, you will see the swim lanes foreach team, with the packages for each team shown as dots.Packages and Package StatusesPackages play a prominent role in the Design Collaboration module. If you’re already familiarwith Revit, you know that a Set equates to Sheets and Views generated by Revit. Extendingupon this, a Package is the Revit Model and a Set. Packages have different levels of states thatindicate their level of consumption.20
Setting up and Sharing PackagesTo set up a package:1.Select the button at the right of your team’s swim lane.2.Edit the name of the package.3.Select the set, or model you wish to share.4.Select Save.5.Click Share.Setting permissions on who can share a packageAdministrators can restrict who can View, Edit, and Share Packages.To set up permissions:1.In Project Administration click the Services tab.2.Click Design Collaboration.3.Select a team.4.Click Manage Team Members.21
Note: You will need to do this after setting up Teams because Project Administrators can sharepackages until you add the new permission level. This only needs to be done one time.Consuming a Shared PackageConsuming a package means that you’ve brought another team’s package into your environment, not to own it or take responsibility for it, but to see it combined together with your workand with all other teams’ work.If your Revit authors have linked into the other team’s consumed online models, those Revitlinks are automatically updated in your team’s authoring environment. You will see the consumed files in the Consumed subfolder under your team folder in the Document Managementmodule.22
To consume a package:1.Go to the shared swim lane2.Select an available package by clicking the dot.3.Click Consume.The file(s) in the consumed package will then show up in the “Consumed” folder for your Team in theDocument Management folder.23
Track changes in a packageTo see what has changed in a published package click the Dot of the package Explore ShowChanges24
Working in RevitInitiate Collaboration to your Team (sub)folder in Project Files.Note: While you can see the Plans folder, Revit Cloud Worksharing will not work if you initiateworksharing to that folder.Note: The Design Collaboration module only supports folders under Project Files.25
Linking filesThere are two ways to link files, Direct Linking and Indirect Linking.Direct Linking displays the working, linked model as it is updated in real time by the consultant.To directly link a file: Insert Manage Links Project Files Team Folder Filename.rvt.Note: that the link will be reloaded on file open or explicit reload in Manage Links.There are two ways to indirectly link files. Use the Shared folder to allow the author to update the linked file in the host. Use the Consumed Folder to allow the consumer of the link to determine when the link isupdated by consuming a package shared by the author.Using the Shared folder, the author of the linked model makes a copy of the model through BIM 360Document Management to the Shared folder where other teams have View (or greater) permissions.To link a model from the Shared Folder: The Host file uses Insert Manage Links Project Files Shared Filename.rvt as the linked filelocation, and the link will be reloaded on host file open or explicit reload in Manage Links.To link a model from the Consumed Folder:1. he consumer consumes the package which updates the model in Project files Team folder Consumed Author Team folder Filename.rvt.2. The Host uses Project files Team folder Consumed Author Team folder Filename.rvt as the linked file location, and the link will be reloaded on host file open or explicit reload inManage Links.26
Managing Cloud ModelsFor 2019, you cannot delete or rename a model using the Manage Cloud Models tool.To delete or rename a model, you can do this in .27
CADPRO Systems Consulting TeamGary PageGary FohlCADPRO Systems have BIM consulting specialists whocan precisely navigate you through the correct use andimplementation of the products talked about Today.Please enquire with us to book in time with our expertsGary Page, Gary Fohl and Elrina Mills.Call (09) 302 4028Elrina Millssales@cadpro.co.nzwww.cadpro.co.nzCADPRO productivity tools for Autodesk Revit & Civil 3DCADPRO Systems (CPS) Revit Tools are a series ofadd-in utilities for Autodesk Revit. The tools extendthe capabilities of Revit in various key areas. Theyare easy to use and make working in Revit easierand more efficient.While working on a wide variety of projects andfocusing on the Autodesk Revit product strategy,these CPS Revit Tools are developed to deliver afull range of added benefits: Providing the ability to quickly and easily explorevarious design possibilities. Tools that offer immediate productivity for the enduser thus saving you production costs.* Increased project productivity through an improvedworkflow process.CADPRO Systems Civil 3D Tools are a set of essential AutoCAD Civil 3D plug-ins that will make yourwork in Civil 3D fast, easy and efficient.These tools will dramatically reduce the amountof tedious tasks and help you focus on engineeringchallenges. 275 GST per year orFirst Year FREE to CADPRO clients ona current contracted Autodeskmaintenance plan or subscription.ENQUIRE NOW: sales@cadpro.co.nz Creation of perfect projects in less time.33
CADPROSystems LtdConsultingTrainingSoftwareHardwareCADPRO Systems Ltd is New Zealand’s leading supplier of professional Computer Aided Design technology. We specialise in providing BuildingInformation Modelling (BIM) technology for architects, engineers, contractors, owner/operators and digital prototyping solutions for manufacturers.Our solutions provide you access to the most innovative design, simulation and data management tools from world-class vendors. With a broad portfolioof software applications available, you are able to accelerate design of your projects, decrease product development cycles and collaborate more efficientlywith your counterparts. All while delivering better outcomes for your clients, improving quality of design and products, and reducing costs.We offer consulting services, software, computer hardware, data management solutions, training, customisation and application development nationwide.Our Sales and Support staff are industry-experienced and provide an unparalleled level of expertise and service. CADPRO Systems have Autodesk AuthorisedTraining and Certification centres in Auckland and Christchurch. We have been operating since 1992 and are 100% New Zealand owned and operated.Autodesk Subscription & CADPRO Technical SupportBy subscribing to Autodesk products and adding CADPRO Technical Support you get full software maintenance and the best support available inNew Zealand. Our technical support team provides you rapid access to experienced and highly skilled Autodesk certified support staff. We are widelyrecognised as providing the best, most professional after-sales support. CADPRO Systems provides support via telephone, email and web based remotedesktop software, this enables remote interrogation and troubleshooting of your software, ensuring a speedy resolution of the most difficult or advancedproblems or questions. On-site support is available at an additional charge.The decisions you need to think about.1234What productsuits your needs?Who will beaccessing it?How long do youneed it?What support willI need?Individual productssingle-userannual termOffshore Autodesk Support*Industry Collectionsmulti-usermulti-year termCADPRO Technical SupportIf you subscribe or hold a perpetual license witha current maintenance plan of Autodesk designsoftware, you can enjoy the following benefits: Latest Versions and Enhancements Offshore Autodesk Support*CADPROTECHNICALSUPPORT Up to 3 previous versions Global Roaming Rights Administrative ToolsCall (09) 302 4028sales@cadpro.co.nz Unlimited** Support provided by CADPRO’s NewZealand based Autodesk Certified Product Specialists This Priority support offering is subject to reasonableuse and is provided via phone, email or remote desktopby CADPRO's New Zealand based Autodesk CertifiedProduct Specialists. Cloud BenefitsCADPROCUSTOMERCARE TEAMThis is a premium priority support offering that can beadded for assistance with installation and licencing errors/issues when you subscribe to Autodesk products.No matter what type or term of software you subscribe toyou we will be looked after every step of the wayCustomer Liaison & CareTechnical Support TeamOrders / Dispatch / AdminTraining Sales & CoordinatorSubscription ManagerAdministrationAccounts- Julia Anderson - julia.a@cadpro.co.nz- Peter Crawley, Neil Markham, Gavin Bath, Scott Moyse, Gary PageElrina Mills - support@cadpro.co.nz- Chelsea Smith - chelsea.s@cadpro.co.nz- Patricia Monteiro - patricia.m@cadpro.co.nz- Sarah Holland - sarah.h@cadpro.co.nz- Jenny Grootegoed - jenny.g@cadpro.co.nz- Caroline Northin - caroline.n@cadpro.co.nz* Offshore Autodesk Support is an Autodesk provided service using off shore support services. CADPRO Systems extend Autodesk Support with localtechnical support** delivered by our staff for errors with installation and licensing. Additional premium support, CADPRO Technical Support can beadded when you subscribe to Autodesk products.** Any onsite service or Autodesk Vault query is an additional charge. No product training, customisation or implementation services are provided with thisoffer and is subject to reasonable use. Access to services requires an Internet connection and is subject to any geographical restrictions set forth in theCADPRO Systems Terms and Conditions.
4 BIM 360 Docs The Document Management module, included in all BIM 360 products, or purchased as a stand-alone as BIM 360 Docs, is the fou