Transcription
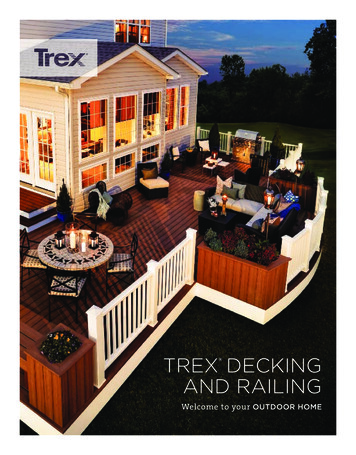
2020 DECKINGINSTALLATION GUIDE
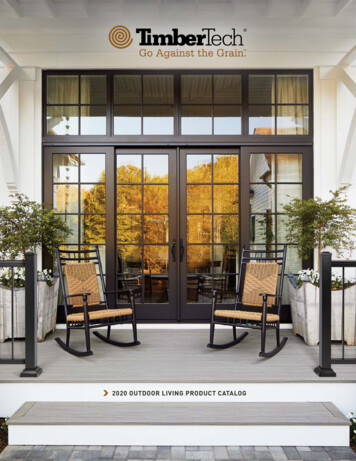
To learn about Trex Signature aluminum, and Transcend and Select railing products, visit www.trex.com/products/railing.What’s New for 2020:Page 5 – Revised Care and Cleaning GuidePage 12 – Revised decking- and fascia-recommended fastenersPage 13 – Revised fascia installation recommendationsPage 18 – Revised width-to-width gapping (face-fastening)Page 26 – Revised warrantiesNeed Help?Trex provides a variety of valuable resources to answer your questions or concerns. For additionalassistance, check out:» Trex.com .Here you will find a wealth of useful information on Trex’s extensive products including: installation,care and cleaning instructions and videos, technical help, and FAQs. You’ll also find inspiring photos ofdeck projects, steps to help you plan and start your project, and tips for selecting the right deck builder.At trex.com, you can request information, register your warranty, and reach out to customer servicerepresentatives who can answer even more questions.» Call 1-800-BUY-TREX (1-800-289-8739) and speak to a Customer Loyalty Advocate who can answeryour questions.Refer to www.trex.com for up-to-date installation and technical documents that may not be found in thisprinted guide.Please visit our website at www.trex.com, and choose Literature at the top of the page,to review individual installation instructions for specific Trex lighting, post mounts, joistmount post, and all railing products.This will ensure you are using the most up to date installation instructions with theseproducts.This symbol indicates text continues to next page.NOTE: Construction methods are always improving. Please refer to www.trex.com for the most up-to-date installation requirements.
CONTENTSSECTION ONE: General InformationSafety. 4Tools. 4Care and Cleaning. 5INSTALLATION GUIDETrex Installation GuideSECTION TWO: Planning AheadTrex Decking. 8Railing (Including ADA Handrail). 8Trex DeckLighting . 8Trex RainEscape Drainage System. 8Installing Hot Tubs, Planters, and Seating. 8Installing Fireplaces and/or Fire Pits. 9Installing a Pergola. 9Installing Trex Spiral Stairs . 9Installing Trex Outdoor Kitchens . 9SECTION THREE: DeckingDecking, Fascia, and Fastener SKUs.11Decking and Fascia Recommended Fasteners.12Trex Fascia Installation Recommendations.13Framing and Fastening Tips.14Rooftop and Sleeper Deck Systems.15Metal Framing Requirements and Gapping.16Code Compliance.18Gapping and Overhang.18How to Install DeckingImportant Notes Before Installing Trex Decking.19Routing Square Edged Boards for Trex Hideaway Hidden Fasteners.19Abutted Board Attachment Requirements.19Installing Trex Transcend , Enhance , Select Deck Boards. 20Installing Trex Escapes .21Replacing Trex Boards .23Spanning Requirements For Trex Stairs.24Installing Trex Stair TreadsInstalled with Hidden Fasteners.25SECTION FOUR: WarrantiesTrex Transcend, Trex Enhance, Trex Select, and TrexUniversal Fascia Limited Fade & Stain Warranty. 27Trex Limited Warranty.29Color Palette.313
GENERAL INFORMATIONSafetyWhen working on any construction project, you shouldwear protective clothing and safety equipment. Wearsafety glasses, gloves, a dust mask and long sleeves,particularly when cutting in confined spaces.Trex decking and railing are heavier and more flexiblethan wood. DO NOT try to lift the same quantity ofTrex boards as you would traditional lumber. Go towww.trex.com for Safety Data Sheets (SDS).ToolsSAWSMiter Saw:When using a mitersaw we recommendusing the Trex Blade or a carbide-tippedblade with 60 teethor more. The TrexBlade comes in threedifferent sizes andis ideal for cuttingall Trex decking andrailing products (notrecommended forTrex Elevations).Jigsaw:For detailed and/or small cuts (ie:cutting deck board tofit around a post), ajigsaw witha carbide-tippedblade can be used.DRILLSInstall Trexrecommended fastenerswith standard powerdrills, impact drivers(use care if using impactdrivers), or right angledrills.* Trex Blade is manufactured and sold by Freud Tools, Inc. under aTrademark License Agreement with Trex Company, Inc.4SPECIFIC DECK BOARD ATTACHMENT TOOLSScrew Guns:Some Trex recommended deck fasteners are compatiblewith screw guns. Refer to the recommended fastenerspage for more information.TigerClaw Pneumatic Gun:If choosing to use theTrex Hideaway HiddenFastener Connector Clips(these are the metal clips)for Transcend or EnhanceDecking or the TigerClawTC-G Hidden Fasteners withTrex Select Decking, theTigerClaw pneumatic gun is a terrific option that allowsfor quicker install time.Trex Router Bit:Trex decking routs to giveextremely crisp edges whenusing the Trex Router Bitwith standard router, andcan be use with all TrexHideaway Hidden Fasteners.*Tiger Claw is a registered trademark of Tiger Claw, Inc.NOTE: Construction methods are always improving. Please refer to www.trex.com for the most up-to-date installation requirements.
GENERAL INFORMATIONTrex Transcend , Trex Enhance , and Trex Select Care and Cleaning GuideAll exterior building materials require cleaning. Generally, soap and water is all that is required to clean Transcend,Enhance, and Select products. For additional information, see below.ProblemSolutionDirt and DebrisThe affected area should be sprayed off with a hose to remove surface debris. Use warmsoapy water and a soft bristle brush to remove dirt and debris from the embossing pattern.Using a PressureWasher (GeneralCleaning Issues)A pressure washer with no greater than 3100 psi** that has a fan attachment/adjustmentand soap dispenser may be used to remove dirt or mud. Spray deck with soap, then followby gently scrubbing each deck board with a soft bristle brush. Spray/rinse each individualdeck board using a fan tip no closer than 8-in (203 mm) from the decking surface. RINSETHOROUGHLY. If dirty water from cleaning is left to dry, a film will remain on the deckingsurface.Issues with Concrete,Cement, Mortar, orStucco DustWhen working with cement, concrete, mortar, or stucco, protect the decking asmuch as possible in order to not get dust particles on the decking surface. Theseparticles, once they get hot or wet, can cause a reaction on the decking surfaceand are very difficult to remove. If particles get on the decking surface, Trexrecommends using Sakrete Concrete Dissolver (www.sakrete.com/products/concrete-dissolver). BE SURE TO FOLLOW MANUFACTURER'S INSTRUCTIONS.Hard Water StainingHard water is water with high amounts of mineral deposits like lime, silica and calcium.When the water dries, deposits are left behind, leaving unsightly spots on surfaces. This isnot a defect of Trex products but an issue with the water itself. Generally, these depositscan be cleaned with white vinegar on decking surfaces. Rinsing is required, so care shouldbe taken to not use hard water for this purpose. If hard water must be used, dry with a clothor use a blower to dry surfaces. In some cases a deck brightener product may also be usedto help clean hard water stains.Chalk LinesMost colored chalks are permanent and may discolor the surface. Use only IrwinStrait-Line Dust-Off Marking Chalk (purple), available at www.Irwin.com.Tannins Due to DebrisRemove all debris from the deck using a hose or broom. Once the deck surface is dry, applya deck “brightener"* to the deck as directed by the manufacturer. Deck Brighteners containoxalic acid, which will also remove tannins.Ice and SnowA plastic shovel may be used to remove snow from the deck. Use calcium chloride or rocksalt to melt the snow and ice from the deck surface.Oil, Grease, and FoodAll food spills should be removed as soon as possible. The surface must be cleaned withinseven days to maintain the stain warranty. To remove, spray off with a hose and use warm,soapy water and a soft bristle brush to remove spills from the embossing pattern.Mold and MildewIf debris such as pollen and dirt is allowed to remain on the deck surface, mold can feed onthe biofilm. Using a hose and warm, soapy water with a soft bristle brush is recommendedto remove the food source and mold.5
GENERAL INFORMATIONTrex Transcend , Trex Enhance , and Trex Select Care and Cleaning GuideProblemSolutionWhile this is not common, static electricity can occur on walking surfaces in dryclimates or in areas where dry winds and dust-borne particles lay on the deckingsurfaces. Static electricity can build up on occupants walking across any compositedecking surface, including Trex, then produce a small static shock if they touch agrounded metal surface such as railing, door, etc.Trex and StaticElectricityThis condition can be decreased greatly with the use of a product call ACL Staticide .Two products tested were General Purpose Staticide and Heavy Duty Staticide . Bothare effective in greatly reducing static electricity on Trex decking surfaces. Apply fullstrength, using a mop on a dry decking surface, and allow to dry; no rinsing or dilutingneeded. Products are non-toxic, non-flammable, non-staining (will not change the colorof decking surface), completely biodegradable, and safe to use. Product is water-basedand may require a second application after rain or other weather conditions. Over aperiod of time, the effect of static will dissipate naturally on the decking surface.See link for more information on product:www.aclstaticide.com/antistatic coatings.htmlRubber MatsUse caution when using rubber-backed mats (i.e. welcome mats, etc.) as these maycontain substances that can sometimes discolor or lighten the decking surface.Curving Trex DeckingTrex recommends the use of the Trex CustomCurve to properly curve deckingproducts. Note that Trex Enhance decking cannot be curved.Job Site StorageStore decking on a flat level surface and ALWAYS use proper supports (dunnage).DO NOT store directly on the ground. When stacking decking bundles, supports(dunnage) should start approximately 8-in (203 mm) from each end and be spacedapproximately 2-ft (0.61m) on center. In addition, supports (dunnage) should line upvertically/perpendicular to the decking product. Adjust support blocks (dunnage)accordingly if bundles are loose. For Select decking, Enhance decking, and 1x12 and1x8 products, the maximum stack height is 12 bundles. For all other decking productsmaximum stack height is 14 bundles (IMPORTANT TO NOTE THAT PROPER DUNNAGESPACING MUST BE IN PLACE FOR THESE HEIGHTS). When stacking multiple bundles,ensure that dunnage lines up vertically down through each stack. ALWAYS coverdecking products on site until ready to be installed.Strait-Line is a registered trademark of Irwin Industrial Tool Company.Sakrete is a trademark of Oldcastle APG, a CRH Company.*Use of products containing bleach or acid can lighten the lighten the surface of Trex. Use in an inconspicuous area to determine whether youlike the effect. Neither product will affect the structural integrity of Trex.**Use of a pressure washer greater than 3100 psi could damage the boards and void the warranty.NOTES:» Refer to www.trex.com to view a general care and cleaning video for Transcend, Enhance, andSelect decking.» R efer to www.trex.com for a care and cleaning guide for Trex Early-Generation Composite andPVC Decking.6NOTE: Construction methods are always improving. Please refer to www.trex.com for the most up-to-date installation requirements.
PLANNING AHEADPLANNINGAHEAD7
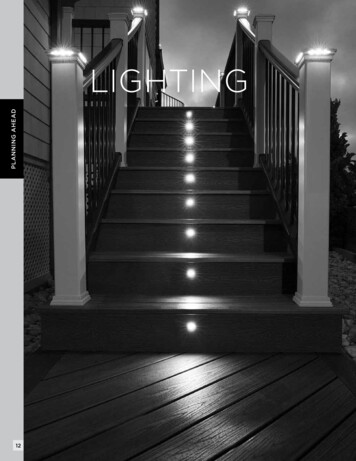
Planning AheadPLANNING AHEADTrex Decking:» When installing any Trex decking product, especiallyTrex Lighting:Trex Transcend Tropicals, it is a good idea to mixand match all of the boards on the job site prior toinstallation to ensure an appealing mix of light anddark tones.» DO NOT combine Trex Select decking with other Trexdecking products. Trex Select boards are thinner thanTranscend and Enhance boards.» Plan locations of lights, power supply, timer, andRailing (Including ADA Handrail):» First, pick the railing style you want.» Calculate your spanning based on the railing you chose.» Determine the number of balusters you will need basedon the railing you chose.dimmer. These should be accessible for service ifnecessary.» Install wiring before decking and railing have beeninstalled.» DO NOT run wires between joists and deck boards.Refer to www.trex.com to view detailed Trex lightinginstructions.Trex RainEscape Deck Drainage System:» Plan ahead for deck layout to allow for properplacement of Trex RainEscape within the joist system.» Make sure joists are straight and square.NOTE: For post placement on stairs, it is VERYIMPORANT to plan your post spacing based onthe length of the rail and angle of the stairs. Fornominal 6' and 8' stair rail lengths, stair postspans (measured horizontally) will be less than 6'or 8' due to the angle of the stairs.NOTE: Trex Transcend and Select horizontal railings aremade to be installed at maximum of 6' (1.83 m) or 8'(2.44 m) on center (depending upon type of railing youchoose). Those railings are not true 6' (72") or 8' (96") inlength. Trex Signature railing and Rod Rail are made to beinstalled at maximum 6' or 8' CLEAR SPANBETWEEN POSTS.See www.trex.com for more information on TrexRainEscape recommendations and installation. TrexRainEscape is manufactured and distributed by Dri-DeckEnterprises, LLC, under a trademark license with TrexCompany, Inc.Installing Hot Tubs, Planters, and Seating:» Plan ahead proper joist spanning if required (this isespecially important if installing a hot tub).» Refer to page 33 for Trex Decking Span Chart forspecific loads.Call 1-800-BUY-TREX for detailed questions.» Determine post locations prior to installing anydecking. In most cases, posts are usually installedbefore decking is installed.» Confirm with your local building official if ADAHandrail is required, and if so plan spanning for postsaccordingly to allow for attachment of Trex ADAHandrail. ADA Handrail requires a span of6' OC for posts.» Grill placement: A good recommendation to helpprevent damage to your railing is to not have a grill tooclose to your railing. Allow for ample airspace(6" or more is recommended) between the back/sidesof your grill to help prevent charring or staining to therailing.Refer to www.trex.com to view detailed install instructionsfor Transcend, Select, or Signature railing.8*DeckProtect is a registered trademark of Infinite Heat Solutions.
Planning Ahead/continuedInstalling Fireplaces and/or Fire Pits With TrexDecking:» Y ou need to consider the location of your pergolaposts with respect to joists. However, you do not haveto mount your plates between joists. It is possible toplace blocks on the bottom of the joists and mountthe Trex Pergola brackets through the blocks.PLANNING AHEAD» Determine if fire will be gas or wood burning.(NOTE: Most fire pits shown in Trex images are gasburning.)» For gas, the fire pit is installed by cutting around theTrex decking. It is not to be installed on top of Trexdecking. A fire-resistant material is installed underthe fire pit and a protective “wall" made from stone orother fire-resistant material is installed to hold fire pitin place and also protect the decking from heat.» For wood, fire pits are not recommended on topof Trex decking unless using a product calledDeckProtect *. Wood-burning fire pits can damagethe decking due to extreme heat from the bottom ofthe fire pit and/or burning embers “shooting" onto thedecking. DeckProtect was tested on all Trex deckingand there were no issues with burning of the deckingsurface when placed directly under a standard sizeportable fire pit along with the accompanying rack(NOTE: Rack is not available for all sizes, so checkwith manufacturer first for verification). Trex doesrecommend that the DeckProtect padding/rack be moved from time to time for general cleaningunderneath. It should be noted that even when usingDeckProtect , burning embers could “shoot" beyondthe protective mat and burn the deck.Trex Pergola products are manufactured and sold by Home &Leisure, Inc., d/b/a/ Structureworks Fabrication under a TrademarkLicense Agreement with Trex Company, Inc. A 25-year LimitedWarranty is provided by manufacturer.Installing Trex Spiral Stairs :» R efer to www.trexspiralstairs.com for detailedinformation on how to plan and install Trex SpiralStairs.Trex Spiral Stairs are manufactured and sold by M. Cohenand Sons, Inc., d/b/a The Iron Shop, under a Trademark LicenseAgreement with Trex Company, Inc. A 25-year Limited Warranty isprovided by manufacturer.Installing Trex Outdoor Kitchens :For more information about this product, pleasevisit their website at www.deckprotect.net or call1-800-BUY-TREX. DeckProtect is a registered trademarkof Infinite Heat Solutions.Installing a Pergola on Trex Decking:» Keep in mind that if you are planning to install a Trex Pergola on your deck, you will need access to theunderside of the deck. Trex Pergola mounts with a10" x 10" (254 mm x 254 mm) aluminum plate on theunderside of the deck, creating a clamping effect onboth the top and bottom of the deck for maximumstrength. If installed, water barriers and any underdeck coverings will have to be removed to properlyinstall the pergola posts.» Refer to trex-outdoorkitchens.com for detailedinformation on how to install Trex Outdoor Kitchenproducts.Trex Outdoor Kitchens is manufactured and sold byCT Acquistions LLC., under a Trademark Agreementwith Trex Company, Inc. A Limited Warranty is providedby the manufacturer.NOTE: You can always reference the DesignTools Section on www.trex.com for additionalplanning ahead aids.NOTE: Construction methods are always improving. Please refer to www.trex.com for the most up-to-date installation requirements.9
DECKINGDECKING10
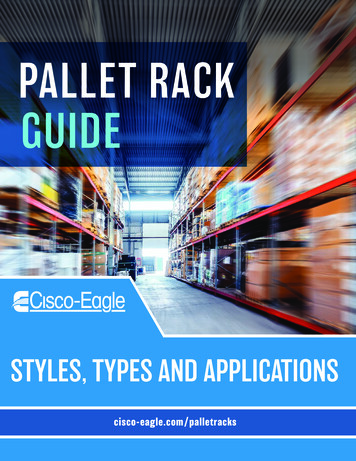
TREX DECKING & FASCIAPROFILE1" Square-Edge BoardActual dimensions:Transcend & Enhance: .94 in x 5.5 in x 12 ft / 16 ft / 20 ft(24 mm x 140 mm x 365 cm / 487 cm / 609 cm)Select: .82 in x 5.5 in x 12 ft / 16 ft / 20 ft(20 mm x 140 mm x 365 cm / 487 cm / 609 cm)1" Grooved-Edge BoardActual dimensions:Transcend & Enhance: .94 in x 5.5 in x 12 ft / 16 ft / 20 ft(24 mm x 140 mm x 365 cm / 487 cm / 609 cm)Select: .82 in x 5.5 in x 12 ft / 16 ft / 20 ft(20 mm x 140 mm x 365 cm / 487 cm / 609 cm)1" x 8" FasciaActual dimensions:Transcend, Enhance, Select, Universal White:.56 in x 7.25 in x 12 ft (14 mm x 184 mm x 365 cm)Actual dimensions:Transcend, Enhance, Select, Universal White:.56 in x 11.375 in x 12 ft (14 mm x 288 mm x 365 cm)2" Square-Edge BoardActual dimensions:Transcend 2x4: 1.3 in x 3.4 in x 16 ft(33 mm x 86 mm x 487 cm)Transcend & Select 2x6: 1.3 in x 5.5 in x 12 ft / 16 ft / 20 ft(33 mm x 140 mm x 365 cm / 487 cm / 609 cm)IMTTHGSRIsland MistTiki TorchHavana GoldSpiced RumLRGPRSTHLava RockGravel PathRope SwingTree HouseCOLORS1 x 6 x 12'1 x 6 x 16'1 x 6 x 20'Transcend TropicalsTranscend TropicalsTranscend TropicalsXX010612TS01XX010616TS01XX010620TS011 x 6 x 12'1 x 6 x 16'1 x 6 x 20'Transcend Earth TonesTranscend Earth TonesTranscend Earth TonesXX010612T2S01XX010616T2S01XX010620T2S011 x 6 x 12'1 x 6 x 16'1 x 6 x 20'Enhance BasicsEnhance BasicsEnhance BasicsXX010612E2S01XX010616E2S01XX010620E2S01CS, BD, SD1 x 6 x 12'1 x 6 x 16'1 x 6 x 20'Enhance NaturalsEnhance NaturalsEnhance NaturalsXX010612E2S01XX010616E2S01XX010620E2S01FW, RH, TS, CB, SC7/8 x 6 x 12' Select7/8 x 6 x 16' Select7/8 x 6 x 20' SelectXX010612SS01XX010616SS01XX010620SS01PG, WG, SD, WB, MB1 x 6 x 12'1 x 6 x 16'1 x 6 x 20'Transcend TropicalsTranscend TropicalsTranscend TropicalsXX010612TG01XX010616TG01XX010620TG01IM, TT, HG, SR, LR1 x 6 x 12'1 x 6 x 16'1 x 6 x 20'Transcend Earth TonesTranscend Earth TonesTranscend Earth TonesXX010612T2G01XX010616T2G01XX010620T2G01GP, RS, TH, VL, FP1 x 6 x 12'1 x 6 x 16'1 x 6 x 20'Enhance BasicsEnhance BasicsEnhance BasicsXX010612E2G01XX010616E2G01XX010620E2G01CS, BD, SD1 x 6 x 12'1 x 6 x 16'1 x 6 x 20'Enhance NaturalsEnhance NaturalsEnhance NaturalsXX010612E2G01XX010616E2G01XX010620E2G01FW, RH, TS, CB, SC7/8 x 6 x 12' Select7/8 x 6 x 16' Select7/8 x 6 x 20' SelectXX010612SG01XX010616SG01XX010620SG01PG, WG, SD, WB, MB1 x 8 x 12'1 x 8 x 12'Transcend TropicalsTranscend Earth TonesXX010812TS01XX010812T2S01IM, TT, HG, SR, LRGP, RS, TH, VL, FP1 x 8 x 12'1 x 8 x 12'Enhance BasicsEnhance NaturalsXX010812E2S01XX010812E2S01CS, BD, SDFW, RH, TS, CB, SC1 x 8 x 12'1 x 8 x 12'SelectUniversal WhiteXX010812SS01WW010812ES01PG, WG, SD, WB, MBWOOD GRAIN WHITE1 x 12 x 12'1 x 12 x 12'Transcend TropicalsTranscend Earth TonesXX011212TS01XX011212T2S01IM, TT, HG, SR, LRGP, RS, TH, VL, FP1 x 12 x 12'1 x 12 x 12'Enhance BasicsEnhance NaturalsXX011212E2S01XX011212E2S01CS, BD, SDFW, RH, TS, CB, SC1 x 12 x 12'1 x 12 x 12'SelectUniversal WhiteXX011212SS01WW011212ES01PG, WG, SD, WB, MBWOOD GRAIN WHITE2 x 4 x 16'Transcend TropicalsXX020416TS01IM, TT, HG, SR, LR2 x 6 x 12'2 x 6 x 16'2 x 6 x 20'Transcend TropicalsTranscend TropicalsTranscend TropicalsXX020612TS01XX020616TS01XX020620TS01IM, TT, HG, SR, LR2 x 6 x 12'2 x 6 x 16'2 x 6 x 620SS01PG, SD, WB, MBVLFPPGWGVintage LanternFire PitPebble GreyWinchester GreyTREX HIDDEN FASTENING SYSTEMSDWBMBFWSaddleWoodland BrownMadeiraFoggy WharfDESCRIPTIONRHTSCBSCIM, TT, HG, SR, LRGP, RS, TH, VL, FPRocky HarborToasted SandCoastal BluffSunset CoveDECKING1" x 12" FasciaXX COLOR PREFIX:ITEM NUMBERDESCRIPTIONCS Clam ShellBD Beach DuneSD SaddleITEM NUMBERConnector Clip (stainless steel)50 sq. ft. (4.6 sq. m) box500 sq. ft. (46.5 sq. m) bucketCONNECTCLIPCLIPPAILGun Pail500 sq. ft. (46.5 sq. m) bucket withcollated pneumatic screwsGUNCLIPUniversal Starter Clip400 sq. ft. (37 sq. m) bagUNIVSTARTCLIPUniversal Fastener (glass-filled nylon)50 sq. ft. (4.6 sq. m) box500 sq. ft. (46.5 sq. m) bucketUNIVCONCLIPDA00002Router BitRouter BitROUTBITNOTE: Construction methods are always improving. Please refer to www.trex.com for the most up-to-date installation requirements.11
Decking and Fascia Recommended FastenersIf any condition occurs which is attributable to the use of non-recommended fasteners, such condition shall not be covered under the TrexLimited Warranty.Transcend Enhance (scalloped profile)Select XDECKING–HIDDEN FASTENERSTrex Hideaway Universal Hidden FastenerXXTrex Hideaway Connector ClipXXTigerClaw TC-G Hidden FastenerXXCortex Concealed Fasteners*XXStarborn Pro Plug System for PVC & Composite (Epoxy Coated &Stainless) (2” are approved for sleeper & roof top applications only)XXSimpson Strong-Tie Deck Drive DCU Composite Screw & DCU ScrewPlugs (Handdrive only & must also use Auto-Set Drive Bit)XXRECOMMENDED FASTENERS XDECKING–COMPOSITE SCREWSFastenMaster TrapEase 3 Ultimate Composite Deck ScrewXXXSimpson Strong-Tie Deck-Drive DCU Composite Screw(Collated & Handdrive)XXXQuik Drive Composi-Lok Deck ScrewXXXSplitStop Titan III Composite ScrewStarborn Cap-Tor xd Epoxy Coated & Headcote Stainless(available collated for Muro CH7390 Driver**)(2” are approved for sleeper & roof top applications only)Screw Products C-Deck Exterior Star Drive Composite Deck ScrewXXXXXXXXXPhillips II Plus PozisquareXXXMuro T-Screw Torx Stainless Steel Screw - Collated(TX0212SFD or M-TX0300SEP)XXXKameleon GRKFasteners INGFASCIA**Cortex Hidden Fastening System for FasciaStarborn Pro Plug System for Fascia – Epoxy Coated & StainlessXXXStarborn Deckfast Fascia System – Epoxy Coated* & Headcote StainlessXXX SplitStop Fascia ScrewXXXSimpson Strong-Tie Fascia Board ScrewXXXFastenMaster TrapEase Fascia FastenerXXX NOTES: » D o not use any hidden fasteners that are plug based with Trex Enhanceprofiles with scalloped bottom.FastenMaster TrapEase 3 and Cortex are registered trademarks ofOMG, Inc.» 2-3/4" or 3" screws can be used with Trex 2x6 product.Quik Drive is a registered trademark andComposi-Lok is a trademark of Simpson Strong-Tie Company, Inc.» Muro T-Screw M-TX0300SEP listed above is approved for 2x6 decking(can also be used with standard 1" (decking as listed above). This screw iscollated and can be used with Muro Auto Feed Screw Gun FDVL41 SpeedDriver. (NOTE: THIS IS NOT A COLOR-MATCH SCREW.)» All decking products are approved for use with Trex Hideaway HiddenFasteners, thus all decking products can be routed according to ourinstructions.» Simpson Strong-Tie Deck Drive DCU Composite Screw in collatedversions works with Quik Drive gun.DeckFast Cap-Tor xd and HeadCote Cap-Tor xd are registeredtrademarks of Starborn Industries Inc.C-Deck Exterior Star Deck Composite Deck Screw is a product of ScrewProducts Inc.Phillips II Plus is a registered trademark of Phillips Fasteners LLC.SplitStop screws are a registered trademark of Titan Metal Werks, Inc.» * Not for use with sleeper systems. Refer to FastenMaster literaturefor more information. Also, these are approved with Trex 2x6 deckingprofiles.» ** Fascia system screws listed above can only be used with compositefascia profiles, and cannot be used with standard thicknessdecking boards used as fascia. Use stainless steel screws near waterapplications.» Contact 1-800-BUY-TREX for Escapes fastener recommendations.» Trex recommends the use of two screws per joist.» All recommended screws are designed to be installed flush withdecking surface. DO NOT countersink screws.12» Use recommended stainless steel screws in any areas near bodies ofsaltwater.Minimum Fastener SizeSCREWSProfileLengthNo.1x62-1/2" or 2-3/4"#8, #102x62-3/4" or 3"#8, #10
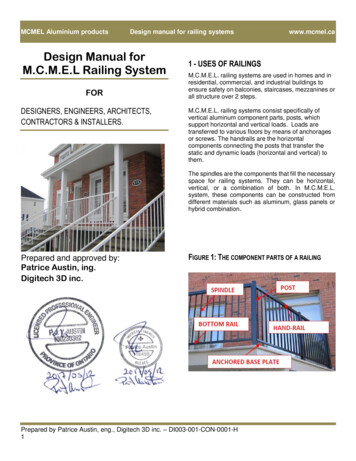
Trex Fascia Installation RecommendationsTrex Fascia utilized around the perimeter of a deck mustbe gapped with the same requirements as Trex deckingto allow for air flow and expansion/contraction of thefascia.» 10" rim joists (represented below unless noted)allow for an easier and more aesthetically pleasinginstallation.» Miter cuts at butt joints and corners allow for a moreaesthetically pleasing installation (end-to-endgapping rules still apply).When Using Approved Fascia Fasteners:NOTE: The fasteners listed below can only be used with1x8 or 1x12 fascia product, and cannot be used withdecking product that is being used as fascia trim or stairrisers.If Using Other Fasteners and/or Using DeckingProduct in Fascia/Stair Riser Applications:See previous page for Trex-recommended Fasciafasteners.Always refer to manufacturing instructions first forinstallation methods. If instructions are not specific, referto the diagram below. Always remember to gap fasciaproperly. A secondary glue is not required when usingthese fasteners.NOTE: Instructions below reflect the use of Trexrecommended fascia fasteners. If using deck boards asfascia, refer to the recommendations in next column onthis page.DeckingTIPS:DeckingFasciaInstall fascia UNDER deckingedges/ends. This will provideprotection to the fascia/framing seam as well asoptimize the aesthetics ofthe installation.Do Not install fascia in themethod shown here. Thefascia board must beattached fully to the rimjoist and cannot run parallelto the decking surface.**IN ADDITION, also use aweather-resistant,construction-grade adhesive(adhesives that work withwood will work with Trexproducts) as a SECONDARY3fastener when attaching**Weather-resistantfascia. Remember to wipeAdhesiveaway any excess before itdries or is allowed to drip on other Trex surfaces.Miter Cut1/8" ( 40 F)3/16" ( 40 F)1"Center1"Abutting Gap1/4" ( 40 F)1/2" ( 40 F)12"Gap end-to-end1/8" ( 40 F)3/16" ( 40 F)DECKINGFasciaWhile Trex prefers the previous methods ofattachment, as these are the very best options, thereare also other recommendations that can be followedfor fascia or deck boards being used for fascia. Usethree Trex recommended composite decking screwsevery 12". ALWAYS refer to manufacturer instructionsto ensure that recommended screws can be used forfascia applications. The top screw should be placed 1"from the top of the rim joist, the second screw in thecenter of the rim joist, and the third screw 1" from thebottom of the rim joist.18"1" x 8"Fascia(2" x 8"rim joist)All Fascia profileswhen usingNon-ApprovedFascia Fasteners**18"1" x 12"FasciaAll Fascia profileswhen usingNon-ApprovedFascia Fasteners**NOTE: English measurements are shown. Convert to metric measurements if necessary.NOTE: Construction methods are always improving. Please refer to www.trex.com for the most up-to-date installation requirements.13 pa
When working on any construction project, you should wear protective clothing and safety equipment. Wear safety glasses, gloves, a dust mask and long sleeves, particularly when cutting in confined spaces. Trex decking and railing are heavier and more fl